
Tomas Rivas
QA Engineer | Testing, Releases & Automation
New to Contra
Tomas is ready for their next project!

QA Testing Workflow
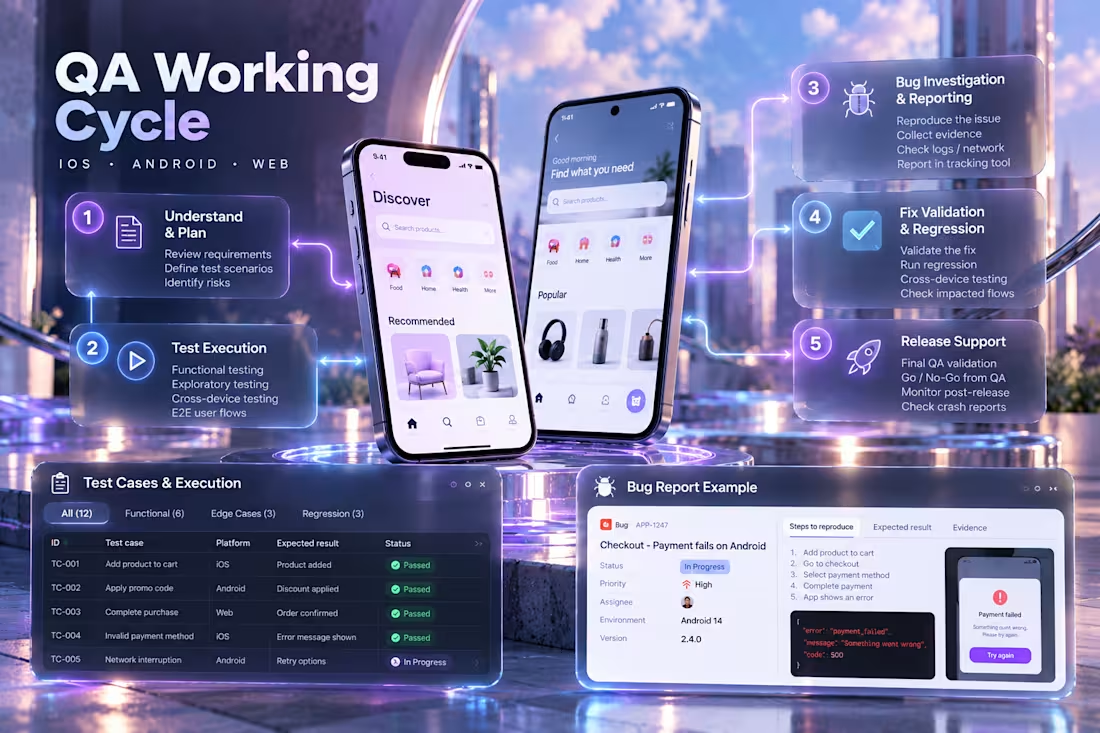
Every project starts with the same objective: understand what needs to be tested, define the right coverage, execute the testing process, document what we find, and provide the client with a clear picture of the product's quality.
Here is how I approach a typical QA project from start to finish.
01 — Understand & Plan
First, I gather the information needed to understand the product and the scope of the testing cycle.
Together with the client, we identify the features and user flows that need to be validated, the supported platforms and environments, and any areas that require special attention.
From this information, I define the testing scope and prepare the scenarios and test cases that will guide the execution.
Output: Defined scope + testing scenarios + test cases.
02 — Test Execution
With the scope defined, I begin executing the tests.
I follow the planned test cases while also exploring the product as a real user would, checking different flows, inputs, devices, operating systems and edge cases when relevant.
Each test is tracked so that we know exactly what was tested, where it was tested and what the result was.
Output: Executed test cases + Pass / Fail results + testing evidence.
03 — Bug Investigation & Reporting
When unexpected behavior appears, I first reproduce it to understand exactly when and how it happens.
I collect the necessary evidence and, when the project provides access, inspect additional information such as network requests, API responses, logs or crash data.
The issue is then documented with everything needed for the development team to reproduce it: steps, environment, expected result, actual result, severity and visual evidence.
Output: Reproducible bug reports + screenshots/videos + technical evidence when available.
04 — Fix Validation & Regression
Once the development team provides a fix, I test the original scenario again.
If the issue is resolved, I validate the surrounding functionality to make sure the change did not affect another part of the product.
The corresponding test cases and bug reports are then updated with the new results.
Output: Fix validation + regression results + updated QA status.
05 — QA Delivery
At the end of the cycle, I consolidate the testing results into a clear QA summary.
The client receives visibility into what was tested, which tests passed or failed, which issues were discovered, their current status, and any remaining risks or observations.
The goal is simple: you should finish the QA cycle knowing exactly where your product stands.
Final delivery: QA report + test results + bug reports + evidence + final testing summary.
Tools & Access
I work with my own QA toolkit for testing and documentation. When deeper investigation or integration with the client's existing workflow is required, the client may provide access to their project tools, test environments, APIs, monitoring platforms, analytics, crash reporting or internal systems.
Any additional paid or project-specific tooling is agreed upon before testing begins.
1
0
71
Bug Investigation & Reporting
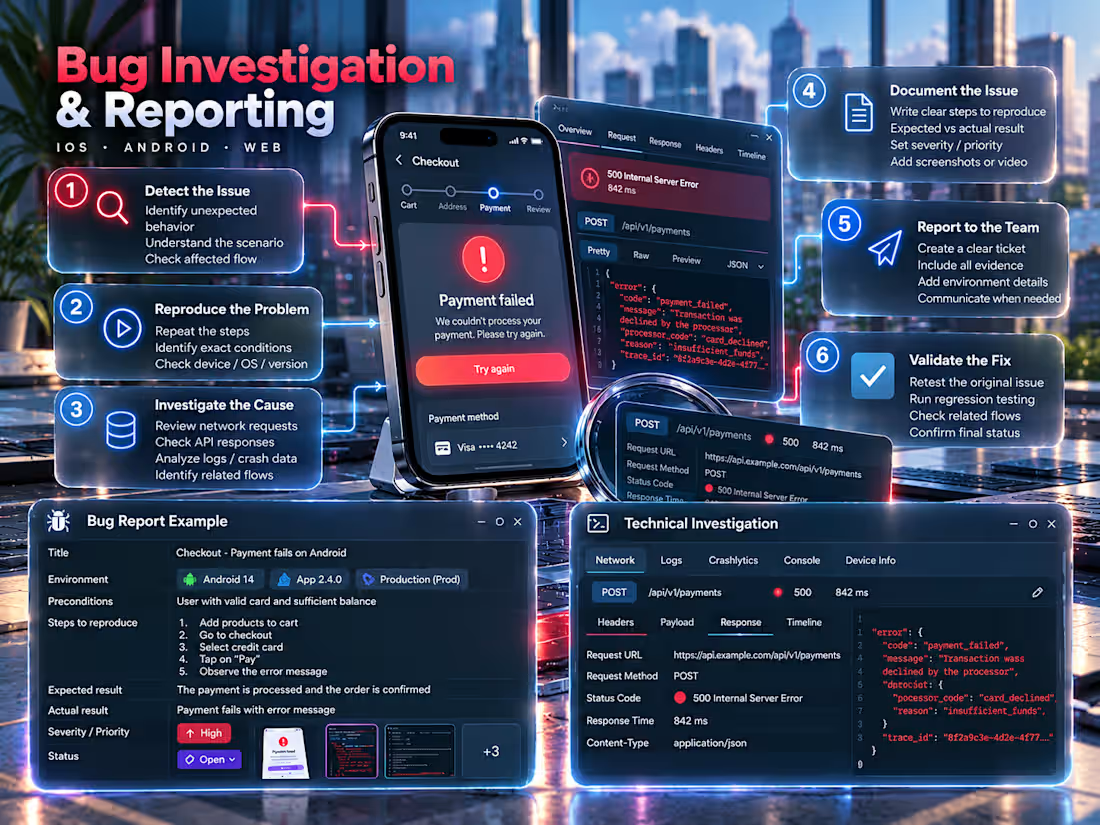
Finding a bug is only the beginning. The objective is to understand what is happening, under which conditions it occurs, how to reproduce it consistently, and what information the development team needs to investigate it efficiently.
This is the workflow I follow when an issue is discovered during testing.
01 — Detect the Issue
When unexpected behavior appears, I first identify the affected user flow and the conditions surrounding the issue.
Before reporting anything, I verify that the behavior is actually unexpected and gather enough context to begin reproducing it.
02 — Reproduce the Problem
The next step is to reproduce the issue consistently.
I repeat the scenario while checking variables such as device, operating system, application version, environment, user state and test data.
The objective is to determine exactly when the problem occurs and establish clear reproduction steps.
03 — Investigate the Cause
Once the issue can be reproduced, I gather additional technical information that may help the development team understand what happened.
Depending on the project and the access provided by the client, this can include network requests, API responses, logs, console errors or crash information.
The goal is not to guess the root cause, but to provide useful evidence that helps developers investigate it faster.
04 — Document the Issue
All relevant information is organized into a clear bug report.
This includes the environment, preconditions, reproduction steps, expected behavior, actual behavior, severity or priority, and supporting evidence such as screenshots or videos.
The report should allow another person to reproduce the issue without needing additional explanation.
05 — Report & Follow Up
The issue is added to the project's tracking system and shared with the appropriate team.
If additional information is required during the investigation, I reproduce the scenario again, collect the requested evidence and keep the report updated throughout the process.
06 — Validate the Fix
Once a fix becomes available, I execute the original scenario again under the same conditions.
If the issue is resolved, I also validate related functionality to identify possible regressions introduced by the change.
The bug is considered validated when the expected behavior is confirmed and the relevant testing results have been updated.
Final result: a reproducible and actionable bug report supported by clear evidence, followed through from discovery to fix validation.
Note: The interfaces, data and examples shown in this project are illustrative and were created exclusively to represent my working process. For confidentiality reasons, no internal data, documentation or proprietary materials from the companies and products I have worked with are displayed.
0
37
Mobile Release Management — From Planning to Production
A successful release is not just about getting a new version into production.
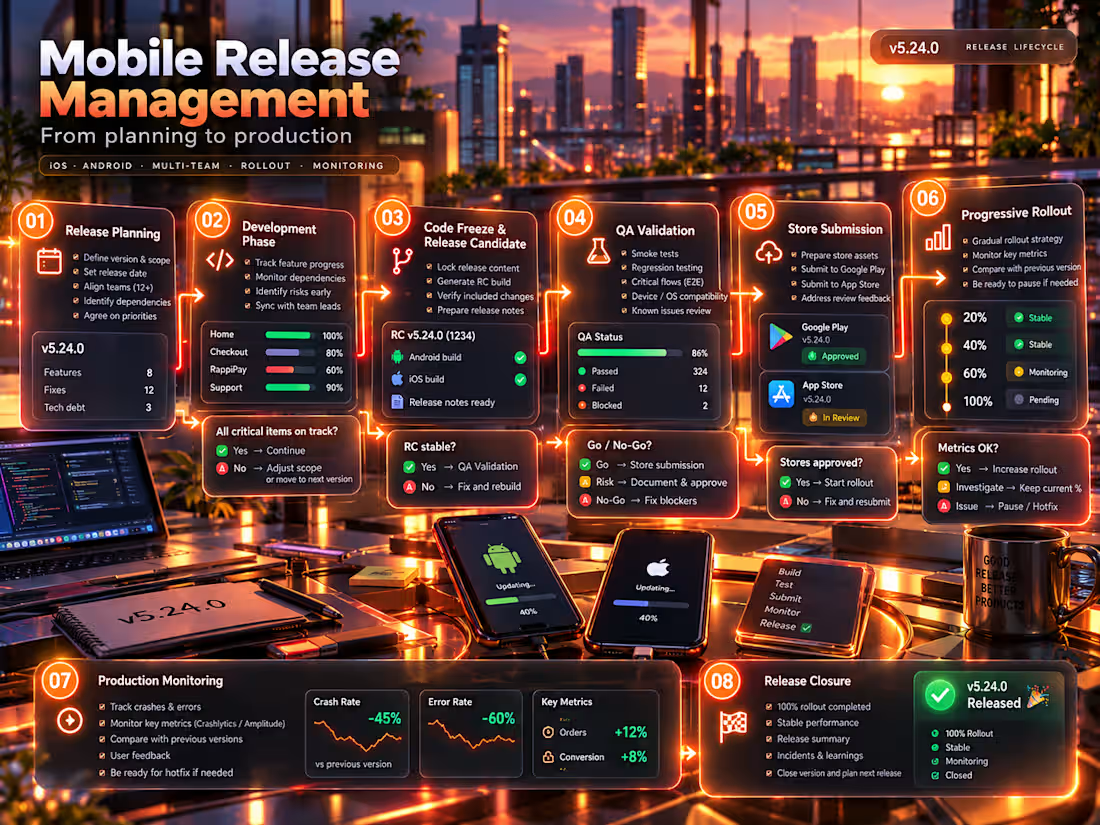
The goal is to move a version through development, validation and rollout with clear visibility of its status, dependencies and risks, making the right decisions at each stage before increasing its exposure to users.
This workflow represents the lifecycle of a mobile release from the initial planning stage to a stable production deployment.
01 — Release Planning
Every release starts by defining what is expected to be delivered.
The version scope, target dates, participating teams and major dependencies are identified before the release cycle moves forward. Critical features and fixes should have clear ownership and expected delivery dates.
Potential risks should also become visible early, while there is still time to react to them.
Expected result: a defined release scope with aligned teams, ownership, dependencies and timeline.
02 — Development Phase
As development progresses, the status of the release changes continuously.
Features and fixes move toward completion while dependencies, blockers and unexpected changes can affect the original plan. The release scope needs to remain visible so these changes can be evaluated before they become release-day problems.
If a critical item cannot be completed safely within the expected timeline, its impact on the release must be assessed.
This creates an important decision point:
Is the critical scope on track?
🔷 Yes → continue toward the Release Candidate
🔶 At risk → evaluate dependencies and available options
♦️ No → adjust the scope or move the affected change to a future version
Expected result: a realistic release scope containing changes that are actually ready to move forward.
03 — Code Freeze & Release Candidate
Once the planned content is ready, the release scope is closed and a Release Candidate can be generated.
The objective of this stage is to establish a stable build containing the changes expected for production.
Included features, fixes, versions and platform builds should match the agreed release scope before final validation begins.
Is the Release Candidate ready for validation?
🔷 Yes → move to QA validation
♦️ No → resolve the issue and generate a new candidate
Expected result: a controlled and identifiable Release Candidate ready for final testing.
04 — QA Validation & Go / No-Go
The Release Candidate is validated before production exposure begins.
Testing can include smoke tests, regression coverage, critical end-to-end flows, device and operating-system compatibility, and verification of known issues.
The objective is not necessarily to reach a version with zero known issues. It is to understand the actual quality status of the build and the risk associated with releasing it.
This leads to one of the key decisions of the release:
GO / NO-GO
🔷 GO → quality is acceptable for release
🔶 Risk identified → document and evaluate before proceeding
♦️ NO-GO → resolve critical blockers before release
Expected result: a release decision supported by known testing results, risks and blockers.
05 — Store Submission
Once approved for release, the Android and iOS builds move into their respective store processes.
Each platform can have a different status. One build may already be approved while another remains under review or requires additional action.
For that reason, Android and iOS should remain independently visible throughout the submission process.
Are the builds approved for distribution?
🔷 Yes → prepare production rollout
🔶 In review → monitor store status
♦️ Rejected → address the issue and resubmit
Expected result: approved production builds with a clear status for each platform.
06 — Progressive Rollout
Store approval does not necessarily mean immediate exposure to 100% of users.
A progressive rollout allows the new version to reach production gradually:
20% → 40% → 60% → 100%
Each increase becomes a checkpoint.
Production stability, crashes, errors, critical flows and other available signals can be evaluated before exposing the version to a larger audience.
Is the release behaving as expected?
🔷 Stable → increase rollout
🔶 Uncertain → maintain the current percentage and investigate
♦️ Critical issue → pause rollout and activate the appropriate response
Expected result: controlled production exposure where rollout decisions are based on observed stability rather than simply elapsed time.
07 — Production Monitoring
Once real users begin receiving the version, production becomes the final validation environment.
Crash information, errors, analytics, key user flows and feedback help determine whether the release is behaving as expected at scale.
The new version can also be compared with previous versions to identify unexpected changes associated with the release.
If an important anomaly appears, rollout progression can be reconsidered before additional users are affected.
Expected result: early visibility into the real production behavior of the new version.
08 — Release Closure
A release is complete when the intended rollout has been reached and the version demonstrates stable production behavior.
The final state should include the rollout result, relevant incidents, known issues, production observations and any lessons that should influence upcoming versions.
At this point, the release lifecycle can be formally closed and attention moves toward the next version.
Expected result: a stable production version with its lifecycle, decisions, risks and final status clearly documented.
Final Outcome
The ideal result is not simply “the new version was published.”
It is a release that moved from planning to production through controlled checkpoints, with clear visibility across teams, informed Go / No-Go decisions, gradual user exposure and production evidence supporting each step forward.
Plan → Develop → Validate → Decide → Release → Monitor → Stabilize → Close
Note: The versions, interfaces, metrics and scenarios shown in this project are illustrative and were created exclusively to represent a release management workflow. For confidentiality reasons, no internal data, documentation or proprietary materials from the companies and products I have worked with are displayed.
0
23
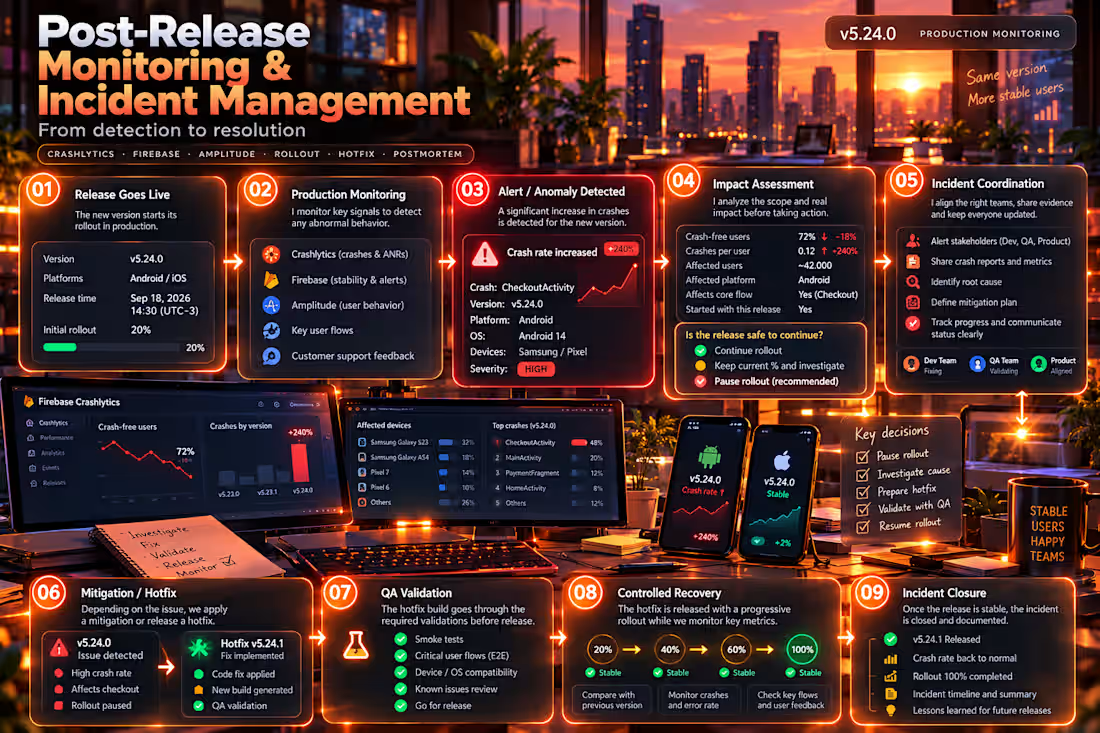
Post-Release Monitoring & Incident Management
A successful release does not end when a new version reaches production.
The goal of the post-release stage is to confirm that the version behaves as expected under real production conditions, detect unexpected behavior early, control its impact, and restore stability when an incident occurs.
01 — Release Goes Live
The new version begins its production rollout.
From this point, the release is exposed to real users and real production conditions. The version, platforms, rollout percentage and release status become the reference for everything that follows.
Expected result: a controlled production launch with a clearly identified version and rollout state.
02 — Production Monitoring
Once the release is live, its behavior is observed through the available production signals.
Crash rates, errors, stability indicators, critical user flows, analytics and user feedback help establish whether the new version is behaving normally.
The important part is not only looking at individual metrics, but understanding whether something changed after the release.
Expected result: enough visibility to distinguish normal production behavior from a potential problem.
03 — Alert / Anomaly Detection
If crashes, errors or another important signal increase unexpectedly, the release enters an investigation state.
The anomaly should be connected to its context: affected version, platform, operating system, devices, users and functionality.
Expected result: an observable production problem becomes a clearly defined incident instead of an isolated alert.
04 — Impact Assessment
Before deciding what to do, the real impact of the incident must be understood.
How many users are affected? Is a critical flow broken? Is the problem limited to a specific platform or OS? Did it begin with the new version? Is the impact increasing as rollout expands?
This leads to one of the most important post-release decisions:
Can the rollout safely continue?
🔷 Stable → continue rollout
🔶 Uncertain → hold the current percentage and investigate
♦️ Critical impact → pause rollout and respond
Expected result: production exposure is controlled according to actual risk.
05 — Incident Coordination
Once an incident requires action, the relevant teams need a shared understanding of what is happening.
Evidence, impact, affected versions, current rollout status and investigation progress should remain visible while Development, QA, Product and other involved teams work toward resolution.
Expected result: one coordinated response instead of multiple teams investigating the same problem without context.
06 — Mitigation / Hotfix
The response depends on the nature and severity of the incident.
Some situations can be mitigated while the existing version remains active. Others require stopping expansion and preparing a hotfix.
When a new build is required, the problematic version transitions toward a corrected release:
v5.24.0 ⚠️ → Fix → Hotfix v5.24.1
Expected result: reduce the impact of the incident and produce a safe path back to a stable release.
07 — QA Validation
A hotfix should not solve one production problem by introducing another.
The corrected build goes through the necessary validation, including the original failing scenario, critical flows, smoke testing and relevant regression coverage.
Expected result: evidence that the original issue is resolved and the new build is safe enough to return to production.
08 — Controlled Recovery
After validation, production exposure increases gradually again.
20% → 40% → 60% → 100%
At each stage, the same signals that revealed the original incident are observed again and compared with the affected version.
The rollout only continues while stability remains within the expected range.
Expected result: confidence is rebuilt progressively instead of immediately exposing every user to the new build.
09 — Incident Closure
The incident is closed when the corrected version is stable, rollout is complete and the affected production signals have returned to an acceptable state.
The final timeline, impact, decisions, resolution and lessons learned are documented so the incident can improve future releases.
The ideal outcome is not simply fixing a crash.
It is detecting production problems early, limiting their impact, restoring stability safely and leaving the next release better prepared than the previous one.
Note: The versions, interfaces, metrics and scenarios shown in this project are illustrative and were created exclusively to represent a post-release workflow. For confidentiality reasons, no internal data, documentation or proprietary materials from the companies and products I have worked with are displayed.
0
18