Engineering Methods Project
Date: January 2021 - May 2021
Team: Class Project
Instructor: Daniel Hannon
The class ENP64 was called “Methods for Human Factors Engineering”. My engineering psychology project tasked us with making a physical toy/product for toddlers using the product design process from everything to gathering raw data and analysing our observations to physically constructing the toy.
My personal project was to come up with a toy that would be fun and a good learning experience for my users. I finally decided to build a modified shape sorter that would test colour and shape matching. This project was a huge learning curve for me as a student and designer as it was my first experience with Figma, AutoCAD, and Adobe.
I had to learn on the go, become familiar with various kinds of design and modelling softwares and then build a product using machinery I had never encountered before. More than the actual building process, I learnt about the value of undergoing extensive research and data analysis before and during the design process to understand your users and gain insightful feedback.
Context 👩💻
My project was 3D modelled and constructed in class for toddlers aged 3-5.
It was an advanced course at Tufts that outlined everything on how to gather data, understand and interpret anthropometric measurements and muskoskeleton analysis, work with 3D modelling softwares, and finally learn how to use physical machines within a lab, and finally explore results.
Methods to gather data spanned from understanding how to conduct interviews, construct surveys and questionnaires, undergo task and cognitive analysis. We then used AutoCAD and Figma to finalise our 3D sculptures of our toys.
Finally we were tasked to conduct usability analysis and user testing and how to incorporate feedback into our remodel of designs for both the physical toy and the app mobile interface to accompany it.
Problem ⚡️
The Challenge - how do I create a product that would be both engaging and a learning tool for my target users?
The problem statement I was trying to solve is both how to engage my target audience with a physical toy that could also mentally challenge them. I wanted to build a product that would teach them how to understand the fundamentals of shapes and colour-matching, as well as improve their fine motor skills and dexterity when handling objects and placing them in a specific arrangement.
Due to the nature of my problem statement, I targeted my problem statement towards children who were 4+ and who already understood the basics of colours and shapes to understand the task at hand.
Solution 💡
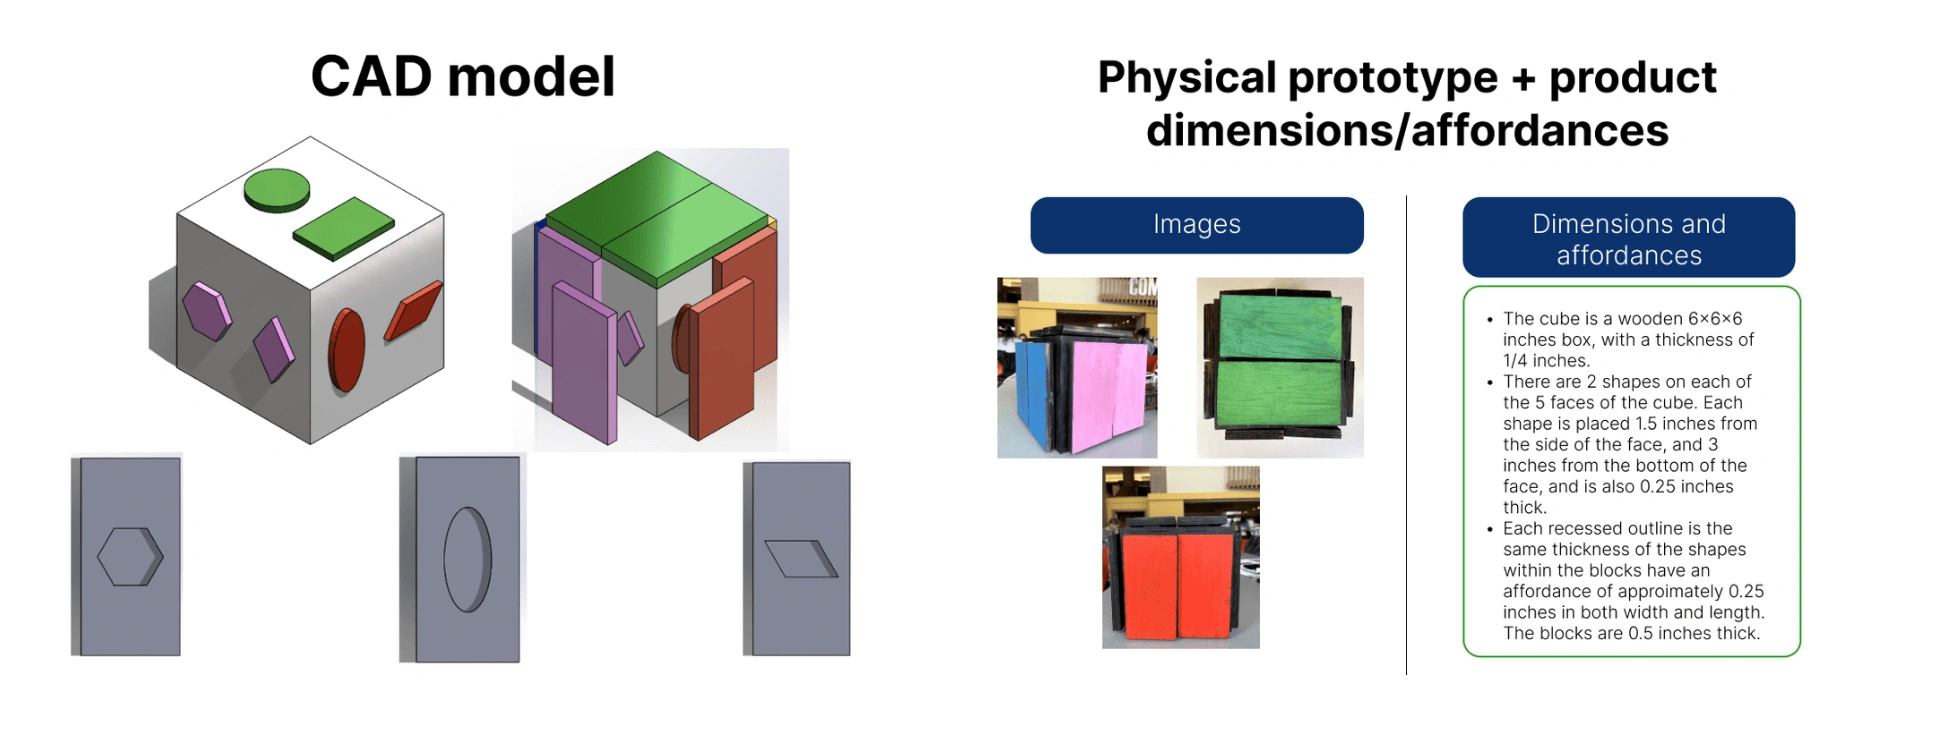
In response to the problem statement, I created a fun way for toddlers to engage in shape matching based on both colour and orientation to improve overall fine motor skills. My product was a 3D black box, consisting of 6 sides. On 5 of the sides, there was 2 protruding shapes that had a specific colour. The product also consists of 10 coloured rectangular blocks with recessed corresponding outlines of the shapes on the cube.
The child has to figure out using their colour matching and shape matching skills, which rectangular block attaches to which shape on the cube. Some of the shapes on the cube were the same but a different colour. So the goal for the user is to understand why a block may fit to a side of the cube, but not have both of their colours match.
Design Process 📋
Research
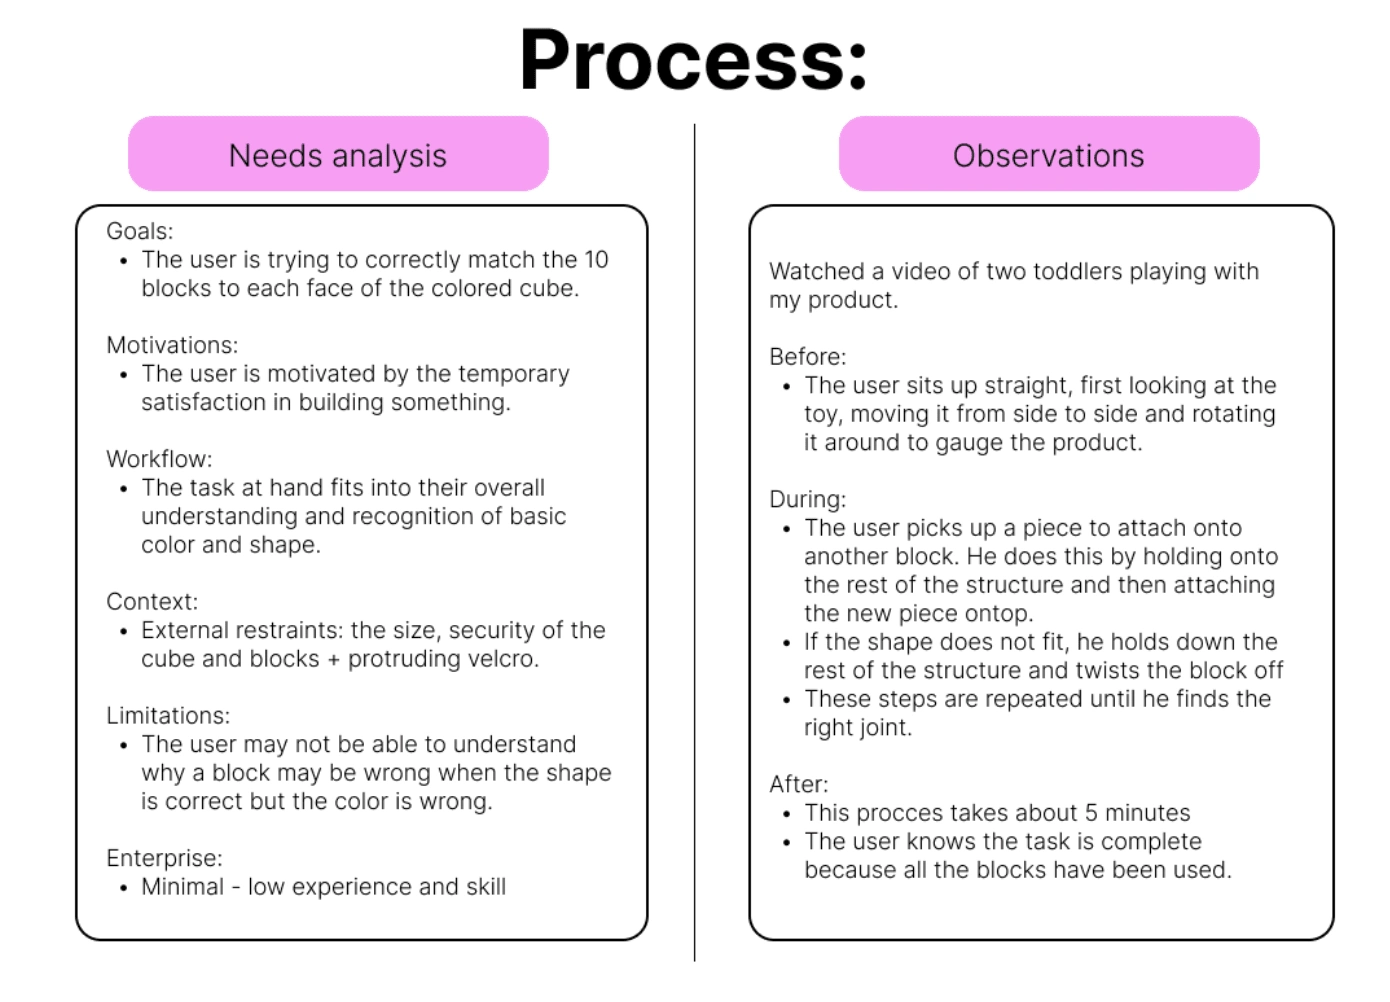
The process was long – spanning around 4-5 months to ideate, create, prototype, and test. I started with conducting a needs analysis which outlined the goals, motivations, workflow, context, limitations, and enterprise of my target users. Then, I underwent some observations of toddlers initially playing with all kinds of shape sorter toys to see how they would respond to my product. These observations were detailed and meticulous – outlining every aspect of what their actions were when playing with the toys.
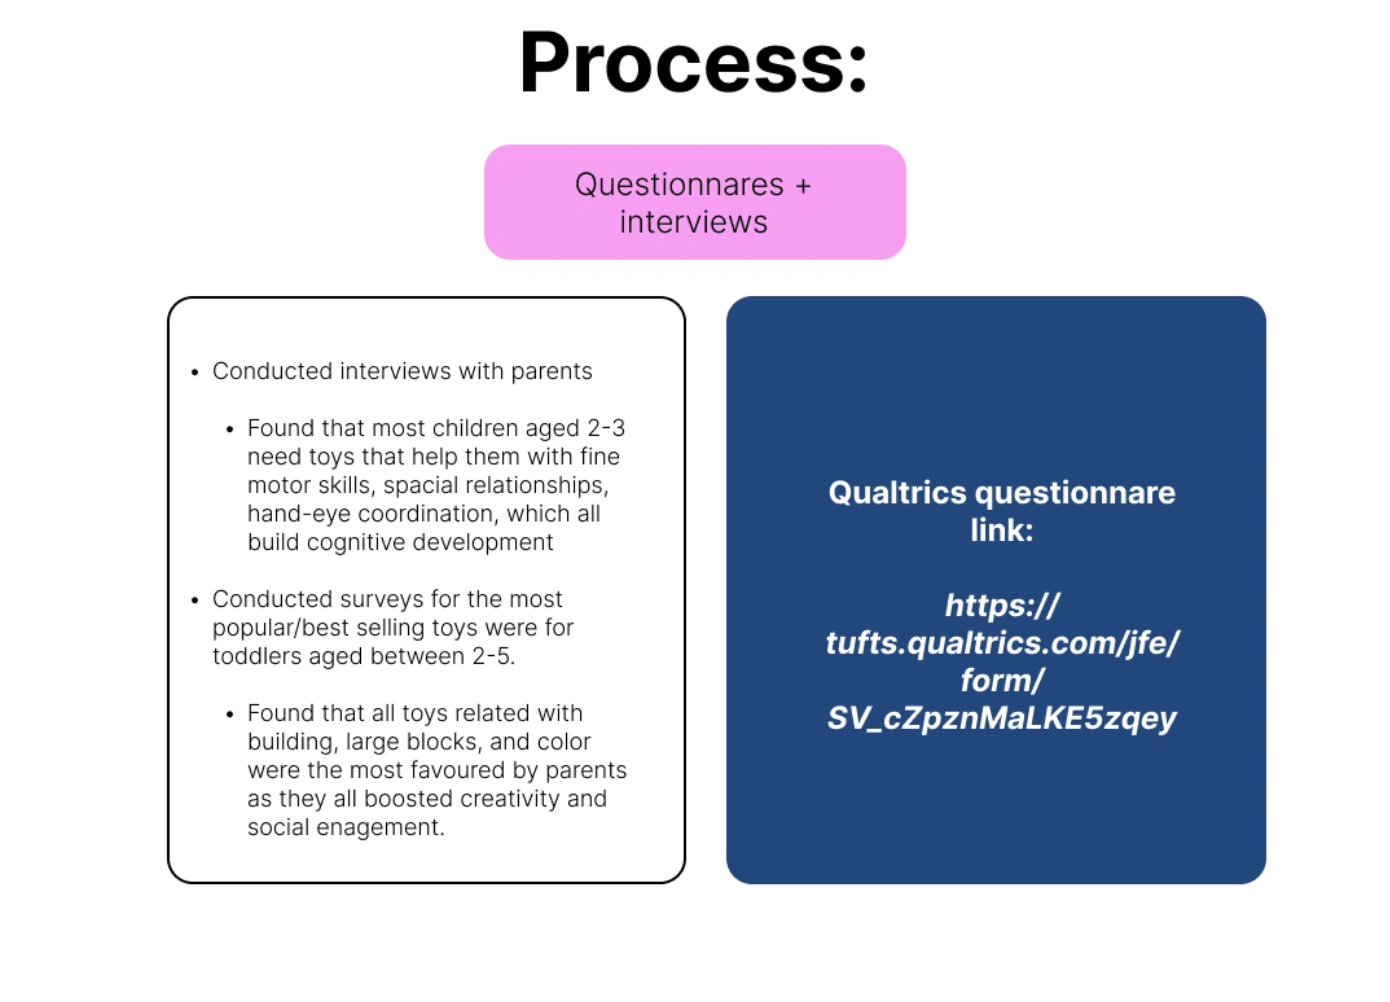
I then created a Qualtrics survey and questionnaire which I sent to many parents to collect some raw data. I found that most children aged 2-3 need toys that help them with fine motor skills, spacial relationships, hand-eye coordination, which all build cognitive development. Another key finding was that all toys related with building, large blocks, and colour were the most favoured by parents as they all boosted creativity and social engagement.
I then created a Qualtrics survey and questionnaire which I sent to many parents to collect some raw data. I found that most children aged 2-3 need toys that help them with fine motor skills, spacial relationships, hand-eye coordination, which all build cognitive development. Another key finding was that all toys related with building, large blocks, and colour were the most favoured by parents as they all boosted creativity and social engagement.
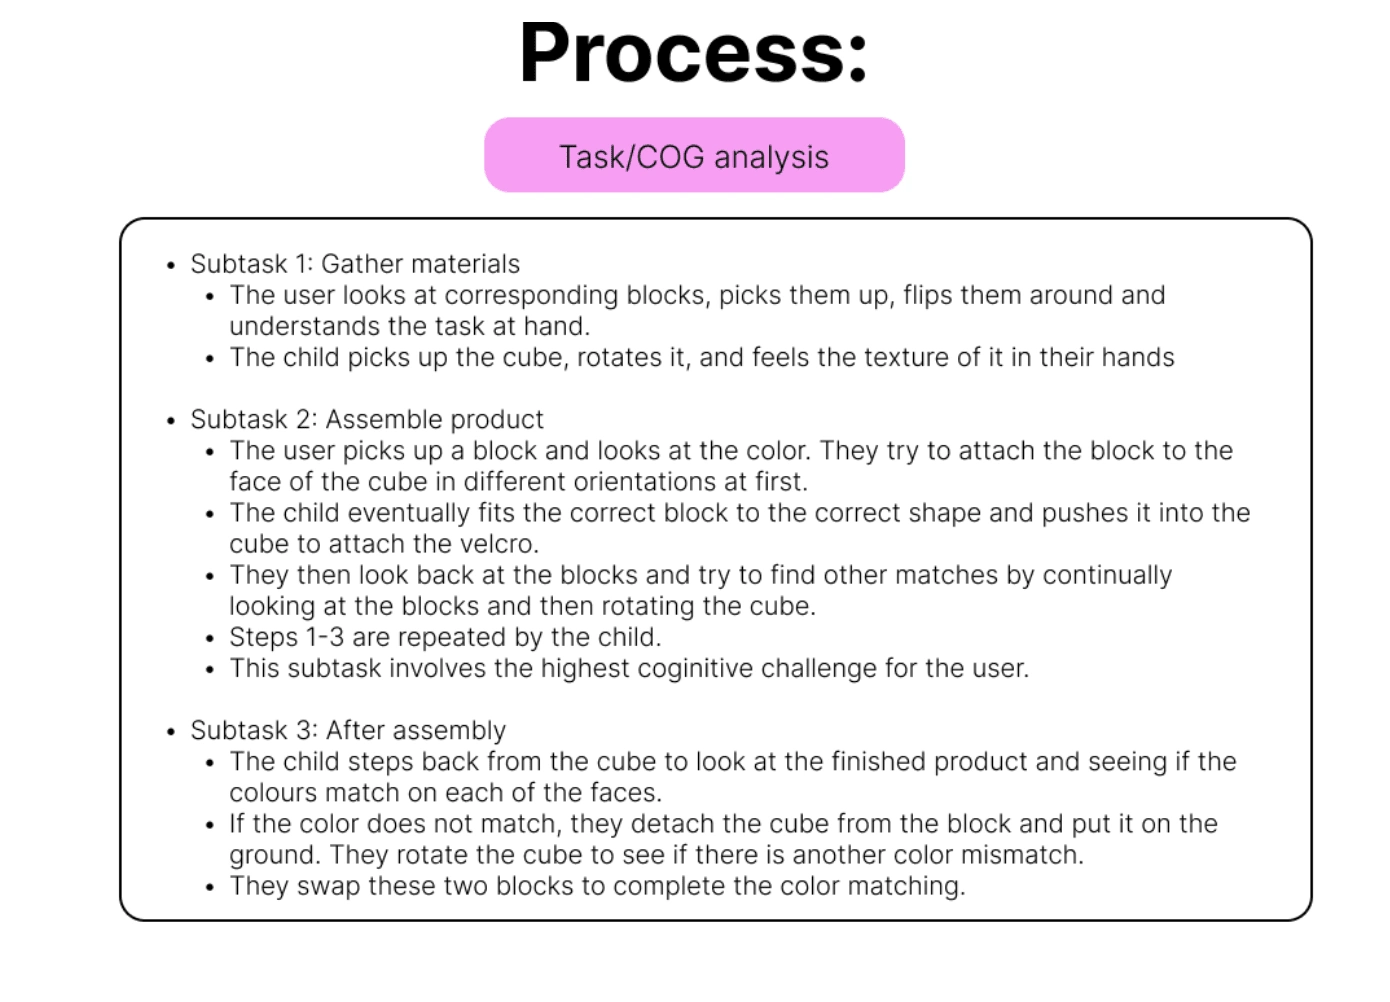
As I built my prototype, I constructed CAD models of my product and underwent task and cognitive analysis. This is more thoroughly detailed, step-by-step layout of how a toddler interacted with my toy. As I went through this process, I made changes and modifications to both my physical prototype and my digital model by making certain affordances to my dimension. I realised that the thickness needed to be a large enough value for the child to be able to grip and place things on the cube and to be able to differentiate between the different shapes and the rest of the product.
[the protruding shapes were 0.25 inches thick, the recessed shapes were 0.25 inches thick, the blocks had an affordance of 0.25 inches in length and width, and were 0.5 inches thick].
Design
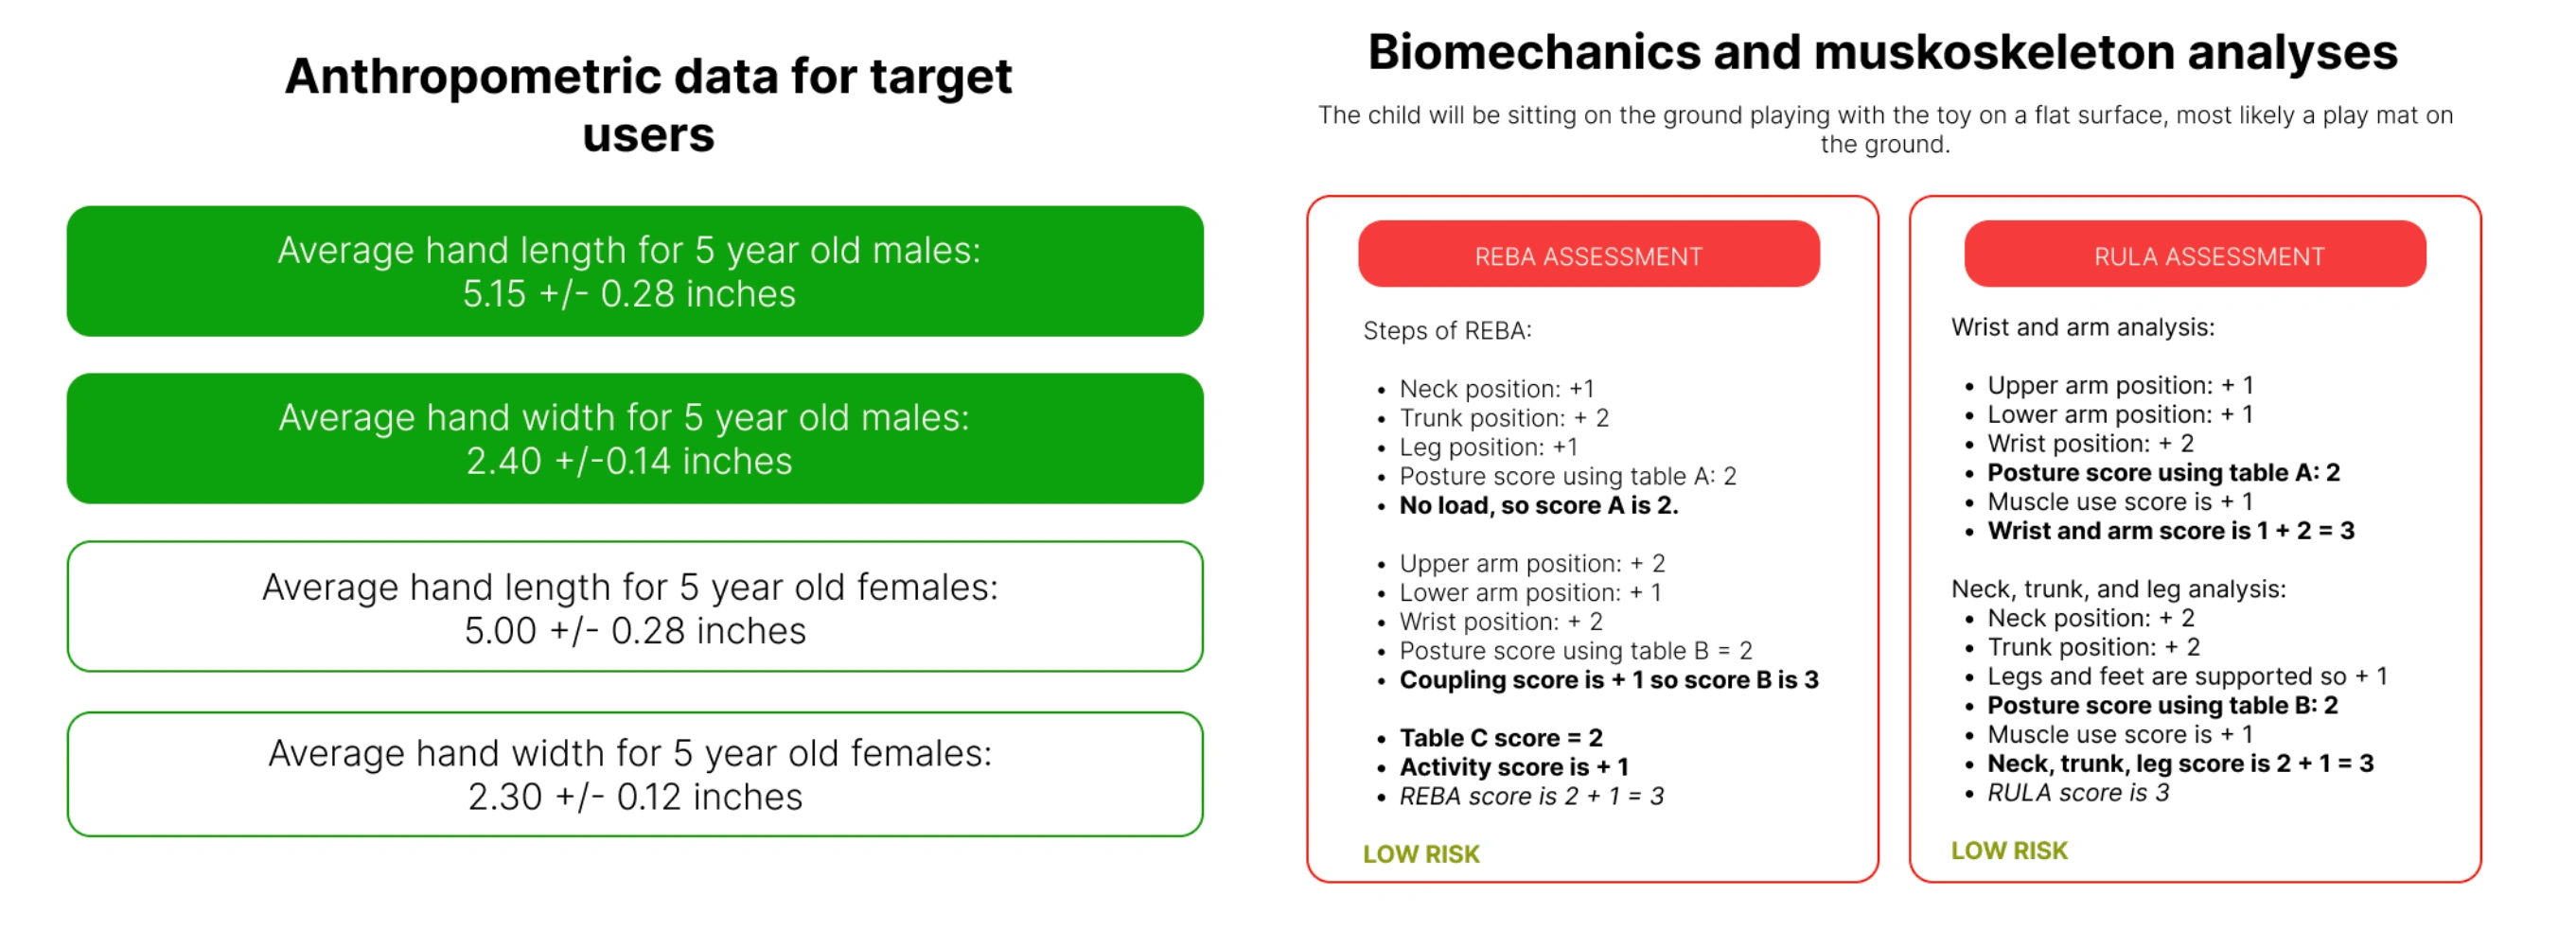
The next step was to start my muskoskeleton analysis. In order to do this, I gathered anthropometric data for male and female toddlers on their hand length and width. I then underwent the REBA and RULA assessment to find out if my toy would impose some risk to my users.
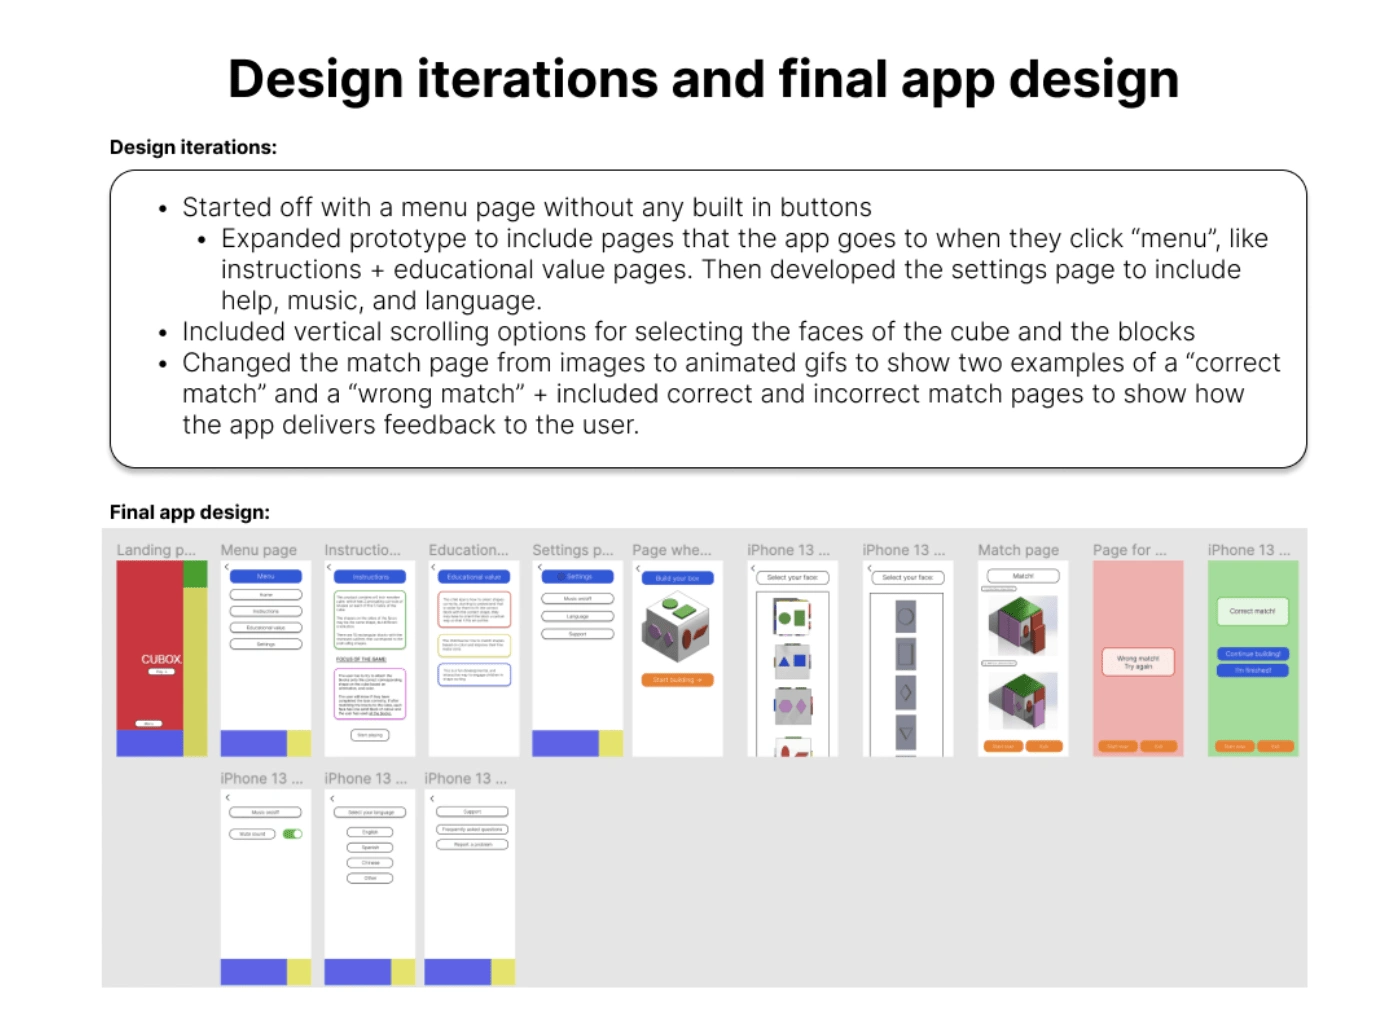
As I finished up the physical building of my product, I thought about my app interface design considerations for the mobile version of my product and drafted a user flow. I went through a heuristic review to test how advanced my app considerations were based on visibility, user control and freedom, consistency, aesthetics, and error prevention.
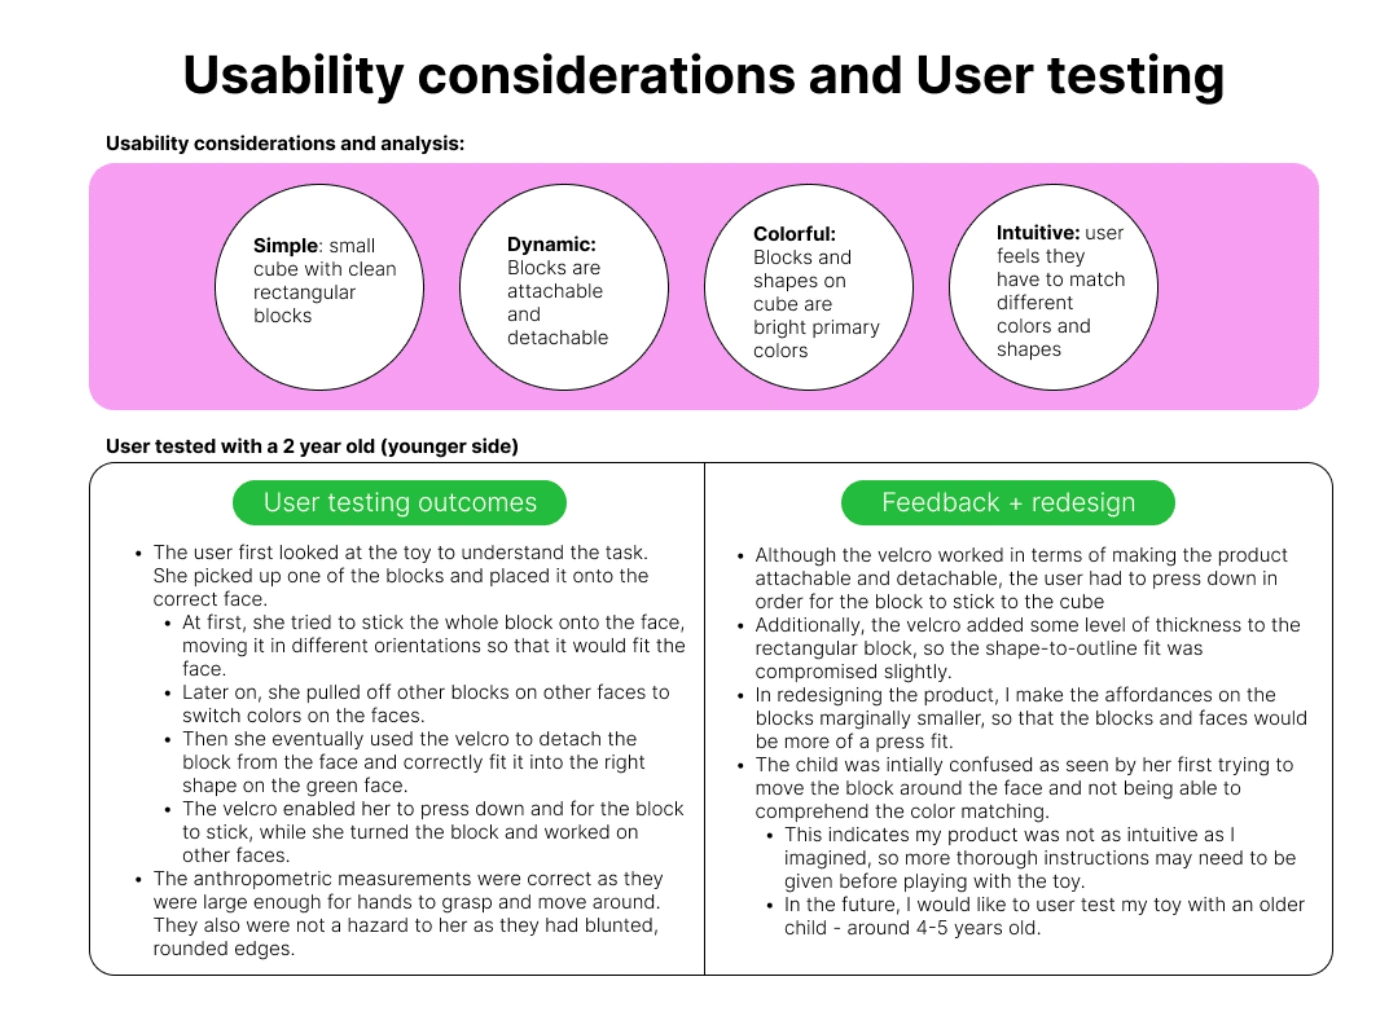
The final step was to go through usability testing and considerations. My usability considerations were simple, dynamic, colourful, and intuitive for the user. Through user testing, I gained feedback and had to redesign certain aspects of my product such as making the affordances slightly smaller so there would be a better shape to outline press fit. Additionally, my product was not as intuitive as I imagined, so more thorough instructions may need to be given before playing with the toy.
Takeaways and Learnings 😁
Reflections and Learnings
I struggled the most with the development of the physical prototype as I had never used CAD/modelling softwares before, was unaccustomed with many of the machines used to make physical products such as the 3D printer, and the laser cutter.
I enjoyed the incorporation of HF methods in this project, as I had never understood what makes a good questionnaire, the importance of surveys, interviews, task analysis, and muskoskeleton analyses in providing feedback for your physical prototype.
My significant takeaways from this course is the overall process of product development from ideation to creation. I learnt the value of gathering feedback from consumers to create user-centred design and to better cater to your target users.
Like this project
Posted Sep 14, 2023
Instructed to model and build a physical toy for toddlers to improve developmental and fine motor skills
Likes
0
Views
24


