Designing the first MVP for wiso.ai
Siraj Dhanani
Introduction
Wiso.ai is revolutionizing Personalized LinkedIn Messaging. In a world filled with cookie-cutter outreach, Wiso.ai stands out by crafting messages that genuinely connect. Using just a LinkedIn profile link and a touch of context, Wiso.ai delves into a prospect’s background – their education, professional journey, recent posts – to create a message that feels personal.
Problem
In today’s LinkedIn landscape, we’re bombarded with generic, sales-oriented messages. These formulaic attempts often get overlooked, leading to poor engagement. Wiso.ai takes on this challenge by handling prospect research, allowing senders to deliver authentic, relevant, and compelling messages without the painstaking legwork.
Challenges
Evaluating the Current State: Digging deep into the existing design to identify its shortcomings can be challenging. It involves conducting a comprehensive audit of the user interface, understanding user pain points, and proposing solutions that address these issues effectively.
Engaging Early Users: Attracting and retaining early users is vital for collecting valuable feedback. The challenge here lies in crafting a design that immediately captures users’ attention, conveys the product’s value proposition, and motivates them to explore further. It’s about creating an interface that compels users to stick around and become active participants.
Continuous Improvement: User feedback is the compass that guides design enhancements. The challenge is prioritizing which user suggestions to implement first and maintaining design consistency as the product evolves. It involves a delicate balance between responding to user needs and staying true to the product’s identity.
Visual Identity: Developing a distinctive visual identity involves more than choosing colors and fonts. It’s about defining a design language that resonates with the target audience, communicates the brand’s personality, and remains consistent across various touchpoints. The challenge is in creating a visual identity that not only looks good but also reinforces the brand’s narrative.
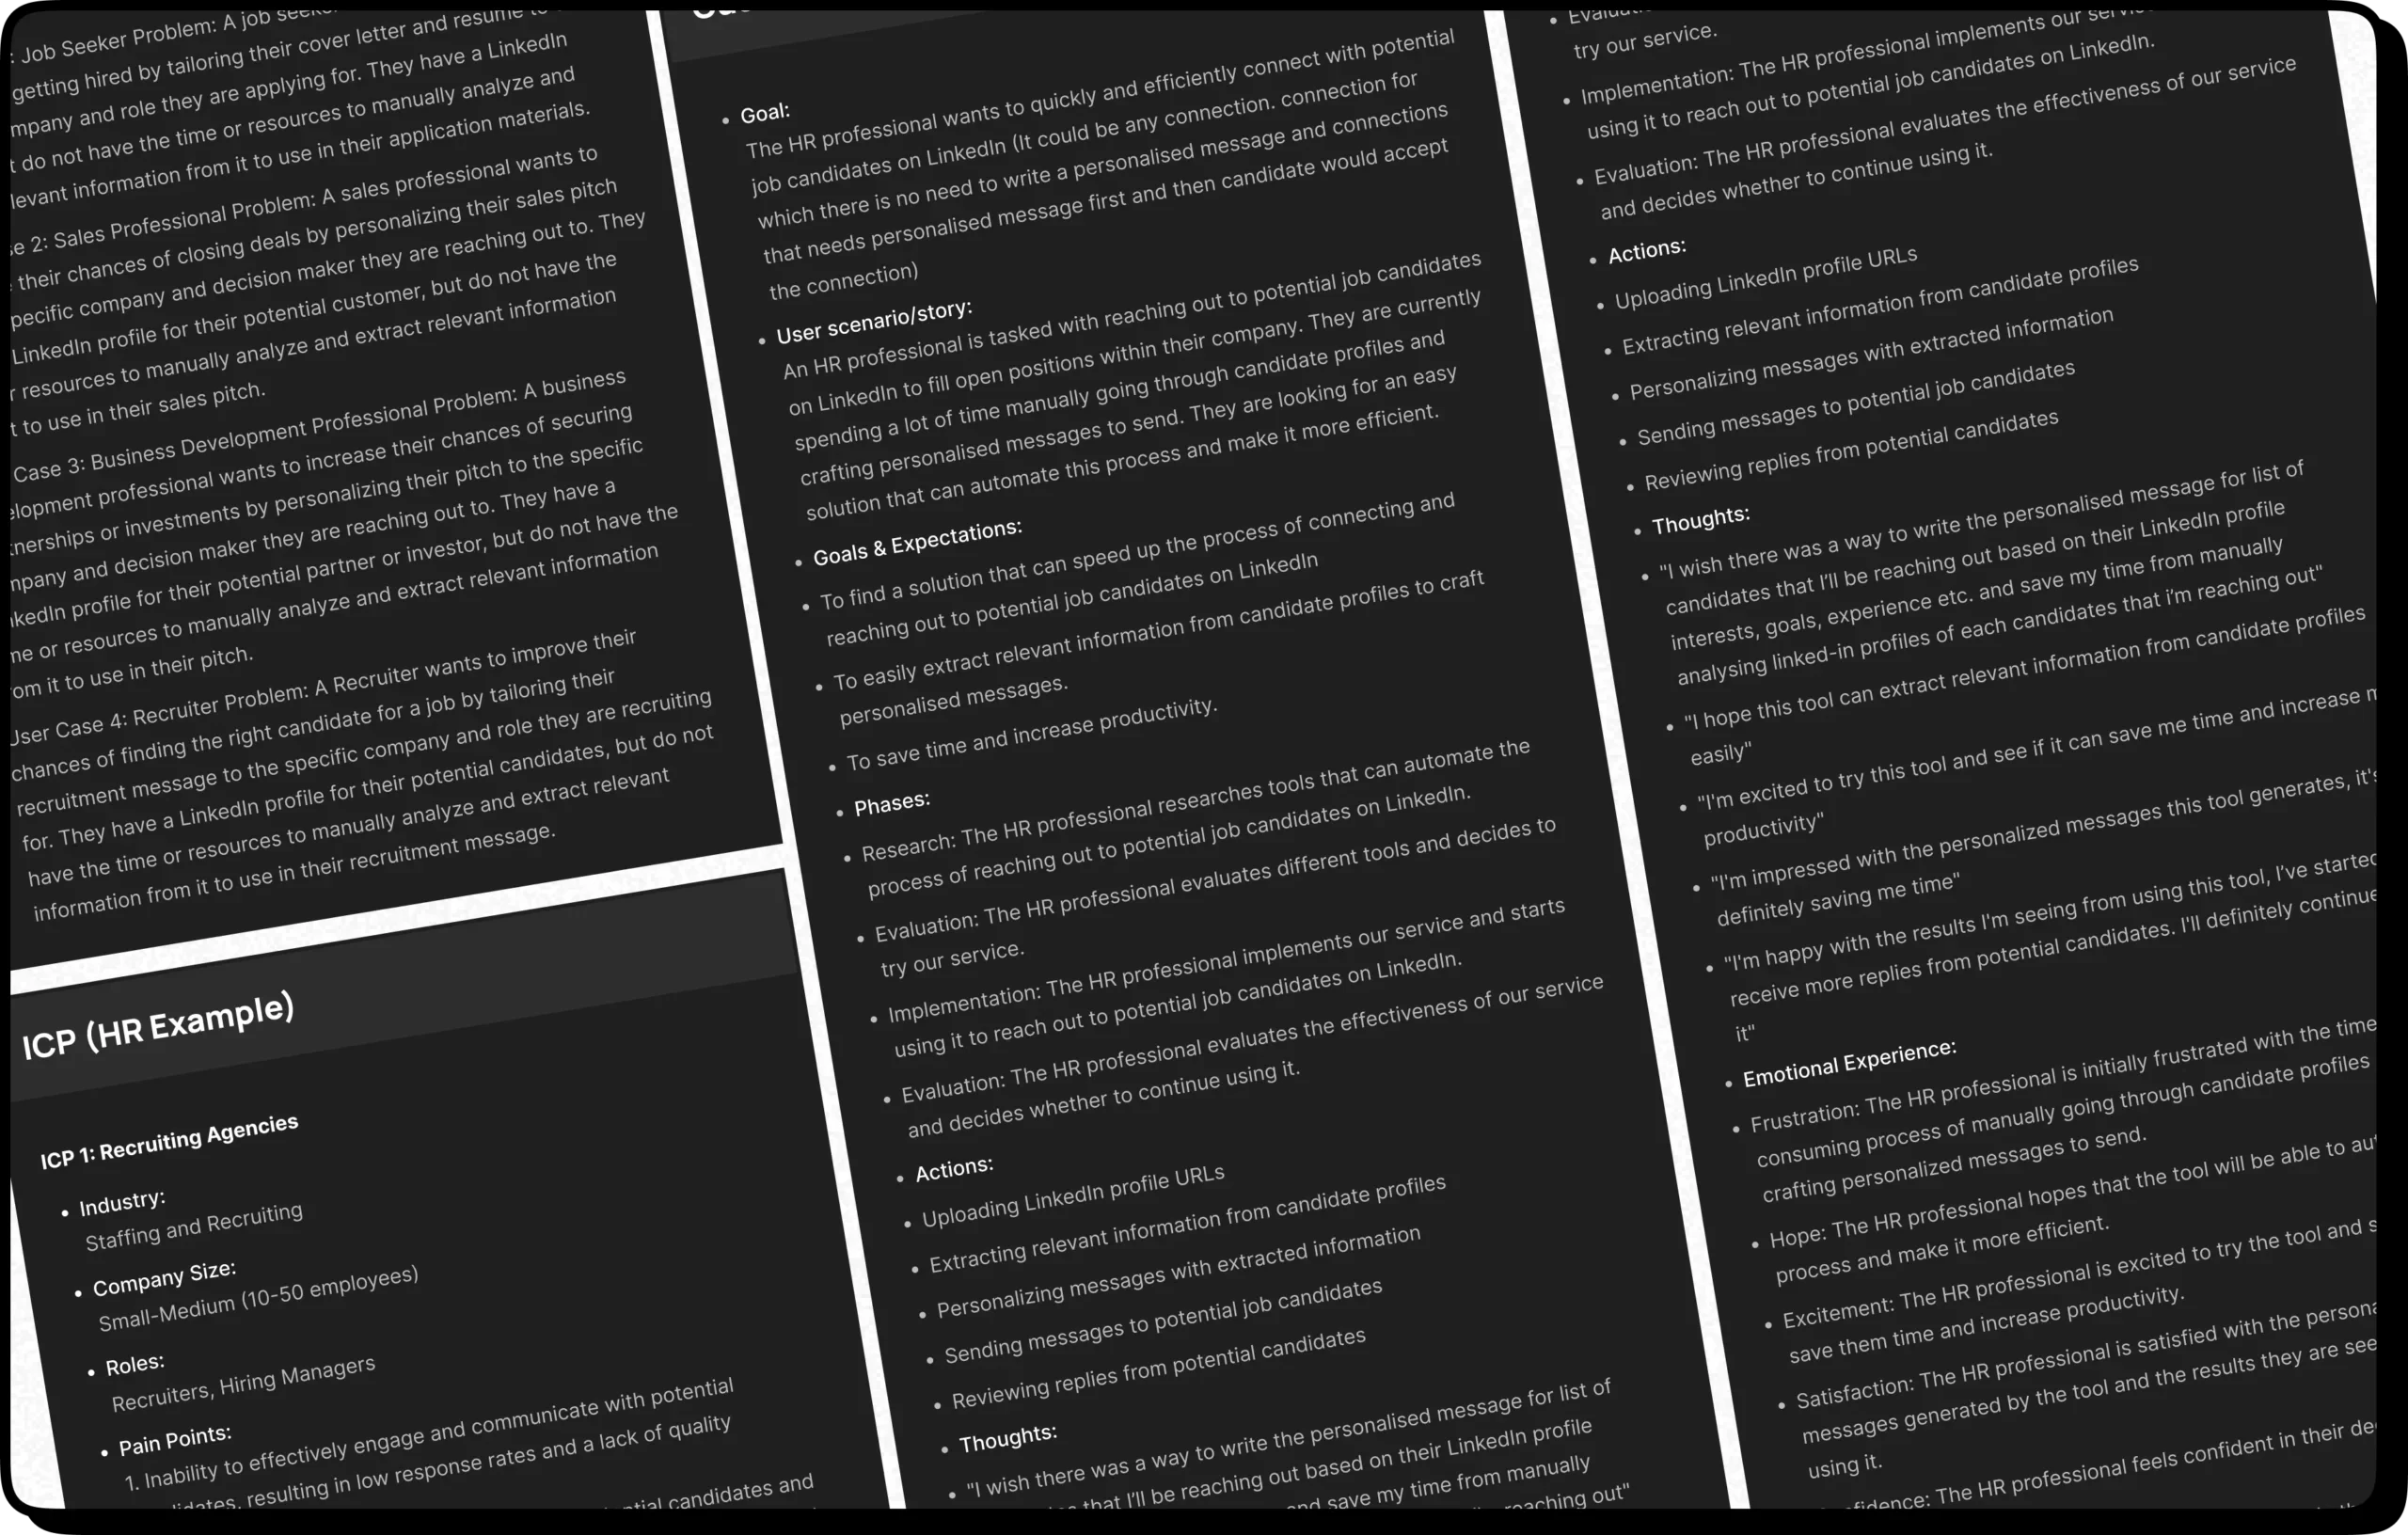
User Research
For our inaugural MVP, we conducted quantitative research through a survey. The survey results revealed that only a small fraction of users were aware of the existence of such tools that enable process automation.
Interestingly, a majority of respondents reported using manual or templated approaches. These findings led us to recognize a significant opportunity – we could address this unmet need by developing our tool, which empowers users to create highly personalized messages more efficiently.
I worked closely with the founder to identify our Ideal Customer Profiles (ICPs) and gain a deeper understanding of who our ideal customer is:
Who is signing up? We pinpointed our target users and ICPs.
What are they trying to do? We delved into Customer Journey Mapping.
Why are they signing up? By exploring the Customer Journey Map, we ascertained the reasons.
What are the job to be done (Goal)? We defined the overarching objectives and goals.
These insights provide a solid foundation for shaping our product and understanding our users’ needs and motivations.
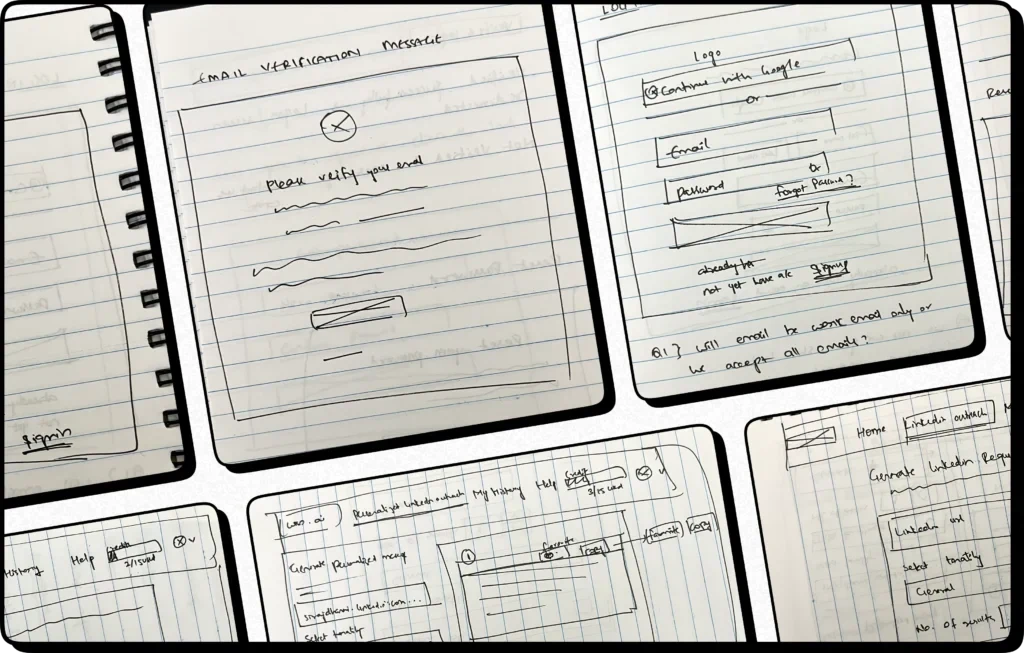
Wireframes
I collaborated closely with the founder to create initial wireframes swiftly. We engaged in direct discussions to refine these wireframes. As I crafted the initial wireframes, I gained insights into aspects I might have missed. I collected these insights and swiftly proceeded with the rough design phase, all within the constraints of our tight deadline.
Competitors research
We’ve conducted a thorough analysis of our competitors in the market. This involved a deep dive into their strengths and weaknesses, allowing us to gain valuable insights into their strategies and approaches.
By assessing our competitors, we’ve been able to refine our own product strategy. This process has helped us identify opportunities to differentiate ourselves in the market and better cater to the needs of our users.
Mid Fidelity Designs
During this phase, we transitioned from basic rough sketches to rough product concepts. This step was instrumental in transforming abstract ideas into concrete visual representations.
My collaboration with the founder was key during this stage. Together, we translated our shared vision into visual depictions of the product. Our primary aim was to provide a detailed preview of how the product would look and function.
This visual clarity helped the founder grasp the concept more quickly.This meeting also provided invaluable insights and considerations for improvements. The founder shared additional perspectives that I was unaware of, and together we agreed on meaningful enhancements to incorporate into the design.
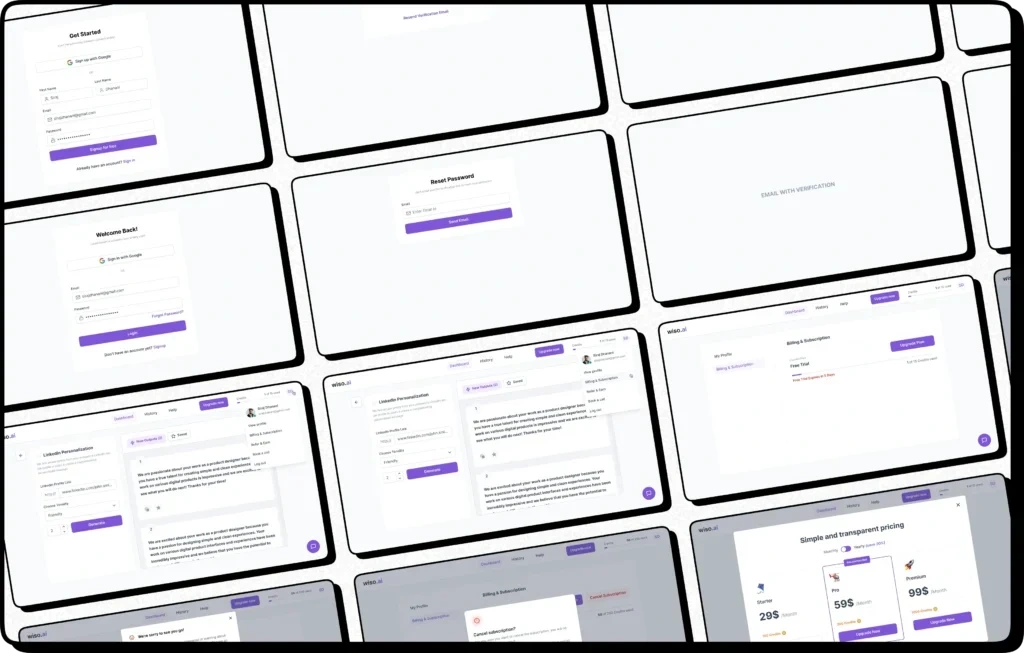
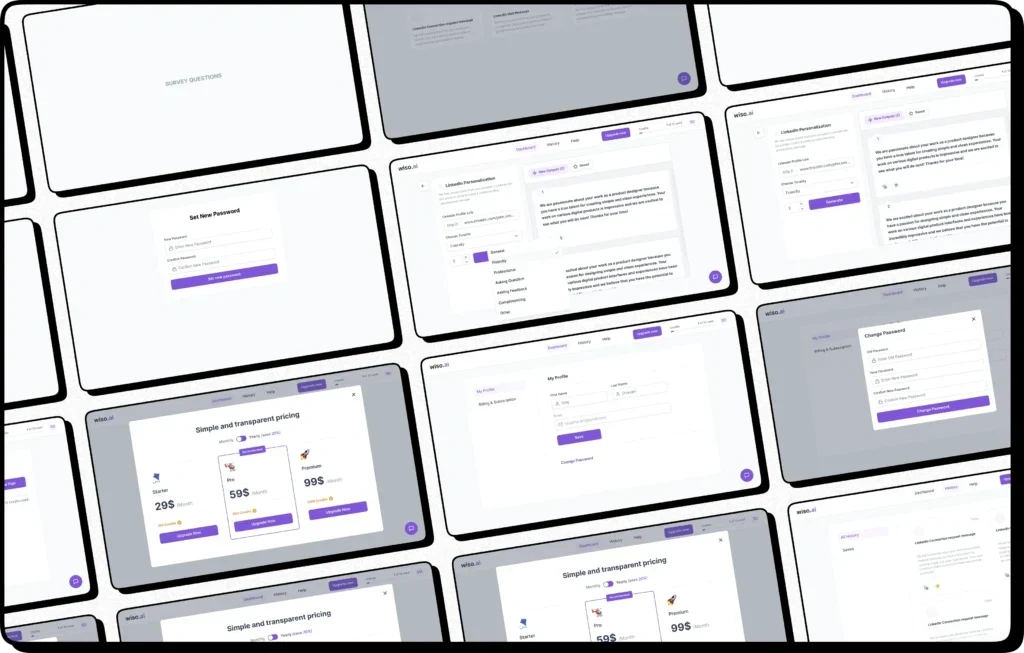
Final High Fidelity Design Handoff
After taking connecting with the founder and working on inputs we have scoped down the things for version 1 and left some more things that we have discussed for version 1.1
Once the mid fidelity design was finalized, we carefully selected the features to include in version 1 while earmarking others for version 1.1. Our primary focus was to launch the product, observe user behavior, validate its need, identify the most engaged Ideal Customer Profile (ICP), and gather vital insights once Its live. To align with these objectives, we ensured that version 1 included only essential flows.
Subsequently, I transitioned into the design phase, where I established the UI styles, including font choices, colour palettes, and brand identity, and began crafting the final design for the flow.
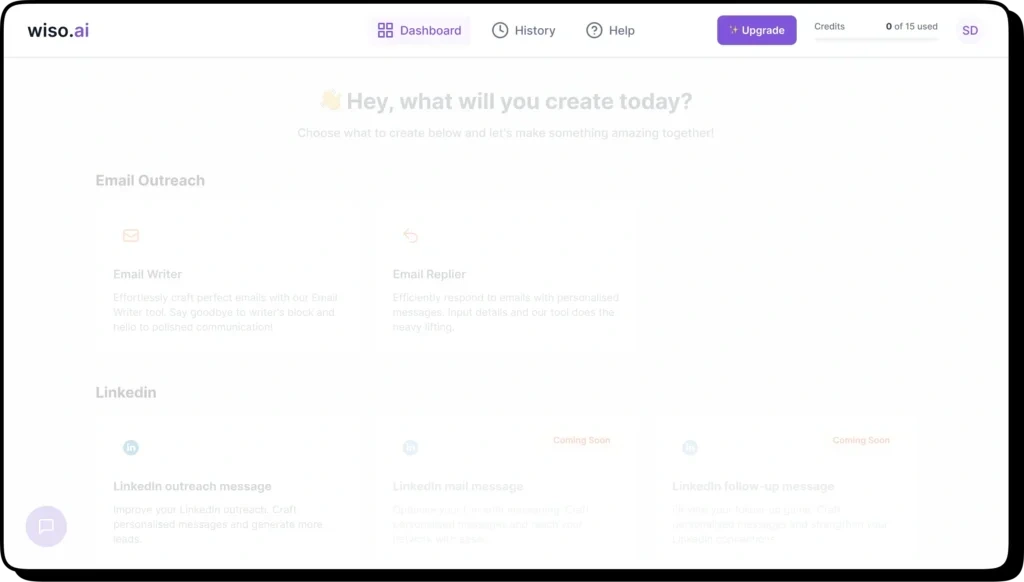
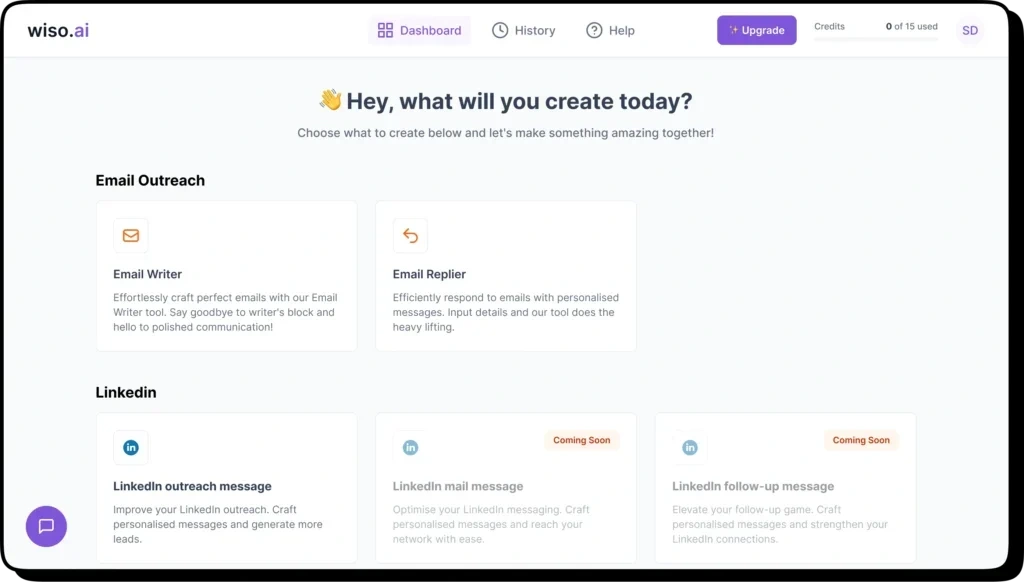
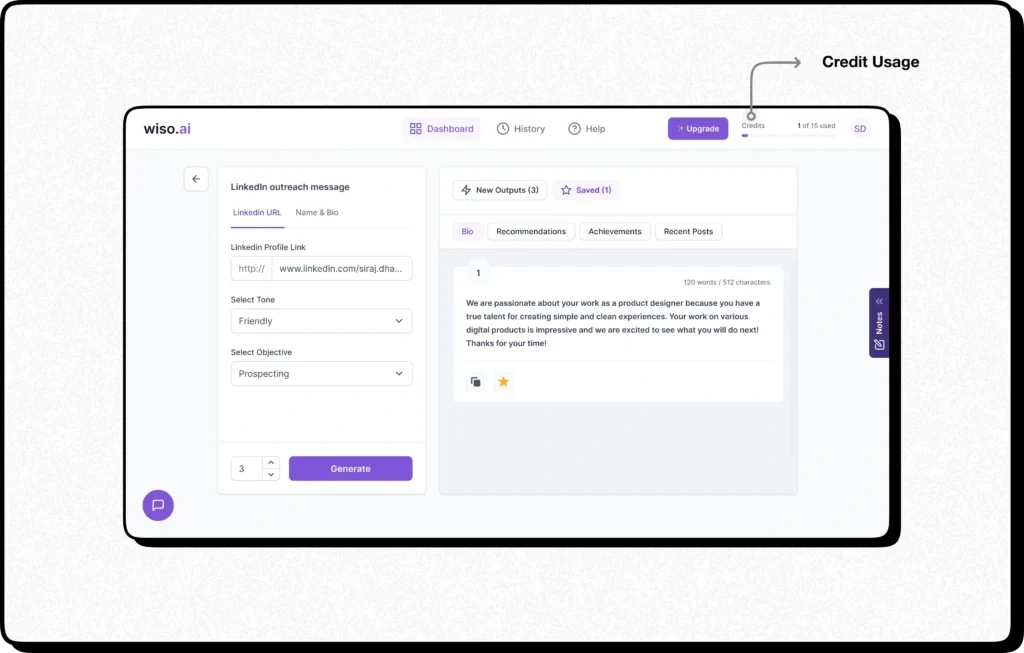
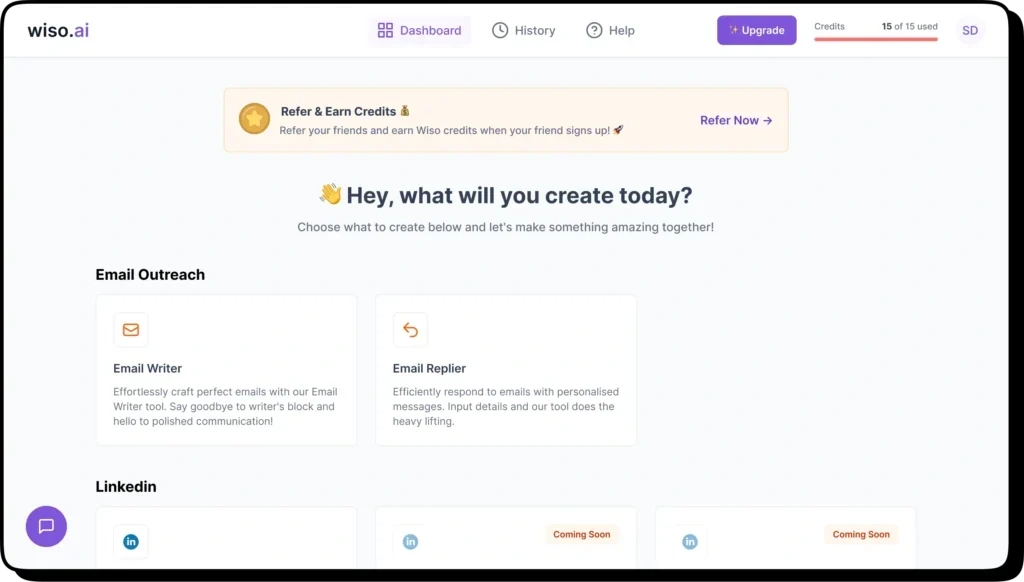
Dashboard
Top Navigation
I’ve opted to place the menu at the top of the screen due to the limited number of options available in this version. By using top navigation, we leave space on both the left and right sides of the screen. In this initial version of the top menu, I’ve included tabs for Dashboard, History, and Support. Additionally, there are a few other elements that I’ll provide more details about below.
Upgrade Call-to-Action (CTA)
In the top navigation bar, when a user is in the free trial phase, I’ve chosen to display an “Upgrade” call-to-action (CTA). This is designed to gently encourage the user to consider upgrading to a higher-tier plan whenever they feel the need to do so during the free trial period. When a user clicks on this “Upgrade” CTA, we will present a modal window containing plan cards. From this modal, the user can select the subscription plan that suits their needs, proceed with the payment, and begin using the enhanced features and services available with the paid plan.
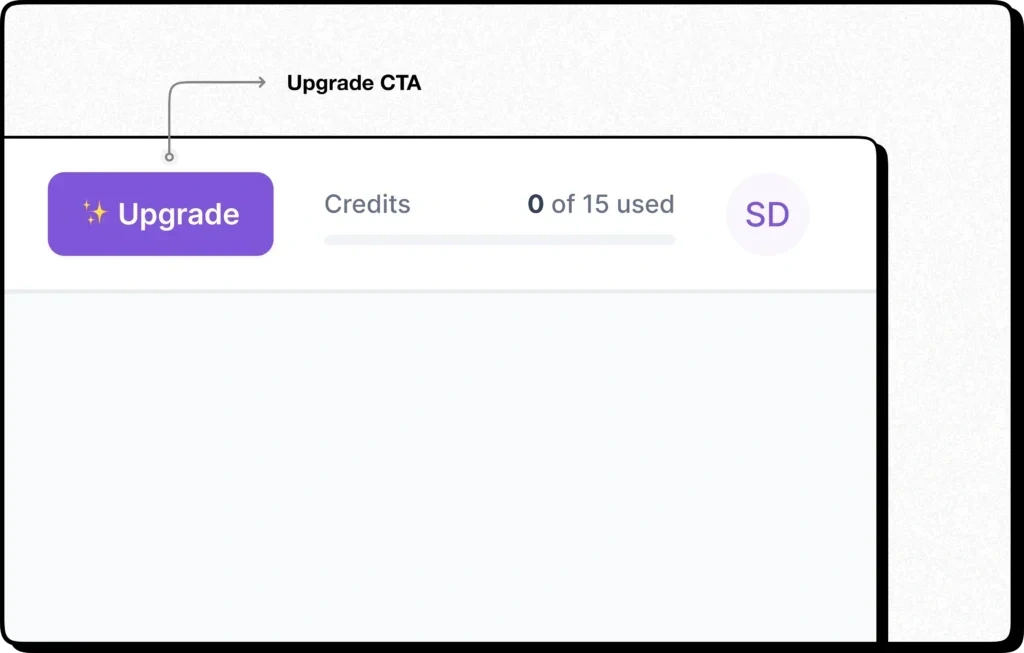
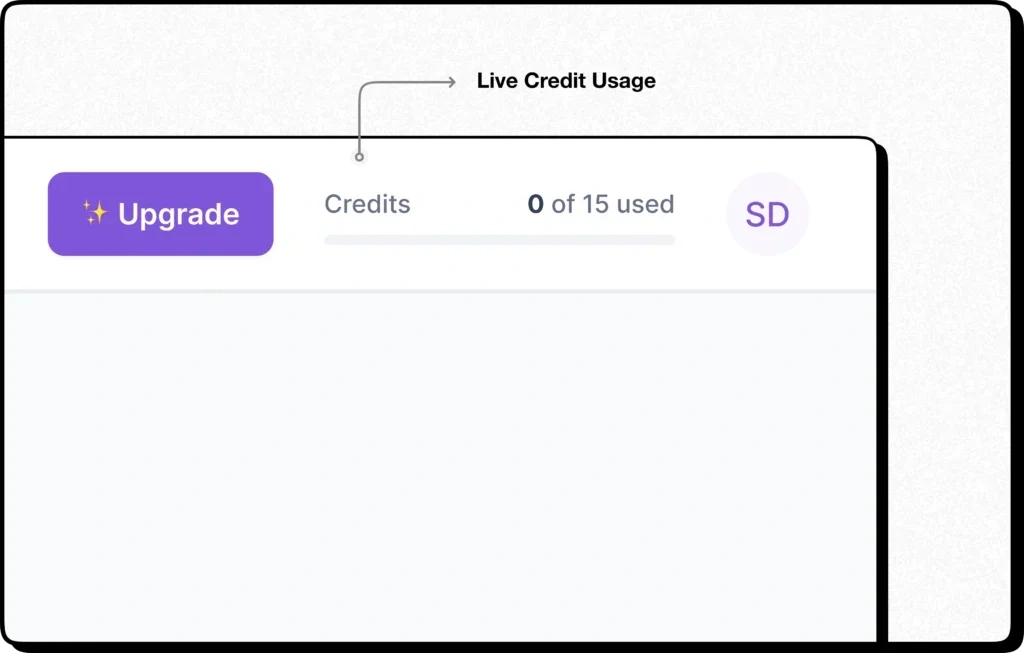
Live Credit Usage
I’ve added a feature to the top navigation bar that shows users their live credit usage. This way, users can easily see how many credits they’ve used and how many they have left. As they use credits, a progress bar will fill up, giving them a clear visual representation of their usage.
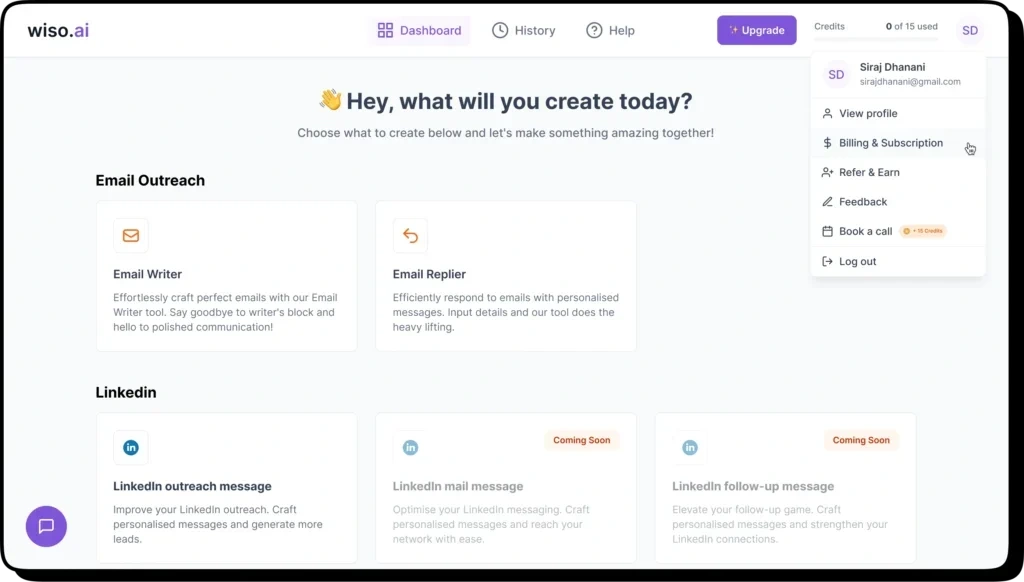
Profile and more
In the top navigation bar, I’ve added a profile icon. When the user clicks on it, a menu with several important options will be shown:
View Profile: Users can access and edit the details they provided during onboarding, as well as save any changes they make. Additionally, users have the option to change their password if they wish.
Billing and Subscription: This section provides users with essential information about their current plan, including details about their credit usage. Users can review their current plan, monitor credit usage, and take necessary actions such as upgrading, modifying, or canceling their plan.
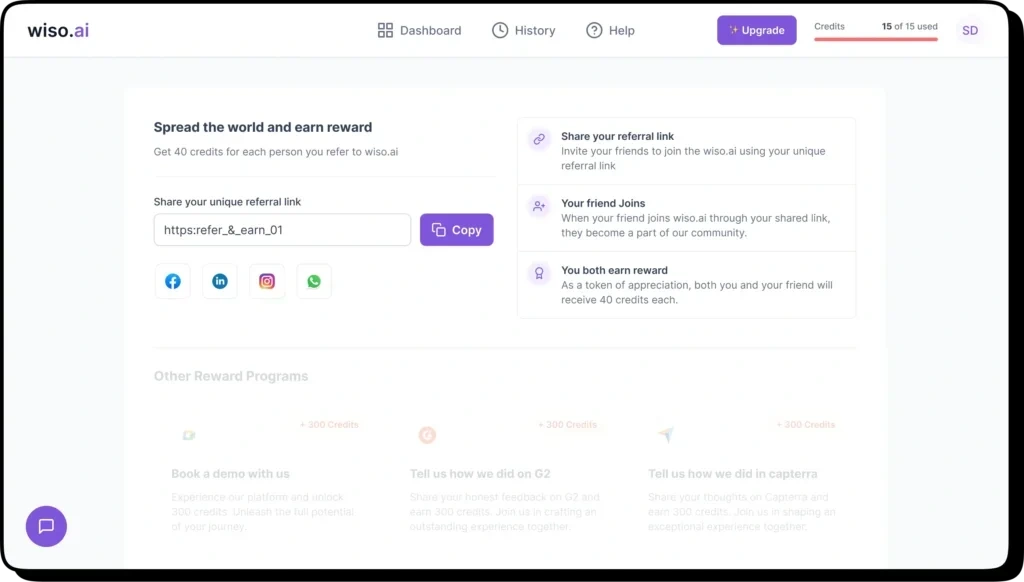
Refer & Earn: To encourage users to share our tool with others, we’ve introduced a “Refer & Earn” feature in our first version. Users can access this page to obtain a unique referral link, which they can share with friends and family. Both the referrer and the new user who signs up through the shared link will earn credits.
Feedback: Recognizing that the initial version may have a few minor bugs, we’ve made it easy for users to provide feedback. Users can submit feedback related to bugs, user experience, and new suggestions. We’ll be integrating a third-party app to streamline this feedback process and handle it effectively.
Book a Call: We value user insights, so we’re offering credits to users who choose to book a call with us. This helps us better understand the types of users we’re attracting and the challenges they’re trying to solve. This feedback is crucial for improving our product and services.
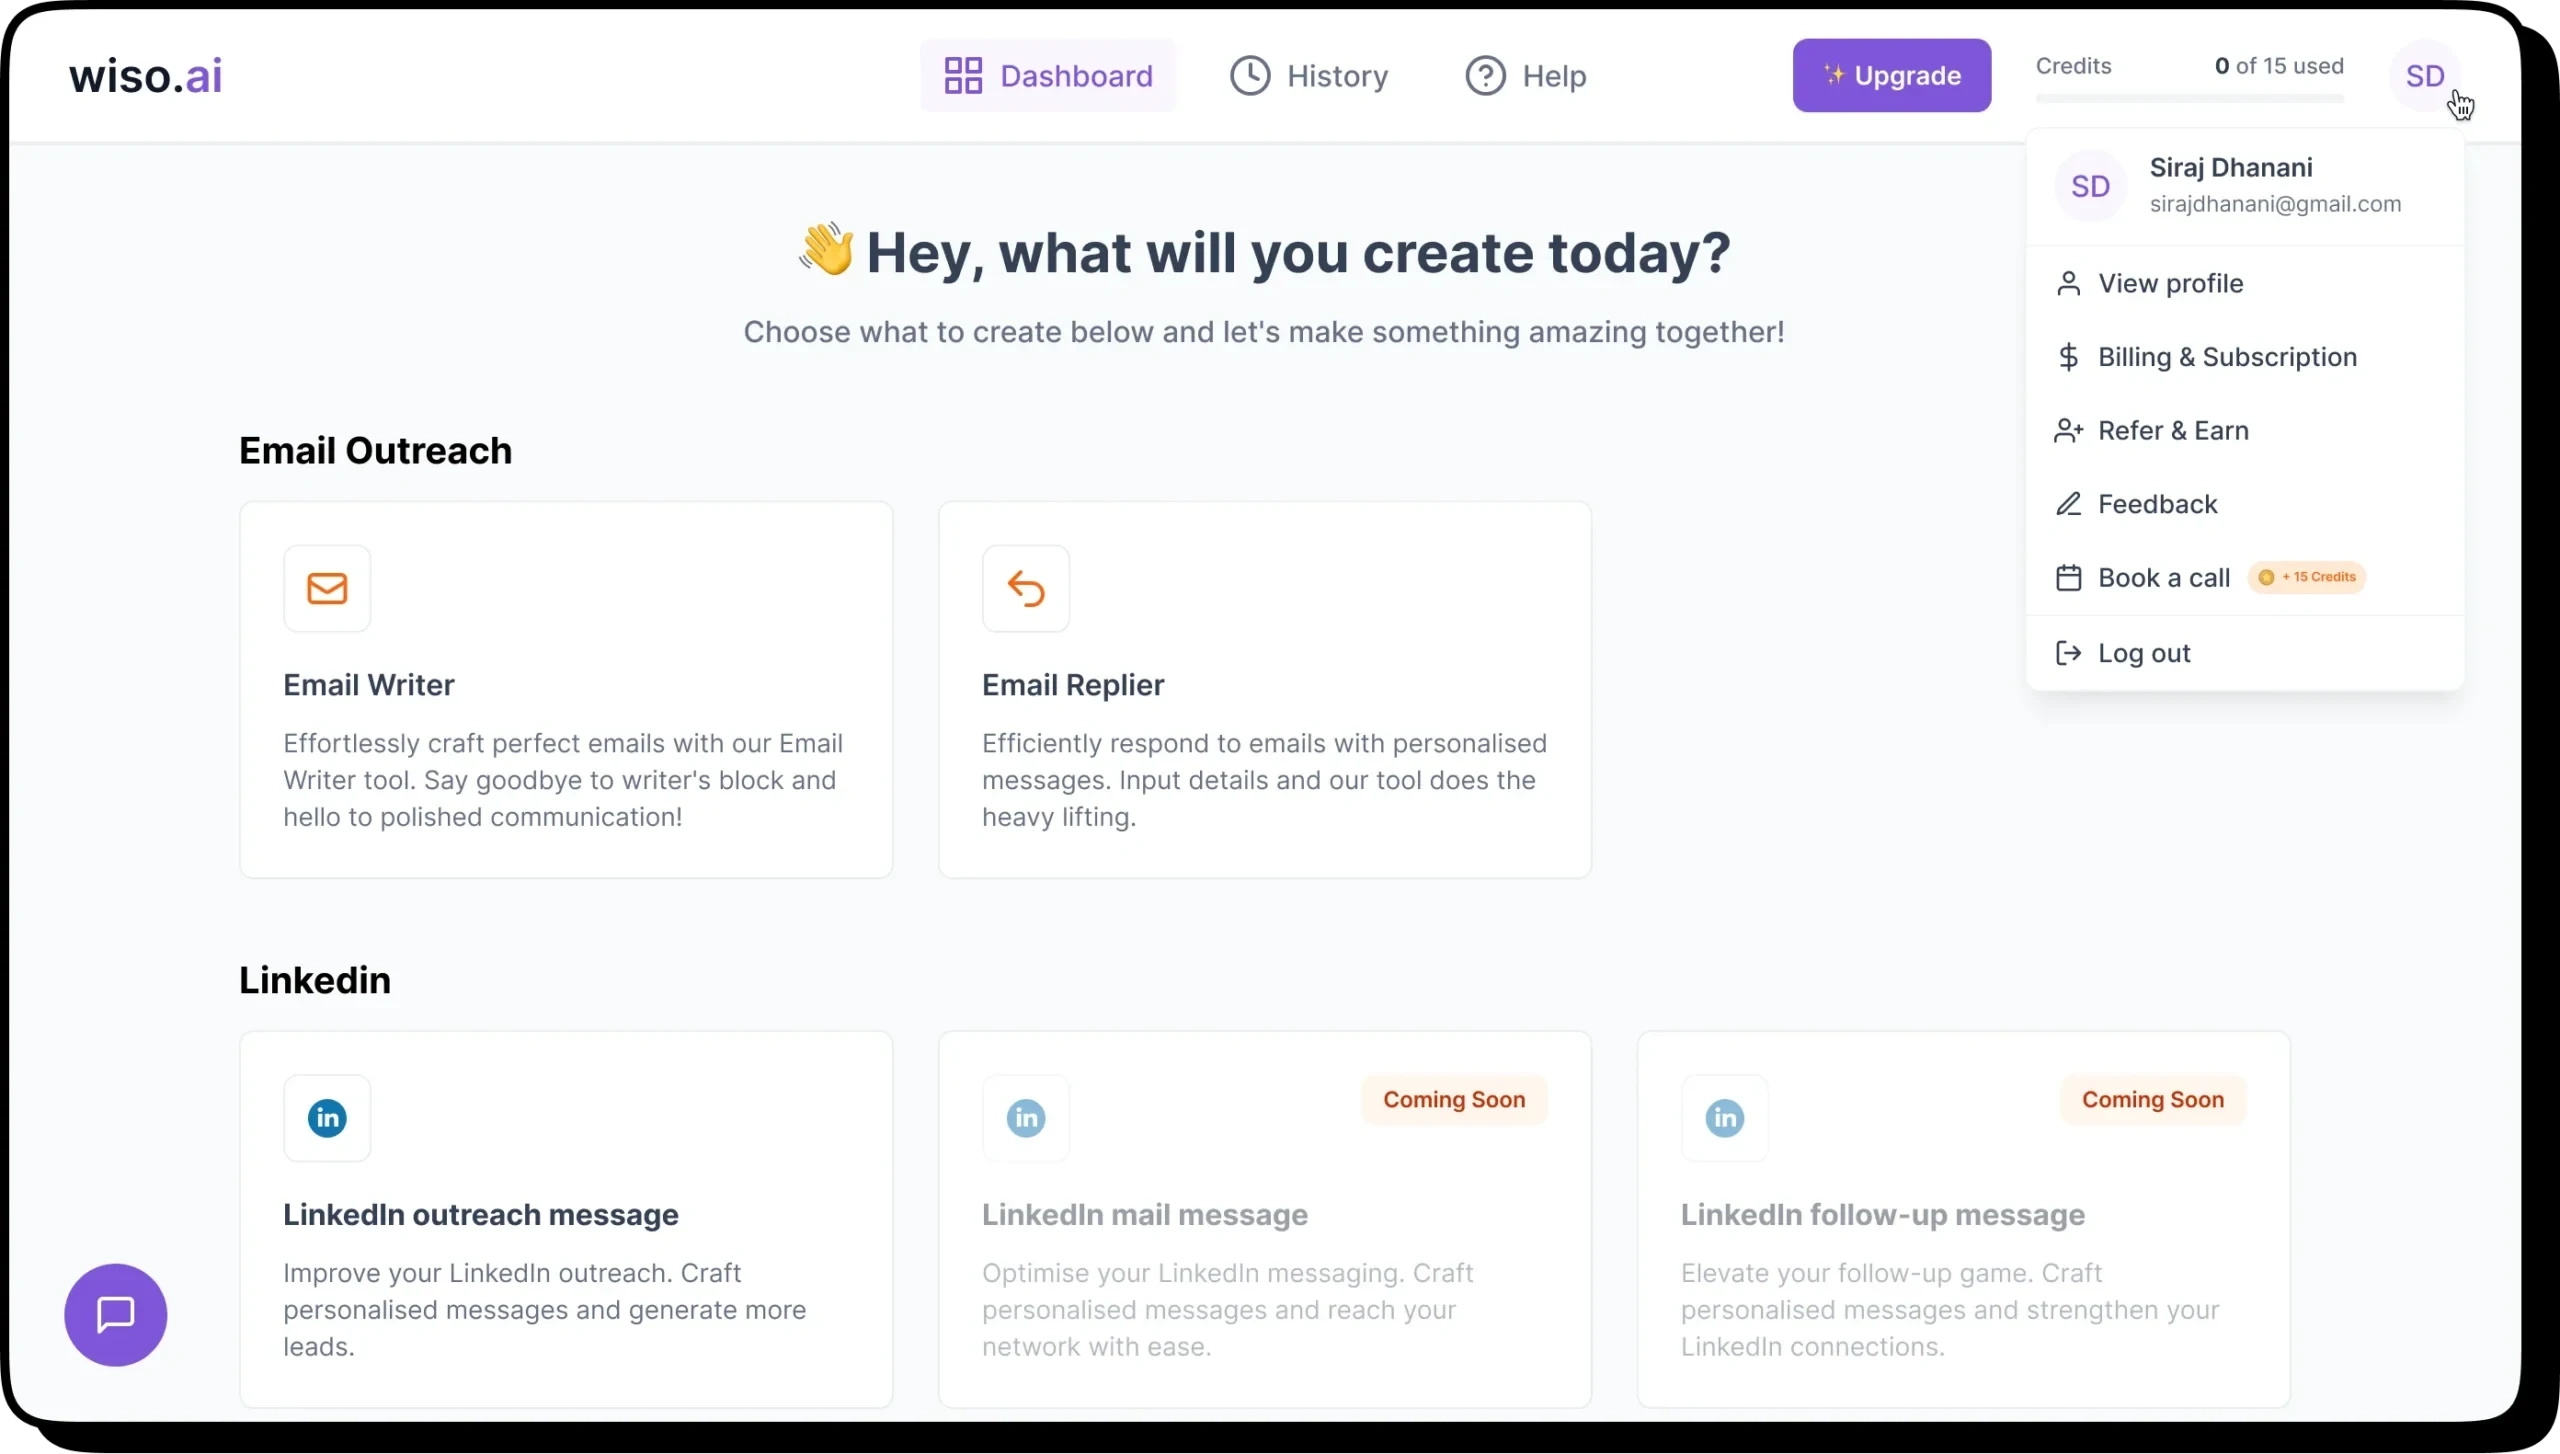
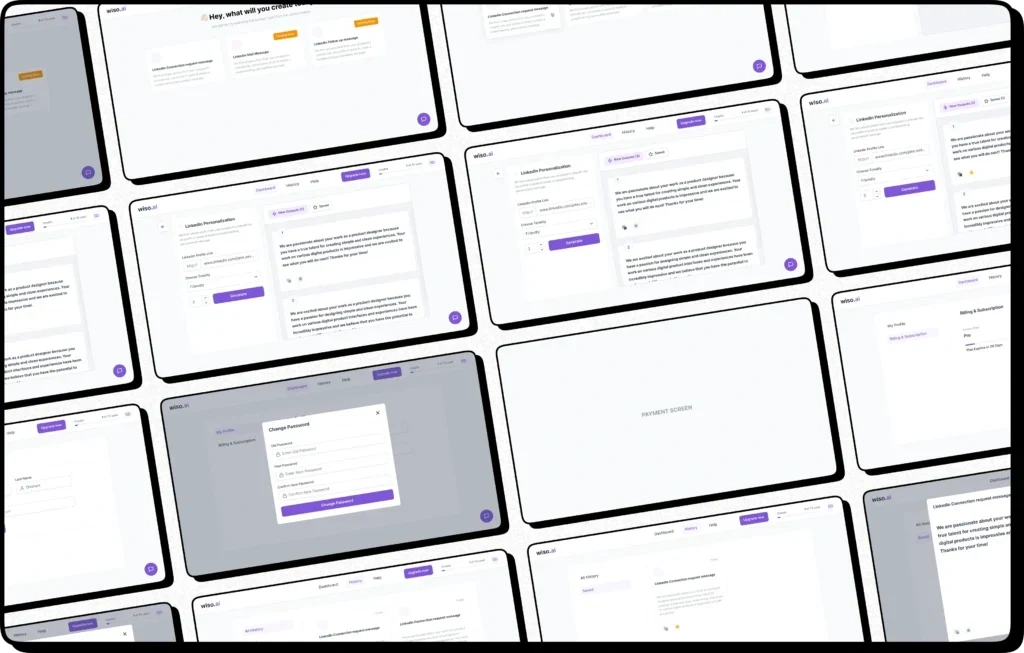
Categorised Content Writing Cards
In discussions with the founder, we’ve made the decision to present our content writing cards in a categorized format. Although we considered several options for displaying these cards, we’ve opted for this design, particularly because we currently have a limited number of cards. As we expand and add more cards in the future, we will update the user interface accordingly to accommodate the growing content library.
At present, we are focusing on experimenting with a select few content writing services. Based on user usage patterns and analytics, we plan to introduce additional cards. These cards will include a “COMING SOON” tag to inform users that more content writing services are in development. This way, users can stay informed and look forward to utilizing these upcoming services as they become available.
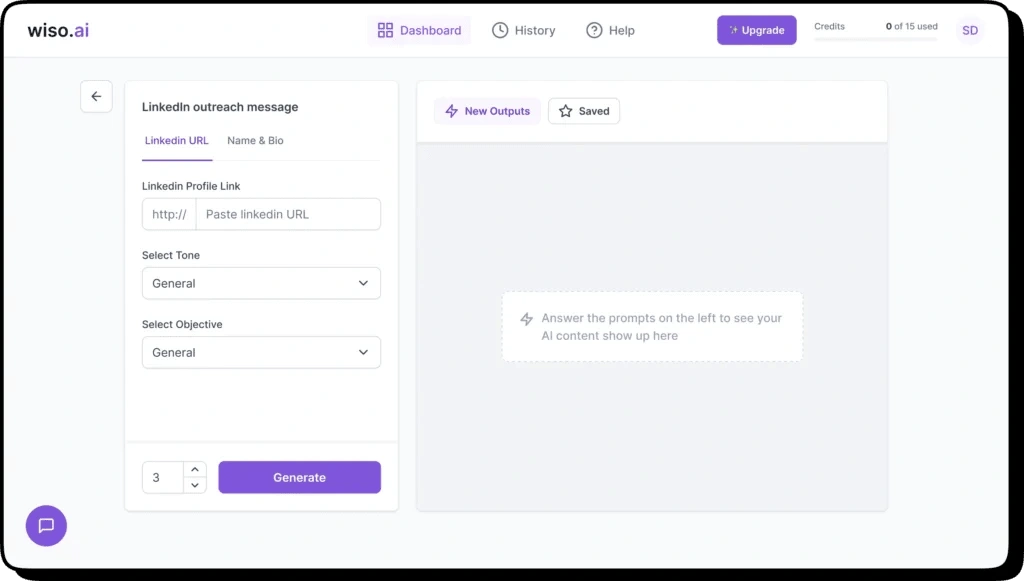
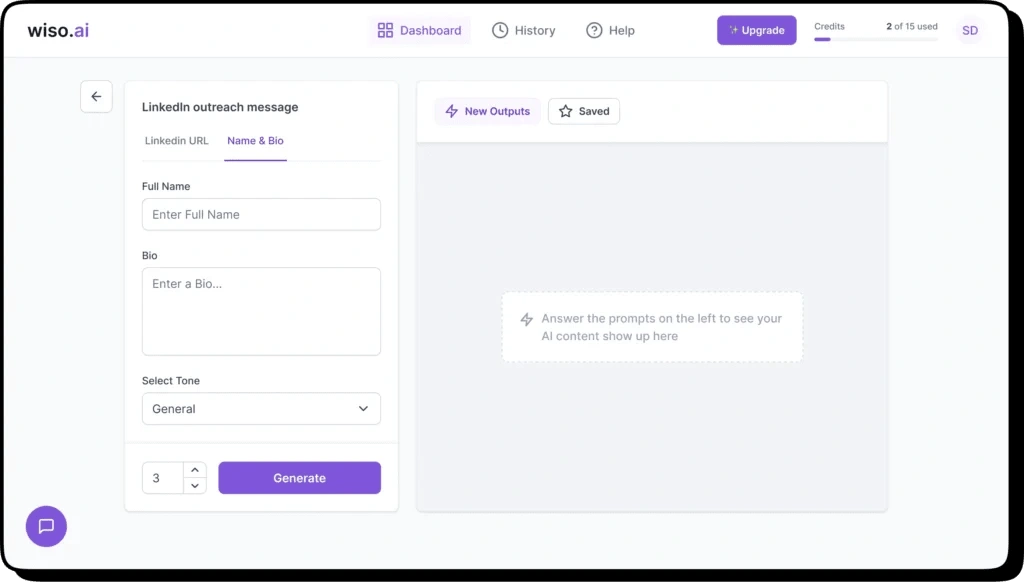
Content Writing Page
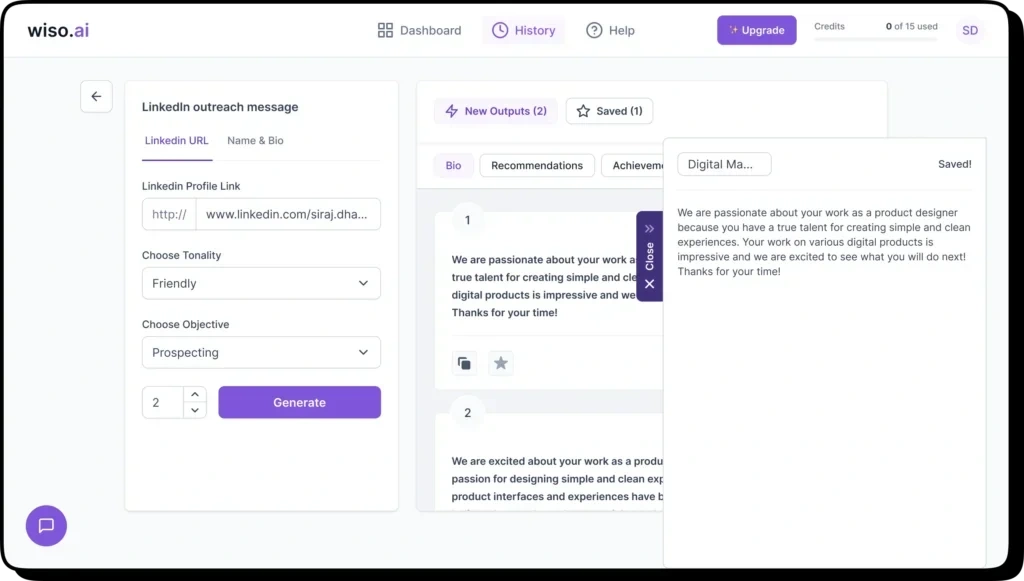
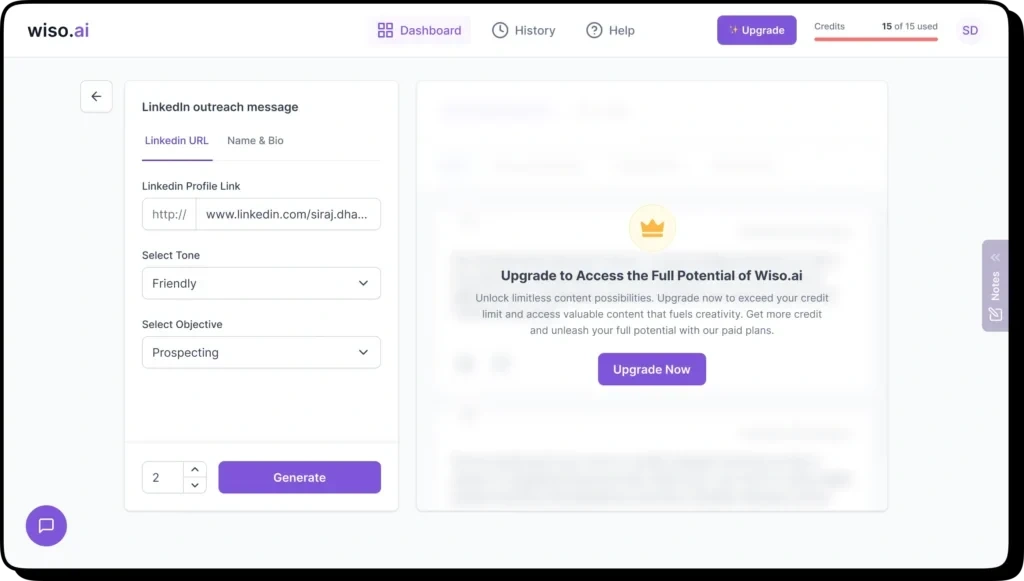
When a user clicks on the “LinkedIn Outreach Message” card on the dashboard, it takes them to the core of our content writing capabilities.
User Prompting
Within the content writing page, I’ve organized the design into two main sections: “Prompting” and “Output.” Let’s focus on the “Prompting” part, where users provide the necessary details. We will request specific information from the user based on the content writing card they’ve selected.

Linkedin URL
In this instance, the user has chosen the “LinkedIn Outreach Message” card. For this service, we offer two options: “LinkedIn URL” and “Name & Bio.” Let’s delve into the “LinkedIn URL” section. This is designed for users who have the LinkedIn profile URL of the potential prospect to whom they intend to send a LinkedIn connection request message.
We will ask for the LinkedIn profile URL, tonality, and objective. By gathering these details, wiso.ai will take care of all the background work. It will navigate to the provided LinkedIn profile and extract additional information such as the bio, Recommendations, Achievements and Recent Posts.
This approach ensures that the generated content is highly personalized and eliminates the need for users to manually check these details.
Name & Bio
Alternatively, in the “Name & Bio” section, users have the option to manually input details such as the name, bio, and tone if they prefer not to share a profile link. In this case, since the user hasn’t provided a profile link, wiso.ai will not delve deeper into profile Bio, Recommendations, Achievements and Recent Posts. Instead, wiso.ai will generate content based on the bio provided.
Output
Beside to the prompting container, I have incorporated an output container to the right. After users select the number of outputs they desire and click “generate,” wiso.ai swiftly generates the content, and these outputs are presented in this section. If users have chosen the LinkedIn URL method in the prompting stage, the outputs generated by wiso.ai will be categorized based on factors such as the individual’s bio, Recommendations, Achievements, and Recent posts.
This categorization simplifies the process for users, allowing them to easily access different variations of content tailored to specific categories.This approach eliminates the need for manual effort on the part of the user.
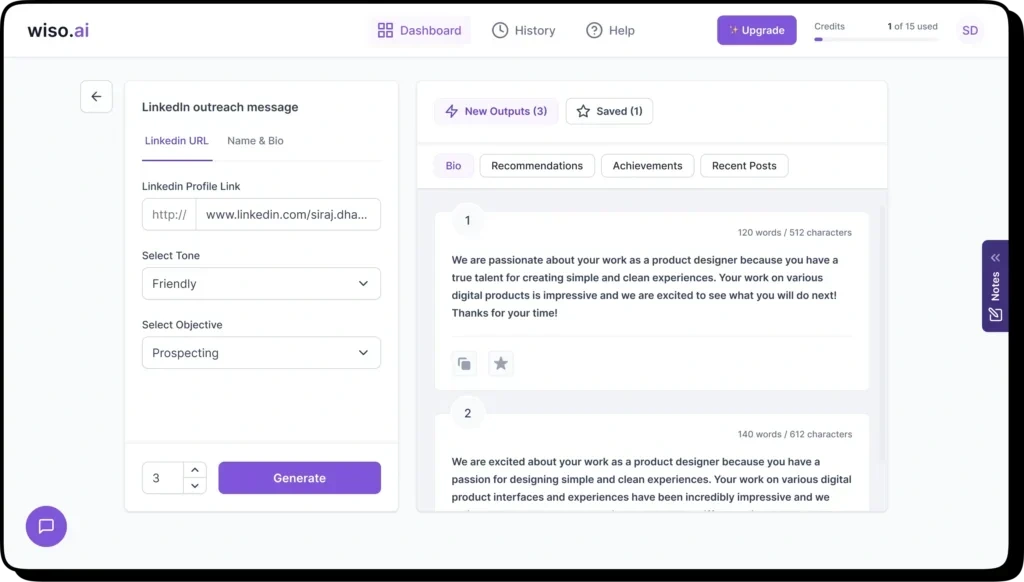
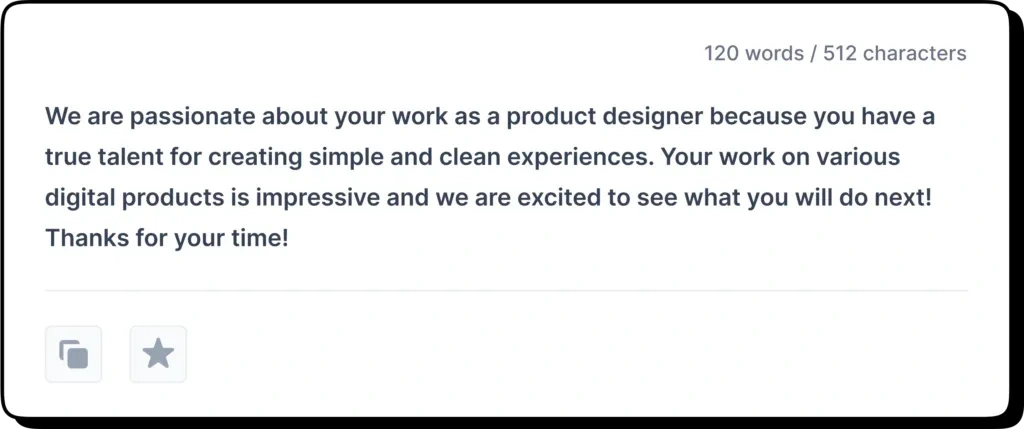
Breaking down output card
Each output card includes a number to indicate the output’s sequence, information about the work and character counts (as LinkedIn connection messages have specific limitations, wiso.ai ensures the content fits within these constraints), followed by the generated content. Below the content, users will find options to copy the output and save it for future reference.
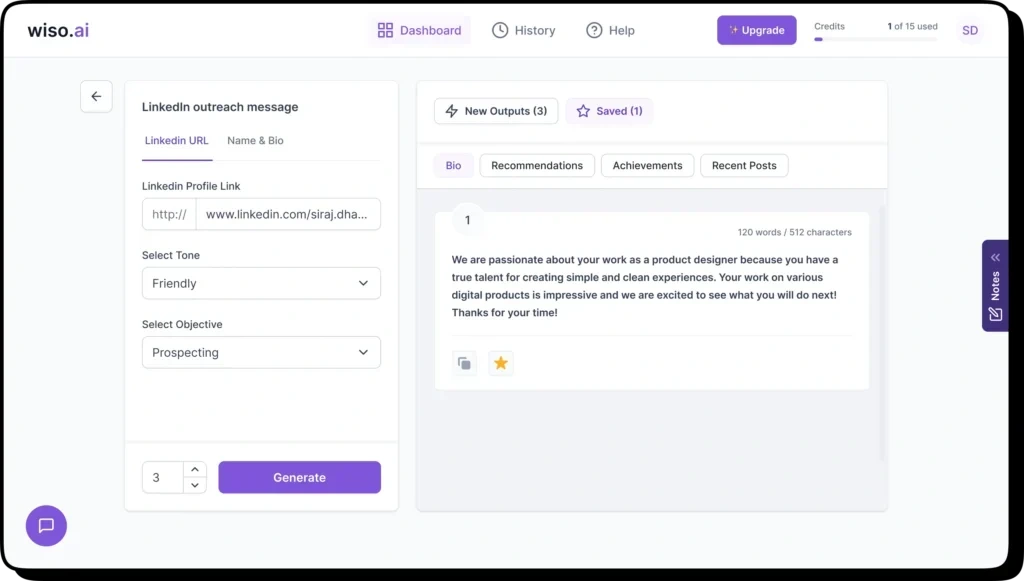
Saved Output
For outputs that users choose to save, they can easily access them in the “Saved” tab, located next to the “New Outputs” tab. Here, users can review all their saved outputs. This feature facilitates experimentation, allowing users to save relevant outputs and then use them to create a final output.
Credit Usage Impact
As soon as the user clicks the “generate” button and wiso.ai generates the outputs, one credit will be deducted from the user’s account. To provide users with clear visibility of their credit usage, I’ve decided to display this information conveniently in the top navigation. This way, users can easily track how many credits they’ve used and how many remain, allowing them to plan their usage accordingly.
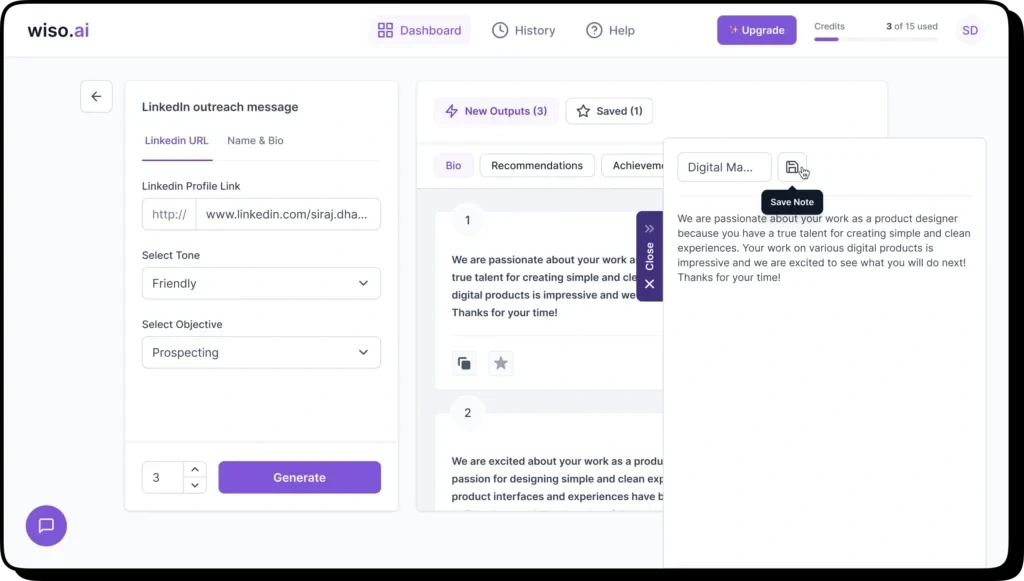
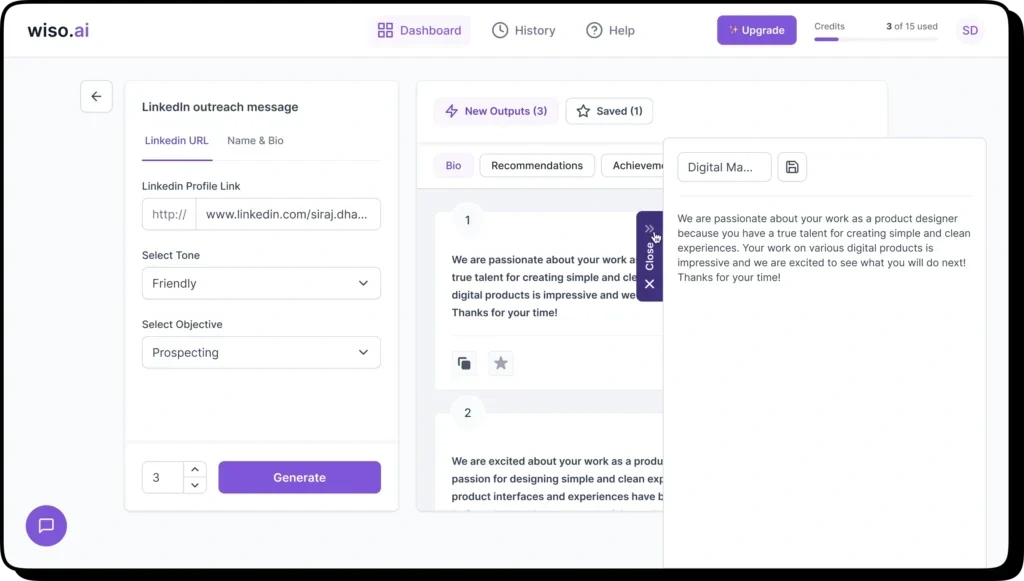
Notes Feature
In our research, we’ve given top priority to the Notes feature for the initial version of Wiso.ai. Users often copy and paste generated content into external note-taking tools for further customization. To streamline this process, we’ve integrated a Notes feature directly within Wiso.ai, making content customization more efficient.
This feature acts as a creative playground for users, allowing them to copy different outputs and experiment with content elements to craft unique and engaging messages.
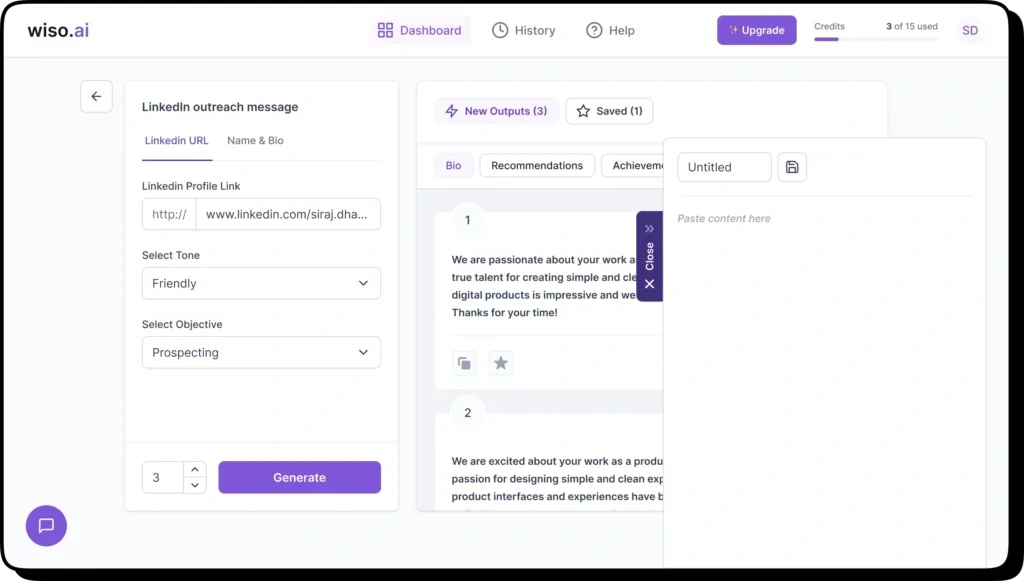
We recognize that users may want to save their work at various stages of the creative process. Our Notes feature offers both auto-saving and manual saving options. Auto-saving ensures that no progress is lost, while manual saving allows users to decide when to preserve their notes, providing flexibility and peace of mind.

History
As we’ve seen before, users can utilize the Notes feature to duplicate different outputs and tailor them to their specific requirements. The subsequent action is to preserve these customized notes, which are readily available within the History section. This area functions as a storage place for all saved notes, guaranteeing that users can effortlessly retrieve and reuse their personalized content whenever they require it.
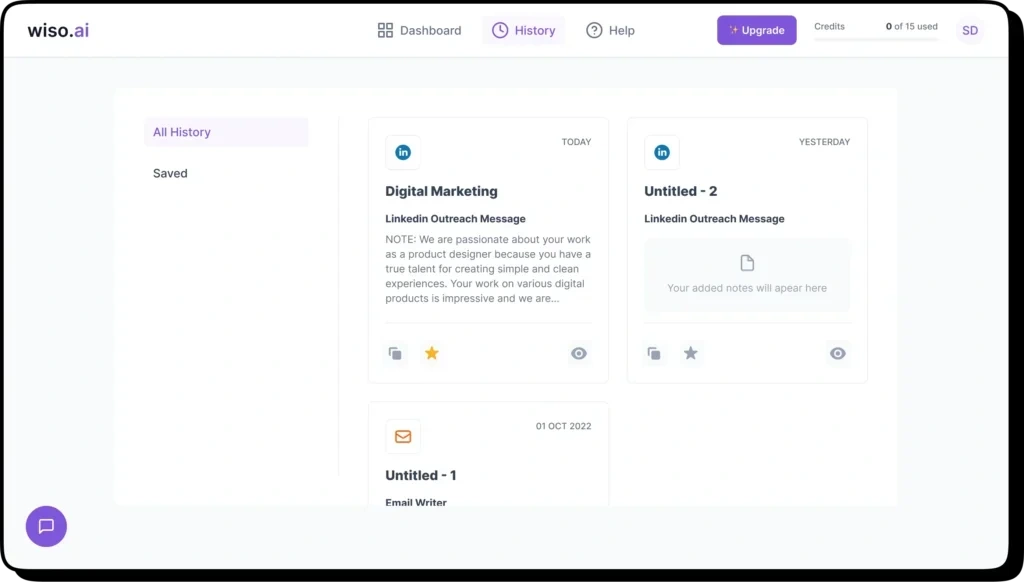
Breaking down card
When it comes to the history card, we’ve included some key elements for enhanced usability:
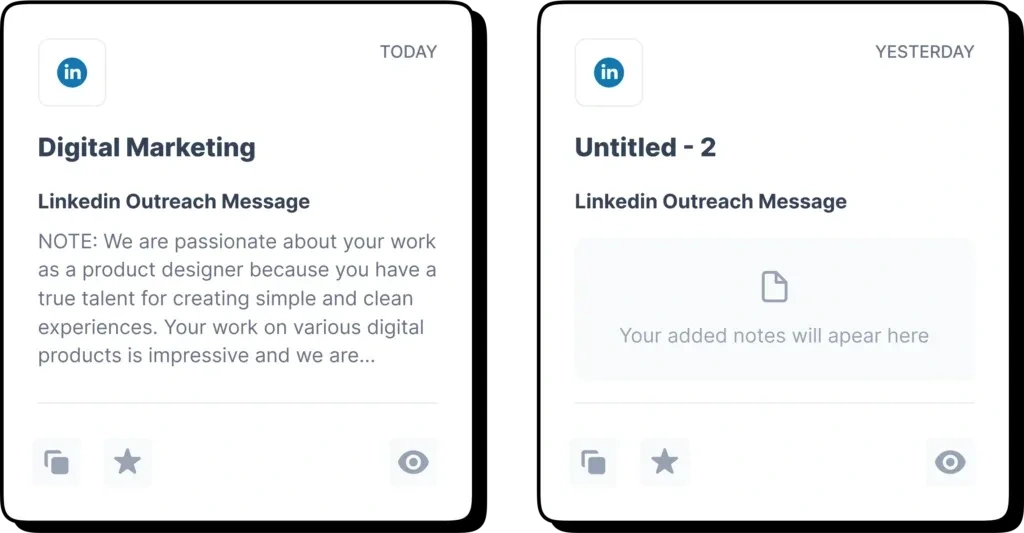
Icon and Service Name: I’ve added an icon representing the content writing service feature and its name. This allows users to quickly identify the service under which a particular note is saved.
Custom Naming: Users have the ability to assign custom names to their saved notes. This custom naming is displayed on the card, making it easier for users to find the specific note they’re looking for.
Date and Time Stamp: To provide context, we include a date and time stamp on each card. This informs users when the note was most recently edited, helping them locate the card they need more efficiently.
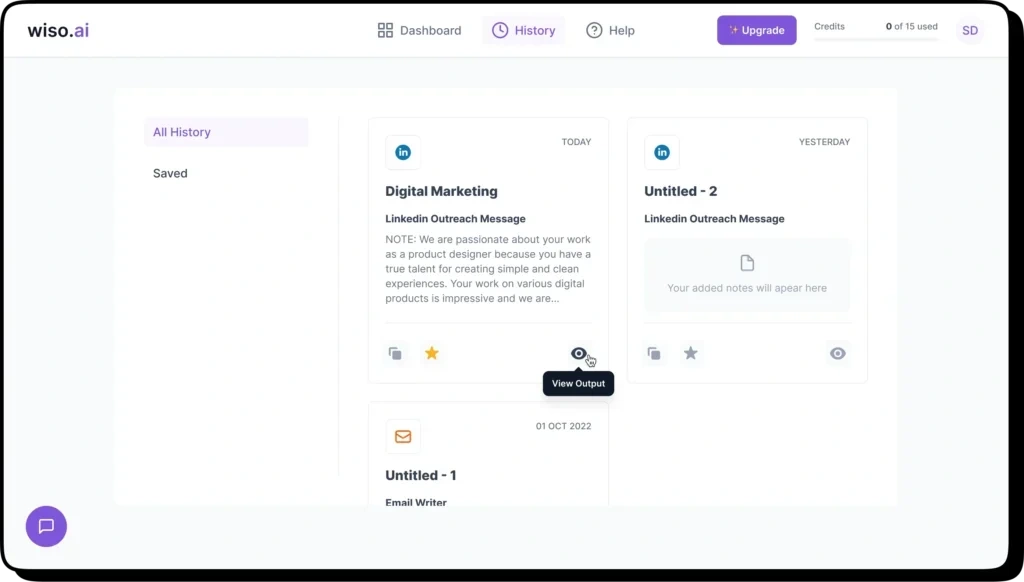
Actions: Each card provides three action options:
1. Copy: Users can copy the content from the note directly from the card.
2. Save: This option allows users to save the note for future reference.
3. View: Clicking the view icon redirects users to the notes section where they can continue working on the note from where they left off.
Empty State: If a note was saved without any content, we display an empty state message. This message educates the user that by adding content to their notes, they’ll see it here. It serves as a gentle nudge to encourage users to click and add the content as needed.
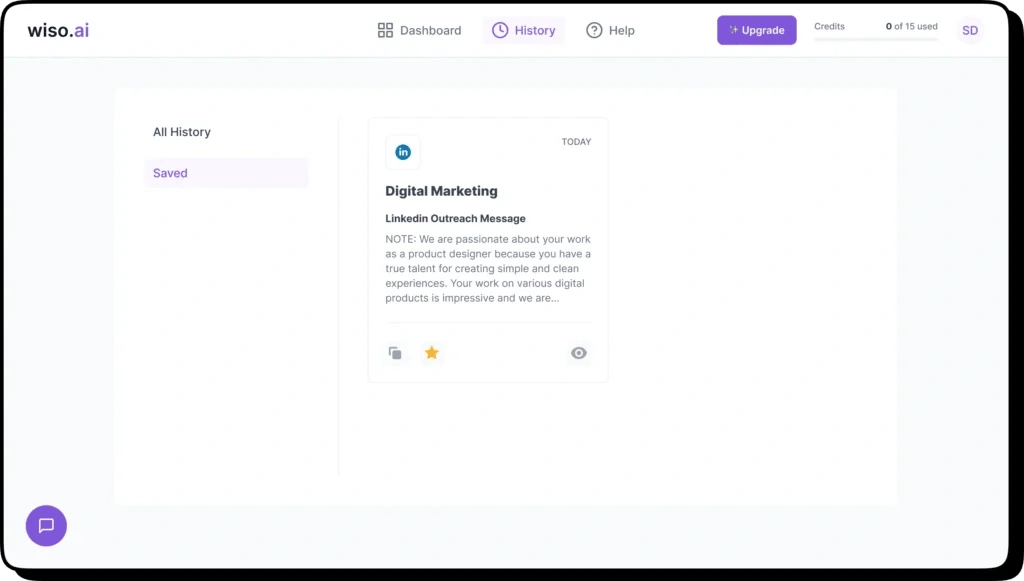
Saved History
In the history cards, we’ve provided users with the option to save notes that they wish to retain for future reference. By selecting the “save” option on a specific note, users can add it to their saved history. When users click on the “Saved” tab, they can conveniently access a comprehensive list of all the notes they’ve saved. This tab serves as a centralized location for users to easily locate and review their saved notes, ensuring that they can efficiently manage and reuse their personalized content as needed.
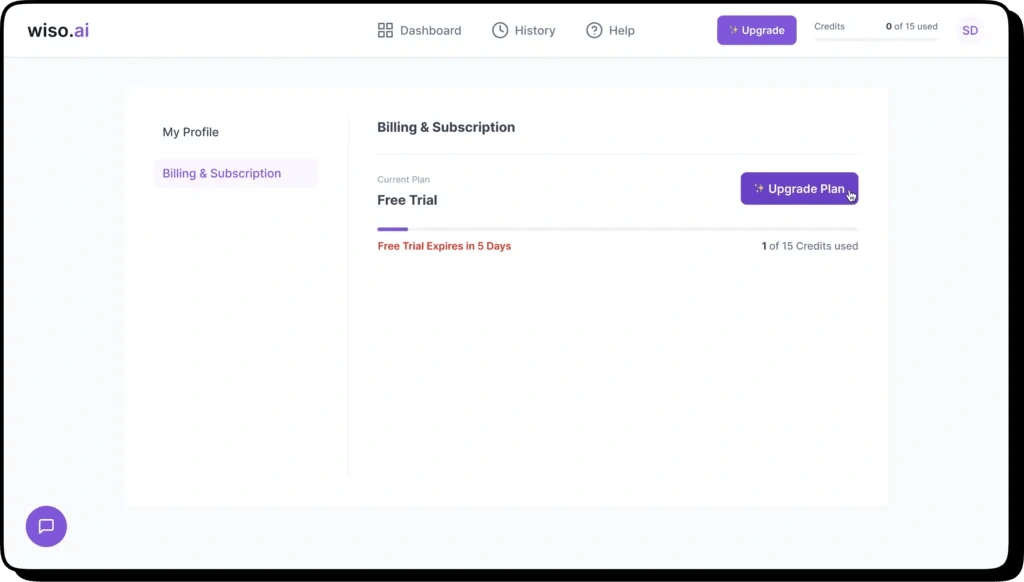
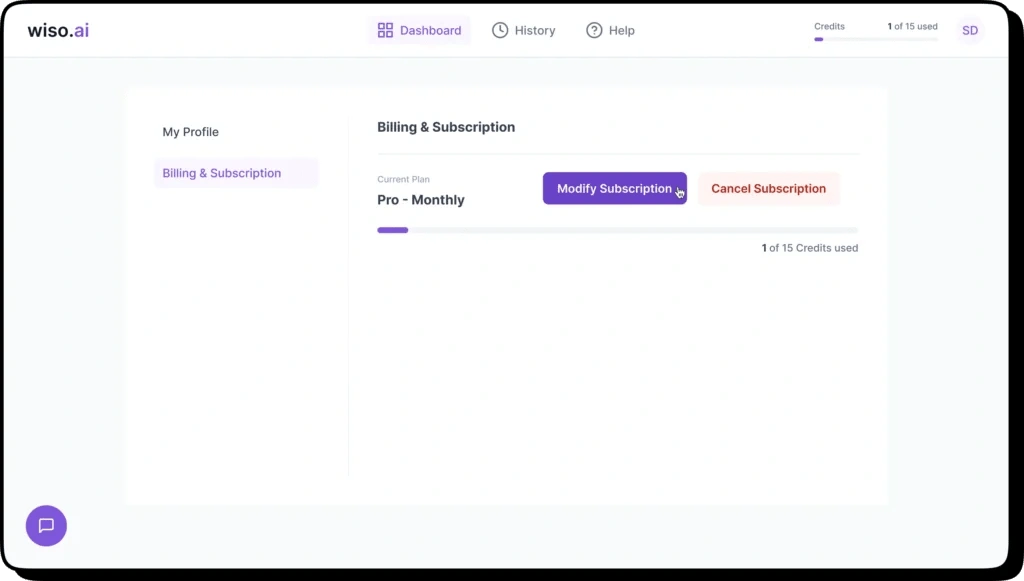
Billing & Subscription
When a user clicks on the profile icon in the top navigation and selects “Billing & Subscription” from the menu, they will be directed to this screen. Here, we provide users with an overview of their current subscription plan details.
Free Trial Plan
During the free trial period, I’ve designed this screen to provide users with relevant information:
Current Plan: The text “Free Trial” is displayed to indicate that the user is currently on the free trial plan.
Upgrade Button: To make it easy for users to upgrade to the paid plan at any point during the free trial, I’ve included a prominent “Upgrade” button.
Days Left in Free Trial: A brief message informs users about the number of days remaining in their free trial. This creates awareness and encourages users to consider upgrading as their trial period nears its end.
Credit Usage: We display information about the credit usage, indicating how many credits have been used and how many are still available. To enhance user understanding, I’ve included a progress bar that visually represents the credit usage, making it easier for users to track their consumption. This progress bar simplifies the process, allowing users to quickly assess their credit usage without the need for extensive analysis.
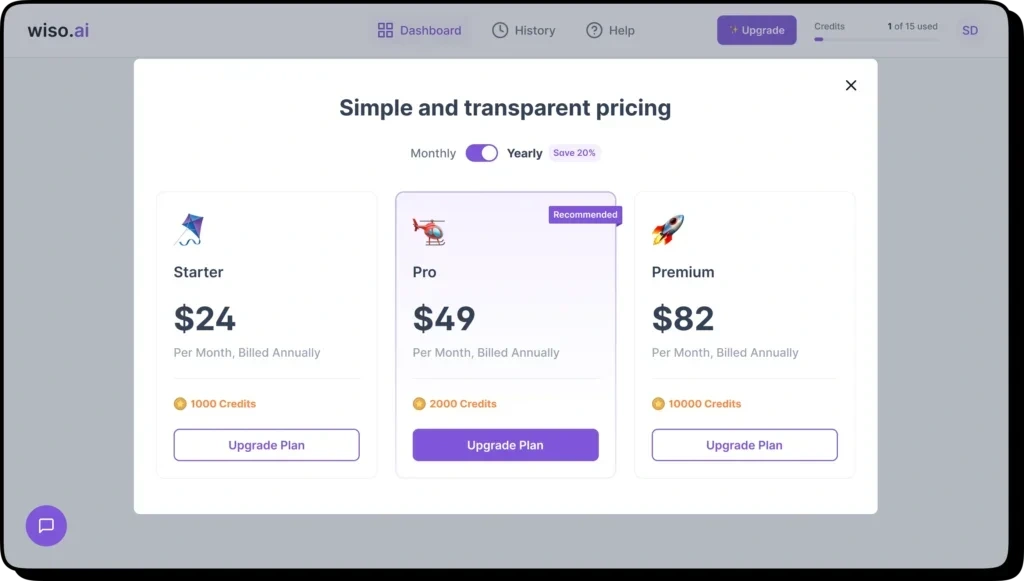
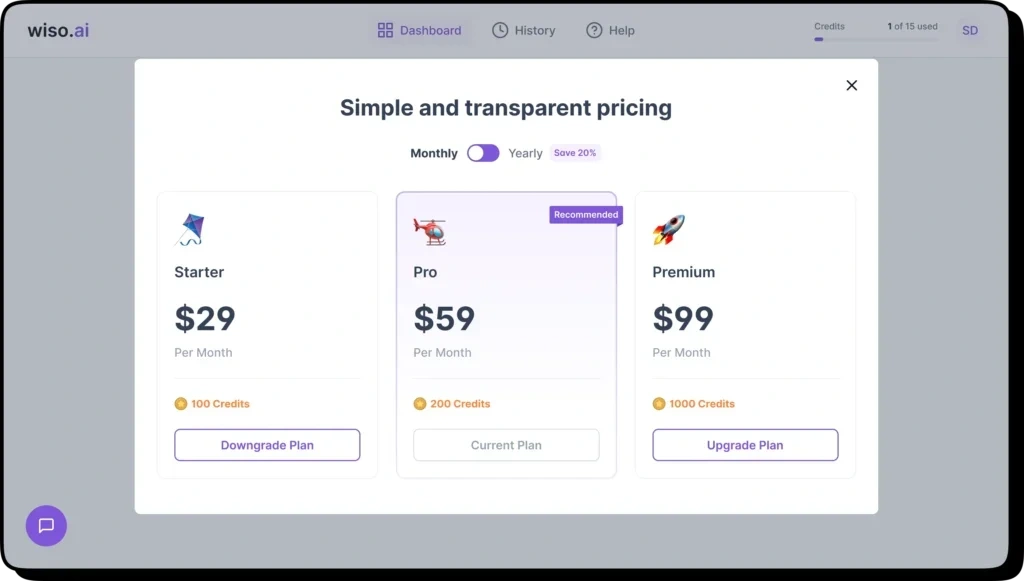
Plans Modal
Once user clicks on upgrade CTA, we will be opening the pricing plans modal directly. Under this modal, we will be showing plans and duration toggle, user can switch between monthly and yearly plans and if user goes with yearly plan, we will be giving 20% discount on the yearly plans.
Under the plan cards as well, we will be showing the recommended plan as a highlighted plan, and inside the plan cards we will be showing plan name, amount, duration and credits provided. basically plan cards are super simple and clutter free.
user can select the plan that user wants to go with and we will redirect the user to stripe payment screen with total amount to pay, once user makes the payment, we will be showing the current plan details to user.
Trial Expired - Refer & Earn Banner
When a user is on the free plan and has exhausted all available credits but still has a few free trial days remaining, at that stage, we’ve have decided to display a banner.
This banner promotes our “Refer & Earn” program, allowing users to refer our tool to friends and family. Both the referrer and the new user signing up for Wiso.ai through the referral will earn credits.
Additionally, we offer credits to users who provide ratings on platforms like G2 and Capterra. On top of all this, users will also receive credits for booking a call with us. This is crucial for us to gain insights into the types of users we are attracting and the challenges they are facing, which led them to choose our product.
Restriction
When a user has exhausted all available credits and their free trial period has ended, attempting to generate content will still allow them to input the details and click the generate button. However, upon clicking the generate button, the generated outputs will be displayed in a blurred-out fashion. Simultaneously, we will gently prompt the user to upgrade to the paid plan. This combined approach serves as a subtle nudge, encouraging users to take immediate action if they are serious about accessing the generated outputs. Additionally, during this period, we will disable the Notes UI as the trial has expired.
Paid Plan
In the paid plan details section, for the current plan, we will display the name of the paid plan and the selected duration (e.g., monthly or yearly). Other elements will remain consistent with what we discussed in the free trial current plan card. The data presented will vary based on the plan selection.
Instead of the “Upgrade” CTA, I decided to replace it with more relevant options for users on the paid plan, such as “Modify Plan” and “Cancel Plan.” This ensures that users have access to actions that align with their paid subscription status.
Modify Subscription
If a user selects the “Modify Subscription” CTA, we will open the modal once again, but with a slight adjustment in CTAs:
The current plan card will feature the “Current Plan” CTA.
Previous plans will include the “Downgrade Plan” CTA, allowing users to switch to a lower-tier plan if desired.
Subsequent cards will display the “Upgrade Plan” CTA, giving users the option to upgrade to a higher-tier plan.
The process remains the same: upon selecting a plan, the user will be redirected to the Stripe payment screen with the total amount to be paid clearly indicated. After the payment is successfully processed, we will guide the user back to the current plan details page. This approach ensures a straightforward and user-friendly modification of the subscription.
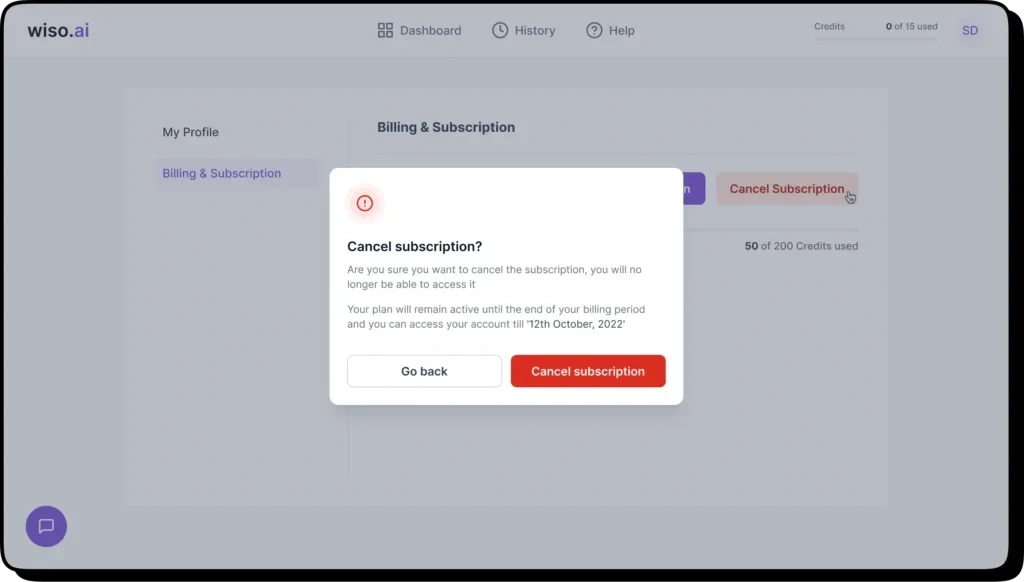
Cancel Subscription
If a user selects the “Cancel Subscription” CTA, we will initiate the following process:
Confirmation Modal: We will display a confirmation modal to confirm the user’s intent to cancel the plan. The modal will provide details about when the cancellation will take effect and other important information.
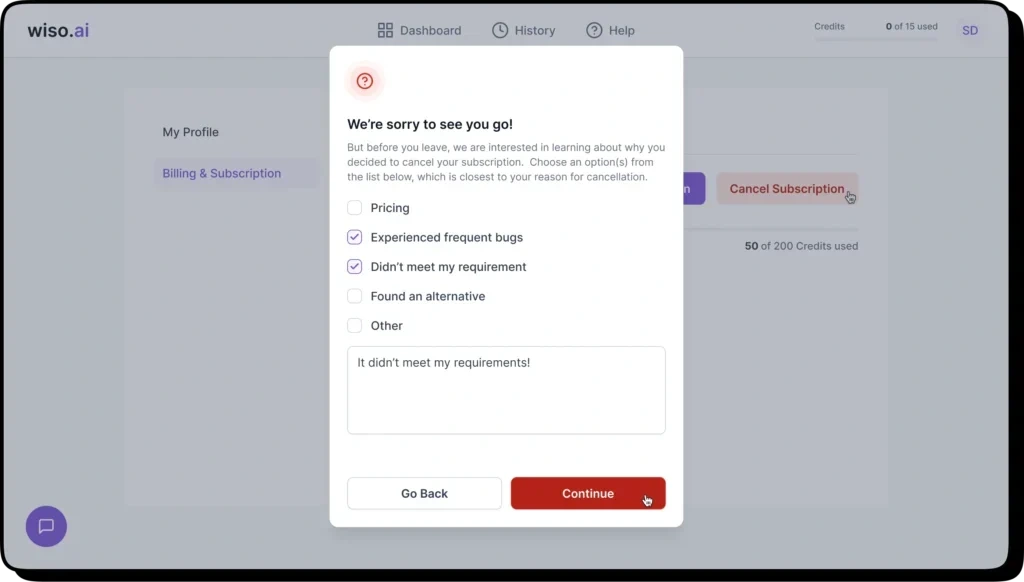
Cancellation Reasons: When the user confirms the cancellation, we will ask them to provide some information through a form. This information will help us understand why the user is canceling the plan.
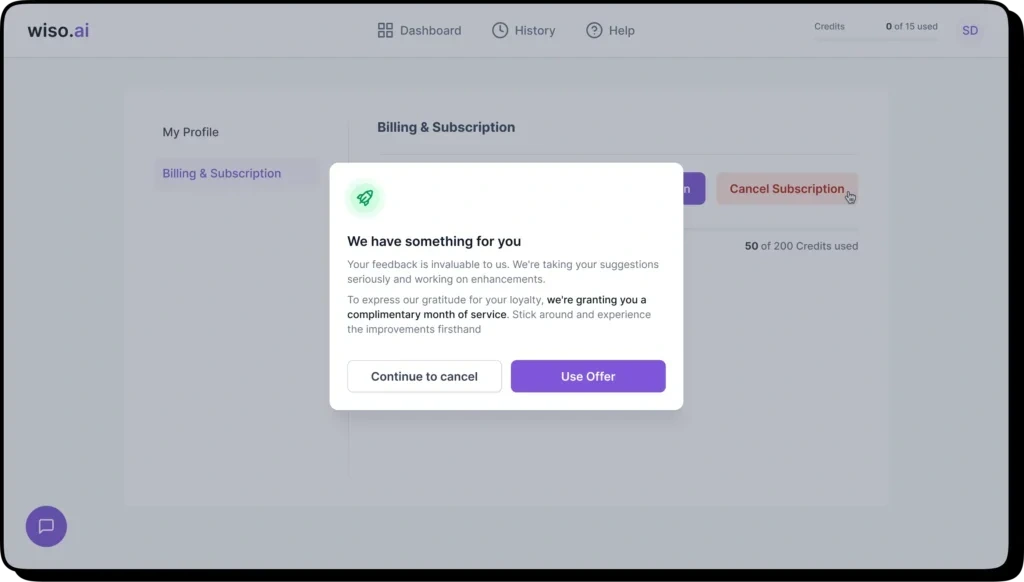
Offer Pitch: After users fill out the form to specify their reasons for canceling, if the user’s reason aligns with the criteria to receive the offer, we will present them with a compelling proposition. In such cases, we will extend an offer of one month of free service as an incentive for them to continue using our service. If the user accepts this offer, we will grant them a complimentary month of service at no cost.
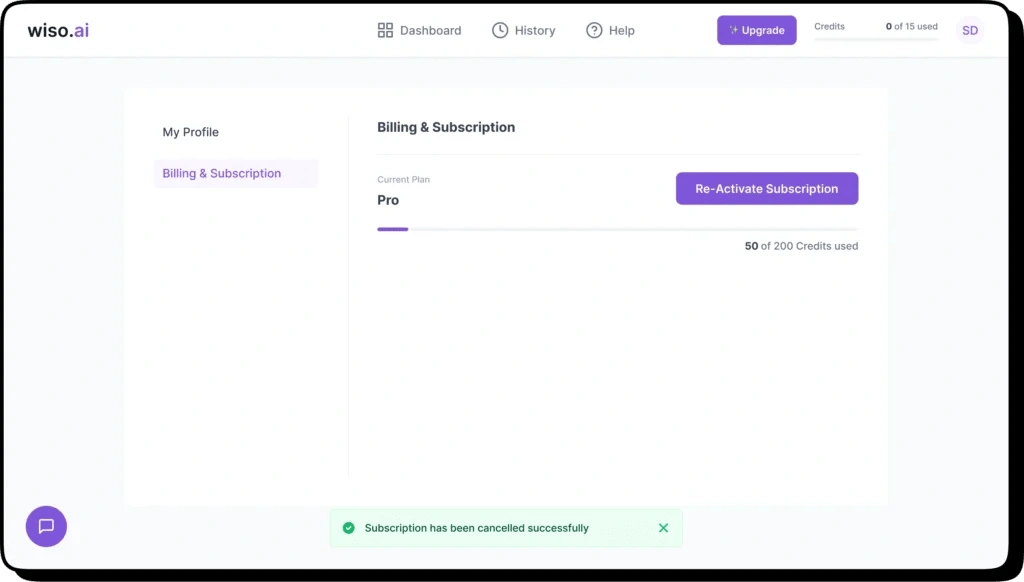
Cancellation Confirmation: If the user decides to proceed with the cancellation despite the offer, we will confirm the cancellation. In the plan details section, we will update the status to “Cancelled.” Additionally, we will provide a “Re-activate” CTA so that users can easily reactivate their plan if they change their mind in the future.
This comprehensive process ensures that users have a clear understanding of the cancellation terms, provides an opportunity to retain them with a tempting offer, and allows for a smooth reactivation process if they choose to return.
Refer & Earn
If users wish to earn additional credits and continue to benefit from our service, they can participate in our Refer & Earn program. By referring friends and family who sign up, users can earn credits. We provide clear, step-by-step instructions on how users can earn these credits, ensuring that they have complete clarity on the process.
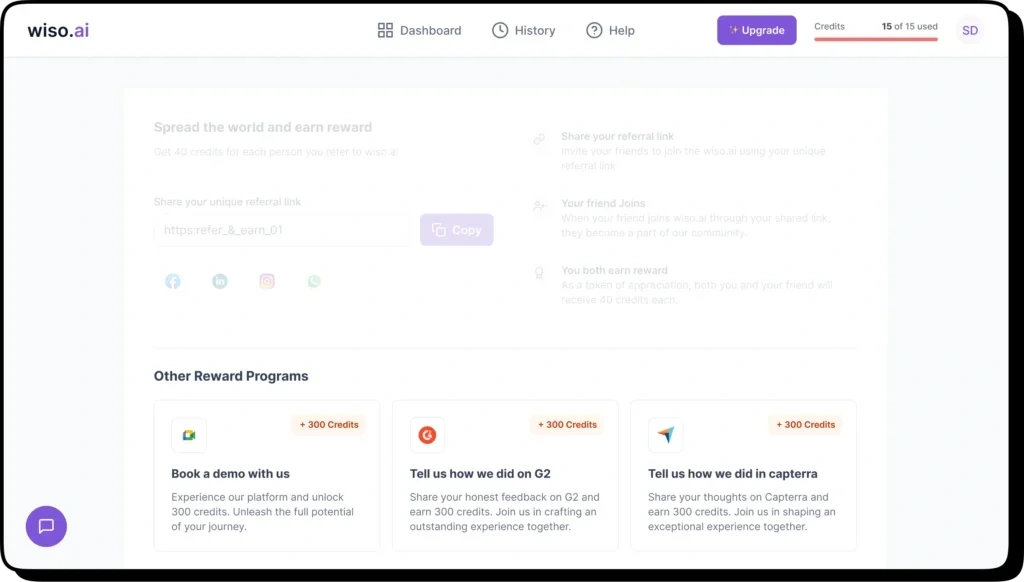
Other Reward Programs
In addition to Refer & Earn, we offer other rewarding opportunities. Users can earn 300 credits when they book a call with us, and an additional 300 credits when they share their experiences with our tool on platforms like G2 or Capterra. These minor adjustments to our initial plan make sense as they contribute to our growth by increasing our user base and enhancing our reputation.
Founders Message ❤️
I had the pleasure of working closely with Siraj Dhanani for revamping the wiso.ai, and I must say his talent as a product designer is truly remarkable. He consistently delivered impressive designs that left me in awe. I look forward to our continued collaboration in future.
— Ravi Sushmith
Like this project
Posted Dec 27, 2023
Worked closely with Wiso.AI's founder to create the MVP. Defined the style and designed both internal and external aspects—website and web app.