Cliq app: Navigating Group finance without tension

Jeremiah George


1.0. About Cliq
Cliq is an app that allows friends, family or any group of people to sort out shared contributions and spending without the social tension and awkwardness of settling debts after.
Instead of spending first and settling debts after, Cliq requires every group member to contribute their share into a collective account or "pot" in the app before any expense is made. The group can then spend from the pot, and those expenses are deducted from and tracked in real time. When the experience is over, any remaining balance is refunded equally to each member of the Pot, and any amount that was spent outside the pot, "logged expenses" are refunded too.
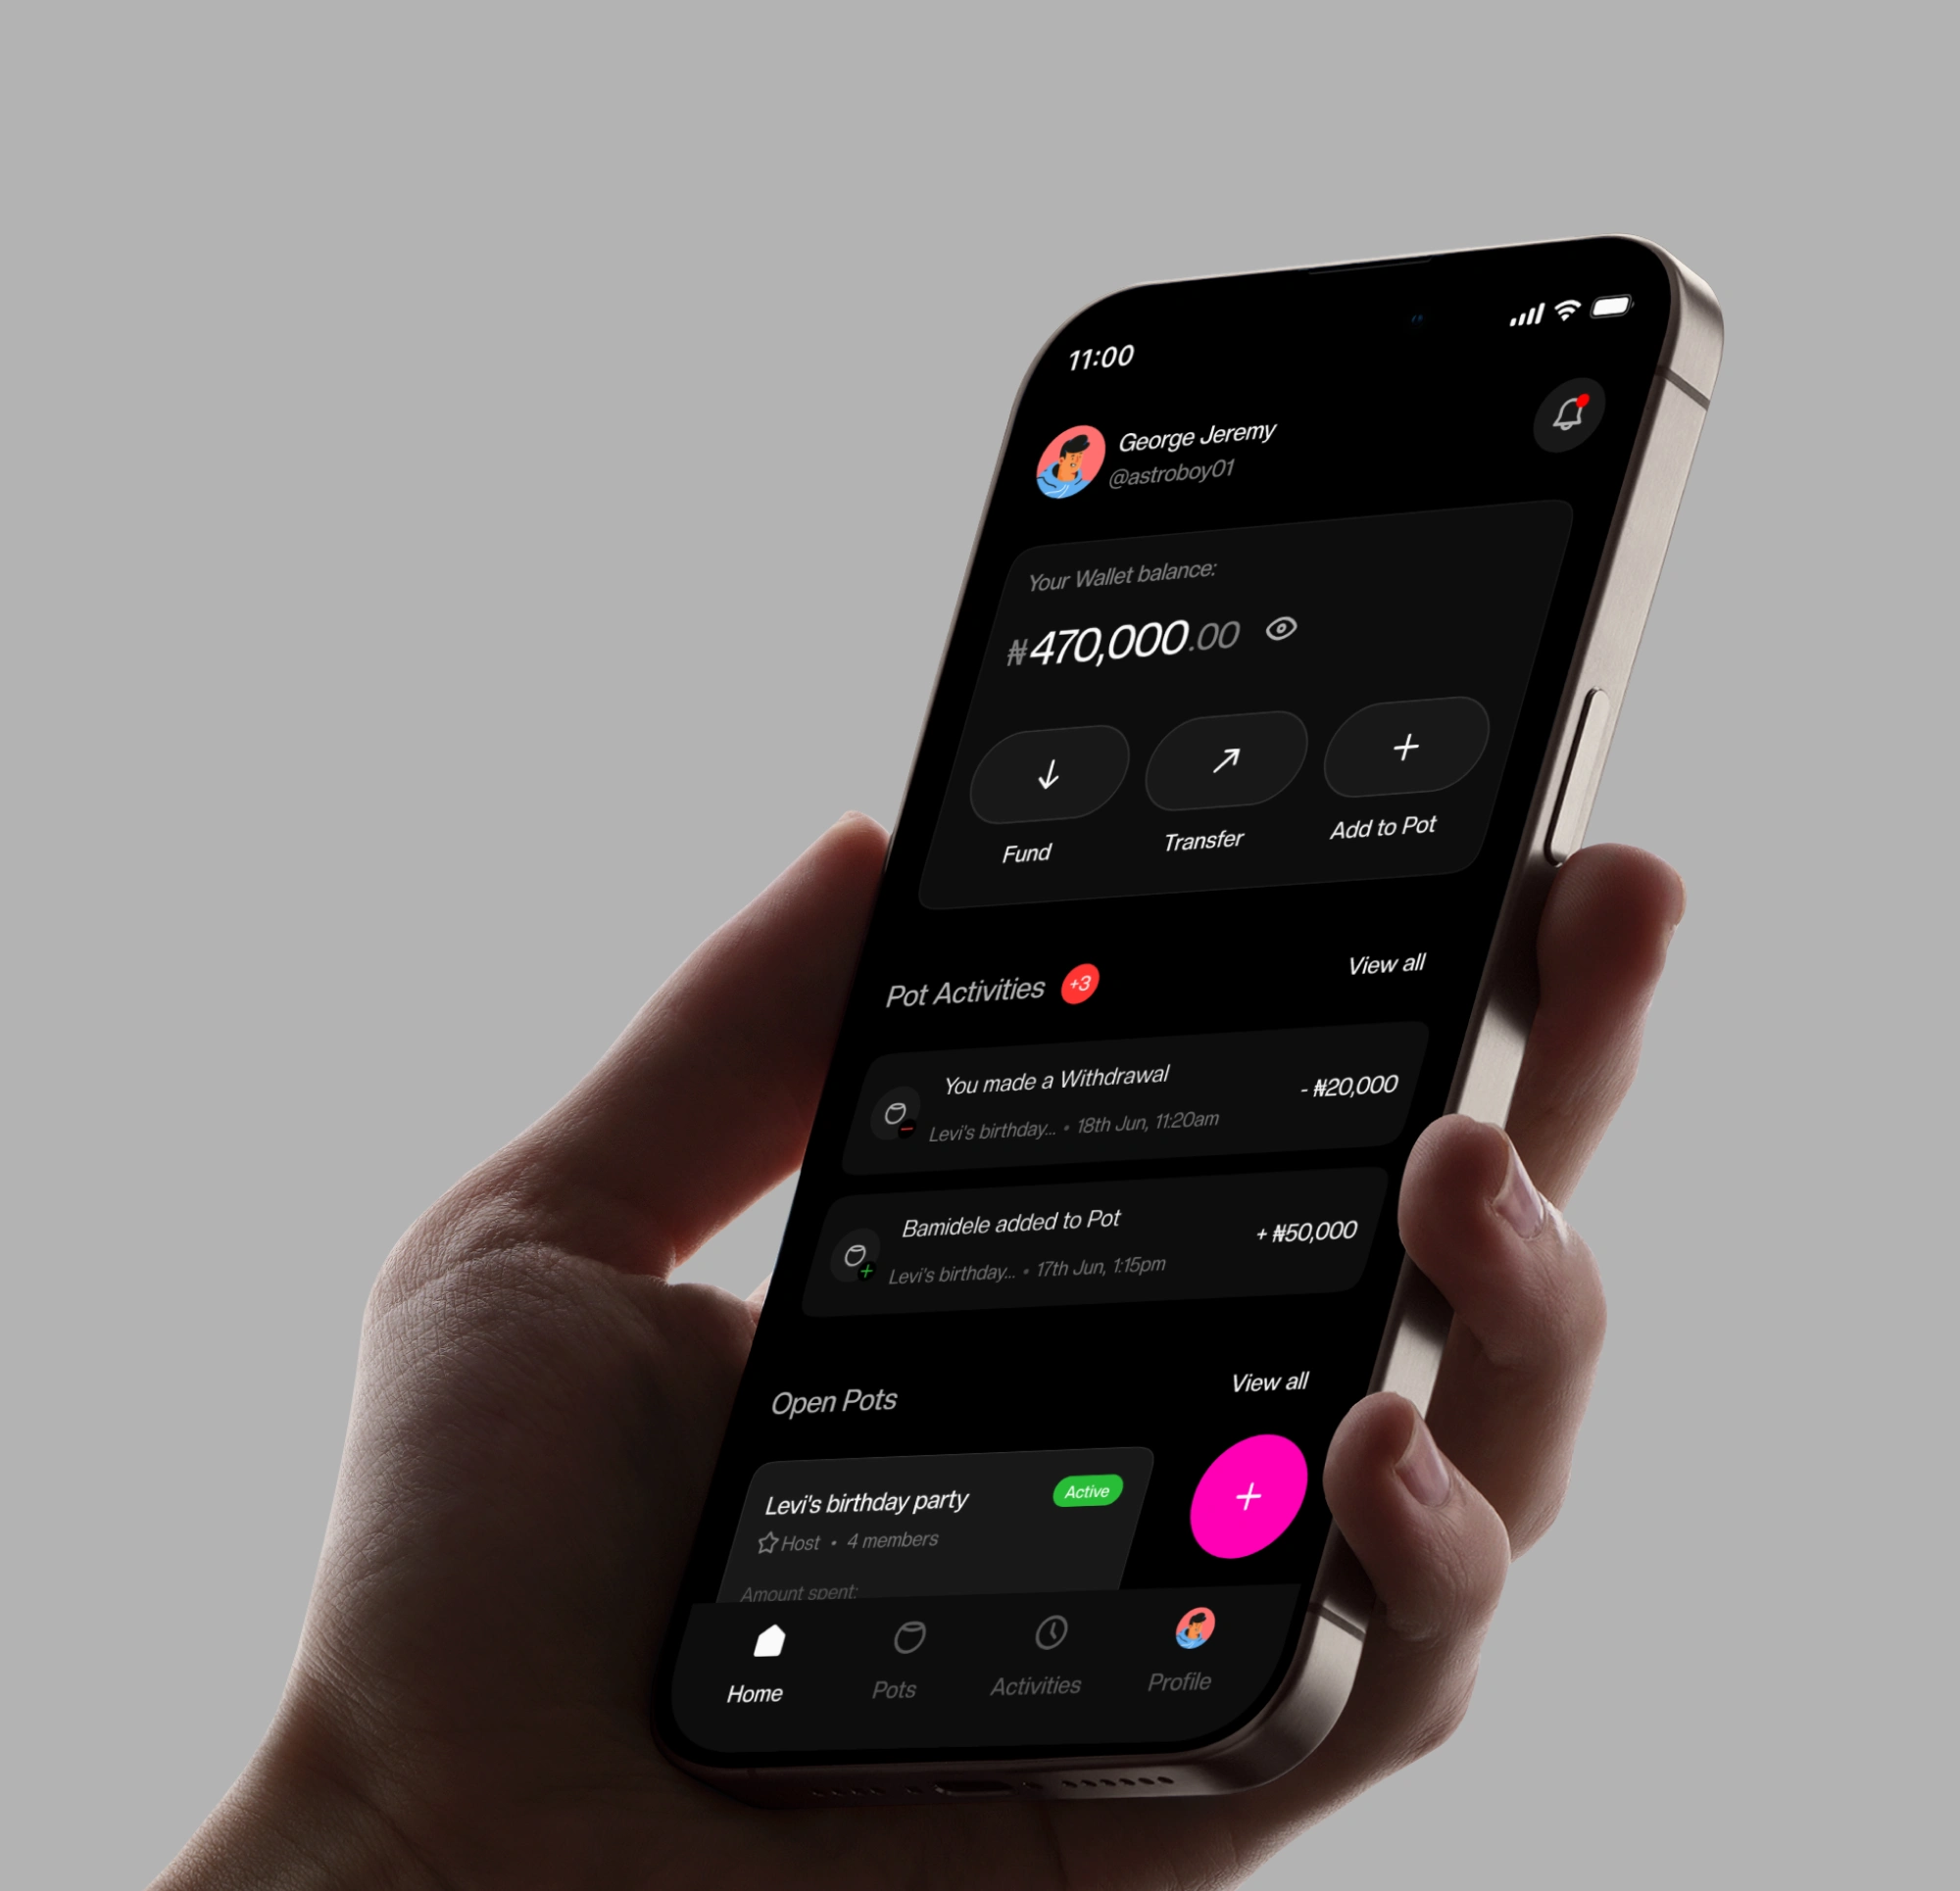
Cliq home screen in mockup
2.0. Core Flows and Decisions
Cliq is built around two core layers — a personal wallet and a collective account or "pot". Every user has a personal wallet inside the app, which can be funded from their bank account at any time. This wallet is their individual balance within the Cliq ecosystem.
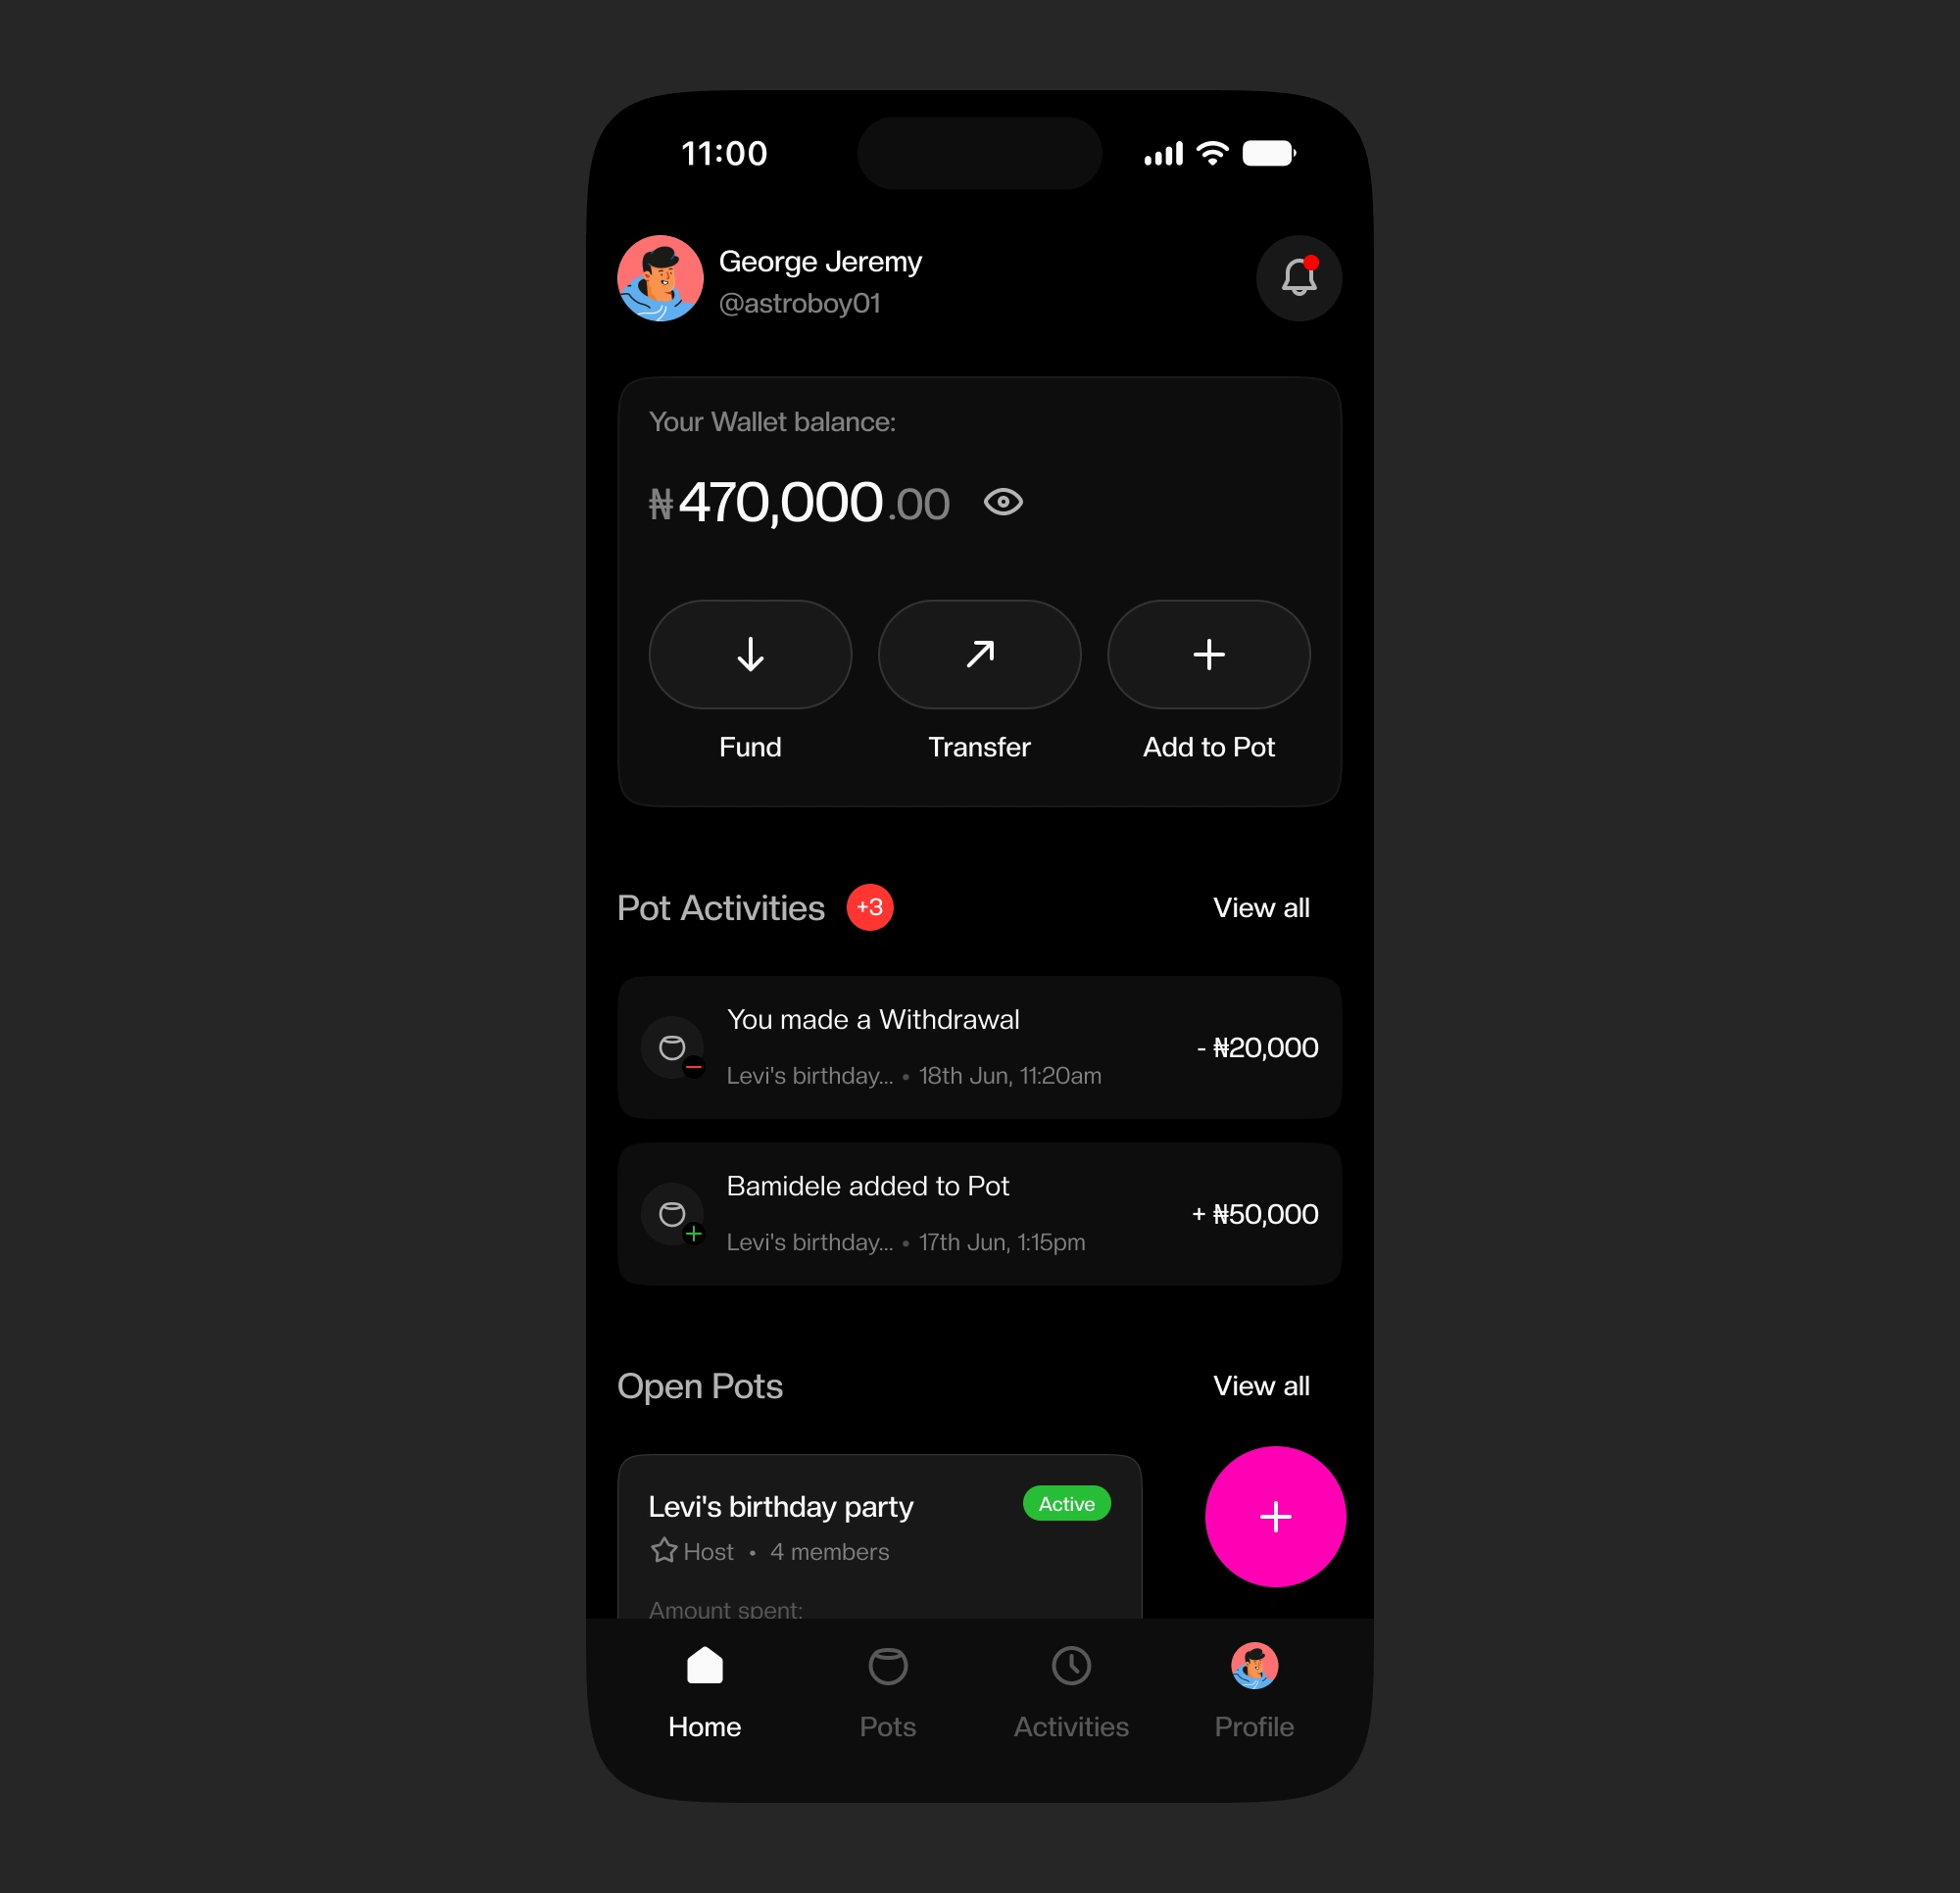
Home screen, showing personal wallet dashboard.
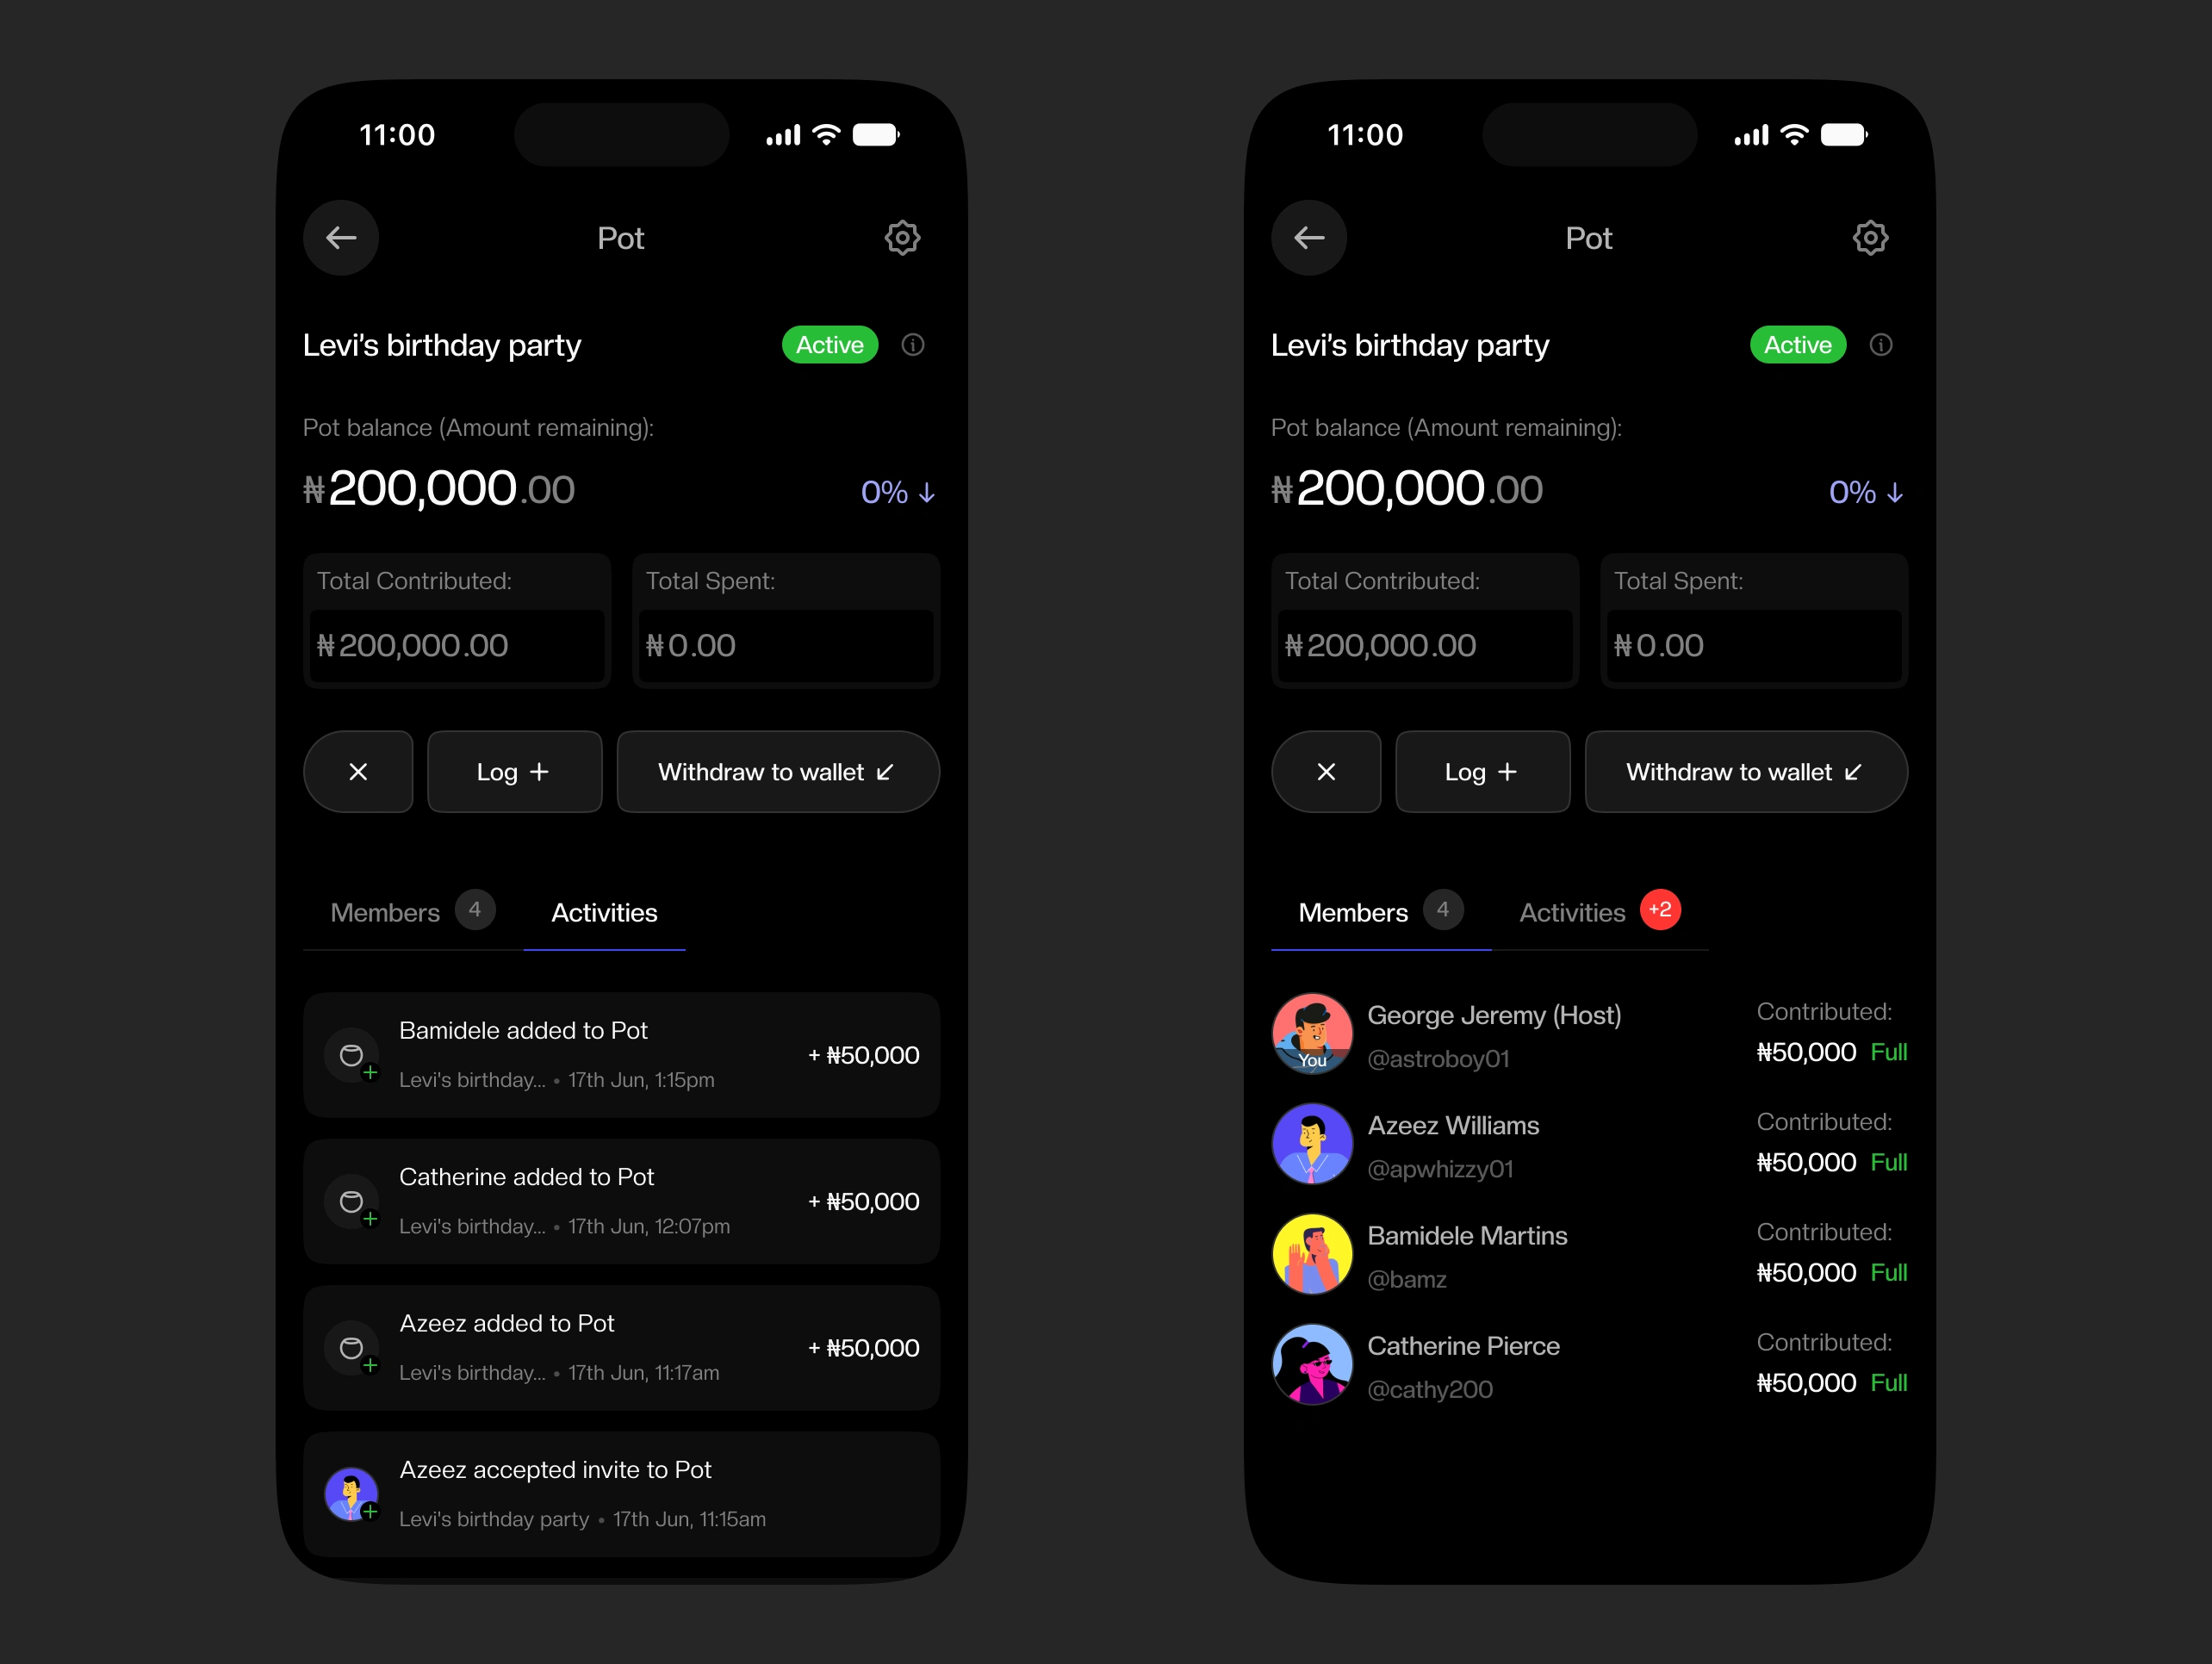
Active Pot screen, showing the activities' view (left) and the members' view (right)
2.1. Fund Wallet
From a new user’s perspective, the product experience starts with funding your internal wallet in the app.
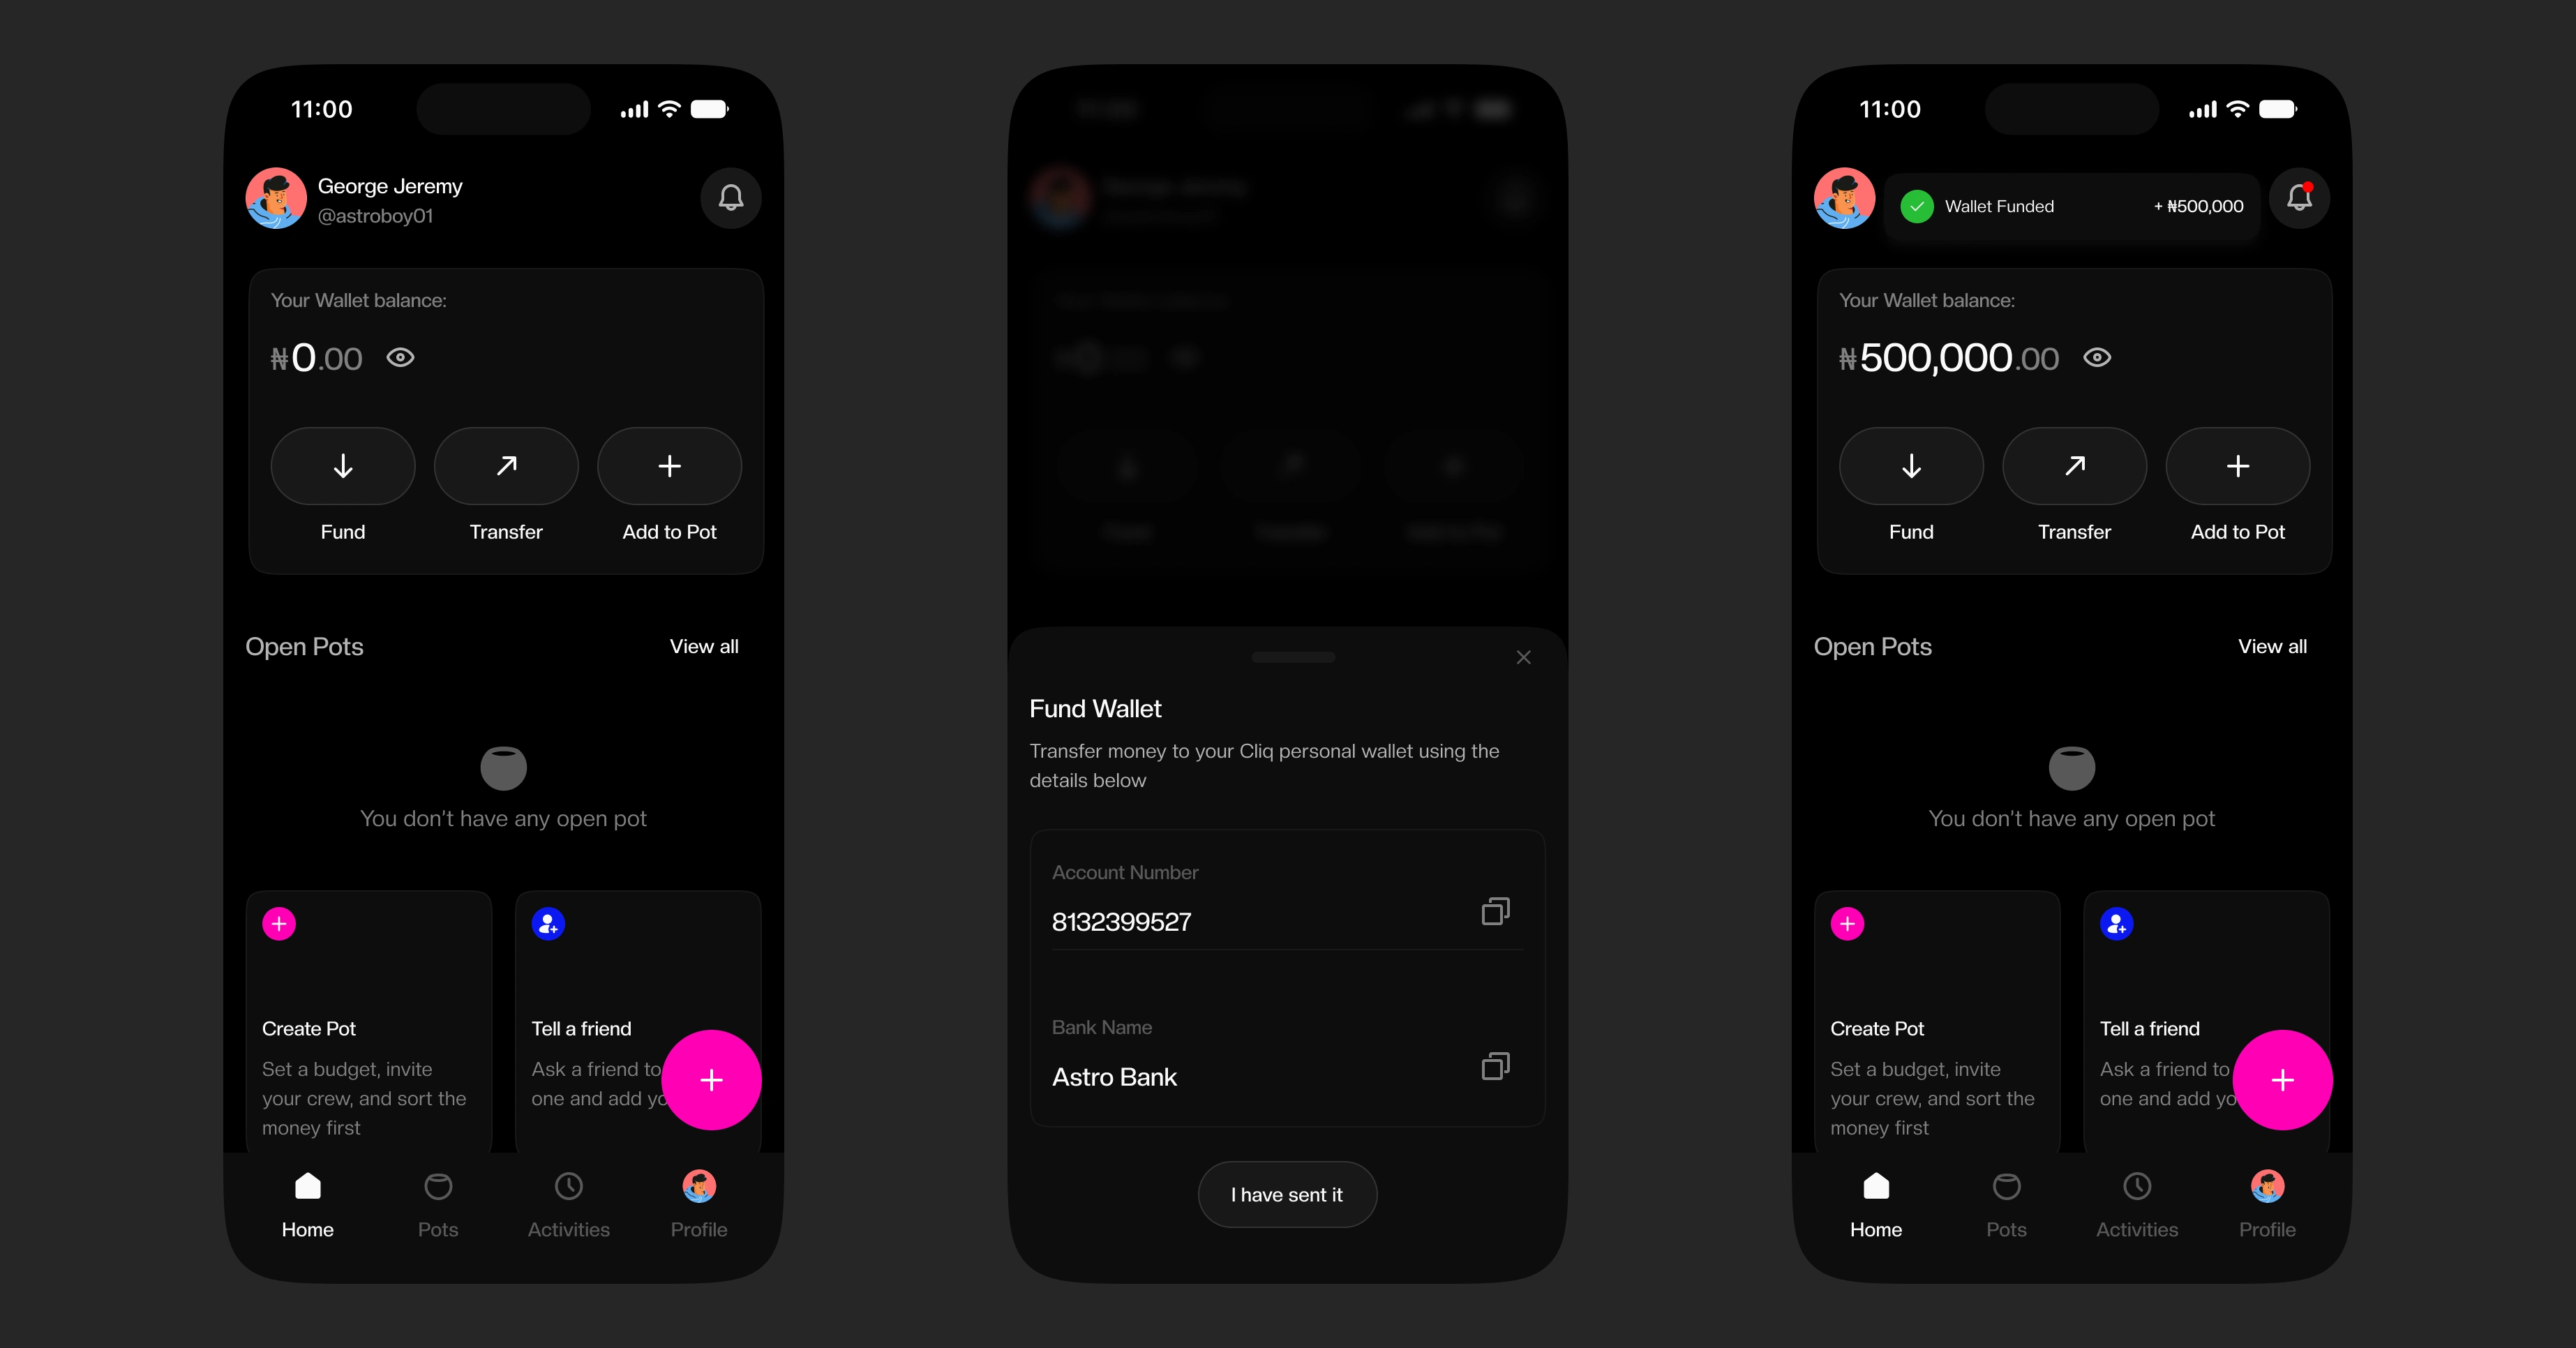
Brief "fund wallet" flow
Fund Wallet
2.2. Create Pot
This is one of the major features of the app. The Pot or “Contribution Pot”, is the collective account in the app where the contribution is collected and also spent by the group. It activates when all members in the Pot have contributed their share (which can also be set for a specific date too). In this context, activating the pot simply means the group is now ready to start spending. Before activation, the pot is in a pending state — it exists but no expenses can be logged against it yet.
When the experience ends, it is closed by the Host (the person who created the Pot). At that point, if need be, the app calculates a settlement, accounting for any remaining balance and also any expenses that the members paid out of pocket on behalf of the group. The host reviews the summary and confirms, then needed refunds are automatically sent back to each member's personal wallet.
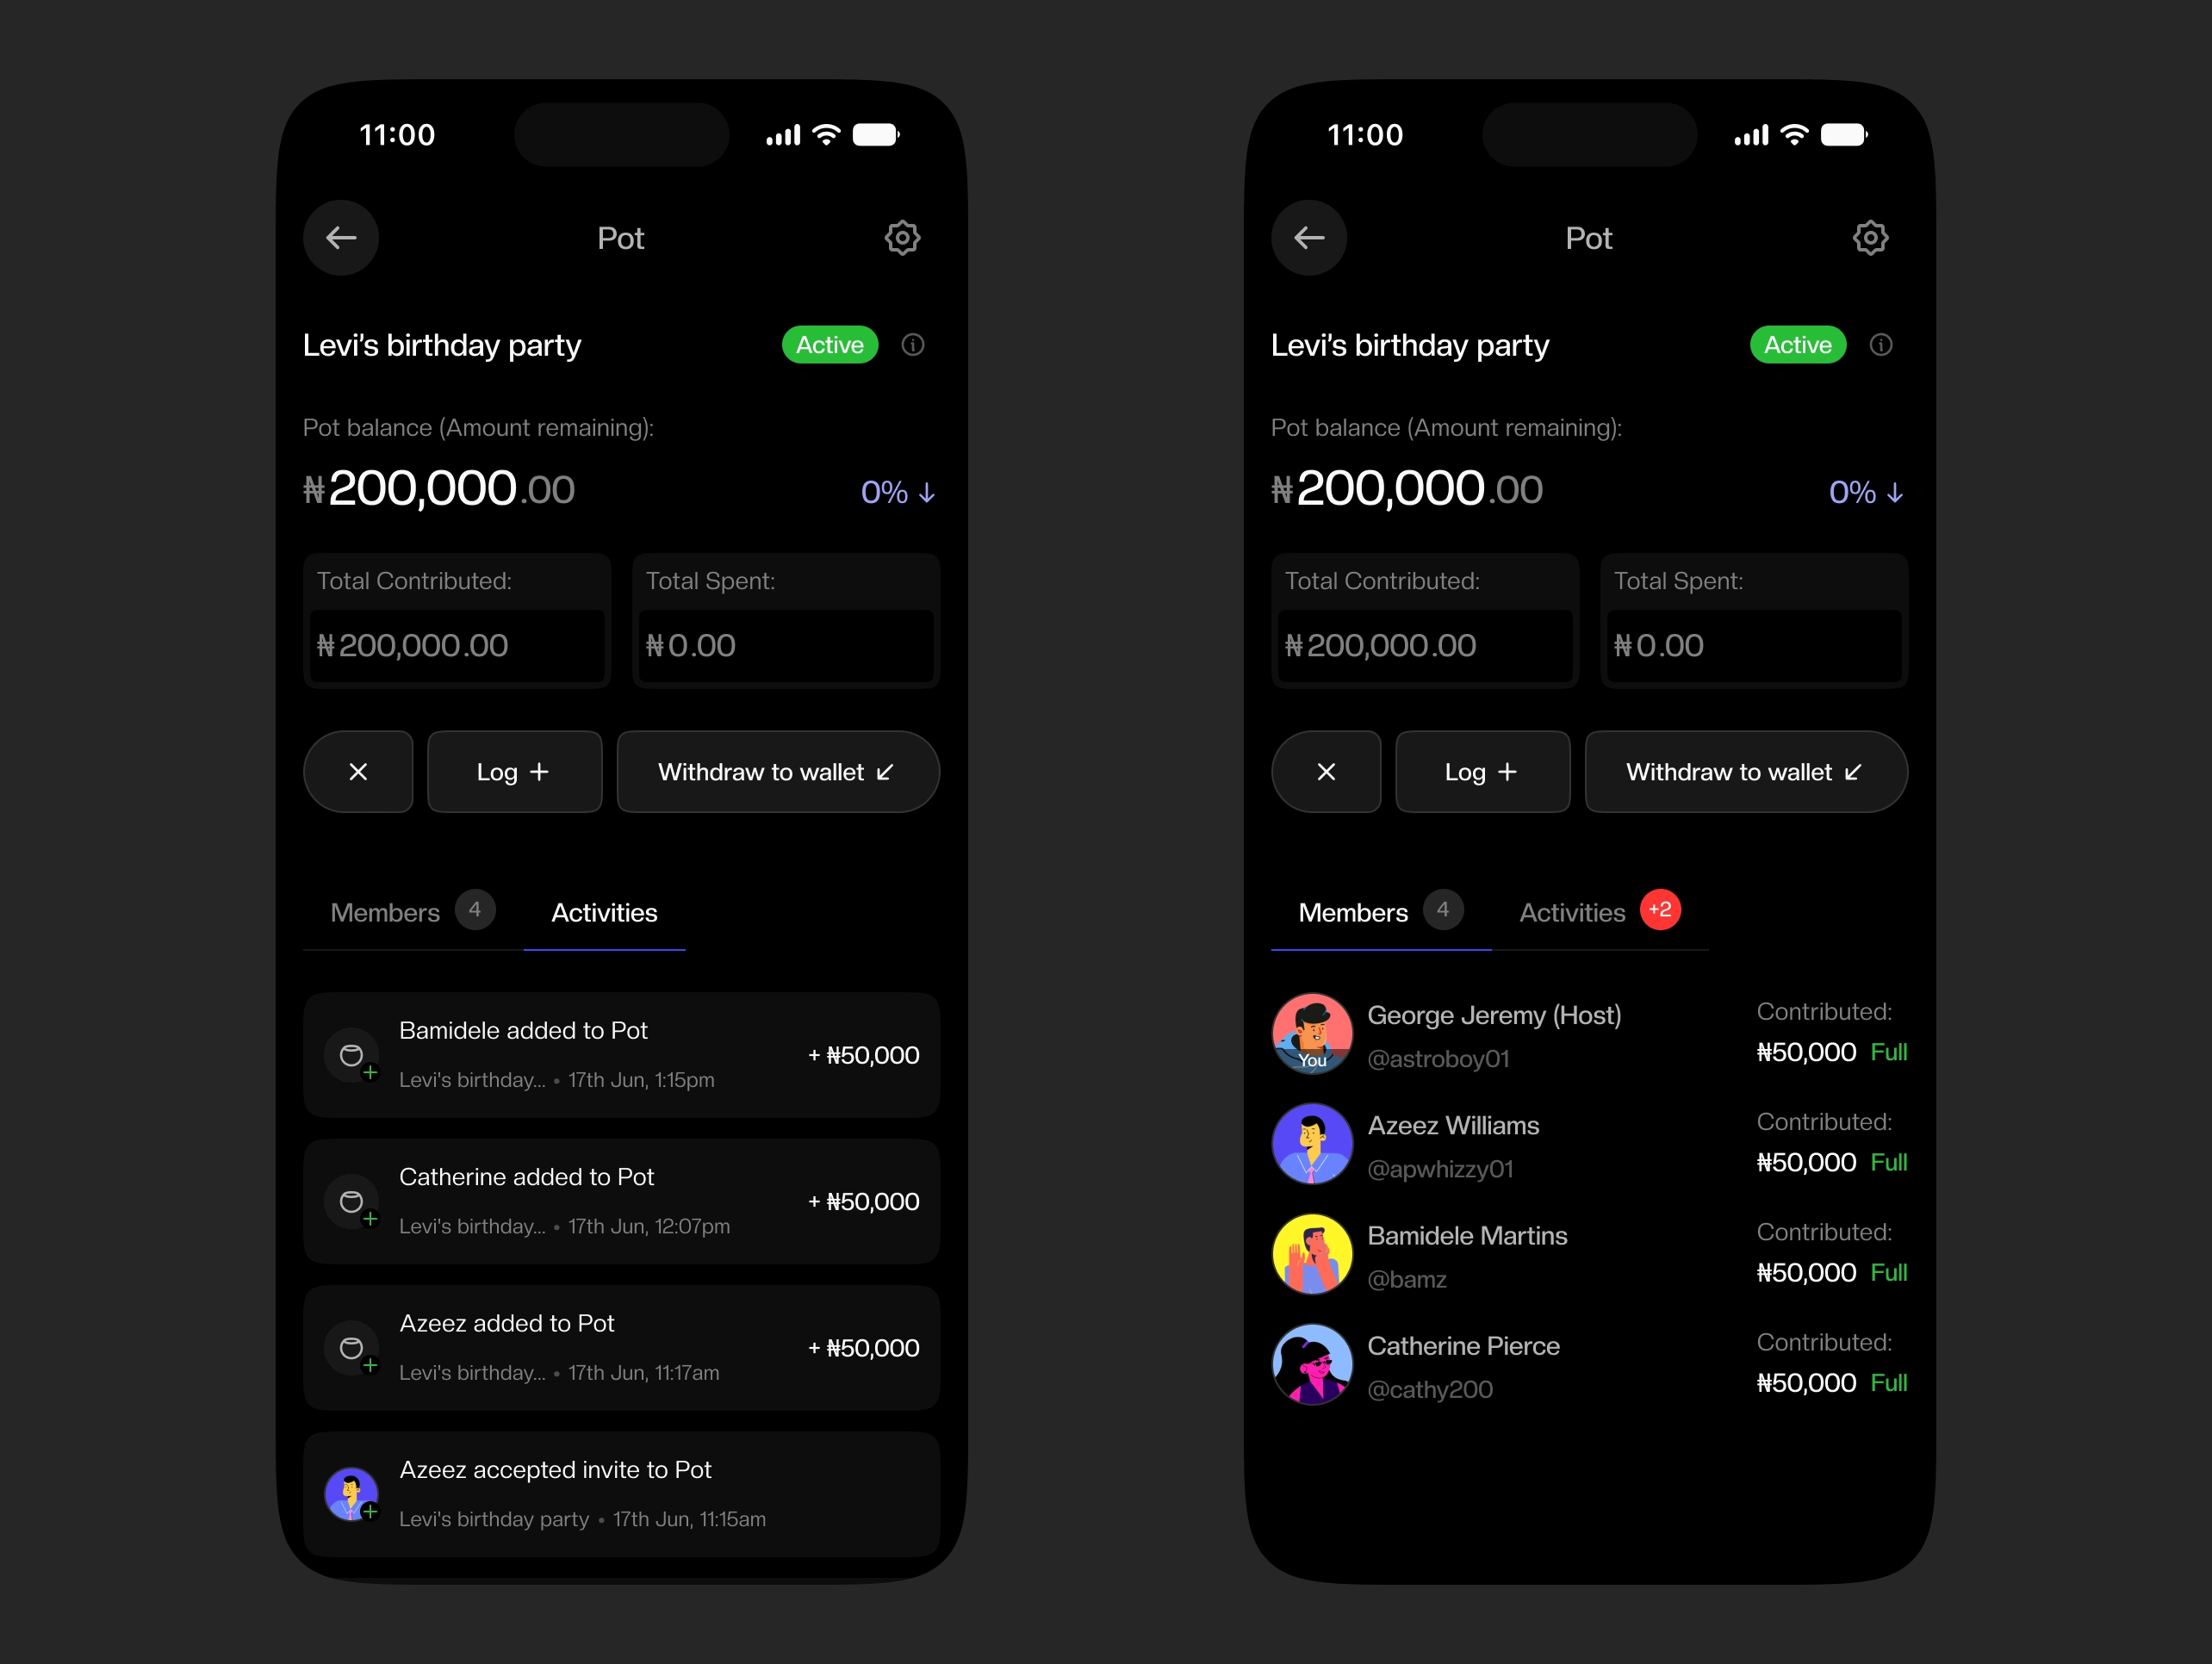
Active Pot screen, showing the activities' view (left) and the members' view (right).
2.2.1. "Start to Create Pot"
I like this phrase, lol
Before we start the “Create Pot” flow, let us look at three screens:
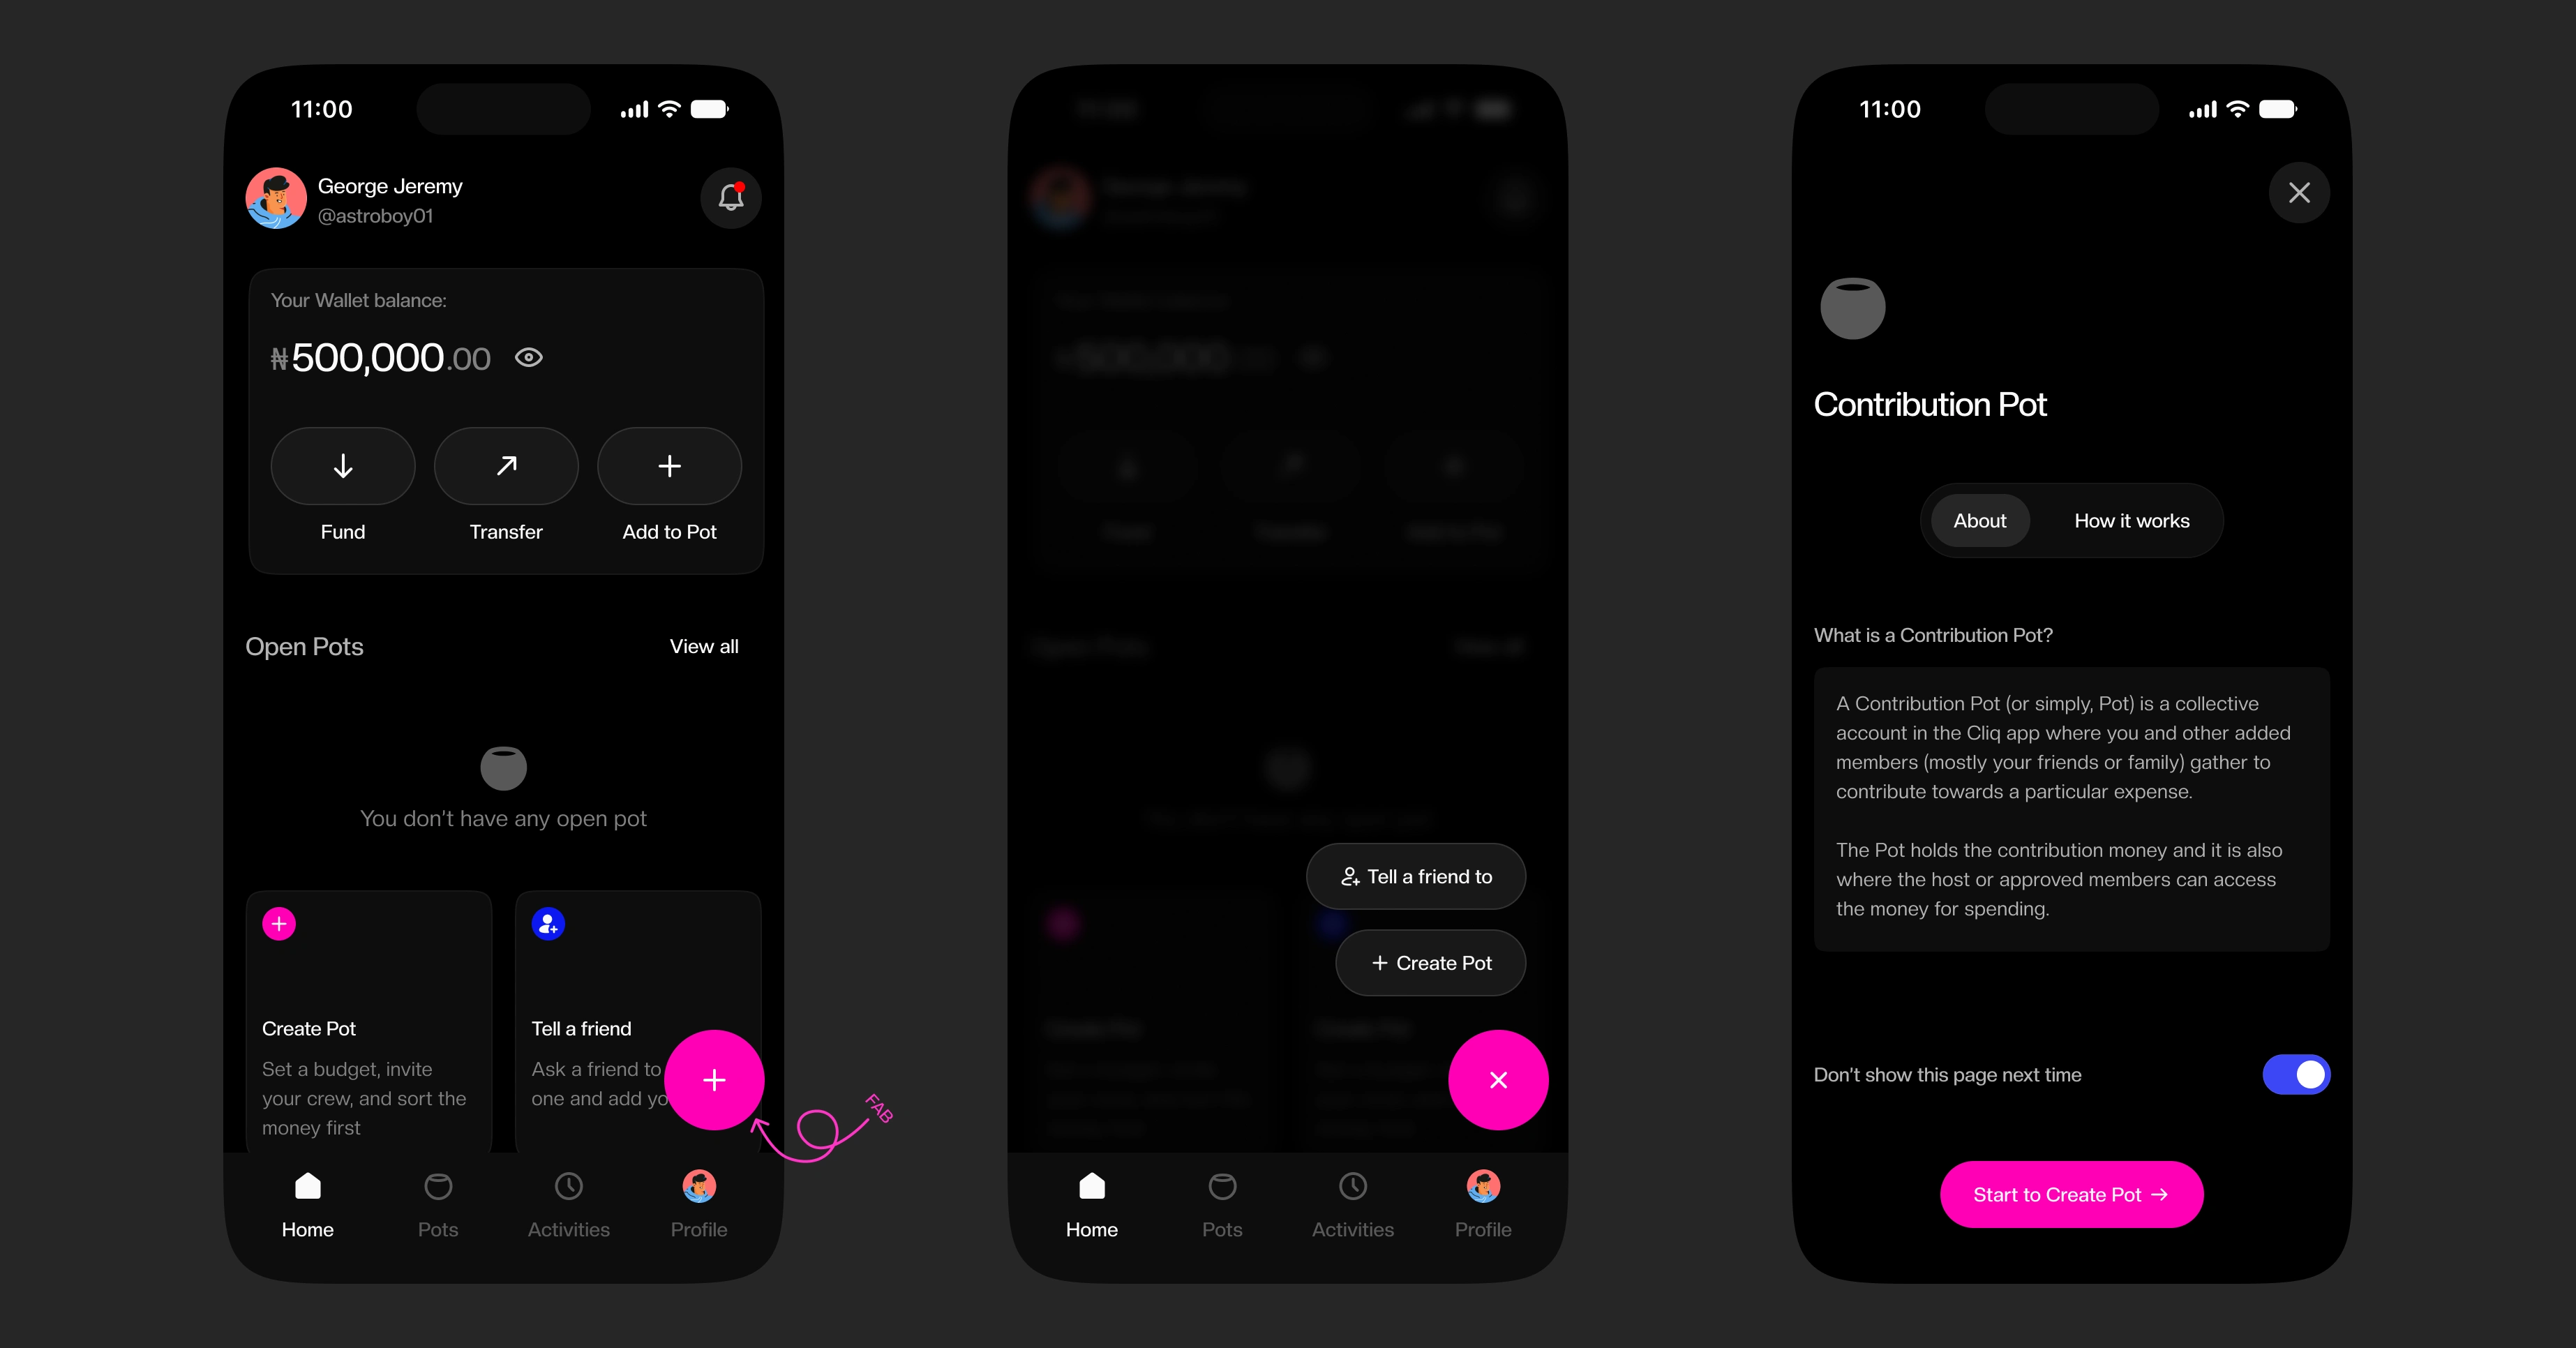
(left) Home screen empty state. No pot has been created yet, (middle) CTA options to create a Pot, (right) An 'about Pot' page to give more context before starting.
Since this is a primary action, the “Create Pot” flow starts from the FAB (floating action button) situated on the home screen. This reveals two options; “Tell a friend to” and the main “Create Pot”.
The first option was added to give users a choice, because not all of them want to carry the responsibility of managing the Pot, so tapping that option gives them the chance to share their referral link and inform a more interested user to join the app and become a host. This serves as a win-win for the interested user and business.
CTAs
Before the flow starts, a screen is dedicated to explain the Contribution Pot feature, so the user is filled in on what it is exactly about and how it works. The user has the choice to opt out of showing the screen the next time they create other Pots.
2.2.2. Filling in the Pot basics
The Pot basics, the first step of the Create Pot flow requires the user to input the name of the pot and how much is expected to be contributed.
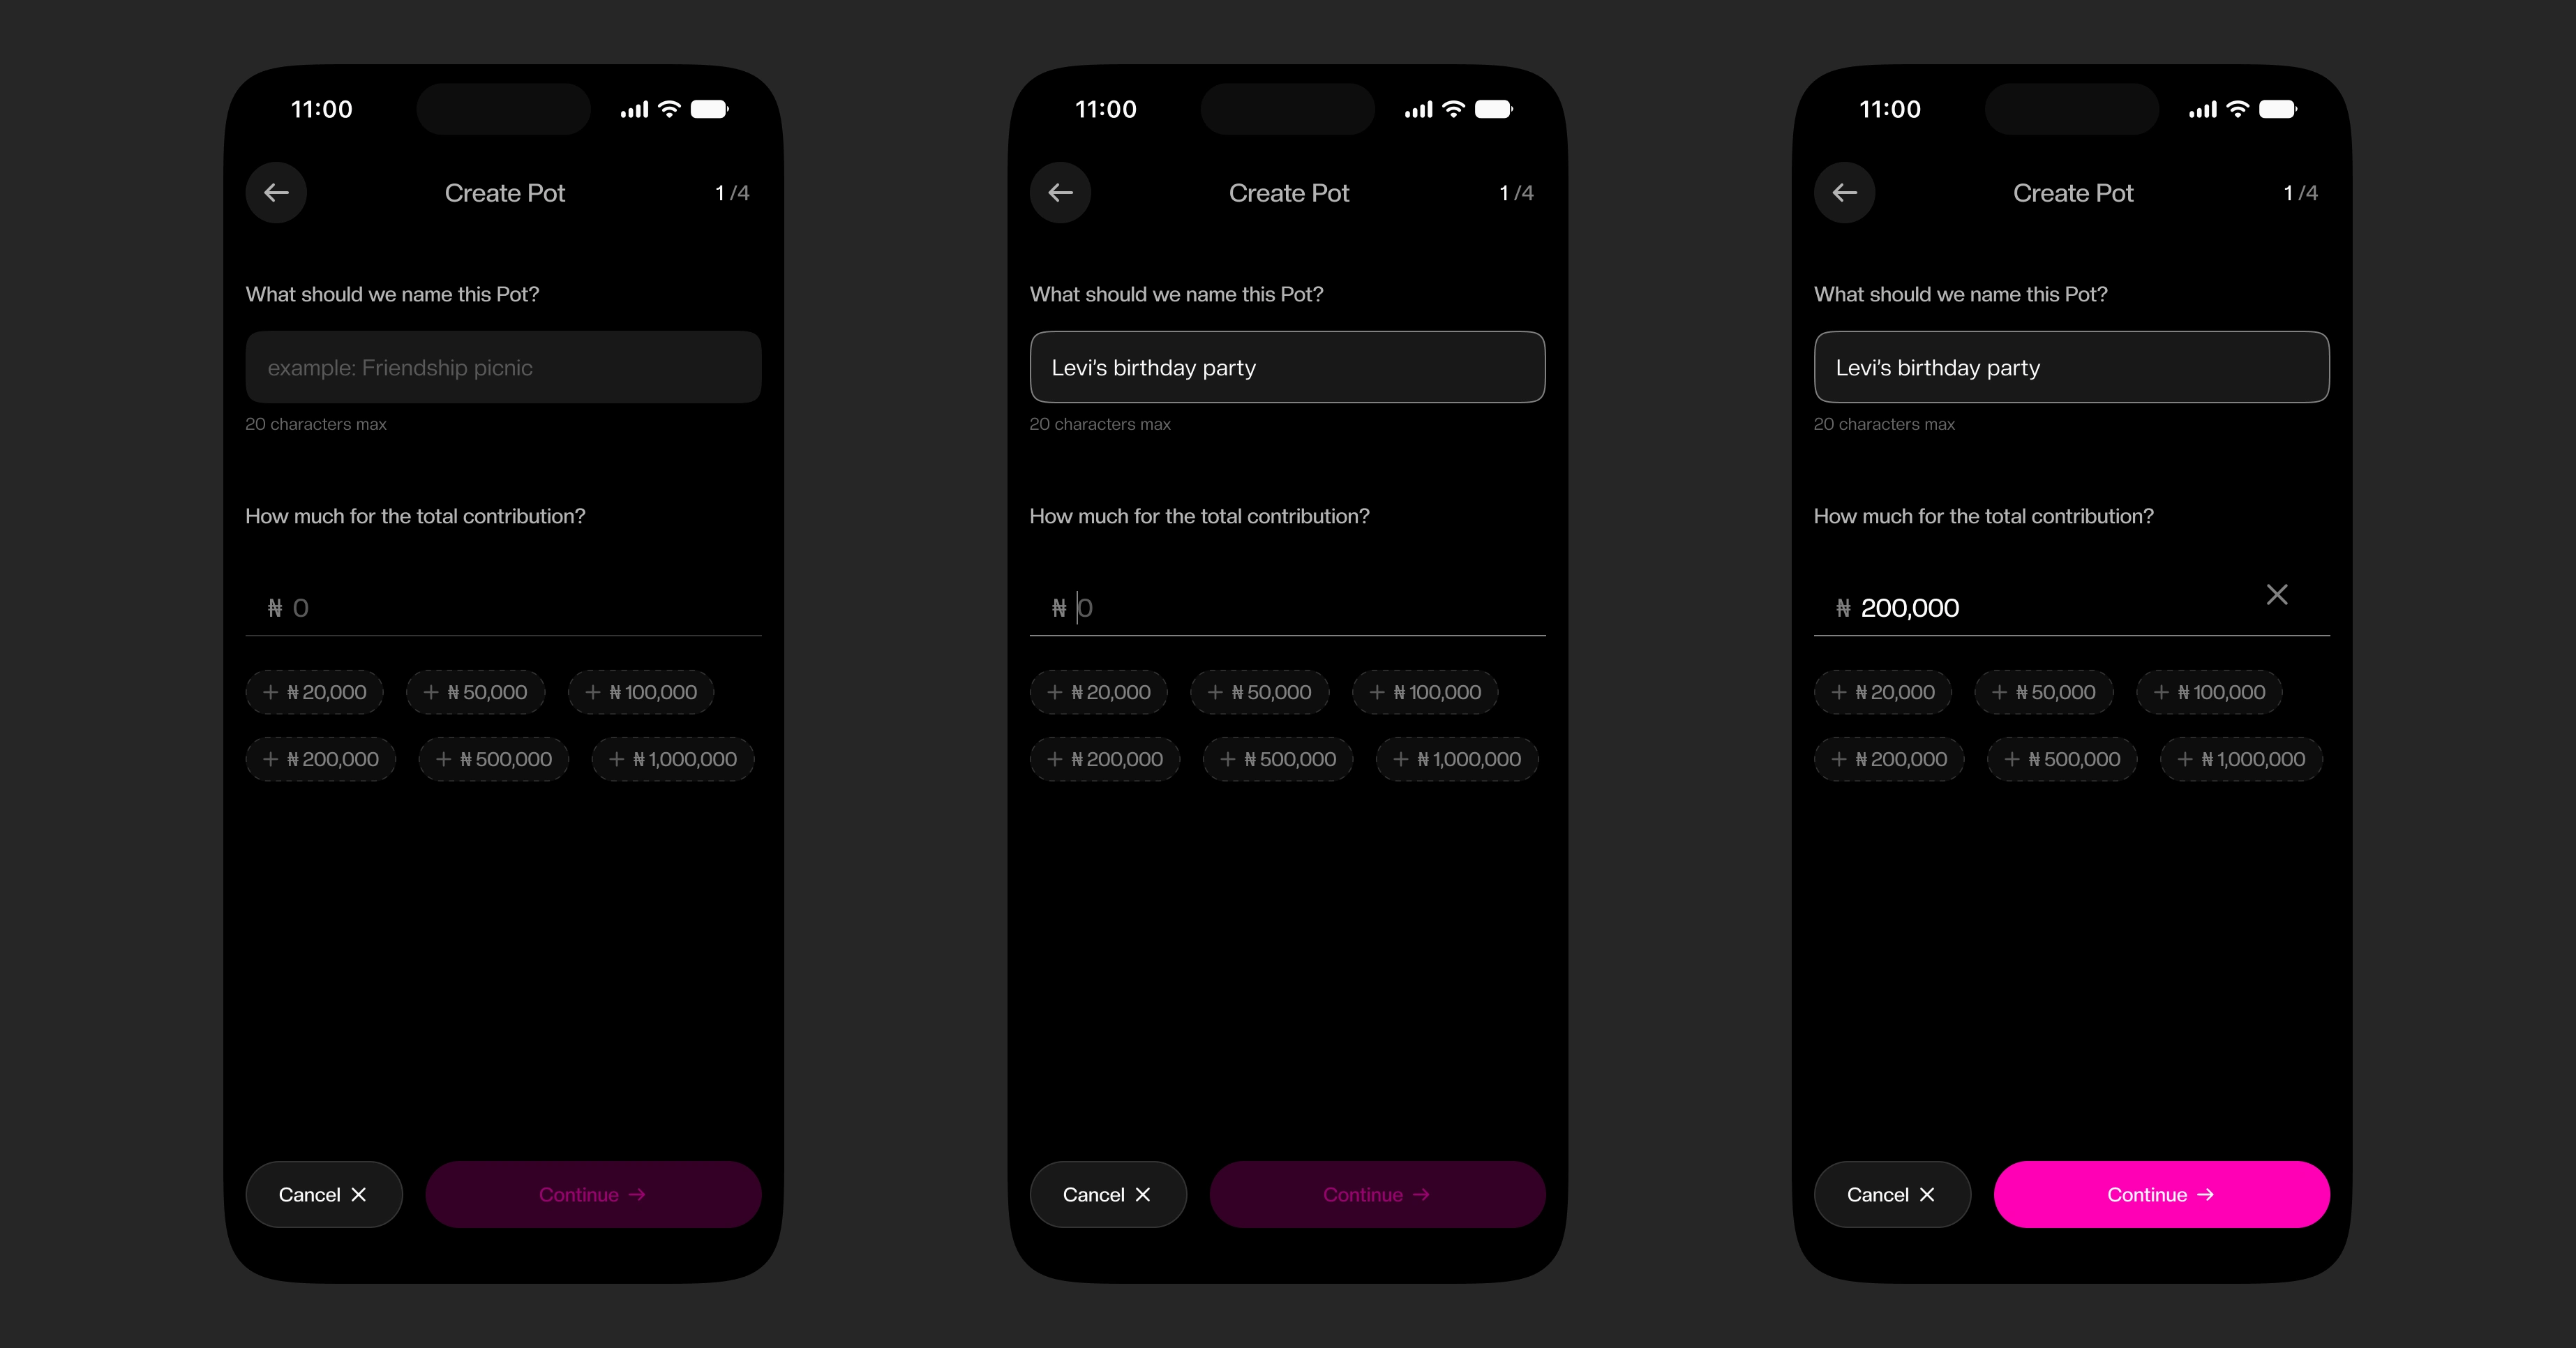
(Input Step 1) The Pot basics
I explored a simpler approach to inputting the contribution amount since most values will deal in large amounts (especially many zeroes).
The input field is paired with quick-select amount buttons that are also additive, so selecting ₦10k for example, populates the field, and tapping ₦20k quick button afterwards automatically adds to it, bringing the total to ₦30k without typing a single zero. The user can also choose to type it in manually instead.
Amount input exploration.
2.2.3. Adding the members
This flow starts with a single input to determine how many members are to be added in the Pot. This influences how many members can be added when it moves to the member lists state.
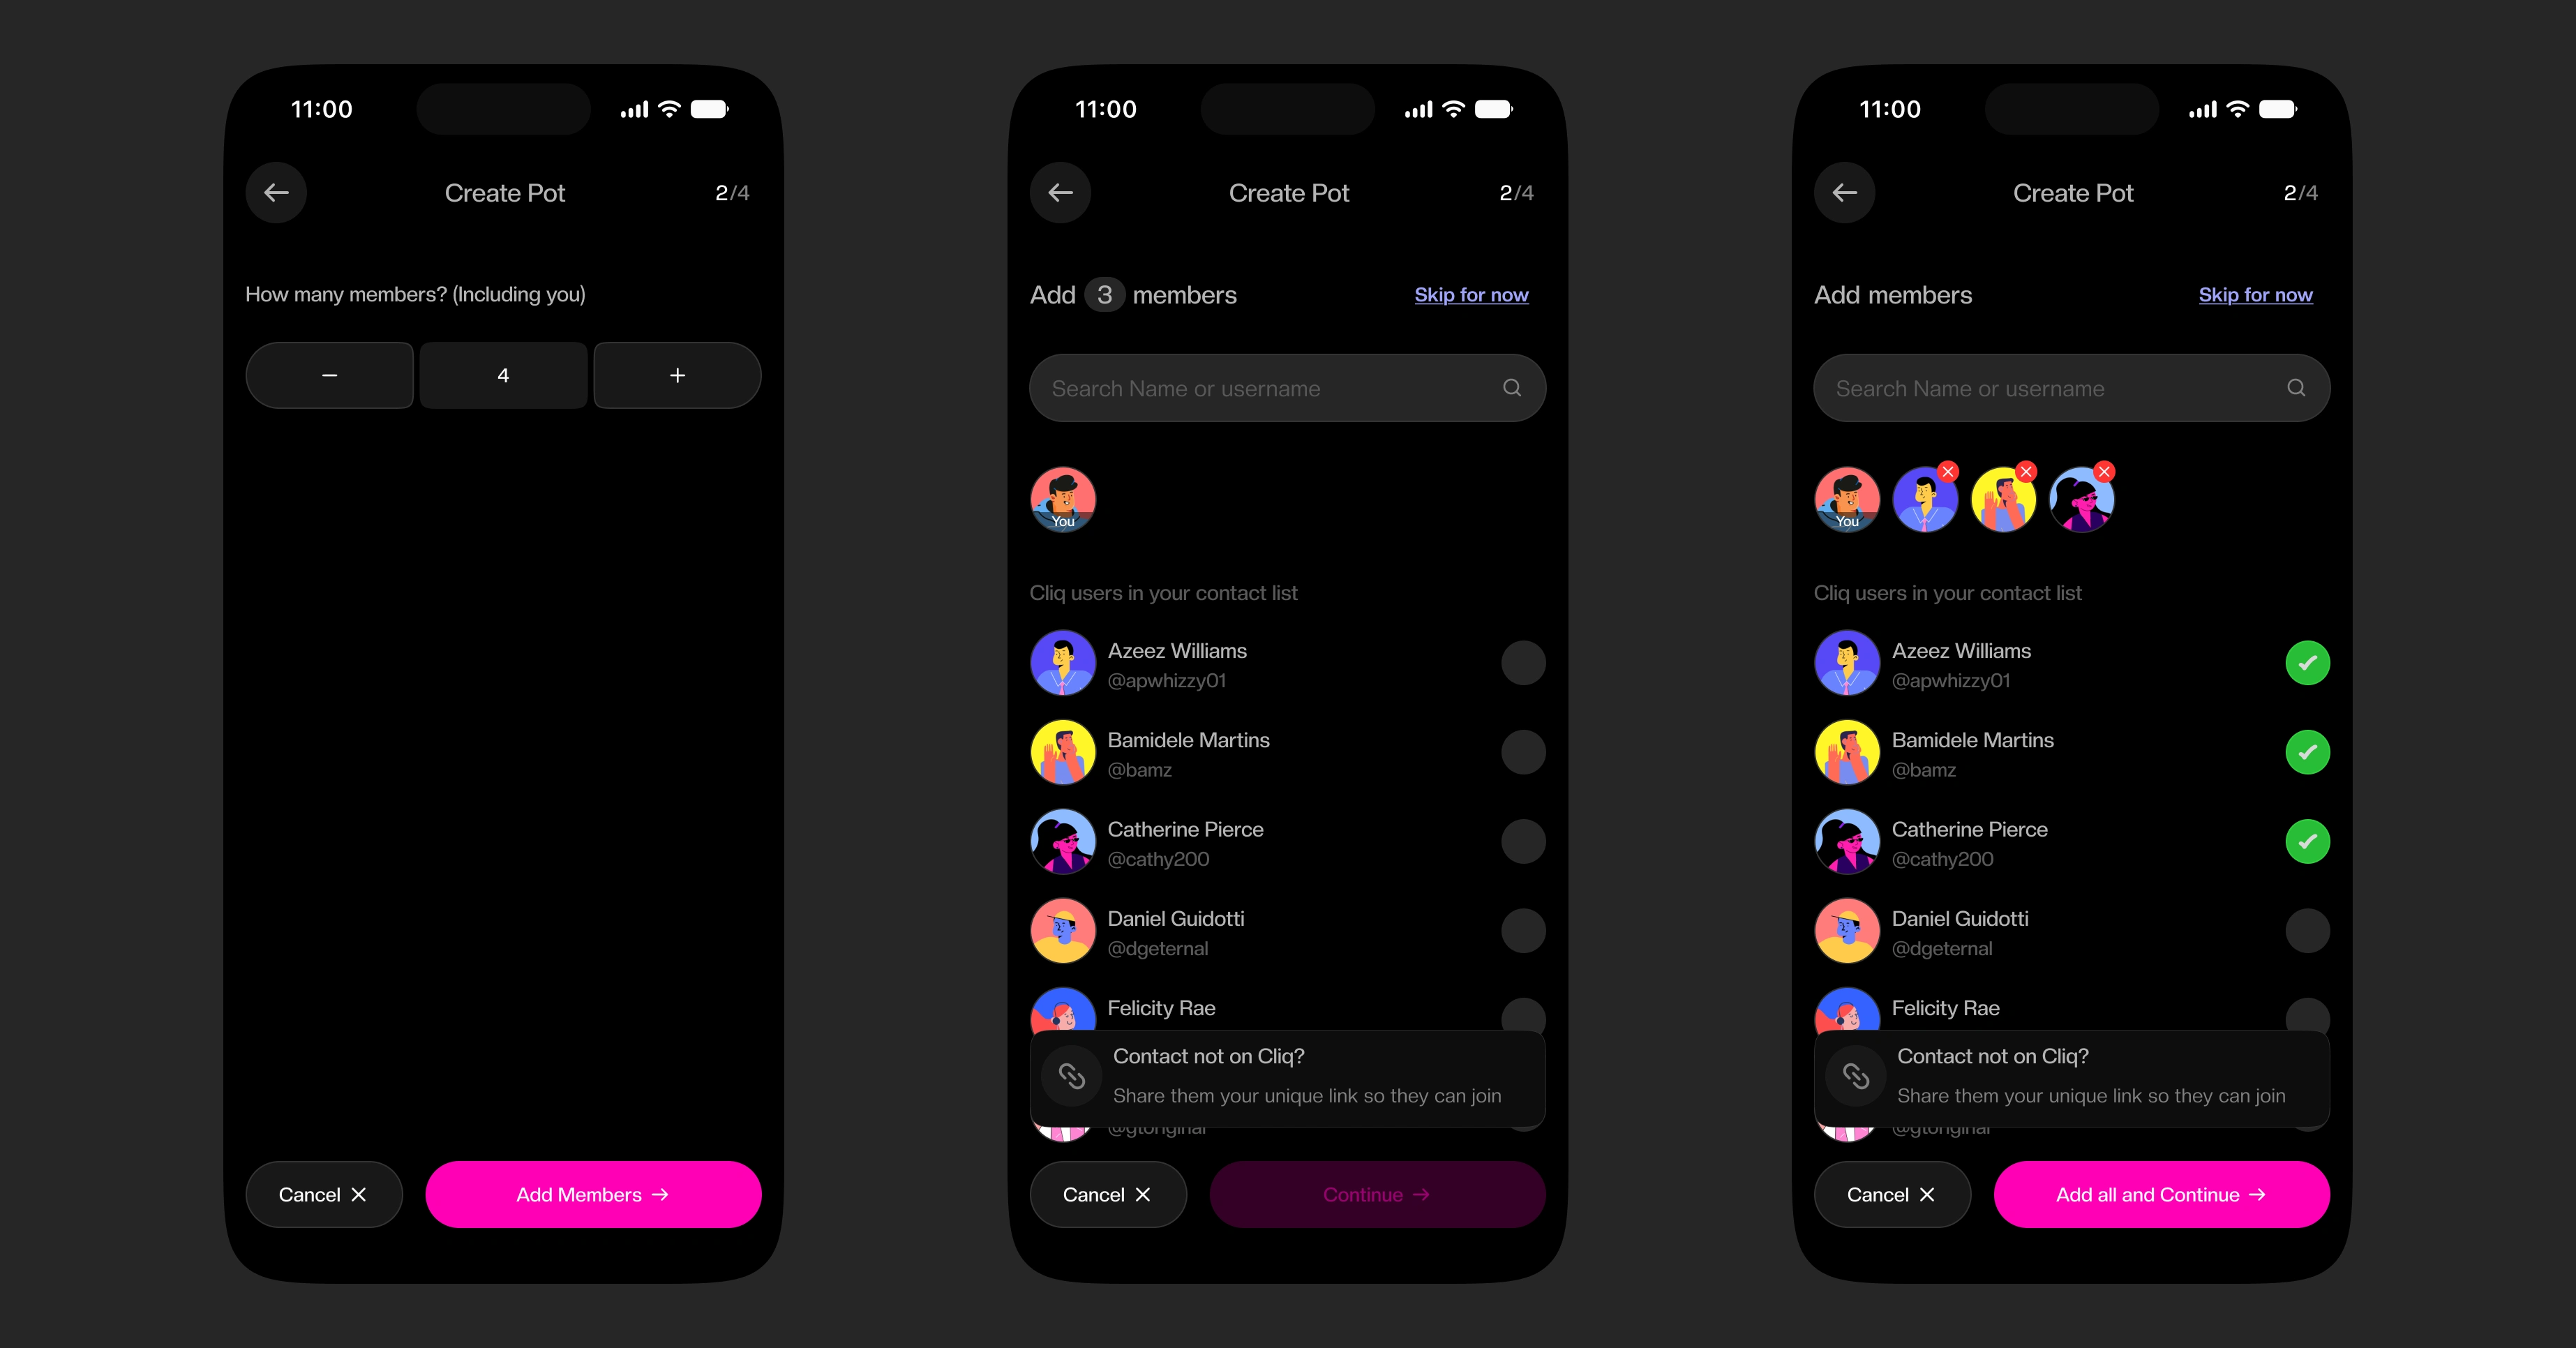
(Input Step 2) Add members
I figured adding members to a Pot might take a while to figure out, like in the case where the host needs a bit more time to find out their members’ username, or wait for an interested member to join the app itself. Instead of having to abandon the whole Pot creation, I added a “skip for now” option which enables them to complete creating the pot and then can add the members later. Creating the Pot to add members later makes the pot created as a “draft” state.
Members can be searched by their username or their official name used to register the app. In the case where the user is not on the app, a designated referral link is accessible at the bottom of the screen to be shared so the Pot can be saved as draft till they are fully registered in the app and can be added.
Add members' flow. From here we can see that the default number of member(s) is 1 because the host (the user creating the account) is already a accounted member. The video also briefly shows the "skip for now' option that allows the user to continue creating the Pot to add members later.
2.2.4. Setting up the Pot
The Pot creation also comes with some basic settings that determine some pot actions.
The user (Host) can set when the Pot should be activated and also who is allowed to make withdrawals, depending on the use case.
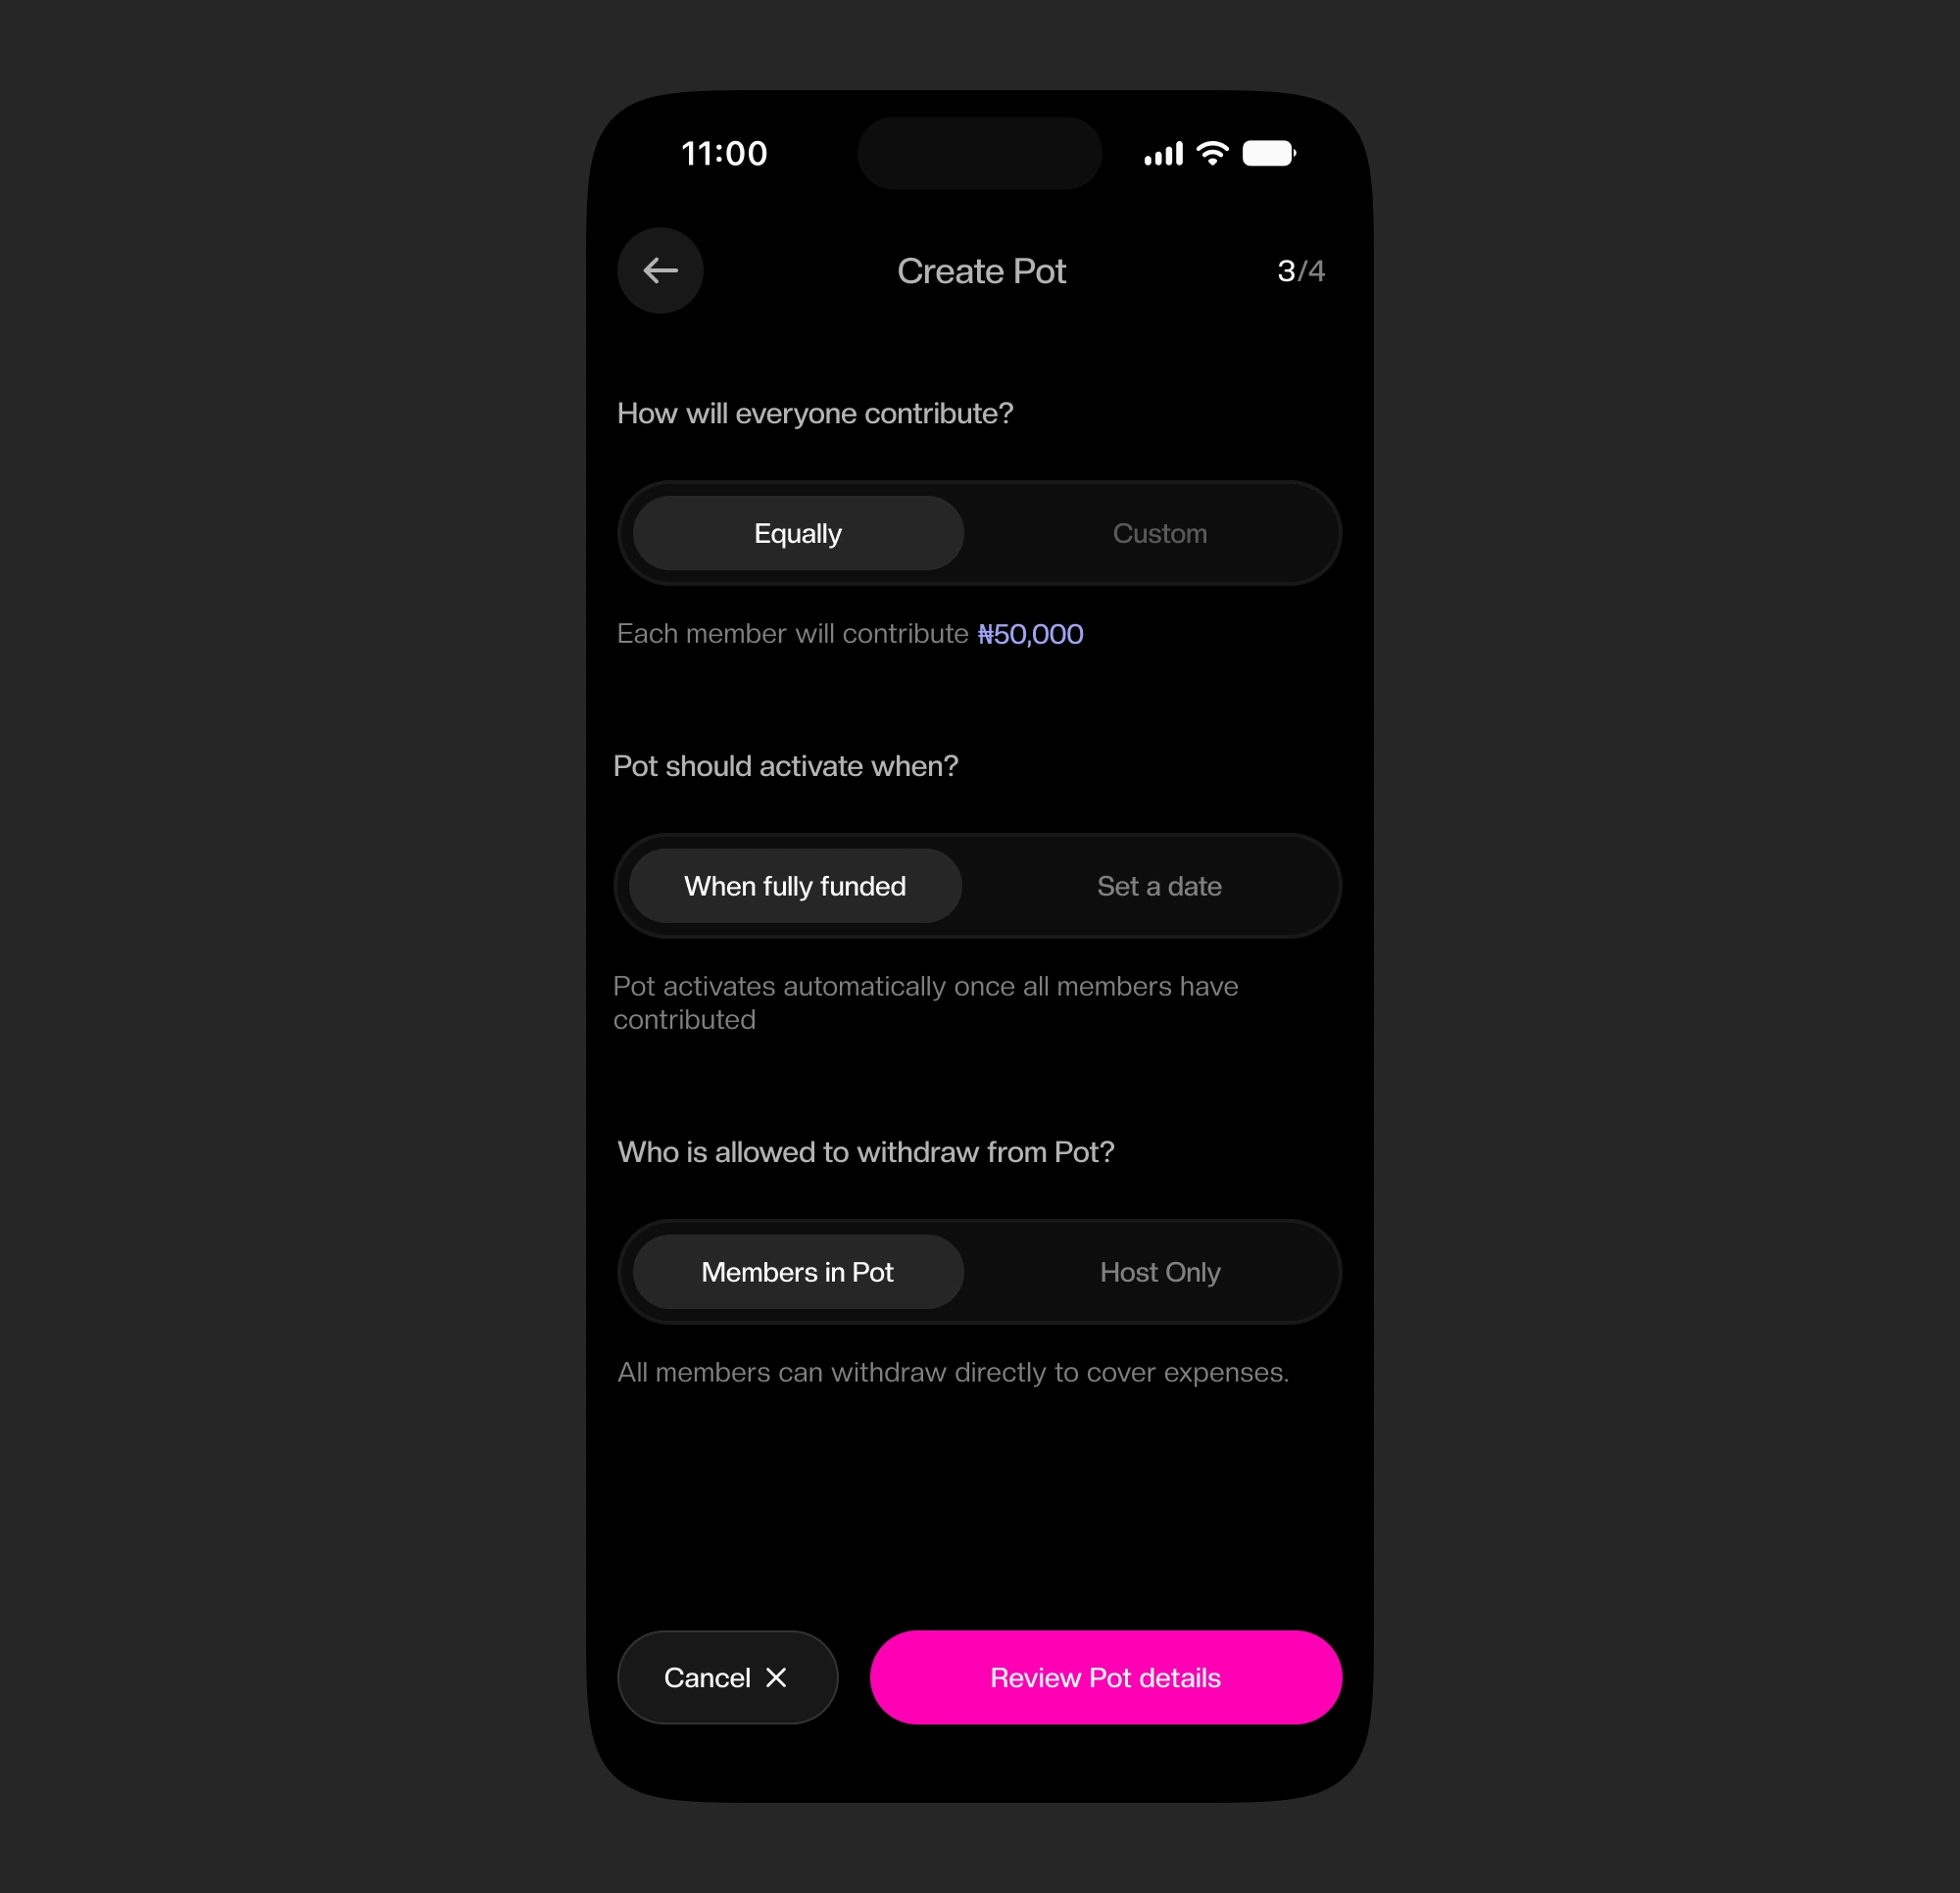
(Input Step 3) Pot settings
After these inputs have been made, the user reviews the Pot details and the Pot is created successfully after confirmation.
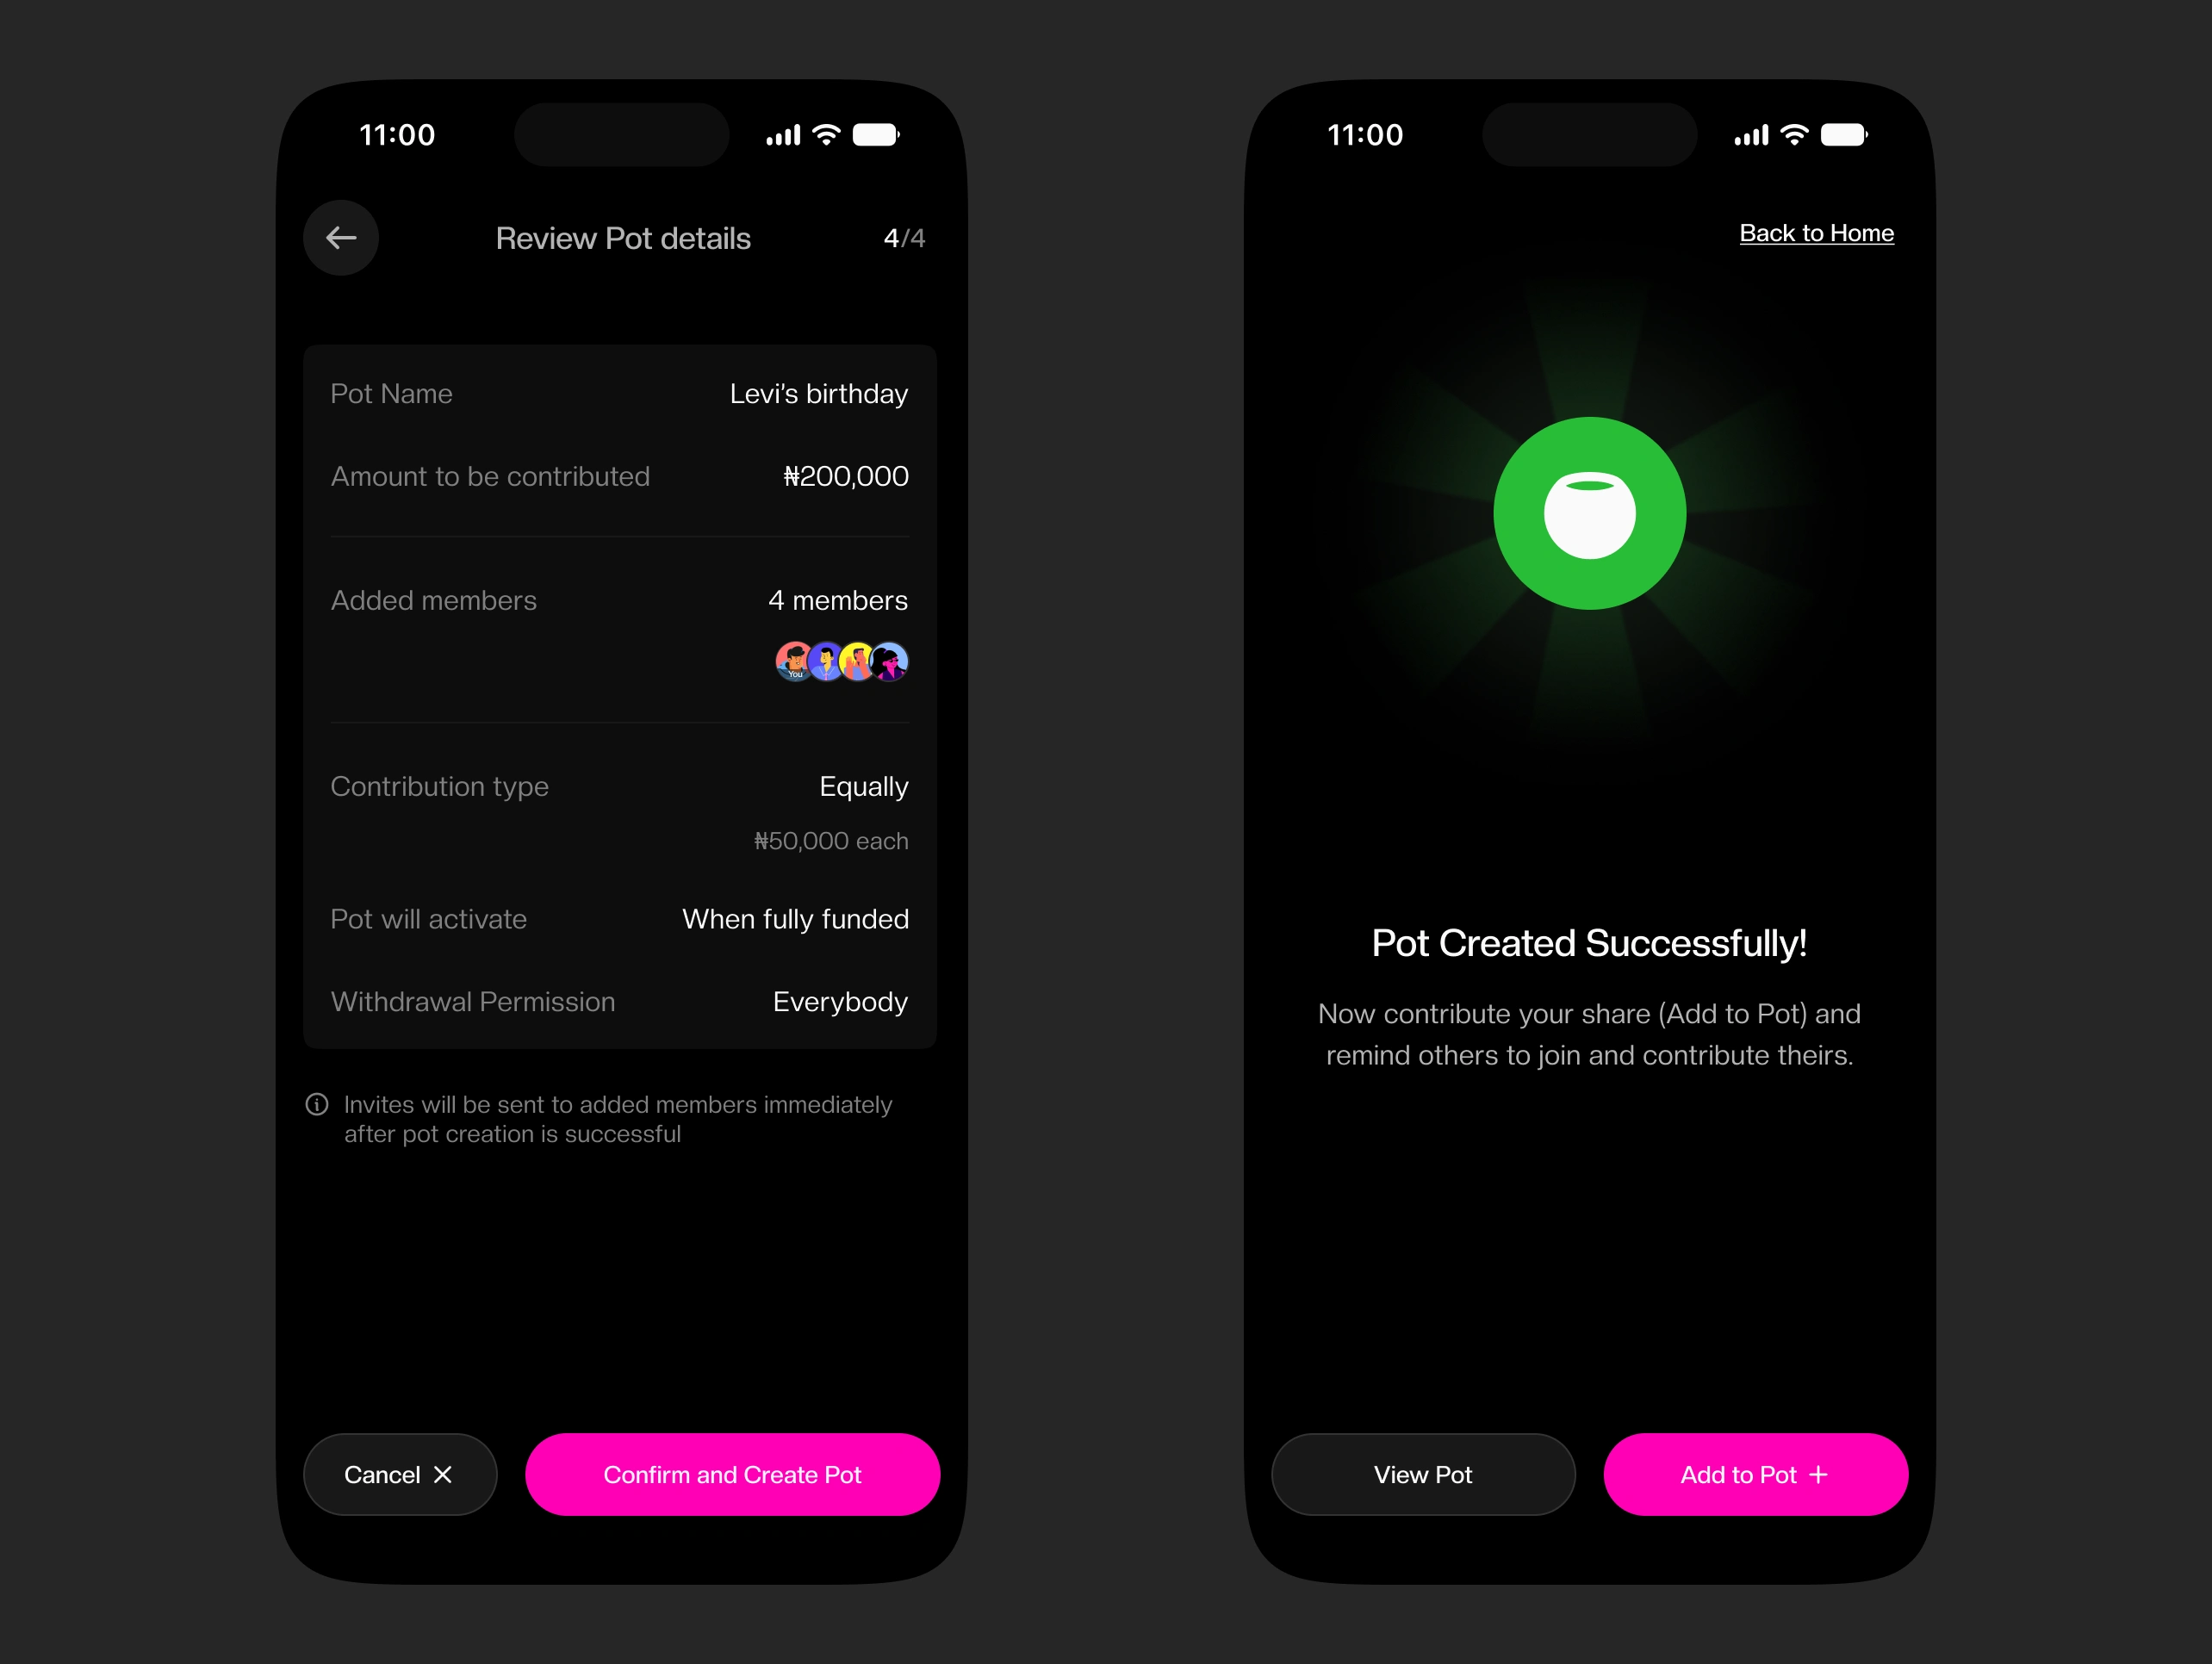
(left) Review Pot details, (right) Success screen
2.3. Withdraw, Log and Close Pot
2.3.1. Withdraw from Pot
After the Pot activates, whether by complete contribution or due date, host and members can withdraw from the Pot to sort out the group’s expenses, depending on the withdrawal settings.
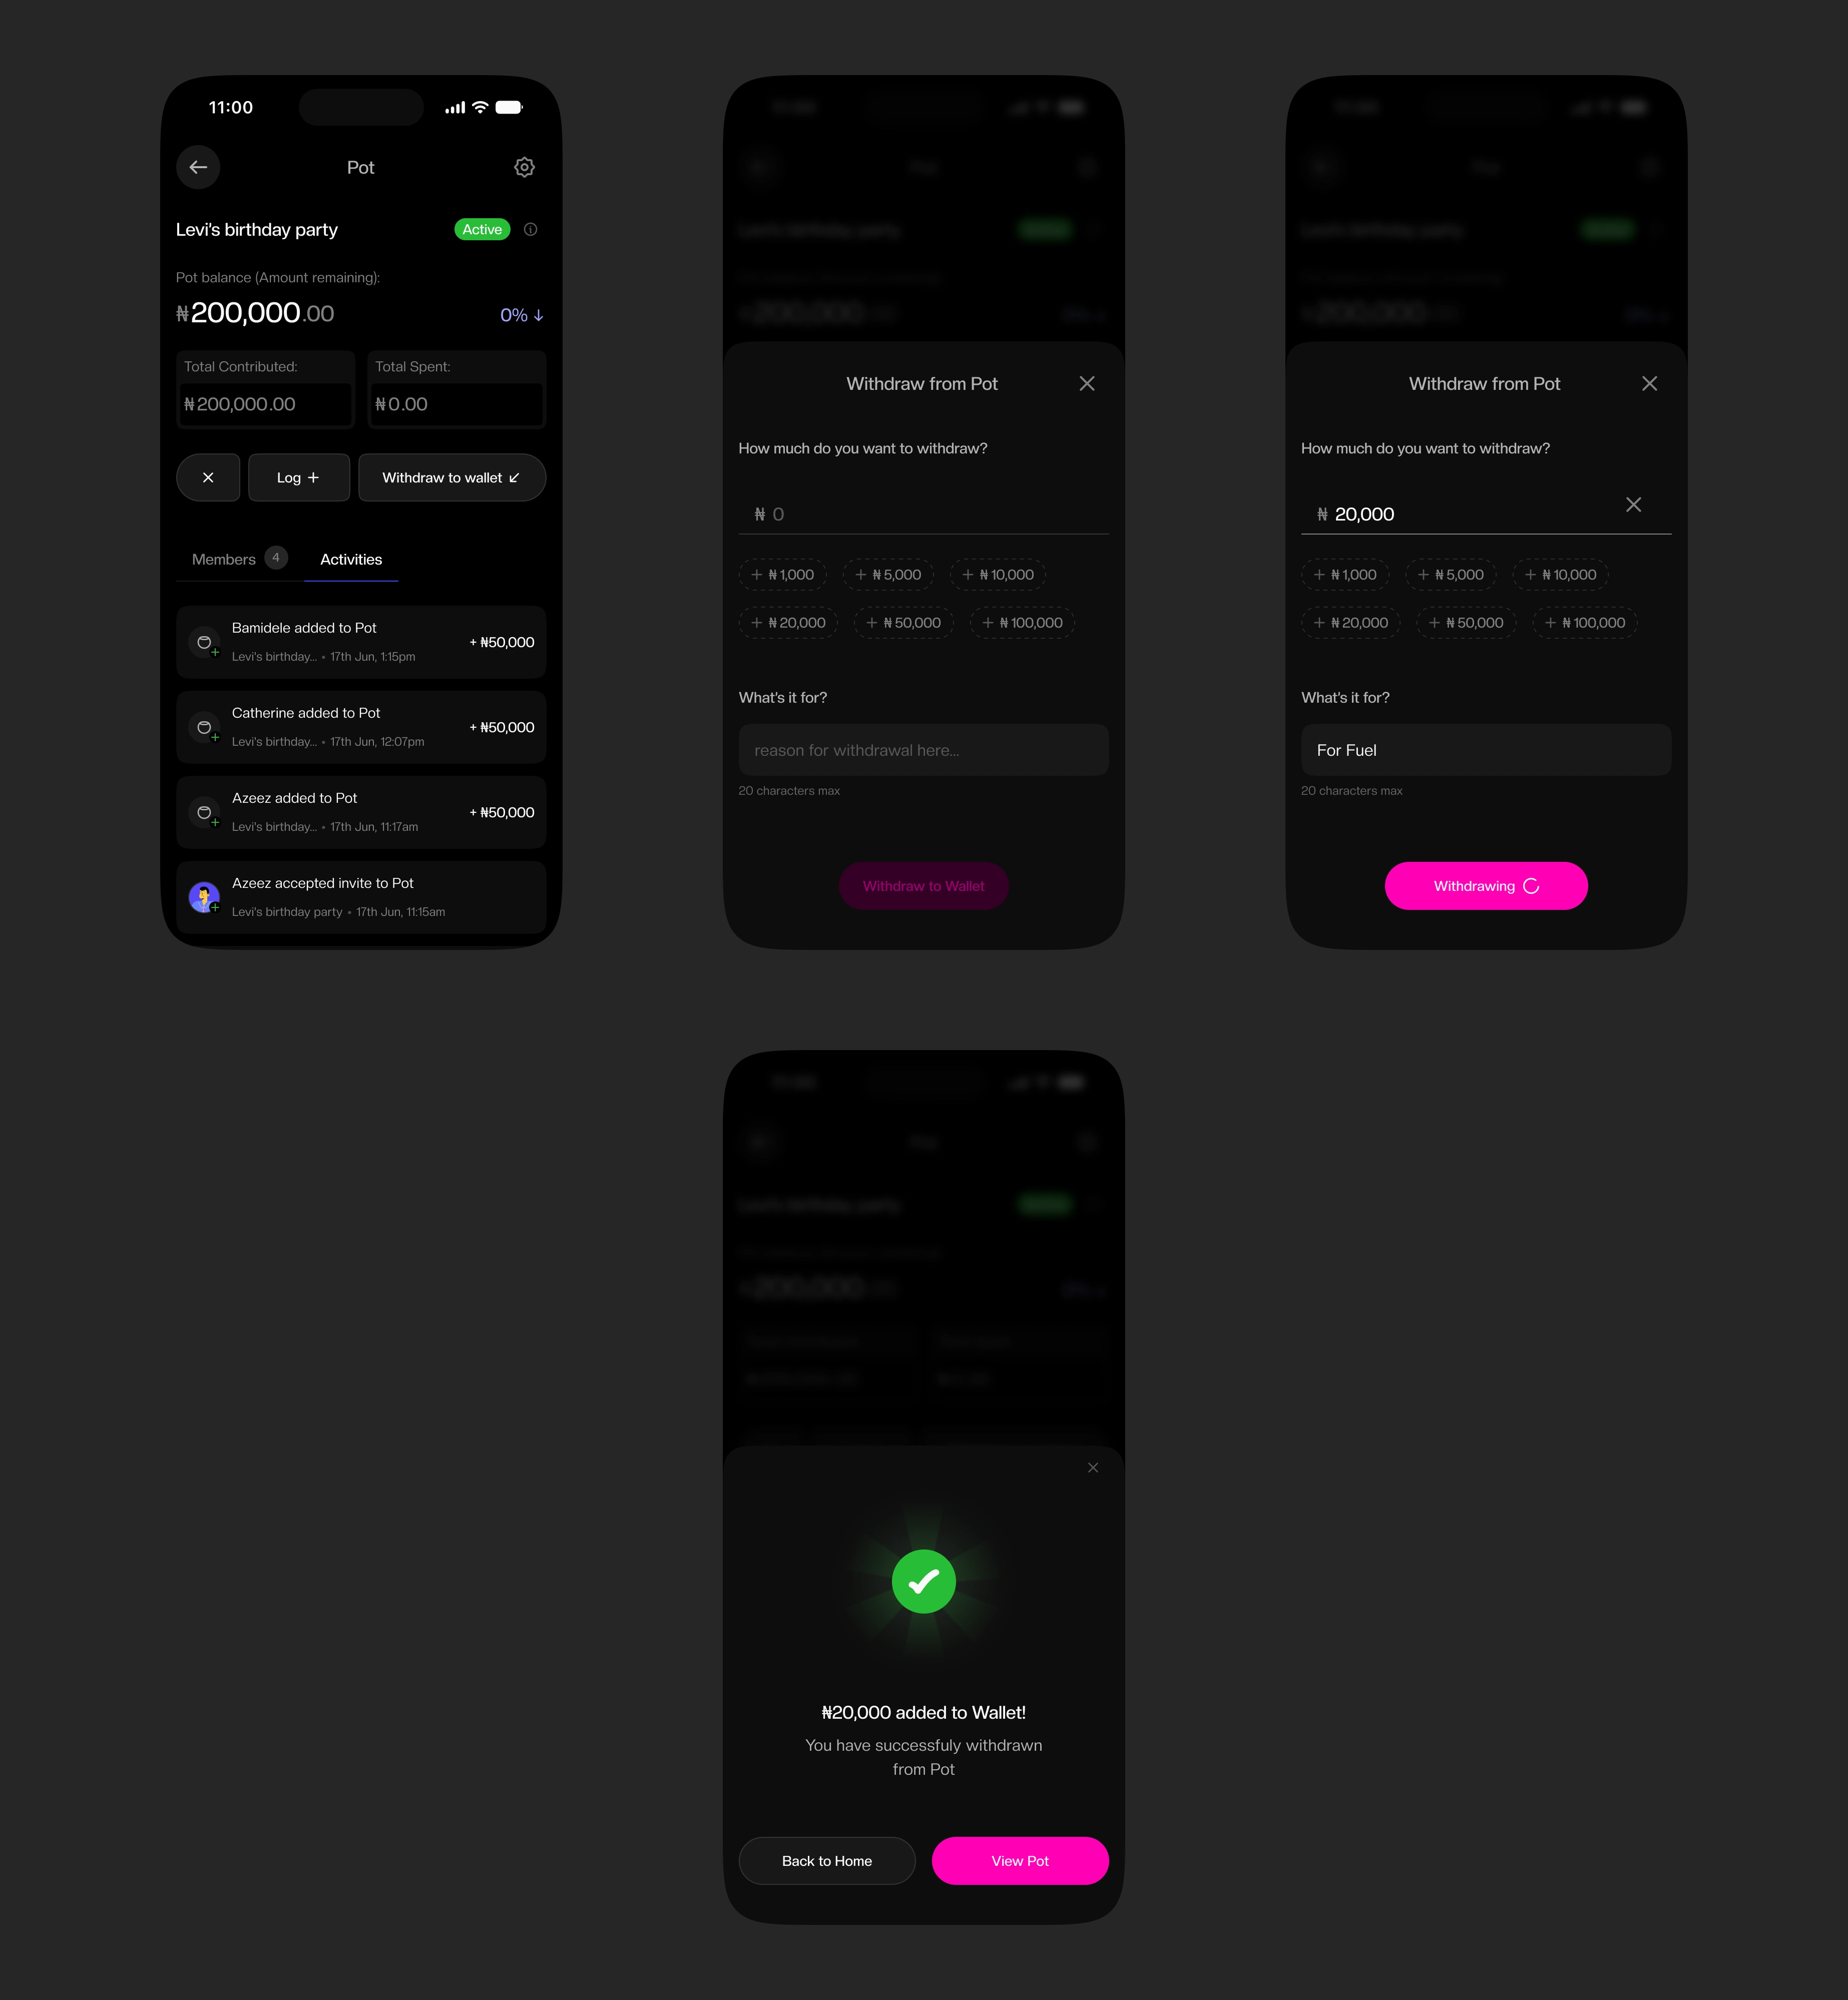
Withdraw from Pot flow
The active Pot is then designed in two states; for when the host limits withdrawals to only themselves, the Pot withdraw button is set to “request withdrawal” and for when it is accessible for all, it is set to “withdraw to wallet”.
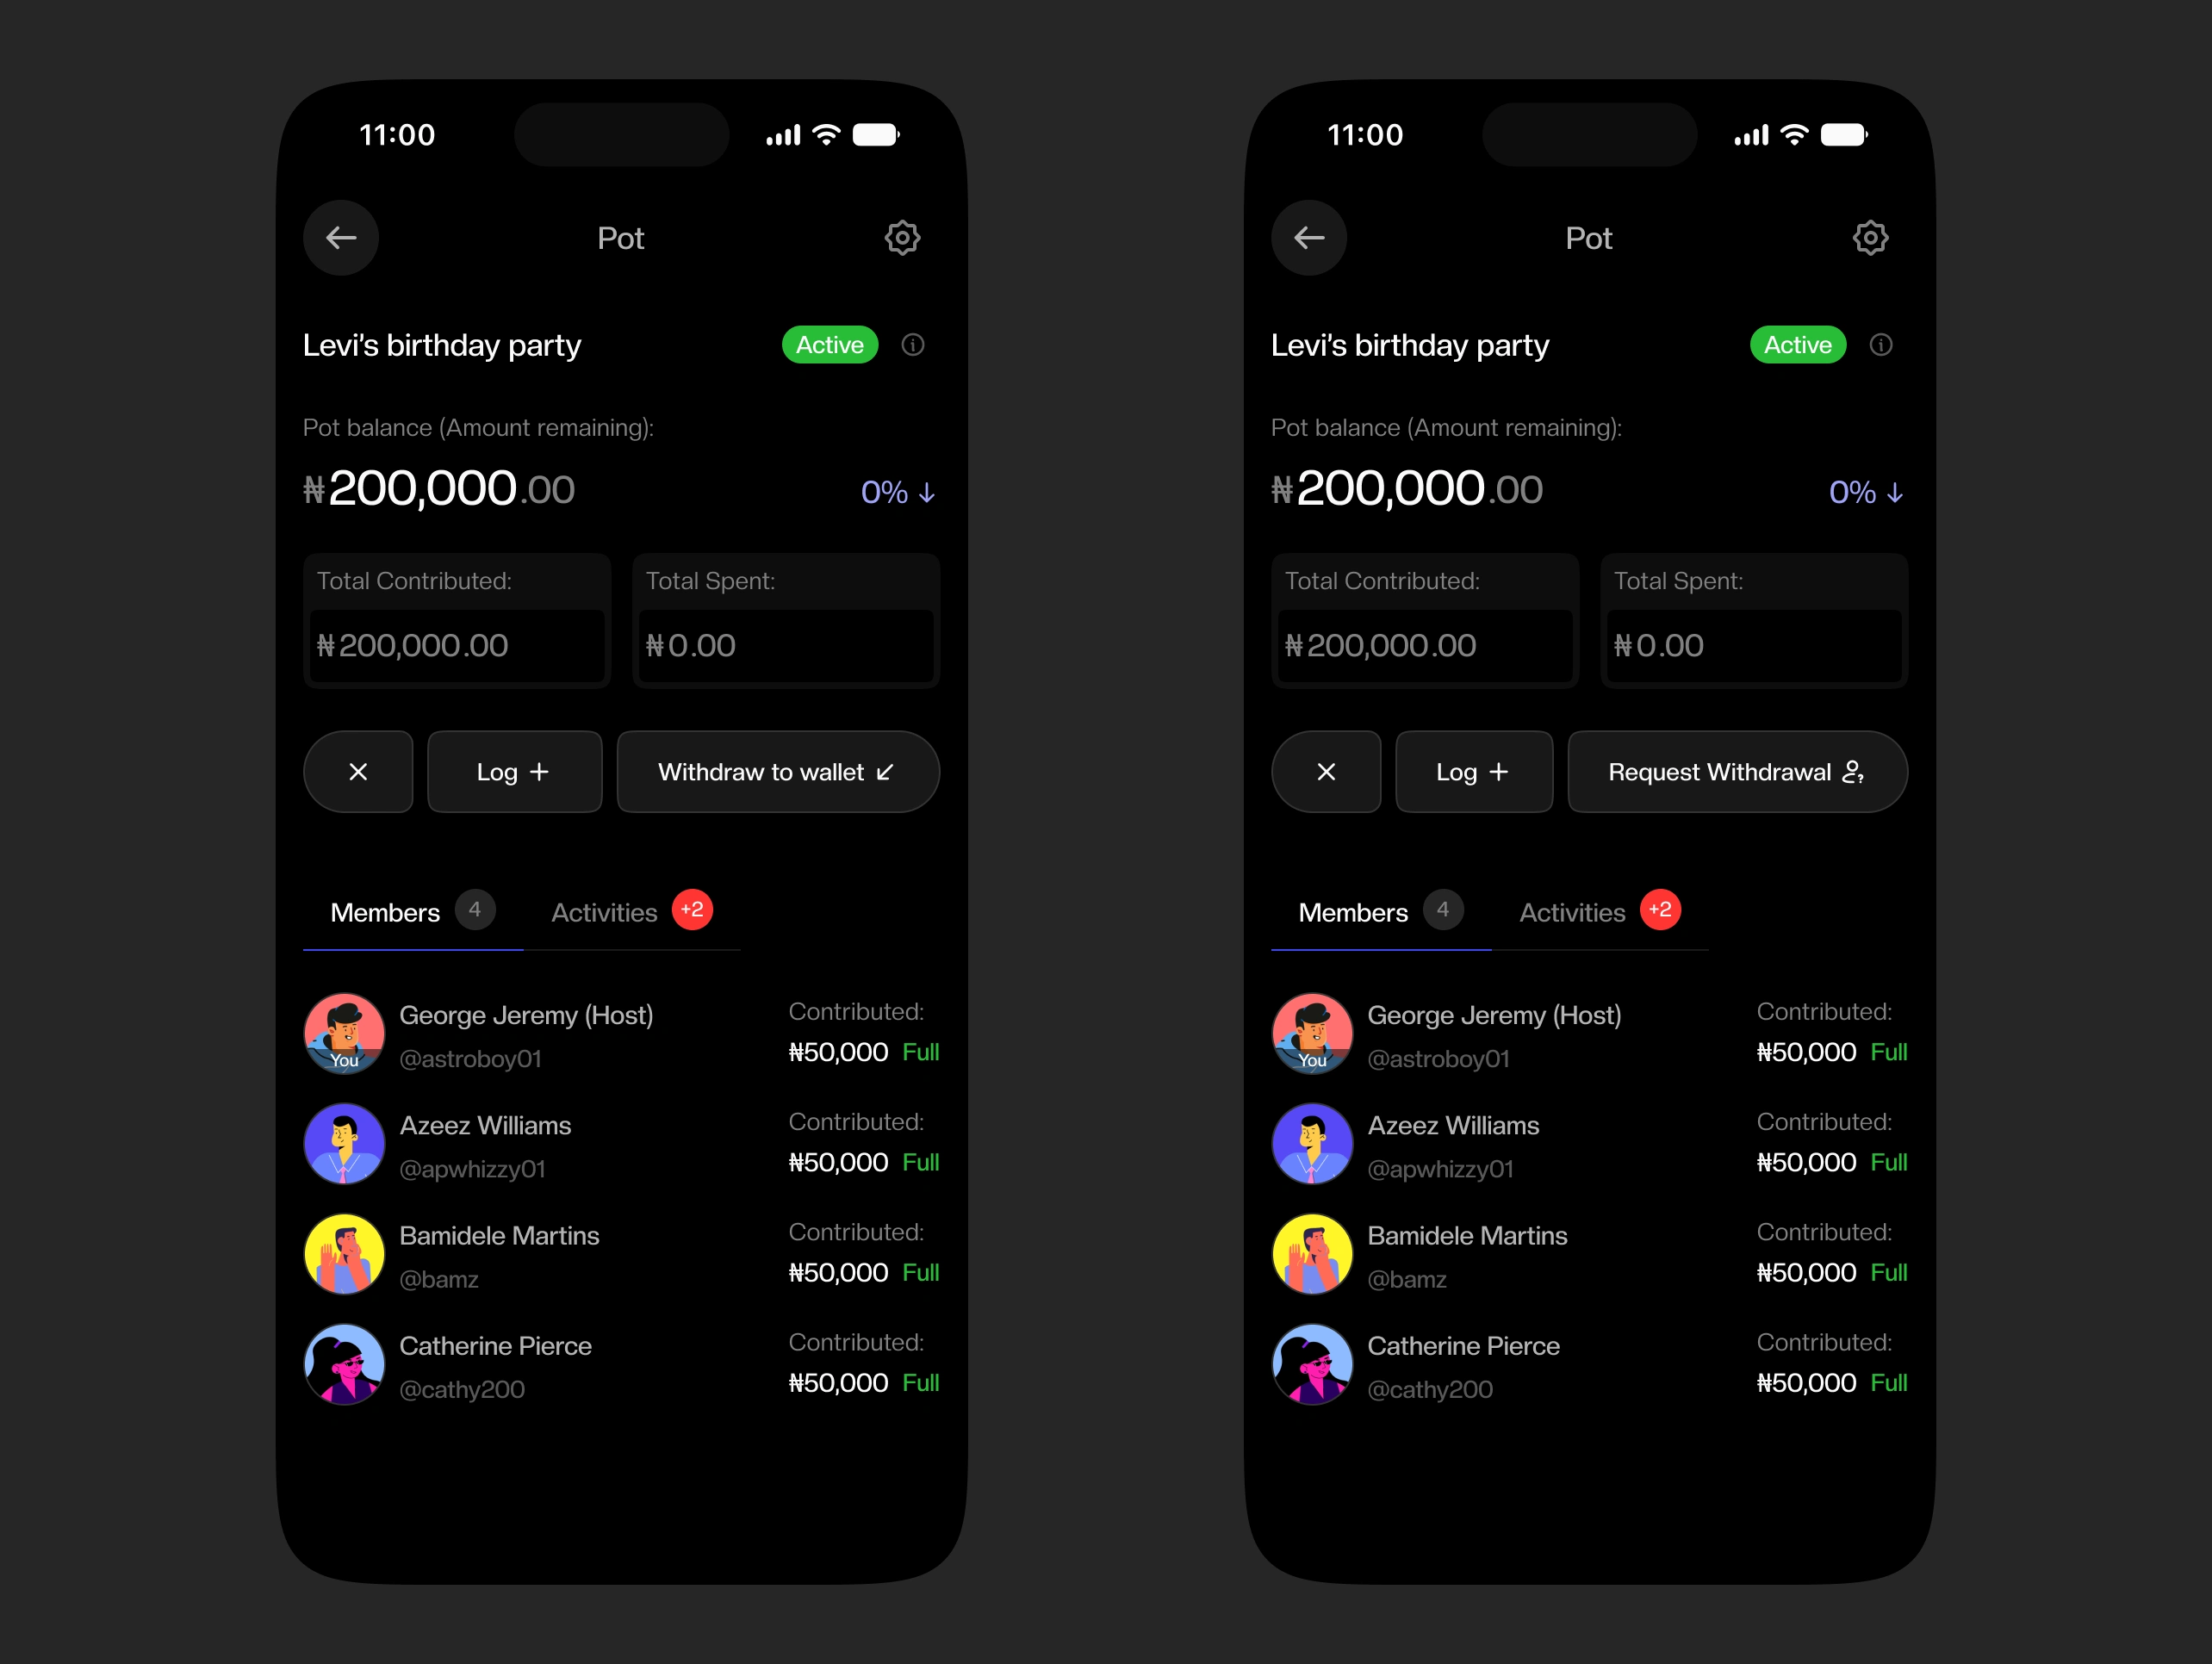
Pot states depending on the Host's withdrawal setting.
2.3.2. Log Expense
Logging an expense helps for easy refunding of any money that is spent outside of the pot to still meet the group’s needs. In the case where the user doesn’t want to deal with any app experience or wants to make a quick payment, they can sort it out with their own money and log it in the app when they have the time and chance. This logged amount is tracked immediately to be reimbursed after the host closes the Pot.
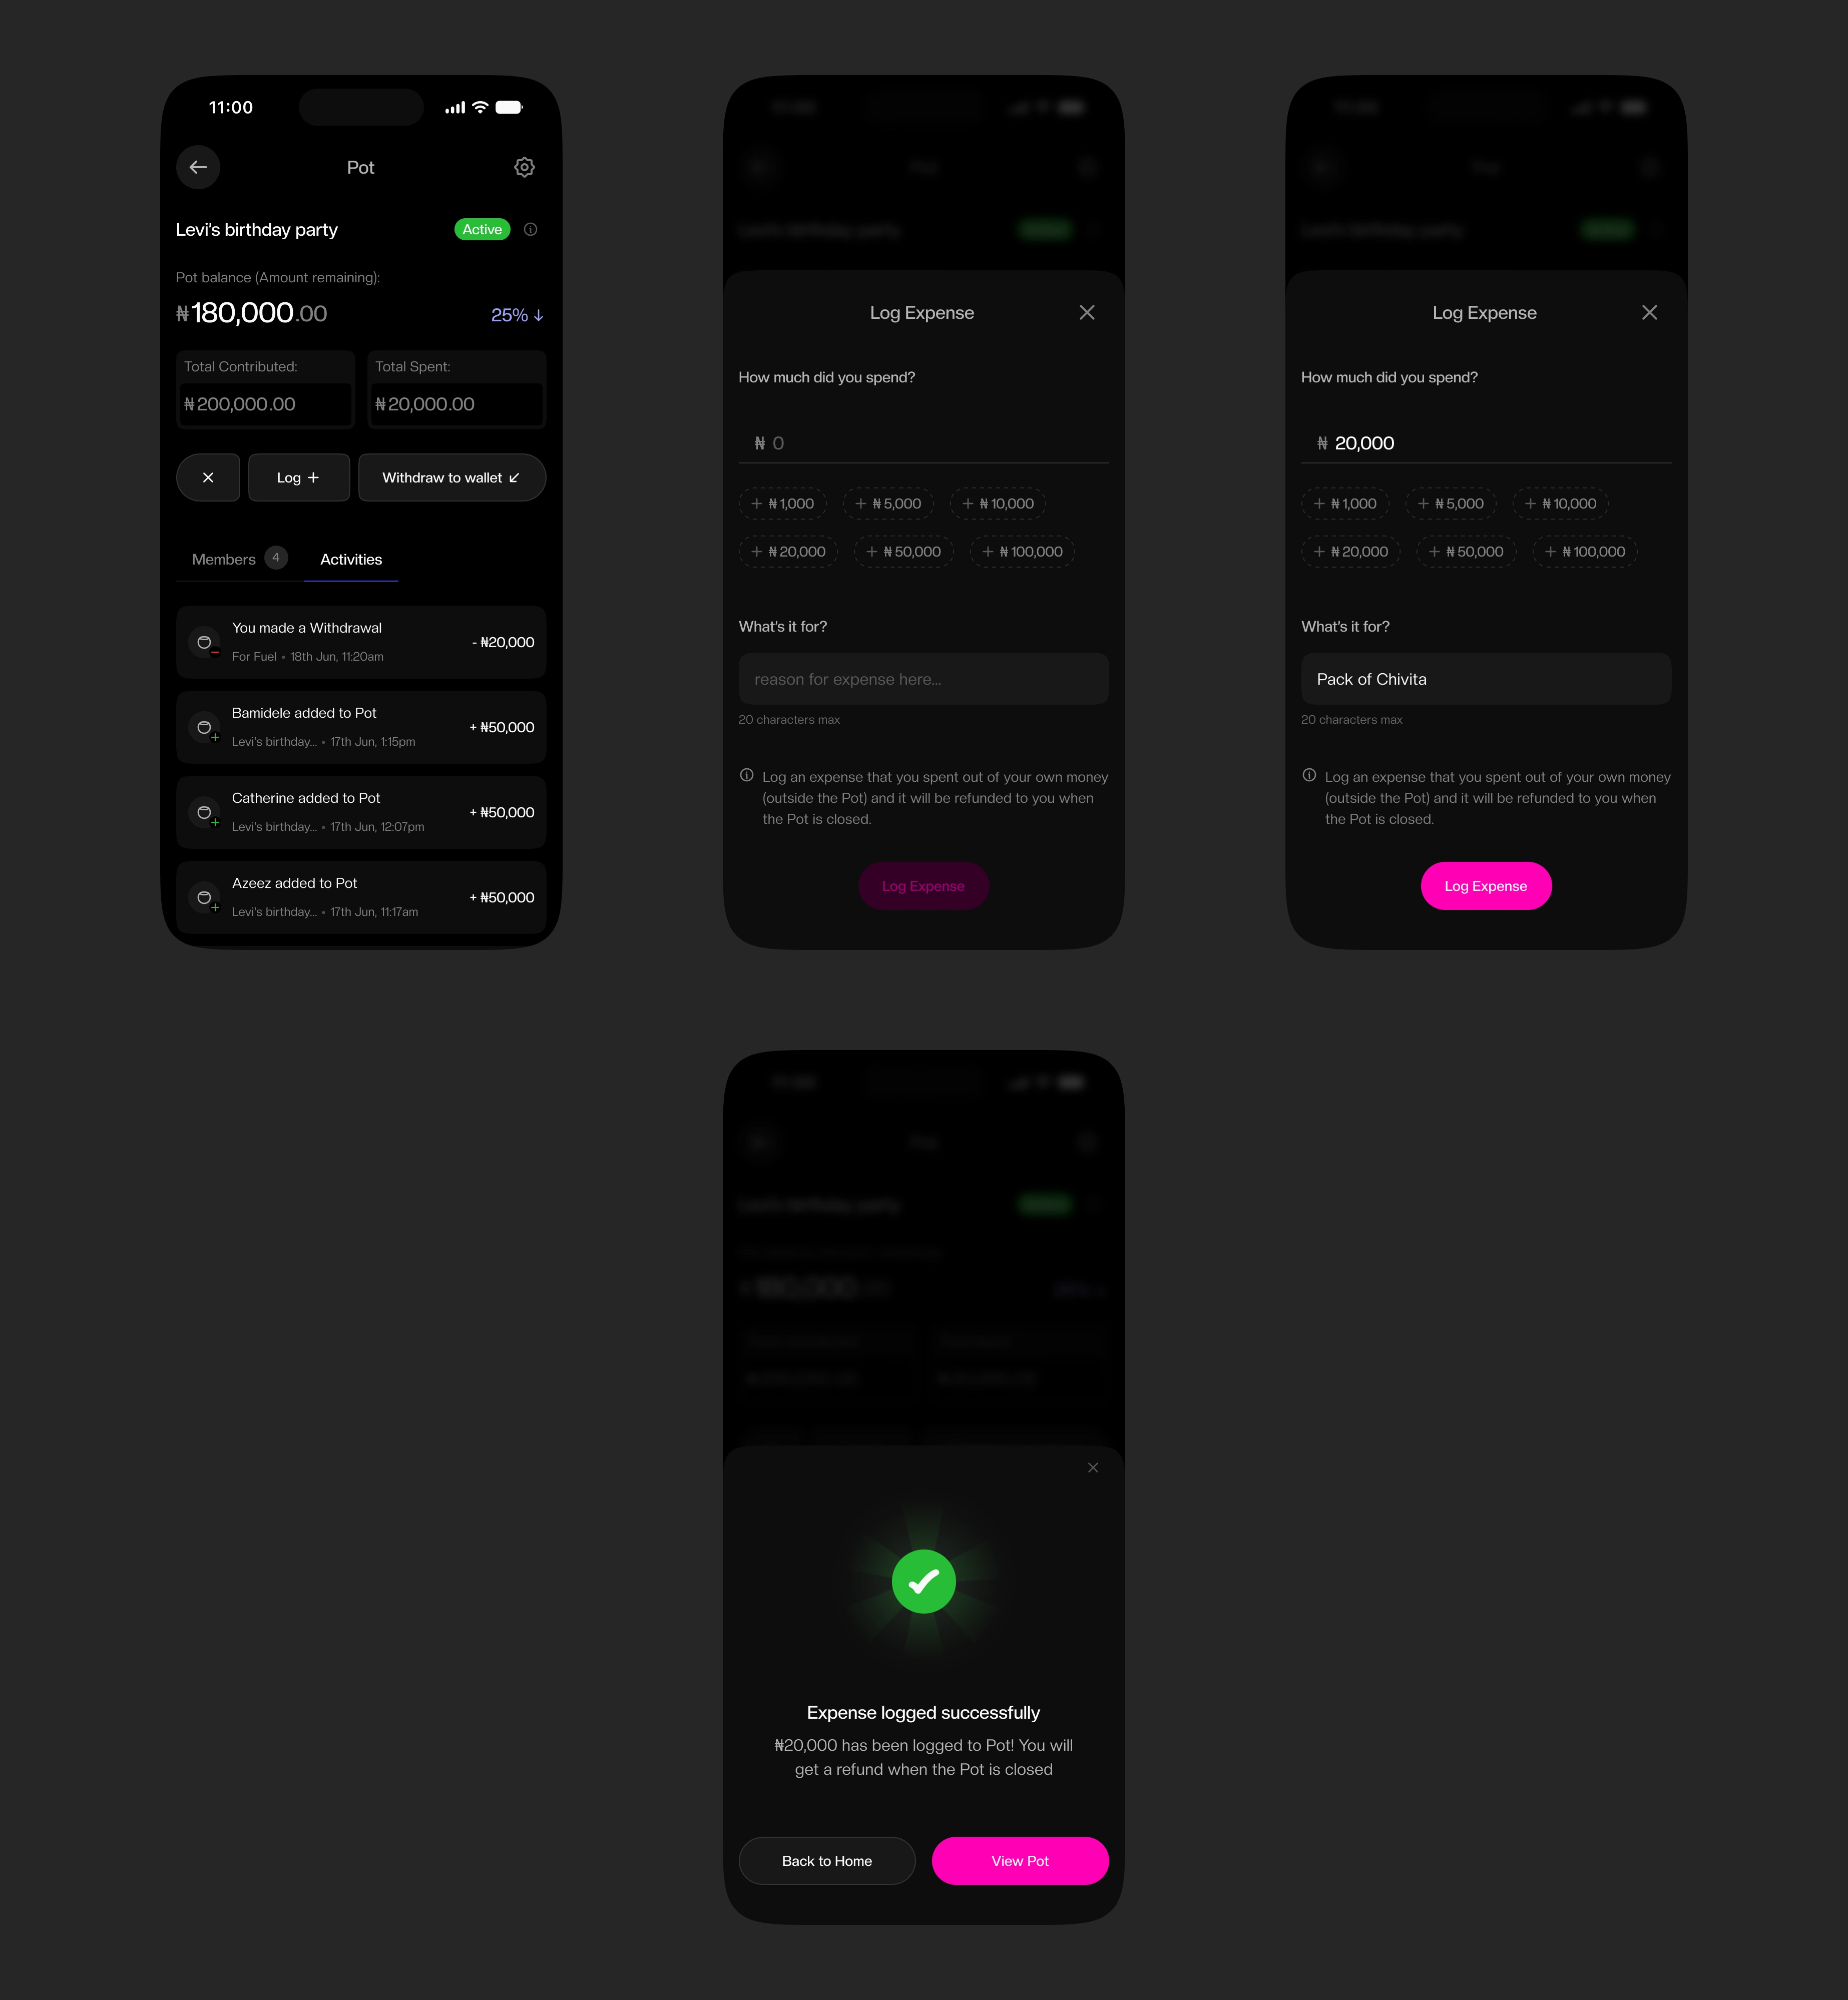
Log expense flow
This feature has a downside though. If a pot experience takes a longer time before it is closed, that means the logged expense refund will take that long. A workaround to this will be due soon.
2.3.3. Close Pot
When the experience ends, the host closes the pot. If need be, the app then calculates and presents a settlement summary which factors the remaining pot balance (if any) to be shared equally and/or any logged expense each member covered on behalf of the group to be refunded. Once confirmed, the refunds automatically get sent to the members’ personal wallets, where they can withdraw to their bank account or hold the balance for a future pot.
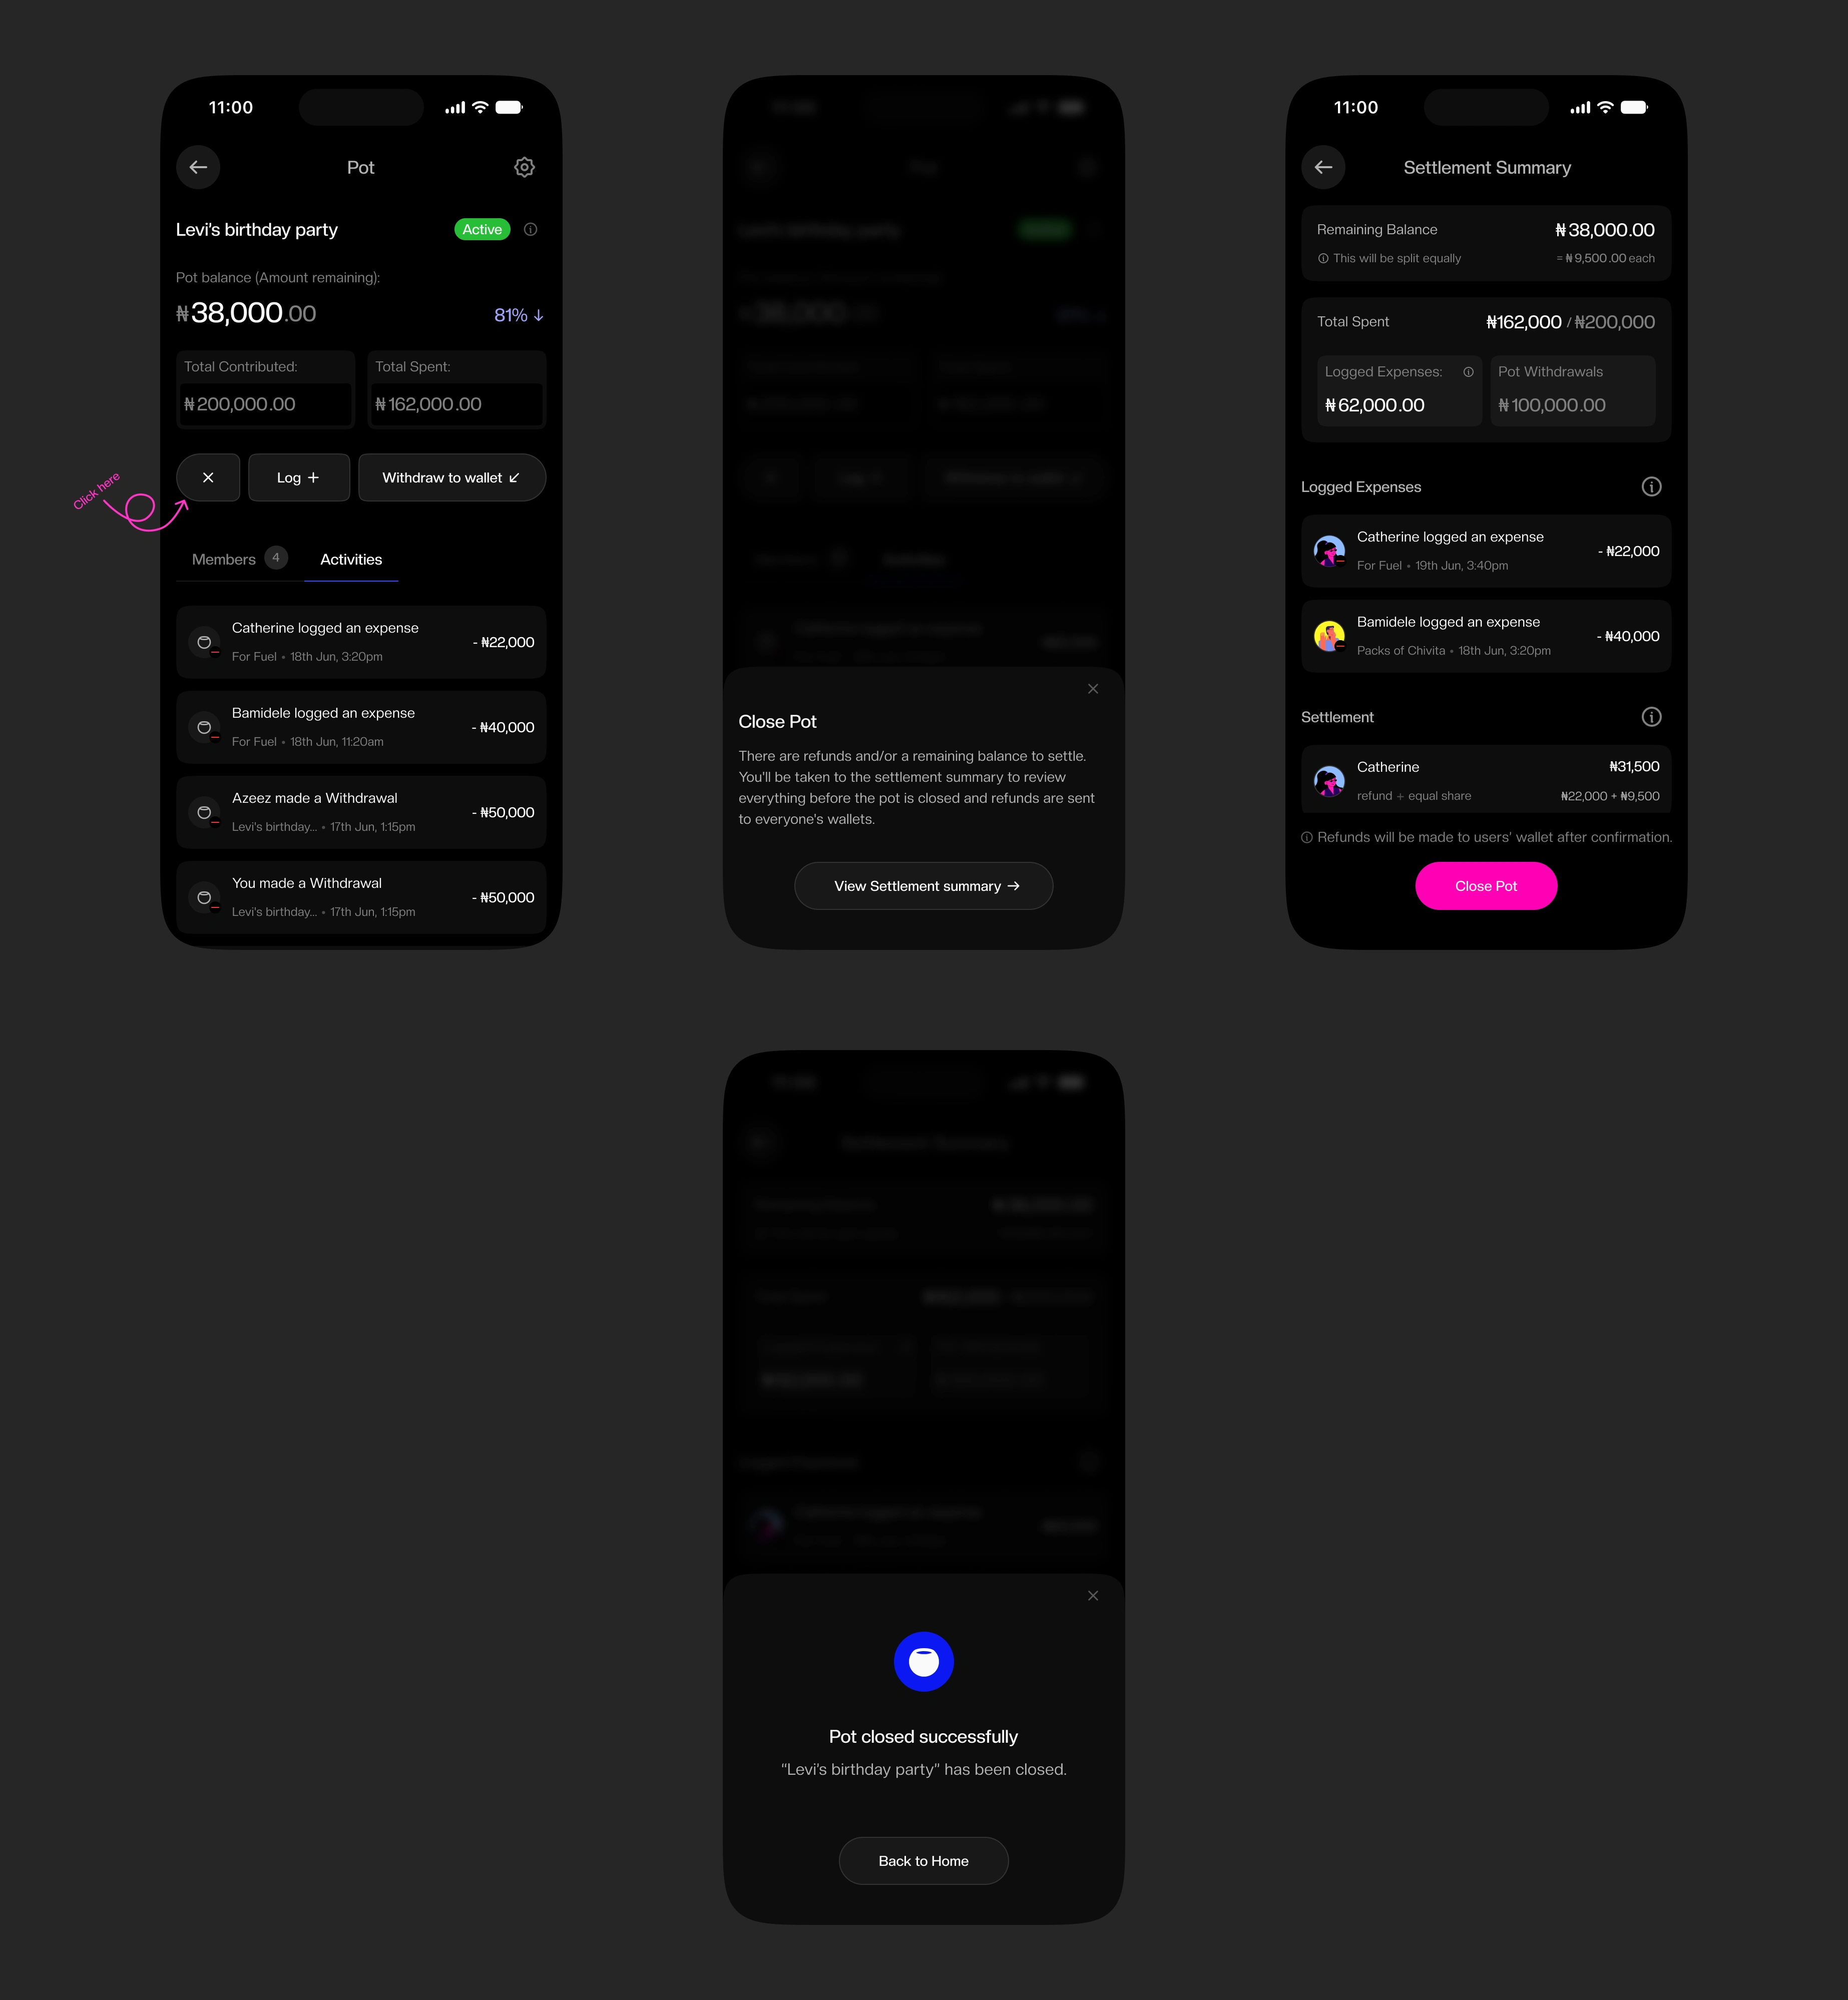
Close Pot flow, showing the settlement summary (top right)
The Close Pot option is also vital in the pending state. This gives the host the option to tap out of any abnormalities in plans that might arise. For example, a member or two backs out of the Pot and refuses to contribute their share, instead of leaving the Pot hanging because of that, they can close the Pot, let the already contributed members get their refunds and can even be able to create another Pot without the defaulting members.
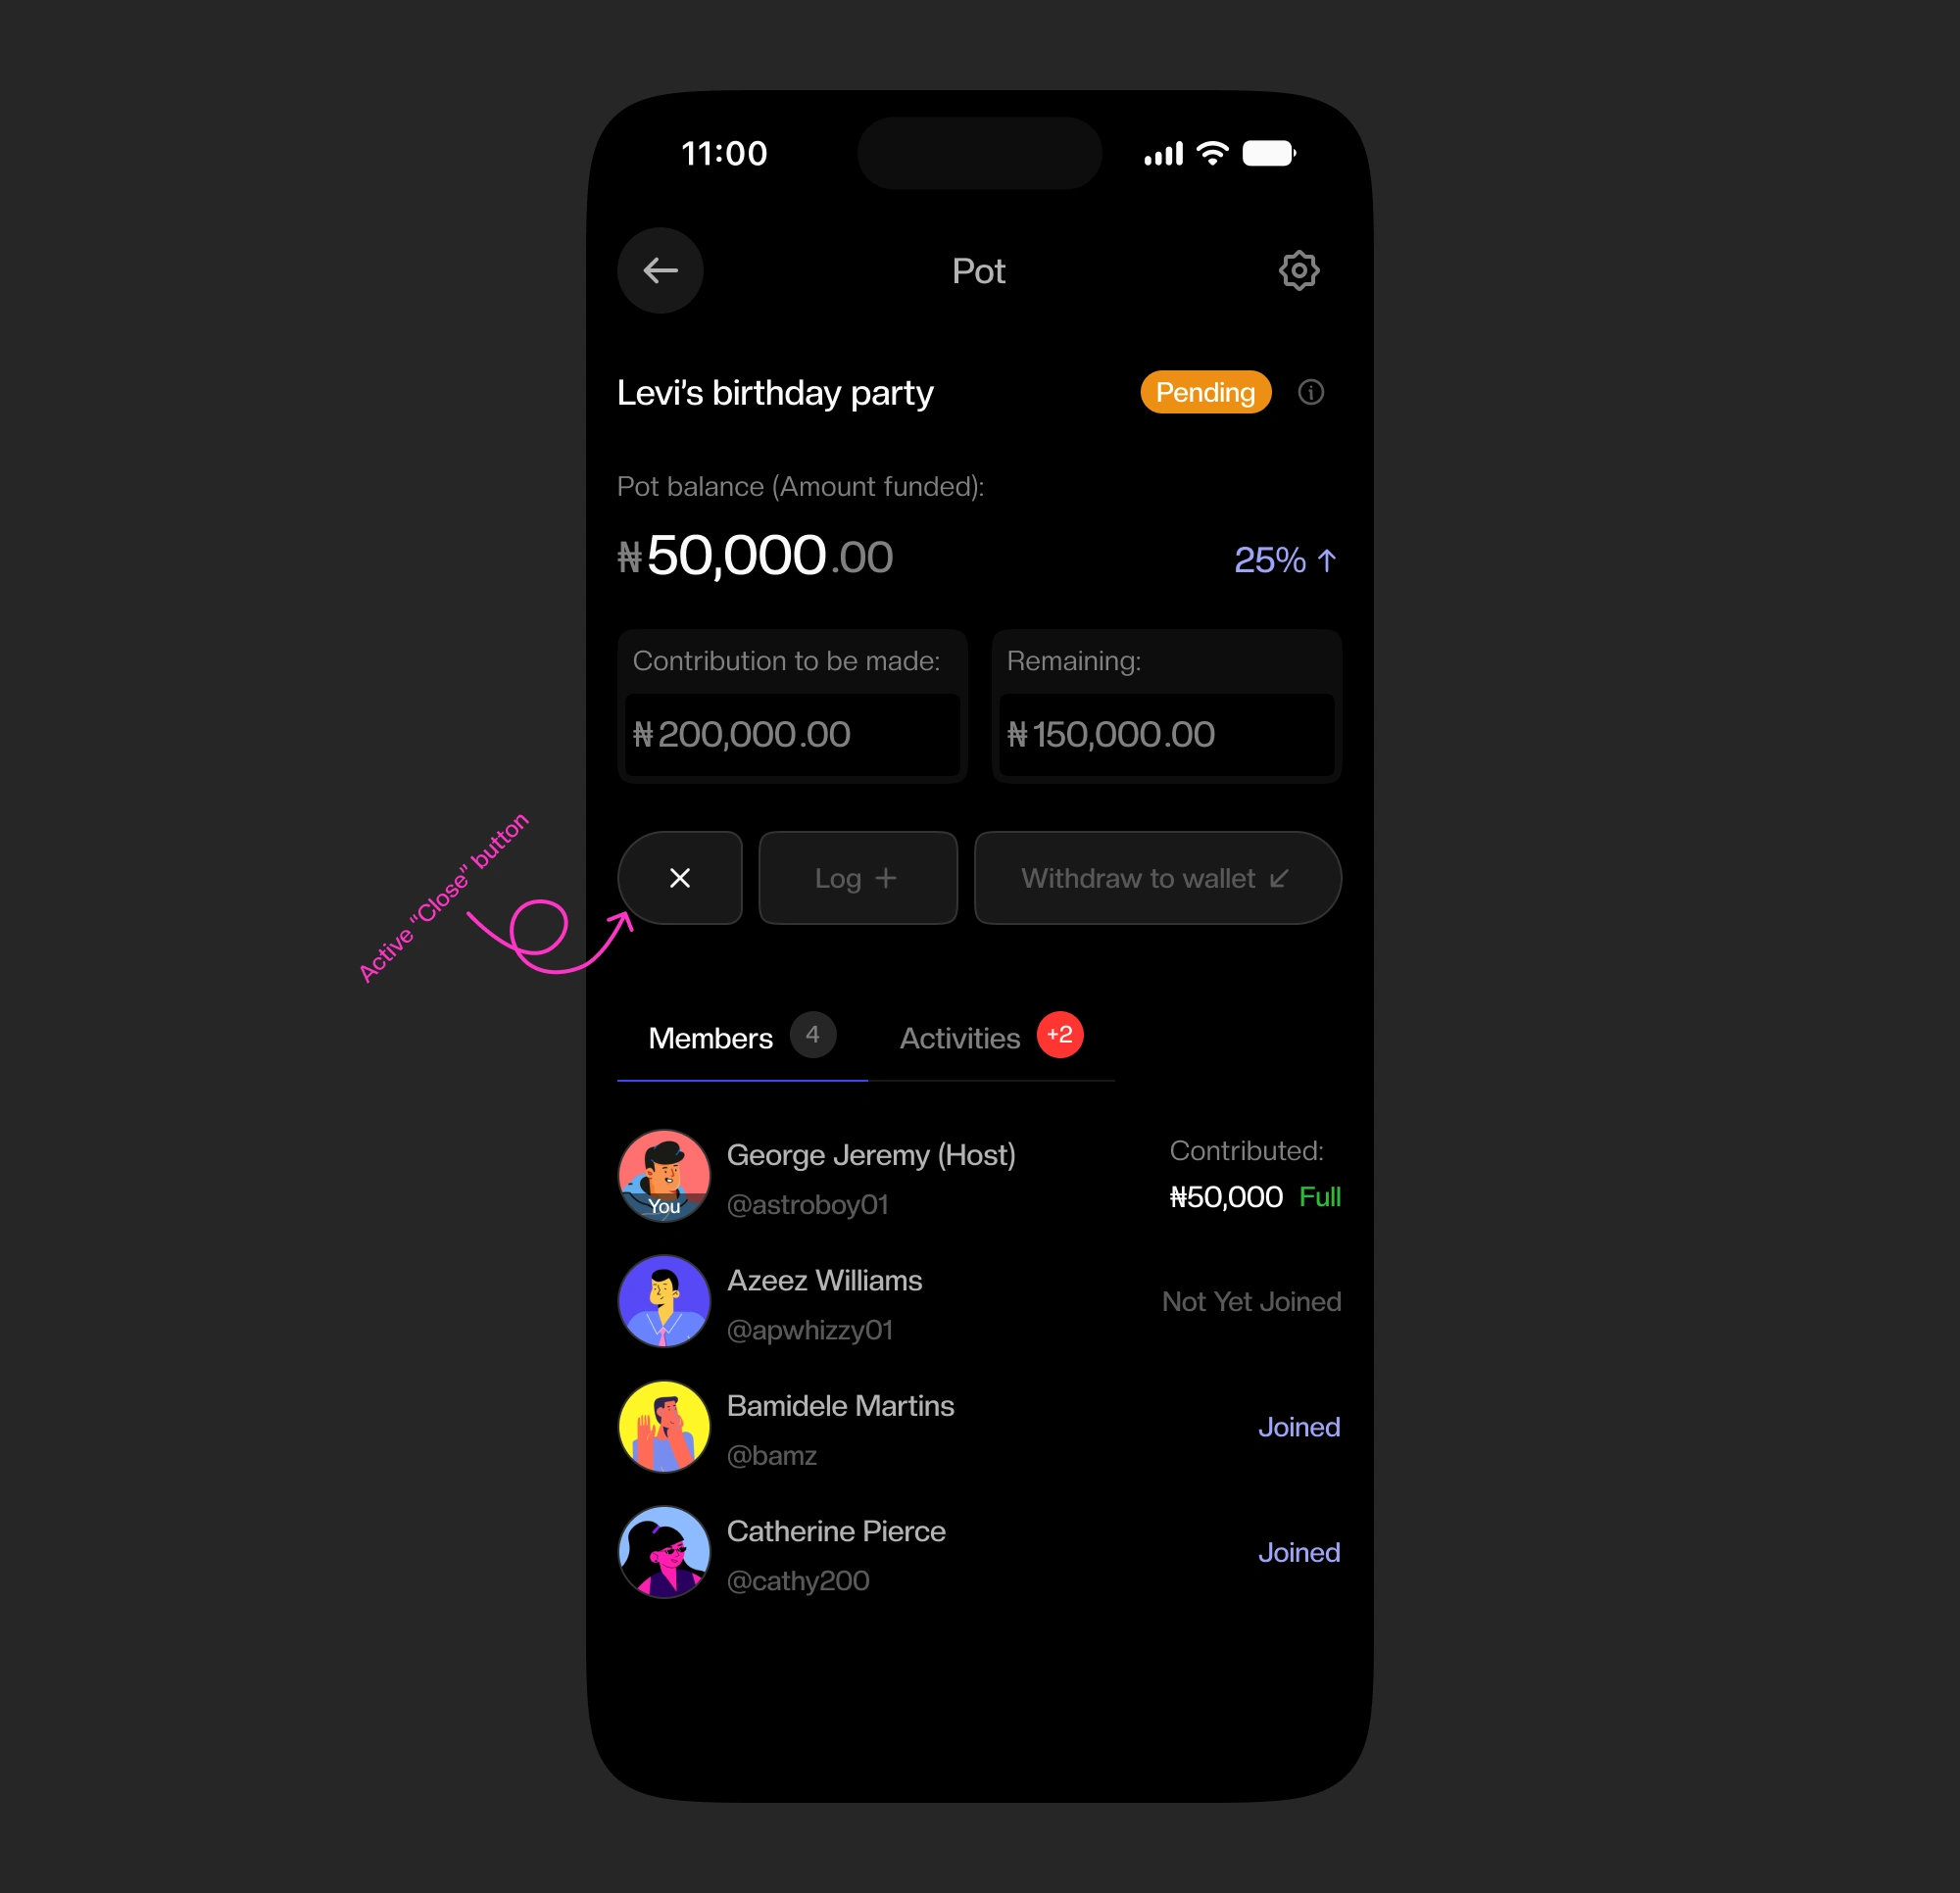
Pending Pot also with an active 'Close Pot' button
As mentioned earlier, there will also be times where all the contribution was spent without any needed refund (logged expense) settled. Hence the Close Pot button also holds two different bottom sheet states; when there is a settlement summary and when there is not.
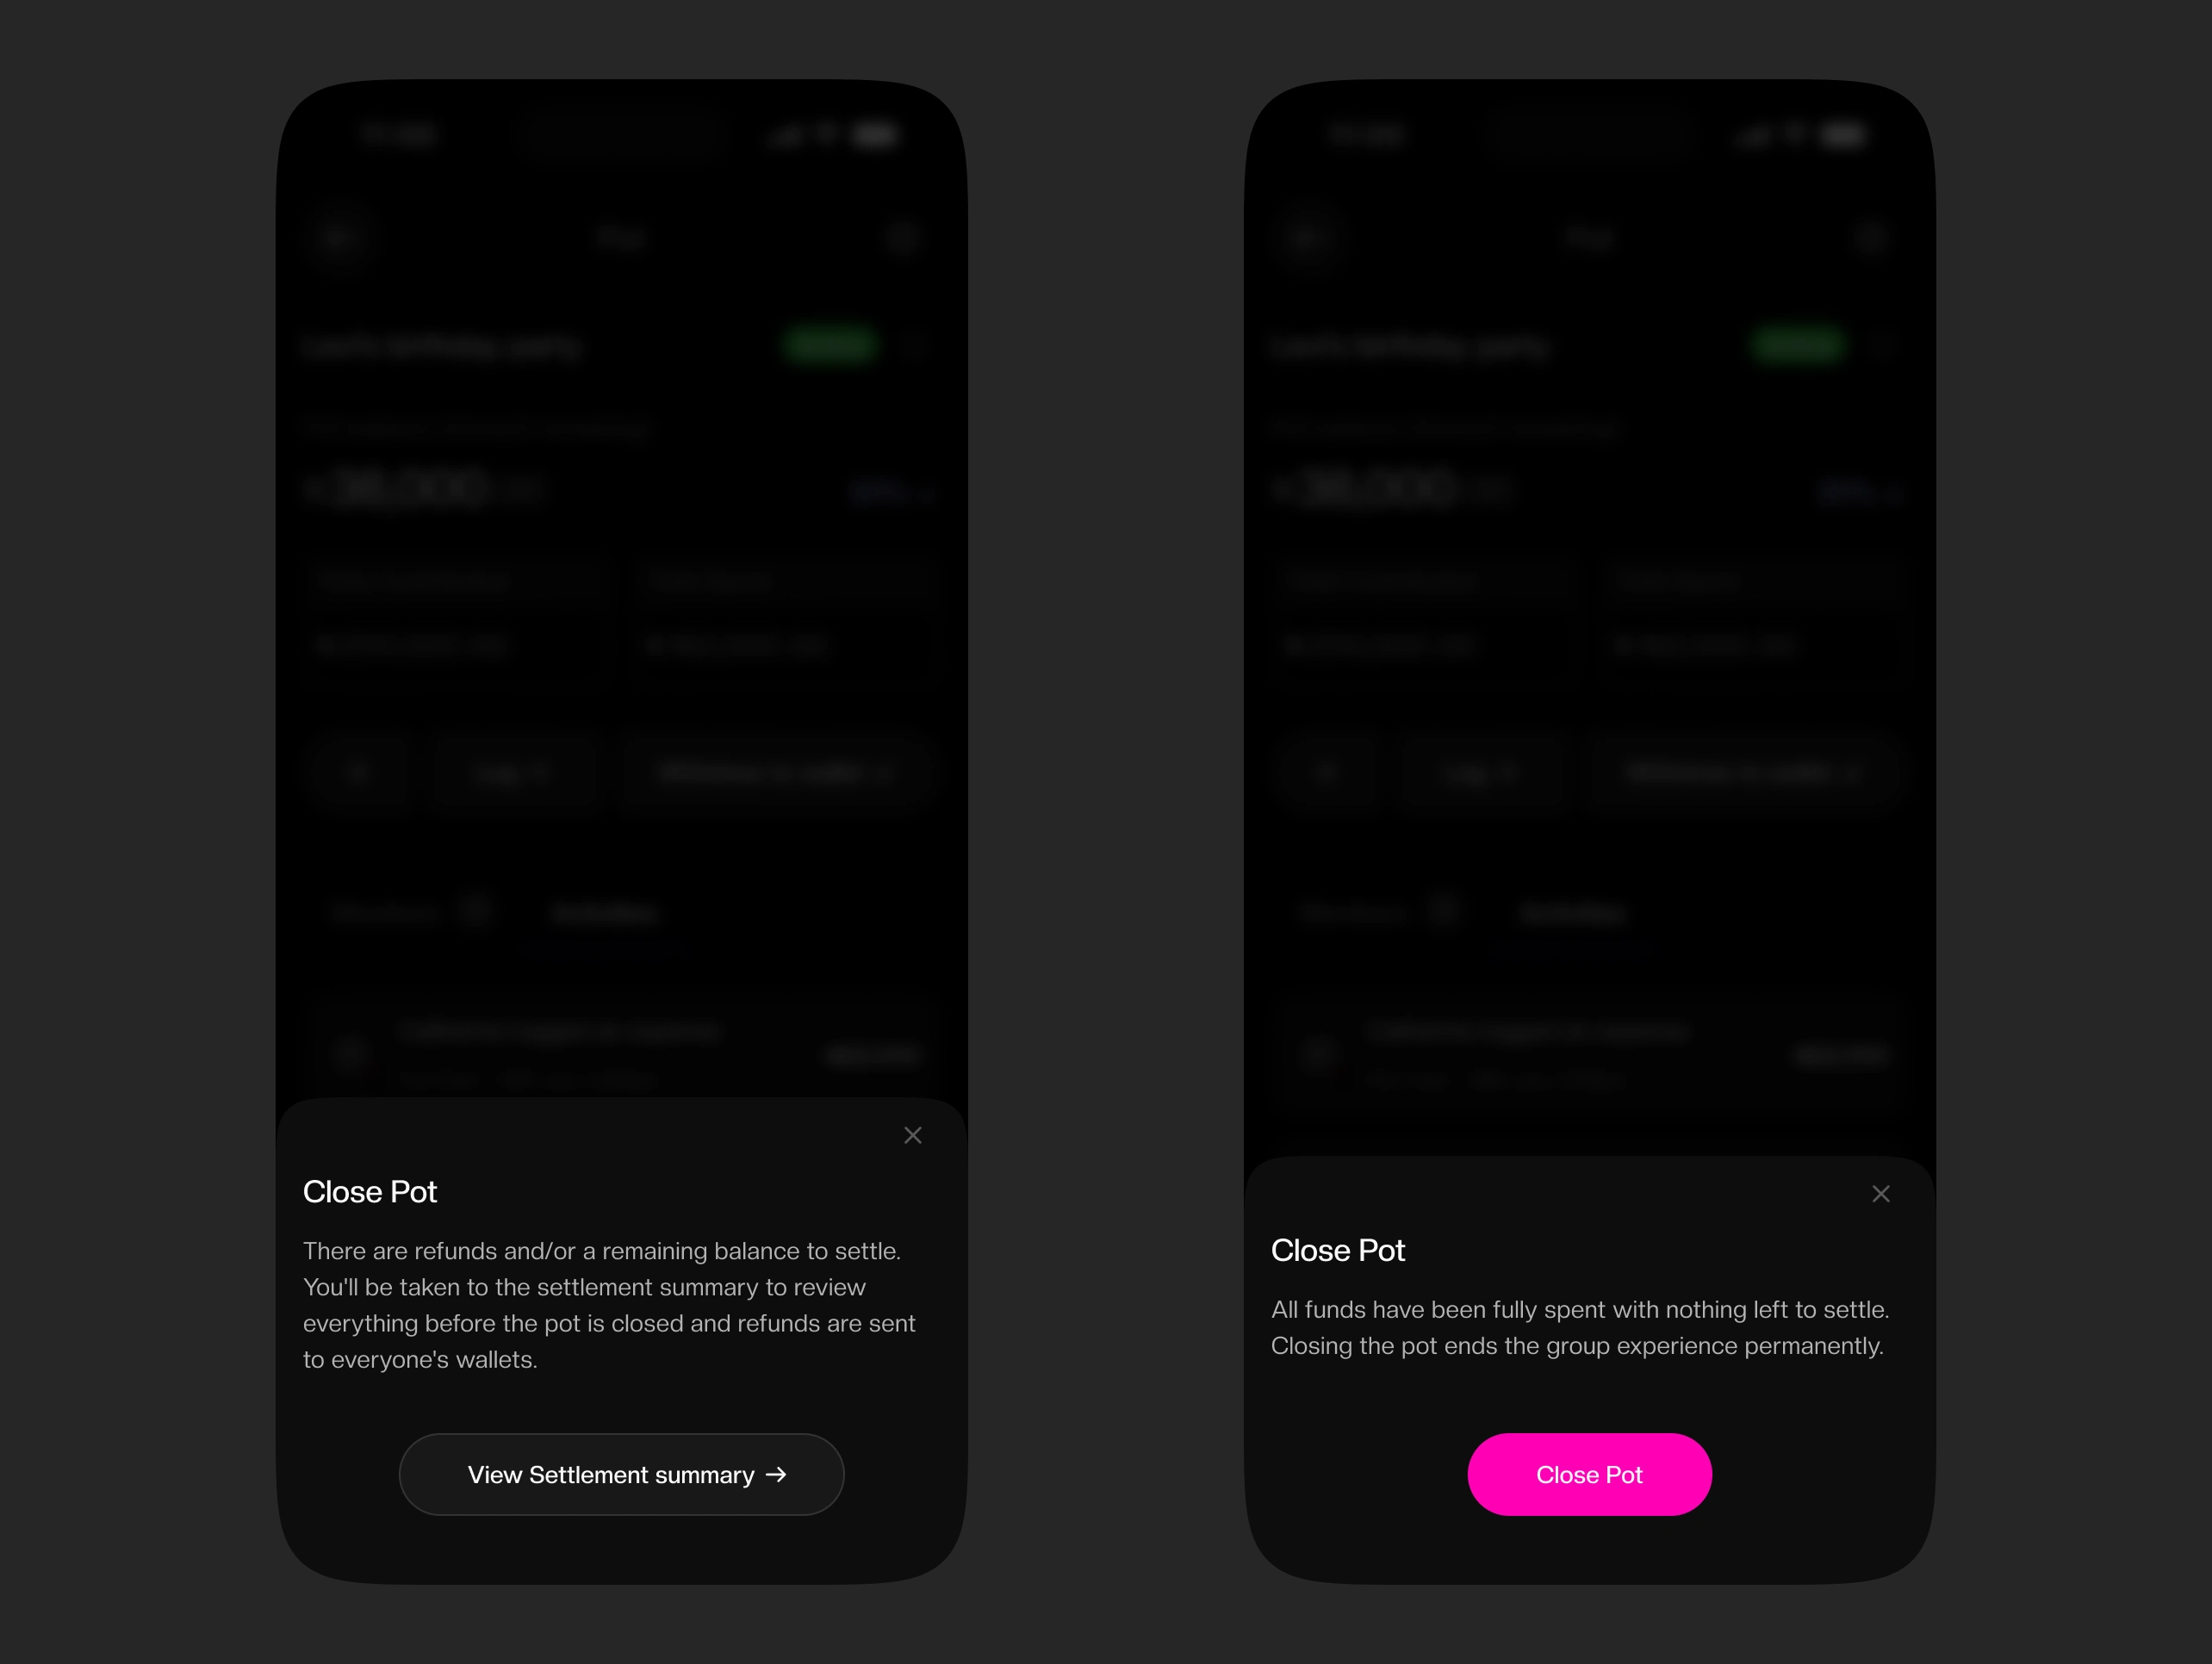
Close Pot button sheet states. (left) for when there is settlement to be made, (right) for when there is not.
2.4. Extras
These are extra highlights besides the major flows
i. The Pot card
(I am really proud of this one, lol).
I ensured the Pot card design showed the important info about the pot upfront without any overload. It even cleanly shows your own activity in the Pot, whether you have funded (for pending Pots), or spent (for active Pots), and also records the number of times for each. It’s such a clean concept (I mean to brag).
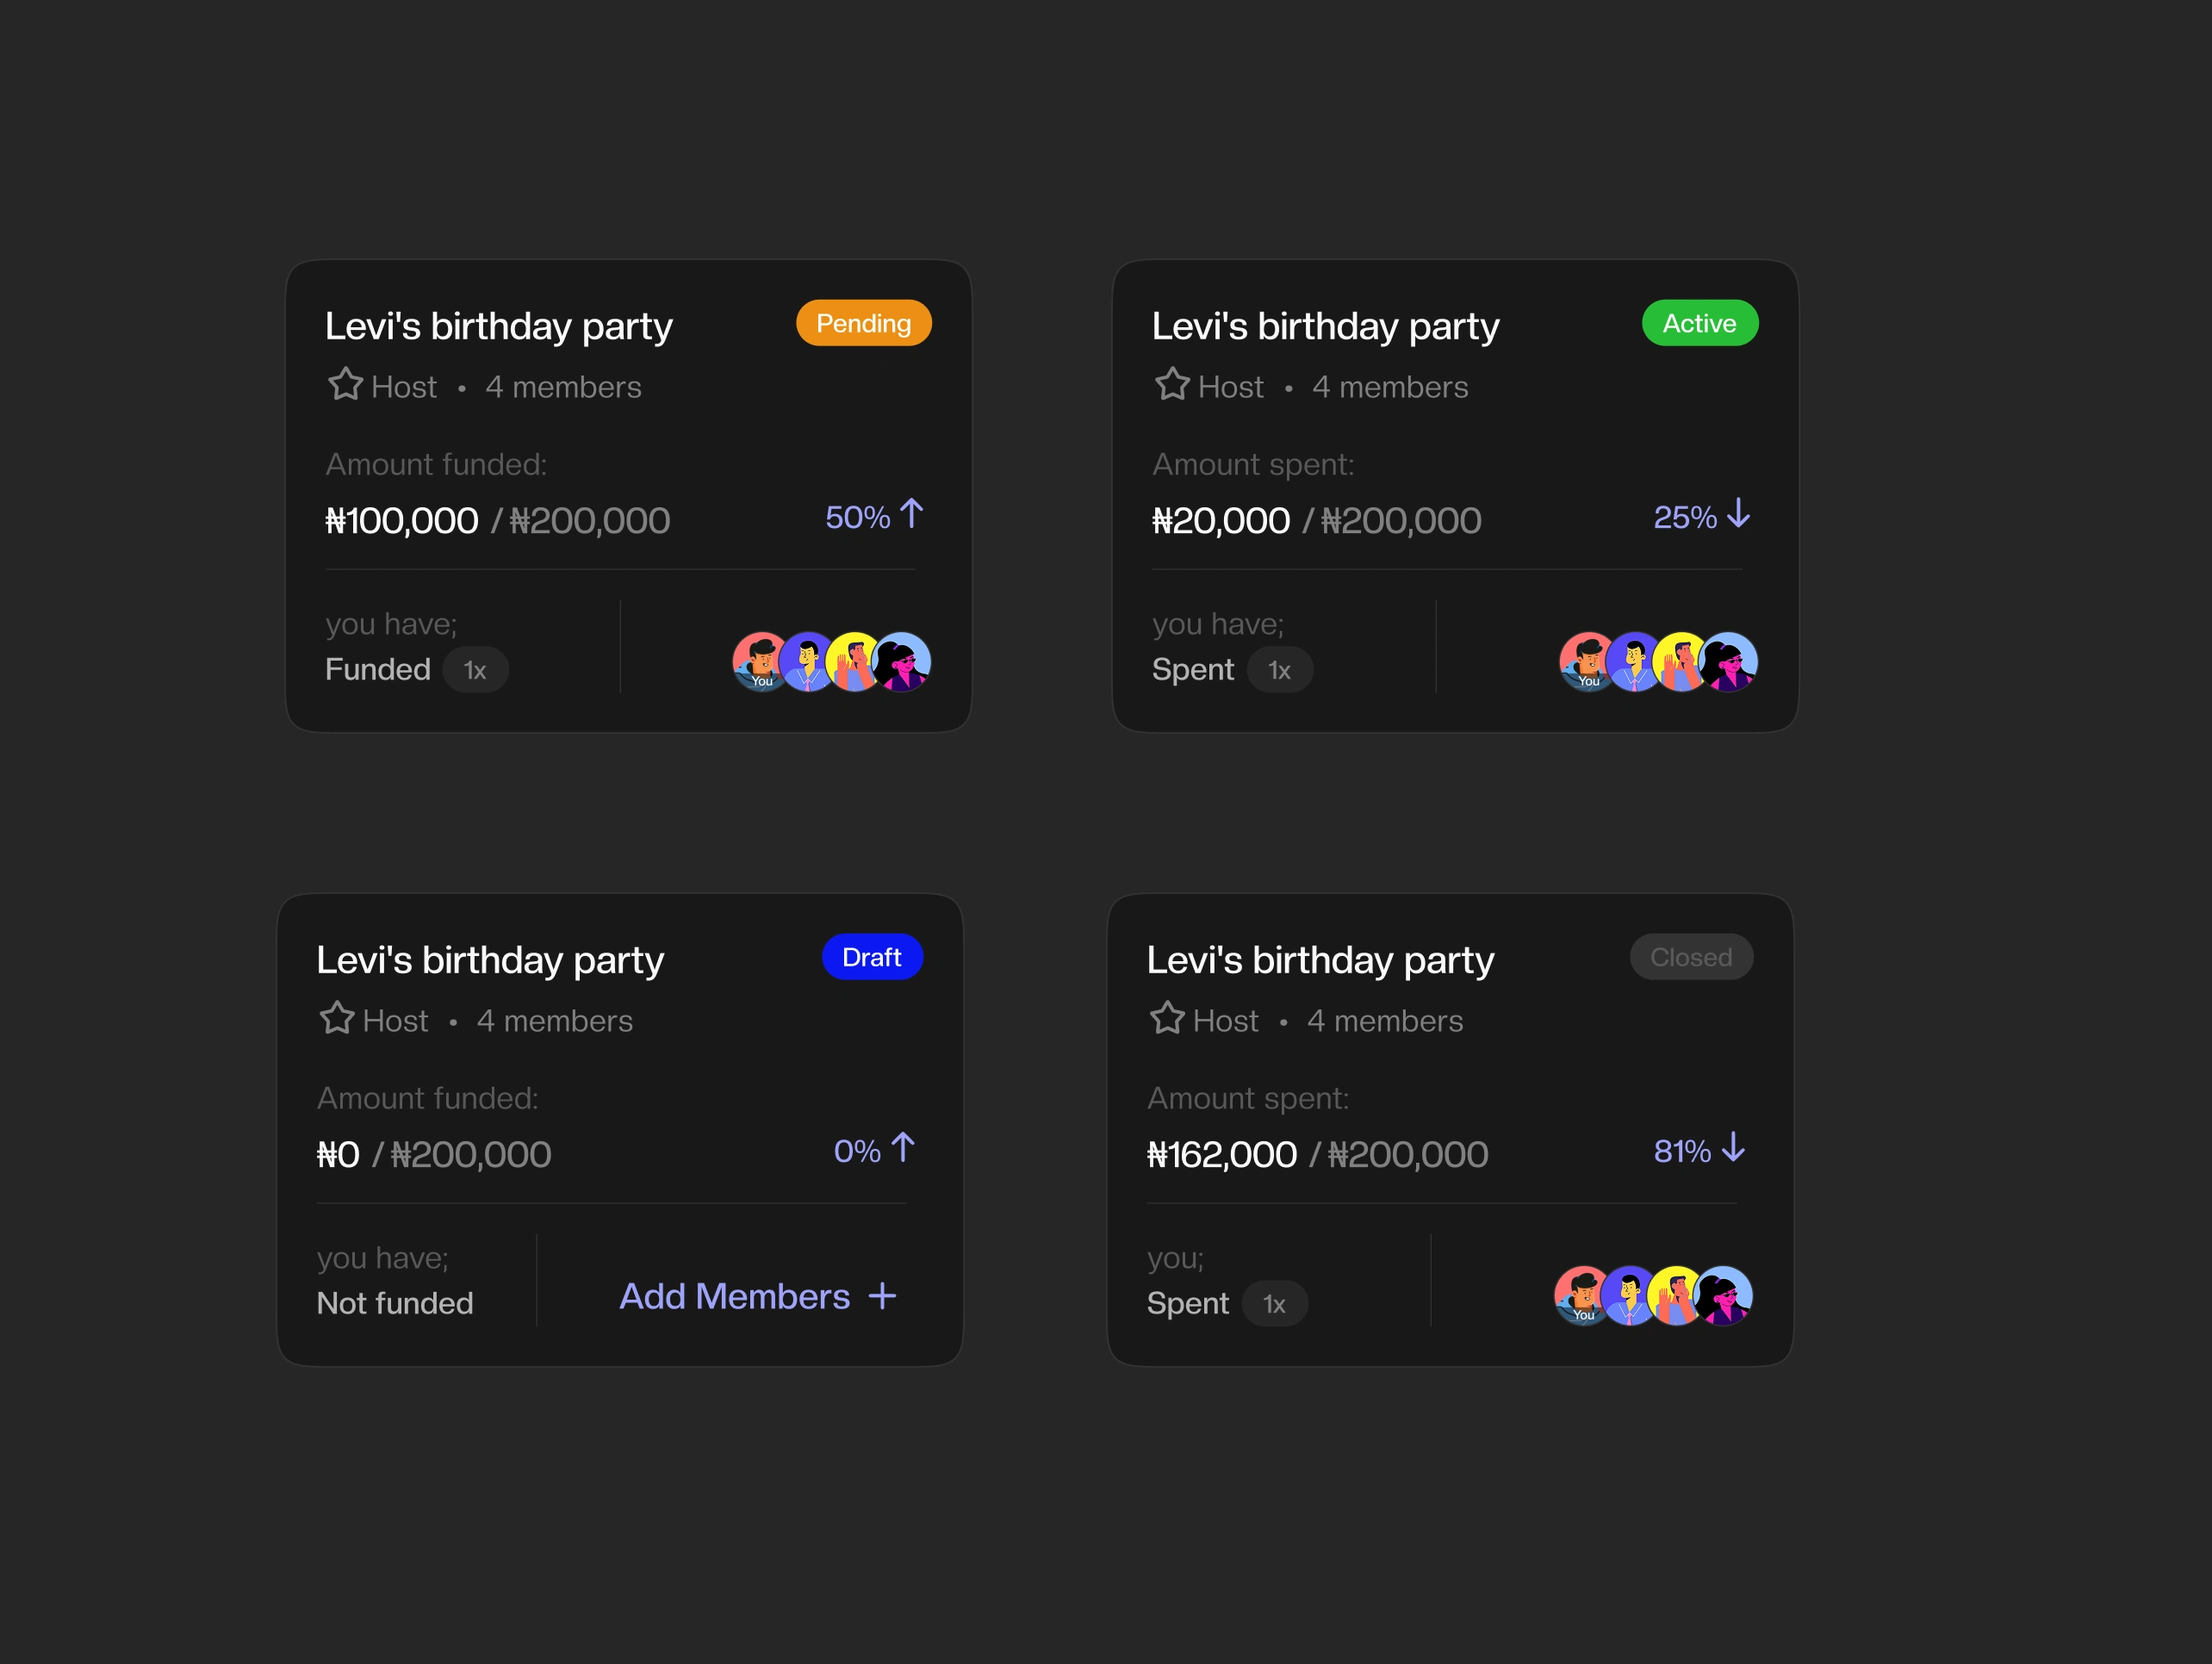
The Pot card states. (top left) for pending Pots, (top right) for active Pots, (bottom left) for draft Pots, (bottom right) for closed Pots
ii. The ‘Add to Pot’ flow
Users add to Pot when they want to make their contribution to any Pot they are in. The money is sent from their balance and funded into their chosen Pot.
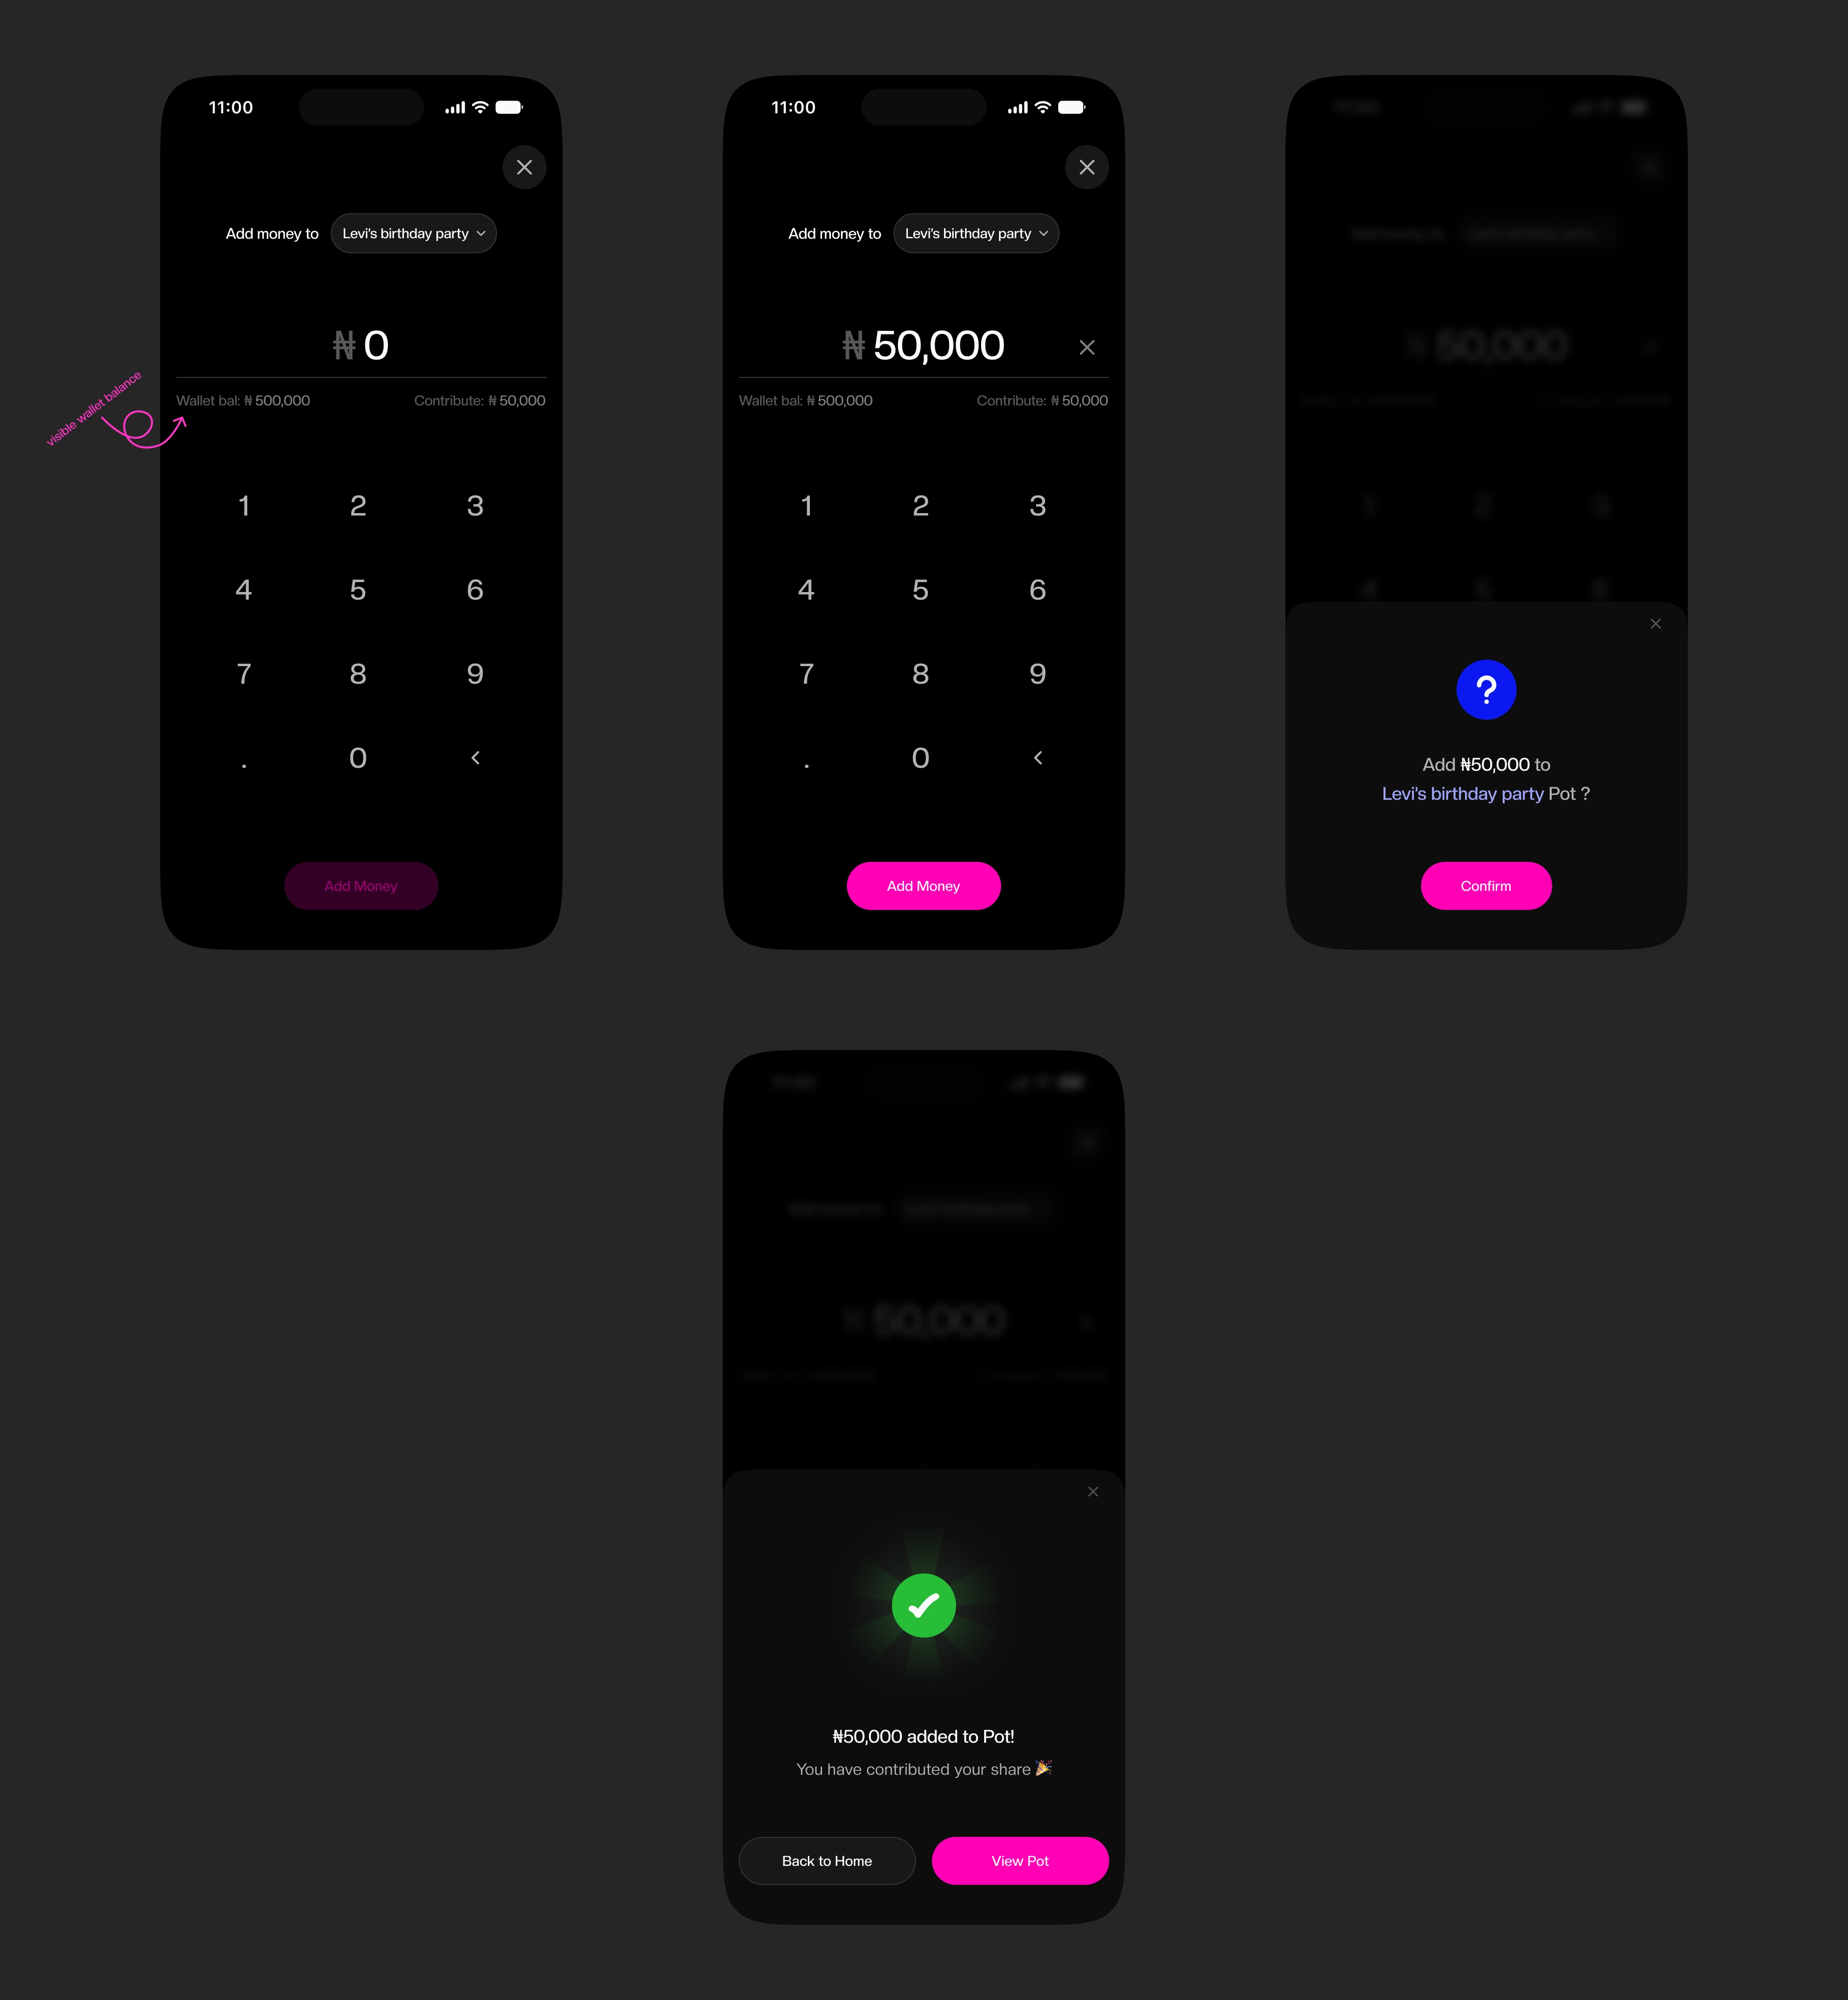
Add to Pot flow
To curb error prevention, I made sure to display the available wallet balance in any transfer page, so they can easily know their max amount and make any (mind) calculation when needed.
Thanks for staying till the end.
Do get in touch with me on Linkedin and let's work on your amazing idea.
Like this project
Posted Jul 16, 2026
Designed key features for Cliq, a fictional group finance mgt app to manage shared expenses and contributions efficiently.
Likes
1
Views
38
Clients
Cliq