Building a Resilient Three-Tier Architecture on AWS with Deploy…
Ankit Jodhani
🙋♂️ Introduction
Hii everybody, my name is Ankit Jodhani. and I'm DevOps and Cloud enthusiast. I recently graduated from university and building my career in DevOps and cloud. I have written many blogs and projects on could and Devops you can see that on my Hashnode profile Ankit Jodhani.
📚 Synopsis
In this blog, I will show you how we can build Resilient Three-Tier Architecture Deploying the MERN Stack app on AWS: Achieving High Scalability, high availability, and Fault Tolerance. In this project we are going to use multi-region deployment, one will be the primary region and the second will be for disaster recovery. here we are going to follow a Warm standby disaster recovery strategy. so that our user faces lower downtime in case of disaster. let me give you a brief introduction to the project.
🔹 Story
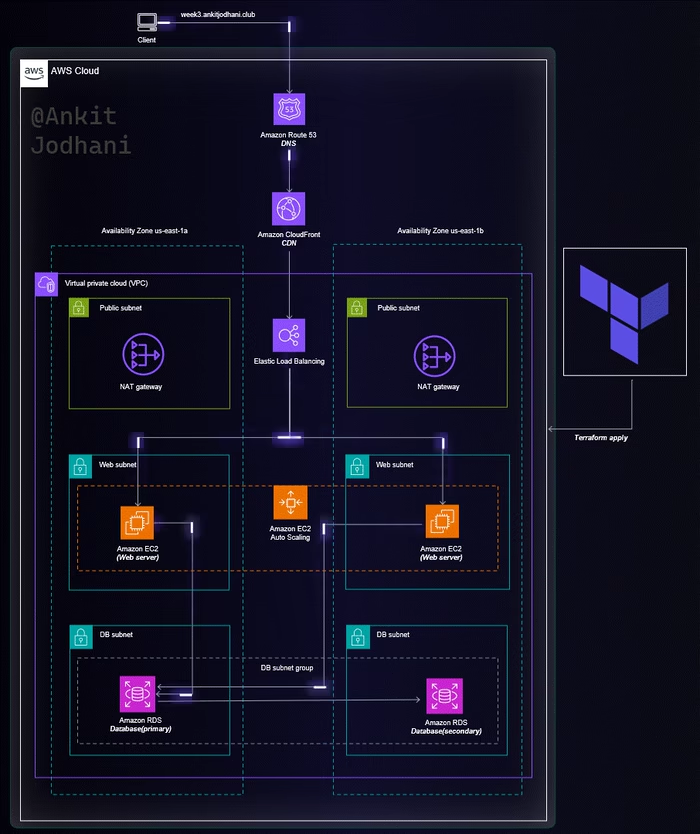
When a user requests the website, Route 53, the DNS service, handles the request and directs it to CloudFront, the CDN (Content Delivery Network), which serves the client. If CloudFront needs to access the web server (frontend) then it routes the request to the Application Load balancer of the web server and that redirects to the web servers. after successfully receiving static pages, the client's browser can make the API call for data. These API calls are routed through Route 53, which sends them to the ALB of the application server (backend server). The ALB then directs the requests to the application server, where data is processed. Additionally, the application server may store some data in the RDS database. and our database is only accessed by the application server. but there is a chance that where we have deployed infrastructure that region goes down because of some kind of disaster. in that case, CloudFront will do the failover for the web tire and Route 53 will do the failover for the application tire. and both start leveraging resources of the DR region. and this is how we will achieve resiliency. if you didn't get an idea then don't worry it will be easy once you see the architecture.
I am going to use AWS Cloud but you can you whatever cloud you like. more or less steps will be similar.
📋 Prerequisites
📌 AWS Account
📌 Basic knowledge of Linux
📦 List of AWS services
🌍 Amazon CloudFront
🌐 Amazon Route 53
💻 Amazon EC2
⚖️ Amazon Autoscaling
🪪 Amazon Certificate Manager
🪣 Amazon Backup service
🗄️ Amazon RDS
☁️ Amazon VPC
🔐 Amazon WAF
👁️ Amazon CloudWatch
💡 Plan of Execution
🤔 What is three-tire architecture
🏠 The architecture of the project
🚀 A step-by-step guide with screenshots
🧪 Testing
🧼 Resource cleanup
🥳 conclusion
🤔 What is Three-tire architecture
Three-tier architecture is a software architecture pattern that separates an application into three layers.
🔸
Presentation layer ➡️ handles user interaction🔸
Application layer(backend logic) ➡️ processes business logic and data processing🔸
Data layer (database) ➡️ manages data storage and retrievalEach layer has distinct responsibilities, allowing for modularity, scalability, and maintainability. This architecture promotes the separation of concerns and facilitates easy updates or modifications to specific layers without impacting others.
🏠 Architecture of the Project
Let's see the architecture of today's project. we are going to follow a goal-driven approach that helps us to put in minimum effort and gain lots of results. it's very important to understand what we are going to build and to understand you can follow the below architecture. I request you please go through it once. it helps you a lot while building this project.
I have spent hours creating this below animated architecture and if you liked it please like my blog and follow me on LinkedIn.
Architecture
Architecture design without animation here
🚀A Step-by-step guide
we are following a Warm standby Disaster recovery strategy so we are going to utilize two regions during our deployment. us-east-1 AKA North Virginia as primary and us-west-2 AKA Oregon as secondary or DR.
🔹 VPC
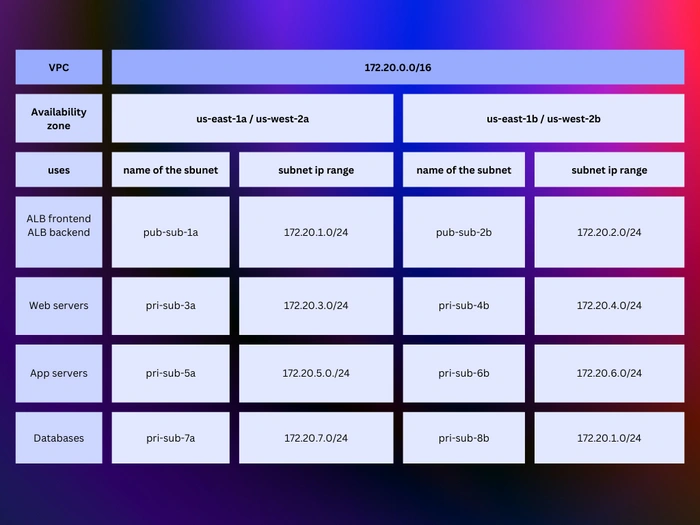
firstly we are going to set up VPC in both regions to isolate our resources from the internet. The below image contained all the subnets, their IP range, and their uses. you can use your own VPC setup if you have a better idea. and if you are a beginner, please create VPC as I have shown below.
please log in to your AWS Account and type VPC in the AWS console. and click on VPC service.
click on
Your VPC's button on the left and then click on Create VPC the button on the top right corner of the page
here we can see the form where we can fill the configuration of VPC. please enter the name that you want to keep and the IPV4 CIDR block. in my case CIDE block is
172.20.0.0/16.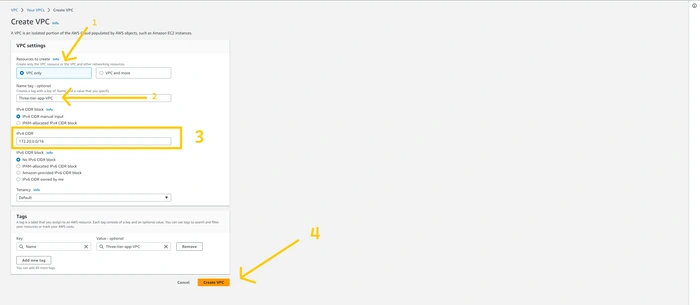
now click on the
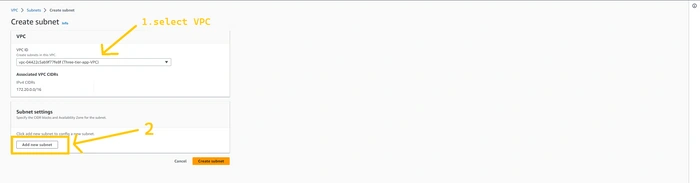
subnet button which is located on the left side and then click on theCreate subnetbutton on the top right corner of the page.
please remove the default VPC ID and choose the VPC ID that we have just created in the VPC ID field. and click on the Add Subnet button at the bottom.
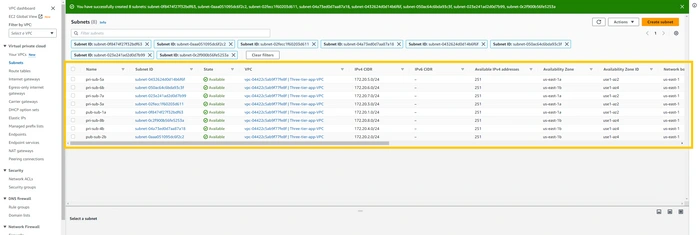
now we need to configure our subnets. Again you can use the VPC configuration image that I shared earlier on the blog to get the IP range and to know which subnet will be used for what purpose. we are going to create a total of 8 subnets of which 2 of them are public and the rest of 6 subnets are private. you can create a subnet as I have shown in the below image. after adding all the subnets click on
Create subnet button.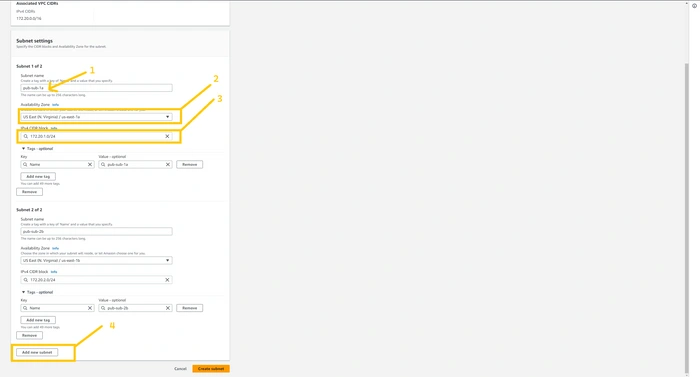
after the successful creation of all 8 subnets, they look like this. you can verify with my subnets.
now we are going to create Internet Gateway also known as IGW. it is responsible for communication between VPC, VPC's public subnet with the Internet. without IGW we won't be able to communicate with the Internet. so let's create that. click on the
internet gateways button at the left panel. and then click on the Create Internet gateways button on the top right corner of the page.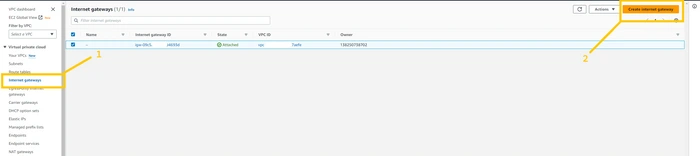
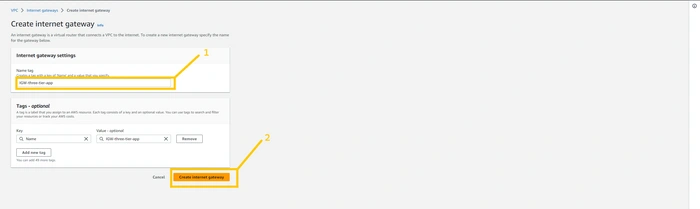
give any name you wanna give to IGW. and click on Create Internet gateway button.
after creating an internet gateway we need to attach it with VPC to use it. for that click on the Action button. here you can see the drop-down list. please select the option Attach to VPC.
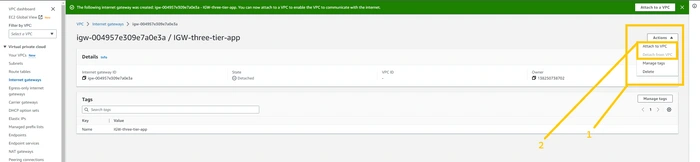
please select VPC that we have created just now from the Available VPC list. and then click on the
Attach Internet gateway button.
Now we need to create a NAT gateway. NAT gateway is responsible to connect resources that are in the private subnet to communicate with the internet. all the resources which will be there in a private subnet will communicate to the internet through the NAT gateway. we will keep the NAT gateway in the public subnet so that it can access the internet. NAT gateway is a chargeable resource. so you will be charged by AWS as long as you keep it up. Now to create a NAT gateway click on the
NAT gateways button on the left panel of the web page. and then click on the Create NAT gateways button in the top right corner of the page.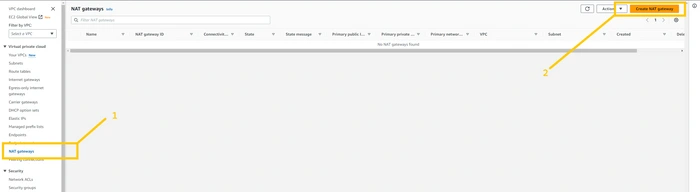
give any name you want to give to the NAT gateway. but be cautious with selecting a subnet. You have to select one of the Public subnets among the two. either pub-sub-1a or pub-sub-2b. then click on the
Allocate Elastic IP button to allocate Elastic IP. and then click on the Create NAT gateways button. NAT gateways creation takes 2-4 minutes.
Now we need to have a route table to handle traffic for public subnet and private subnet and for that, we need to create a Route table. we are going to create two route tables one for the public subnet and another one for the private subnet. first, we are going to create RT for the public subnet. so click on the Route table button which you can see on the left panel. and click on the Create Route table button on the top corner of the page.
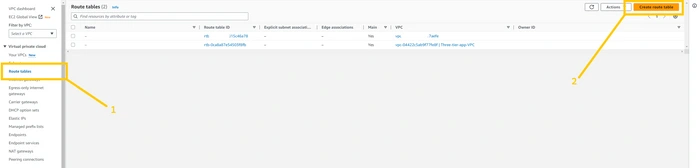
give a name to your RT such as Pub-RT. please give a name that is appropriate for resources then it will be easy to organize the things. make sure you select the correct VPC. and then click on the
create route table.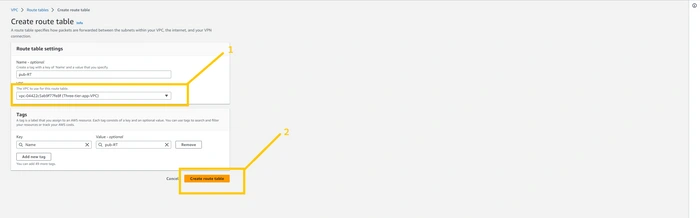
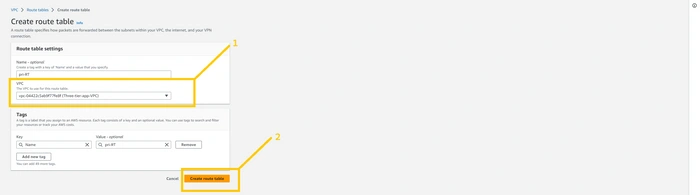
let's create RT for the private subnet.
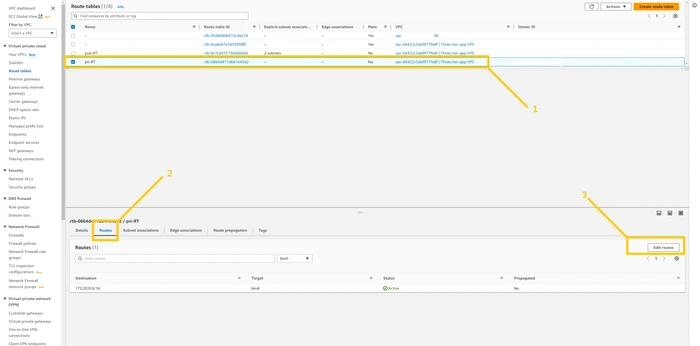
Now, we need to do some association with both RTs so select Pub-RT and click on the
Routes tab at the bottom and then click on the edit route button.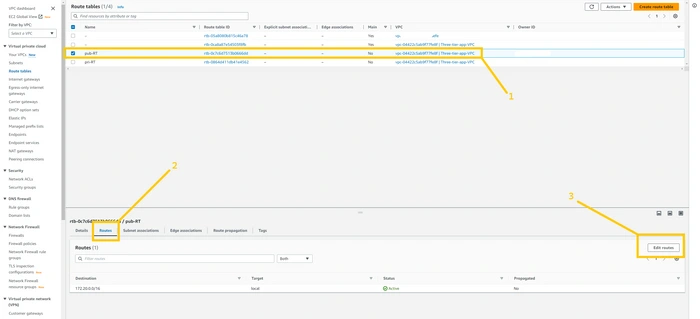
click on the
Add Route button. and select 0.0.0.0/0 in the destination field. and then click on the Target field. As soon as you click on the Target field one drop-down will open and here you have to select Internet gateway, shown in the below image.
here you can see the IGW that we created earlier. select that IGW and click the
save changes button.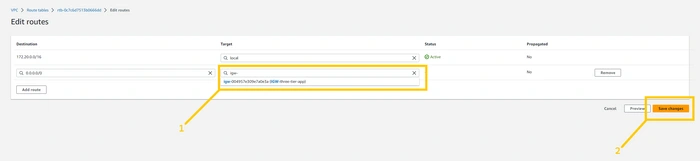
keep Pub-RT selected and click on the
Subnet associations tab next to the Routes tab. and then click on the Edit subnet associations. as shown in the below image.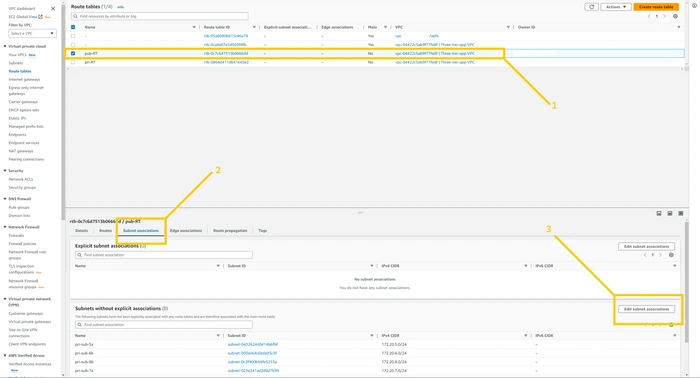
now select both public subnets. pub-sub-1a and pub-sub-2b. and click on the
save associations button.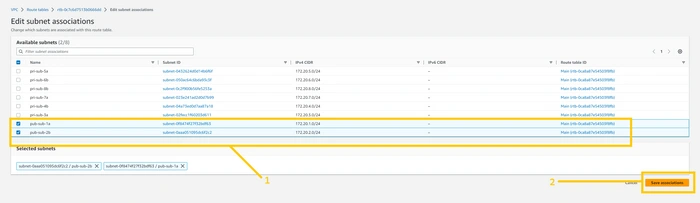
now we have to do the same thing for the Pri-RT as well. but there is one slight change. let me show you. Please select Pri-RT and click on the Routes tab at the bottom of the page.
Here please select
0.0.0.0/0 in the destination field and click on the target. As soon as you click on the target you will see the drop-down list. Please select NAT gateway from the drop-down list. As shown in the below image.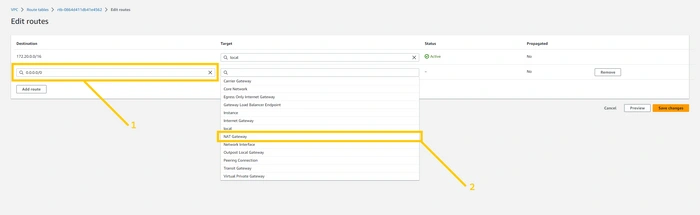
select the NAT gateway that we have just created. and click on the
save changes button.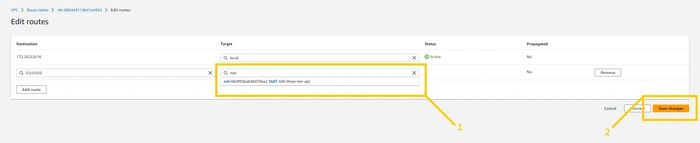
keep Pri-RT selected and click on the
subnet associations tab at the bottom next to the Routes tab. And then click on the Edit route associations button.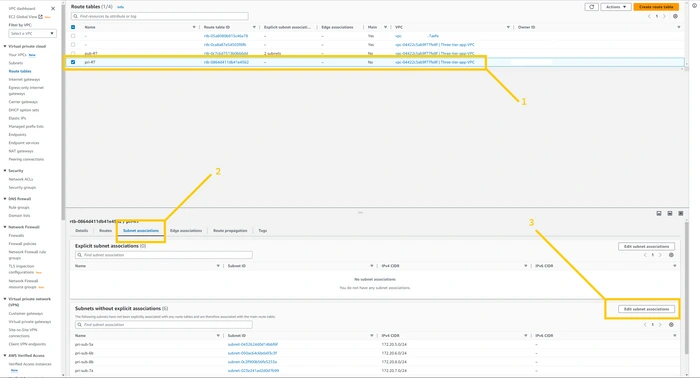
Here you can see the same situation as we saw before. But here we are going to select all the 6 private subnets. And then click on the
save association button.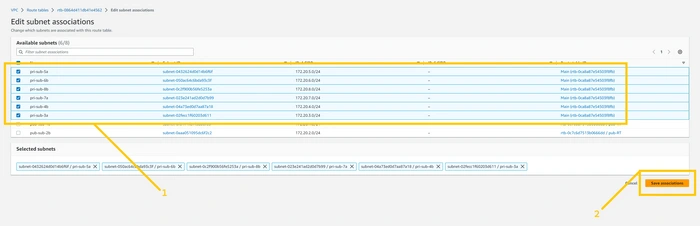
Before we move ahead I want to change the settings of VPC and two public subnets. So just click on the Your VPC button on the left panel and select VPC that we have created and click on the
action button and there you will see the drop-down menu. Select the Edit VPC setting button. As shown in the image.
And here please enable Enable DNS hostname checkbox by clicking on it. and then click on the
Save button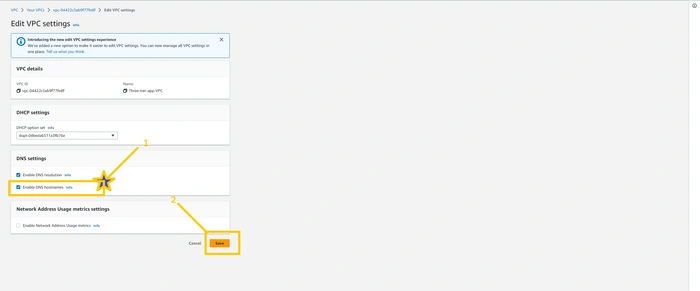
Please go to the subnet page and select the public subnet and click on the
action button and then choose the Edit subnet setting button from the drop-down list.Here you have to mark right on Enable public assign public IPV4 address. And then click on the
save button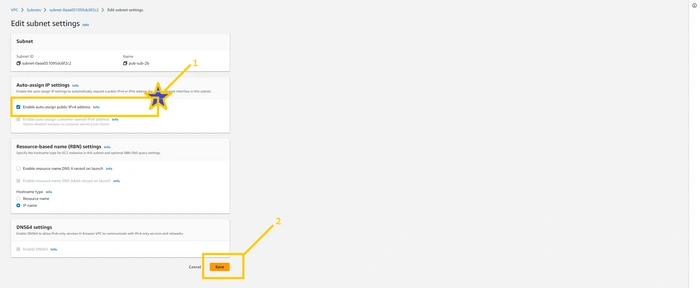
And here we are done with VPC configuration in the primary region. In my case us-east-1 (N.Virginia). But we have to do the same setup in the secondary region as well. As you know I am going to use the us-west-2 (Oregon) as my second region AKA Oregon.
Your task is to set up VPC in the secondary region. All the setup is completely similar. You just have to change the region. And please do VPC set up in the secondary region.
I hope you did the setup. Now let’s move ahead
🔹 Security Groups (SG)
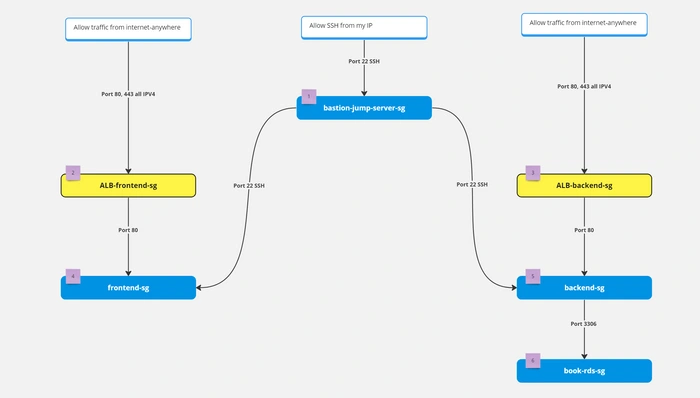
Security groups are very essential part of the infrastructure. Because it can secure the resources in the cloud. SGs are a kind of firewall that allow or block incoming and outgoing traffic. SGs are applied to the resources like ALB, ec2, rds, etc. One resource can have more than one SG.
So let's first understand. How SG will be used in our architecture and how we are going to apply that. Please see the below image you will get all the ideas. Which resource depends on what. And what are the port numbers we need to allow etc..
To create SG, click on the security groups tab on the left panel and here you will see the
Security Groups button. Note that SGs are specific with VPC. So we can’t use SG which is created in a different VPC. So when you create SG please make sure that you choose the right VPC. click on the crate security button on the top right corner.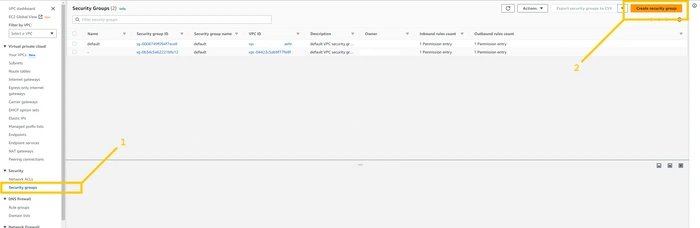
We will create our first SG for bastion-jump-server. Give any name and description you want but please remove the default VPC and add VPC that we have just created. Then click on the
Add rule button in inbound rules. And add SSH rule and add your IP in the destination. Please don’t do anything with the outbound rule if you don't have a good understanding. And then click on the create security group button.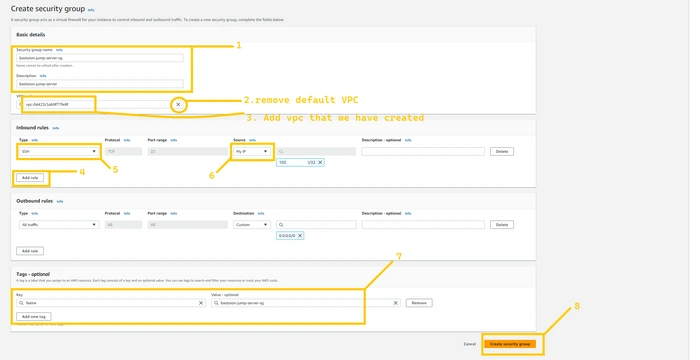
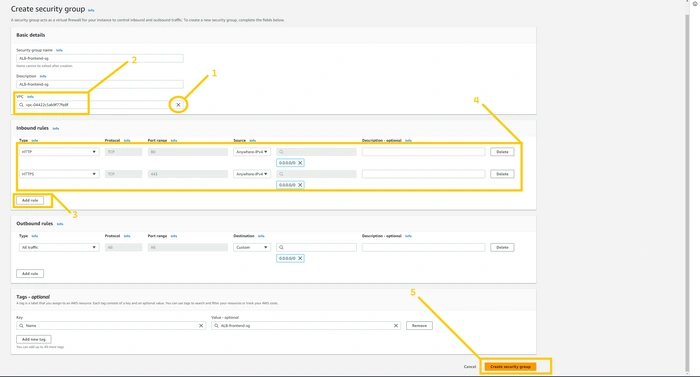
Now let's create SG for the ALB-frontend. Again steps are similar but add the rule HTTP AND HTTPS from anywhere on the internet because both ALB are internet facing. But please select the right VPC.
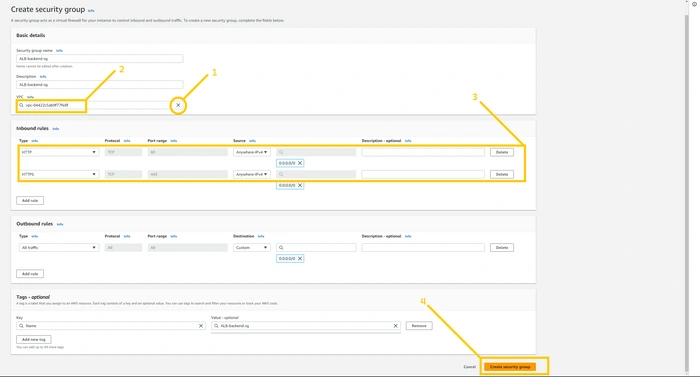
Create SG for ALB-backend. ALB-backend is also internet-facing. Again allow HTTP and HTTPS from anywhere.
create SG for frontend servers. Our fronend server will be in a private subnet so add the HTTP rule and select the source as ALB-frontend-sg. So only ALB-frontend can access the frontend server on port 80. You have to add one more rule SSH allows from bastion-jump-server-sg. So that the bastion host can log in to web servers.
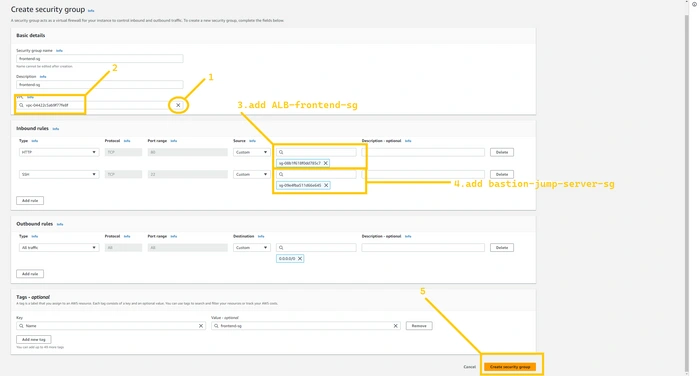
Let's create SG for the backend server. Again steps are completely similar to frontend-sg. You have to allow port 80 from ALB-backend-sg so that only ALB-backend can request to the backend server and add the rule SSH allows from bastion-jump-server-sg. So that the bastion host can log in to backend servers.
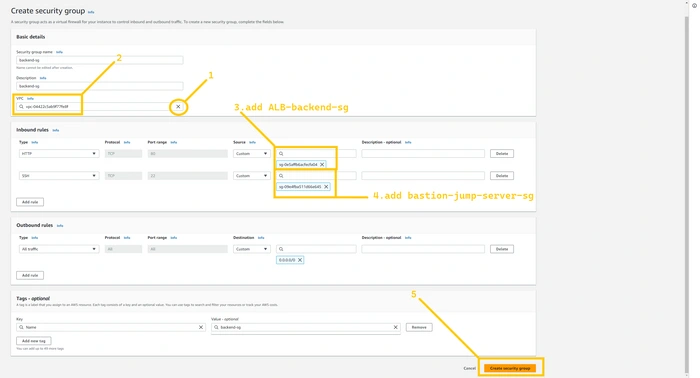
Lastly, we are going to create SG for RDS instance. Allow port 3306 MySql/Arrora from backend-sg so that only the backend server will be able to access it. and no one else can access our database.

And here our SG setups are complete now. Your task is to do the complete same setup for the secondary region. In my case, it is Oregon (us-west-2).
🔹 RDS and Route 53
Now we are going to set up a database for our application. And for that, we are going to utilize the RDS service of AWS. So let's head over to the RDS dashboard. Just search RDS in the AWS console. And click on the service.

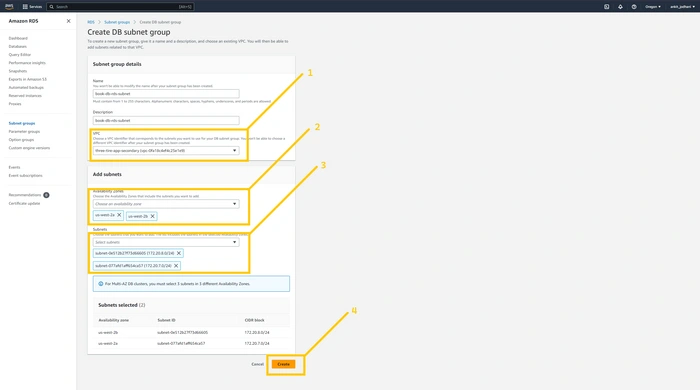
Now first we need to set up a subnet group. It specifies in which subnet and Availability zone out database instance will be created. So click on the
subnet group button on the left panel. And click on the button Create database subnet group which is in the middle of the web page.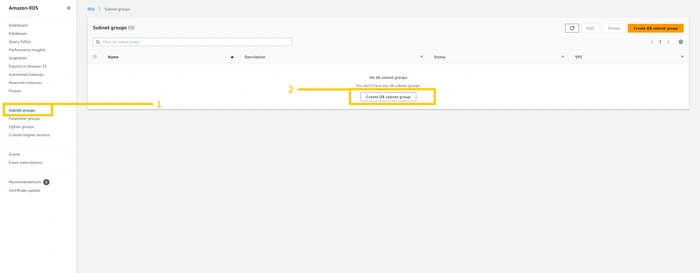
Here we can configure our VPC, subnet, and availability zone. Give any name to your subnet but make sure you select the correct VPC. and select Azs us-east-1a and us-east-2b. According to the architecture that I have shown you, our database will be in private subnet pri-sub-7a and pri-sub-8b. so please select as I have shown in the below figure. And then click on the
create button.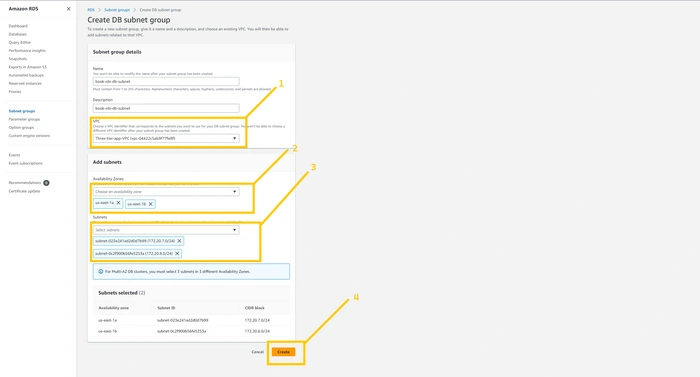
Note: we need to create a subnet group in the Oregon region as well. All the configuration is similar to the above. just need to change the Availability zone us-west-2a and us-west-2b
Now come to the N.virginia region and here we are going to create a database. So click on the
database button on the left panel and then click on the created database button.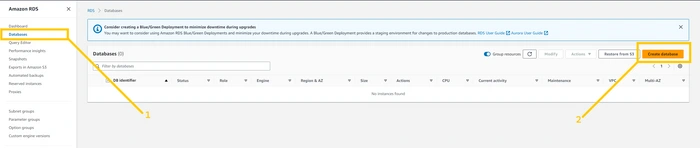
On this page, we can configure our database. Select
stander create because I’m going to show you each and every step. select MySQL in the engine option because our application runs on MySQL database. If your app runs on other engines you can select that one. Furthermore, you can select the engine version my application is compatible with MySQL version. But you can select according to the developer guild.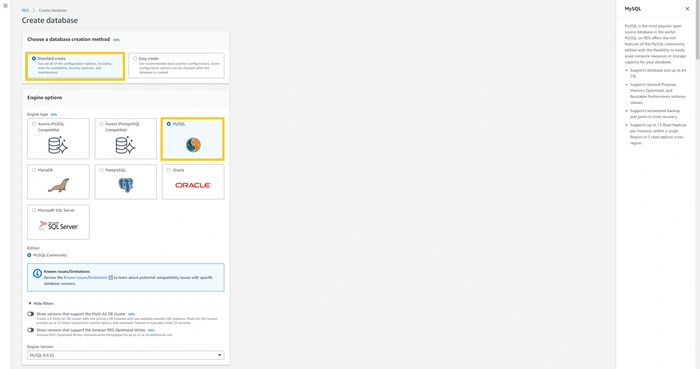
Scroll down, and select
Dev/test as template. If you select the free tier then you won’t be able to deploy RDS in a multi-availability zone. Select Multi-AZ DB instance from availability and durability option. In settings give any name to your database. In the credential setting give the username of the database in the Master username field and give the password in the Master password field. And then confirm the password below. Please do remember your username and password.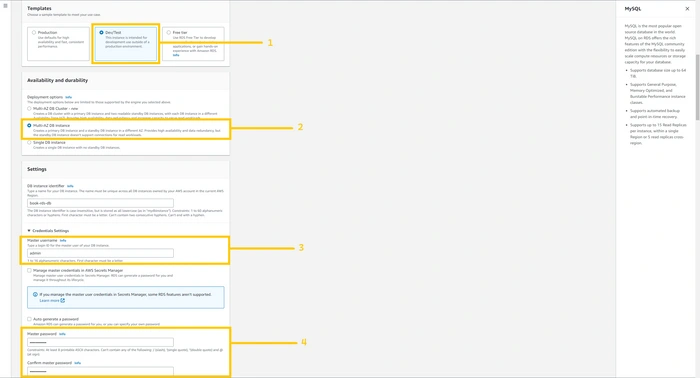
Again scroll down, select
Brustable class in the instance setting and select the instance type. Actually, it depends on your application uses. But for learning purposes, I am selecting t3.micro. now in storage type select General purpose(GP2) and allocate 22 GiB for database. Please uncheck the auto-scaling option to keep our costs low. And In the connectivity option please select the option according below screenshot.In VPC, select VPC that we created earlier and in DB subnet group select the group that we just created, In the public access option please select
No, choose existing security, and select security group book-rds-db.Scroll down, click on Additional Configuration, and in the database option give the name
test because we need a database with the name of the test in the application. Enable Automated Backup. Note: you have to enable automated backup otherwise you won’t be able to create a read replica of the RDS instance.Scroll down, mark on enable encryption checkbox to make the database bit more secure, and click on
Create database button below.Note: RDS take 15-20 minute because it creates a database and then take a snapshot. So please have patience and wait for it to be ready.
After your database is completely ready and you see the status
Available then select the database and click on the Action button. There you can see the drop-down list. Please click on created read-replica.This page is similar to creating a database. In the AWS region select the region where you want to create the read replica. In my case, It is
Oregon (us-west-2). Give a name to your read replica, and select all the necessary configurations that we did before while creating the database. For your reference, I have shown everything in the below images.Once you click on the button
create replica . It will start creating that.You can check your read replica on the specified region’s RDS dashboard. So let me head over to Oregon and show you the read replica.
Note: we can’t write anything into a read replica. It is just read-only database. So when a disaster happens we just have to promote read replica so that it becomes the primary database in that region.
Now we are going to utilize route 53 service and create two private hosted zone. One for north Virginia(us-east-1) and another one for Oregon region (us-west-2) with the same name. you may think Why Two hosted zone with the same name? don’t worry I will answer it later. So head over to Route 53. Type route 53 in the AWS console. And click on the service.
Firstly, we are gonna create a hosted zone for us-east-1. Click on the Hosted Zones button on the left panel and click on the created hosted zone button on the top right corner.
Give any domain name because anyhow it will be private hosted zone but it would be great if you give the name same as mine (rds.com). Please select the private hosted zone and Select the region. In my case, it is us-east-1. And then select VPC ID. Make sure you select VPC that we created earlier. Because this hosted zone will resolve the record only in specified VPC. and then click on the
Create hosted zone.Now we are going to create a Record that points to our RDS instance which is in us-east-1. So click on
create record button on the top right corner.Select
simple routing,Click on the
defined record button in the middle of the box.Here type
book in the record name field. In the record type select CNAME. In the value field paste endpoint of the RDS which is in us-east-1. Then click on the defined record button.Click on
create record button.Now we are going to create a new hosted zone with the same name. but for disaster recovery region and that is us-west-2 (Oregon). While creating hosted zone please keep in mind that you need to choose the us-west-2 region and select VPC that you have created in the the us-west-2 region. Again you can utilize the below image for reference
Our next step is to set up a simple record that points to the read replica (database) which is in the us-west-2 (Oregon). So select the hosted zone that was created for us-west-2 and defined a simple record in that. Everything is the same as we defined the record in the us-east-1 hosted zone.
After successfully completing the above steps your Route 53 console look like this.
You may think that We can connect two regions and VPC in one hosted zone then why two private hosted zone with the same name? And the answer is Endpoint of both databases will be different and we can’t implement a health check coz we attached a security group that allow traffic from 3306 port from only backend SG. So route 53 can’t check the health of databases and because of that we can’t implement a Failover record here but we will do that with the application server (backend-server).
And here we successfully completed our RDS setup. Let's go ahead and explore more services
🔹 Certificate Manager
As you saw in previous screenshots, I have the domain name
ankitjodhani.club in Route 53. Now I am going to use this domain name to create subdomains such as api.ankitjodhani.club and that will resolve ALB-backend DNS. Furthermore, we need an SSL certificate so that we can make the connection secure.Note: we are going to create certificates in both regions us-east-1 and us-west-2.
So let's head over to ACM (AWS certificate manager). Type certificate manager in the AWS console search bar. And click on the service.
Now click on the
list certificates button on the left panel and then click on the request certificate on the top right corner.Select the option Request the public certificate and click on the
next button.In the domain name field please type
*.Your_Domain_Name.xyz in my case it is *.ankitjodhani.club DON’T DO ANY TYPO. In the validation method select DNS validation and click on the request certificate.Here you can see the status pending validation. Now we need to add a CNAME record in our domain. If you are not using route 53 then you need to add this CNAME record manually by going to your DOMAIN REREGISTER. And if you are using route 53 then click on the button
create record in route 53 and click on the create record button. That’s itAnd in just a few minutes you will see the status
issued.Note: I created a certificate in N.virginia(us-east-1) but you need to do the same thing for the Oregon region( us-west-2 ).
🔹 Application Load balancer(ALB) and Route 53
Now it’s time to set up an Application load balancer. We need two load balancers, one point to the backend server, and another point to the frontend server.
Note: I am doing setup in N.virginia (us-east-1 )but you have to do the same setup for Oregon (us-west-2 ) or whatever region you have chosen.
Type ec2 in the AWS console. and click on the EC2 service.
Note: before we created ALB we need to create a Target group(TG). So first we will create TG for ALB-frontend and then create TG for ALB-backend.
Click the
target group button on the bottom of the left panel. And click on the create target group button in the middle of the page.Here we can configure our TG. Select the instance in the target type. You can give any name to TG but try to give some relevant name such as ALB-frontend-TG because we are creating TG for ALB-frontend. In the VPC section select VPC that we created earlier.
Keep everything as it is, scroll down, and click on the
Next button.Click on the
create target group button.Let's create TG for ALB-backend. Click on the
create target group button. Select the target type Instance. Again give some meaning full name such as ALB-backend-TG. Select VPC that we have created.Scroll down and click on the
next button.And click on the
creatd target group. That’s it.So we have two TG. ALB-frontend-TG and ALB-backend-TG.
Now let's associate these TG with the load balancer. So click on the
Load Balancer button at the bottom of the left panel and click on the create load balancer button. First, we will create ALB for frontend.Choose Application load balancer and click on
create button.here we can configure our ALB. First, give the relevant name to ALB such as ALB-frontend. Select the internet-facing option. In Network mapping select VPC that we have created. Select both availability zone us-east-1a and us-east-2b. and select subnet pub-sub-1a and pub-sub-2b respectively.
Select security group ALB-frontend-sg. This SG we have created for ALB-frontend. In the listener part select TG that we have just created ALB-frontend-TG.
Scroll down and click on the
create load balancer button.Now, lets create ALB for backend. Again choose Application load balncer option and click on the create button.
Select Internet facing option. And select VPC that we have created.
Select both availability zone us-east-1a and us-east-2b. and select subnet pub-sub-1a and pub-sub2b. select security group ALB-backend-sg that we created for ALB-backend. And in the listner part select TG that we just created ALB-backend-TG.
Scroll down as click on the
Created Load balancer buttonNow we have two load balancers, ALB-frontend and ALB-backend. But we need to add one more listener in ALB-backend. So click on ALB-backend.
Click on
add listener the button that is located on the right side.Here In listener details select
HTTPS. Default Action should be Forward and select ALB-backend-TG. Now we need to select the certificate that we have created. So in the Secure Listener setting select the certificate. And click on the add button below.So here we successfully completed the ALB setup for the N.virginia region (us-east-1), and your task is to set up the same ALB for the Oregon region (us-west-2).
I hope that you completed the given task.
🔹 EC2
Now we are going to create a temporary frontend and backend server to do all the required setup, take snapshots and create Machine images from it. So that we can utilize it in the launch template. It is a long process so bear with me.
Note: we are doing this setup in the us-east-1 region and we don’t have to do this in the us-west-2 because we are going to leverage AWS backup service and copy it in the us-west-2 region.
First, click on the
instance button and then click on the Launch Instance button on the top right corner.First, we are going to set up a frontend server. Give a name to your instance (temp-frontend-server). Select Ubuntu as the operating system. Choose the instance type as
t2.micro. click on Create key pair if you don’t have it.If you are creating key pair make sure you select .
PEM file format as I have shown in the below image. Because we are going to use Git bash to do the login NOT putty and give any name to your key. And save it somewhere safe location on your computer.Here we are doing a temporary setup so we don’t use our OWN VPC. we can use the default VPC given by AWS. In short, keep the Network setting as it is. In the firewall setting select all the fields as I shown in the below image to keep things simple. And lastly, click on the
Advance details option.Scroll down to the bottom of the page, here we can see one text box with the name USER DATA. Here in this text box, you can write your bash script file and that will be executed during the launch of the instance. I have given the bash script below. so please copy that script and paste it here. And lastly, click on the
launch instance button.#!/bin/bash
sudo apt update -y
sudo apt install apache2 -y
curl -fsSL https://deb.nodesource.com/setup_18.x | sudo -E bash - &&\
sudo apt-get install -y nodejs -y
sudo apt update -y
sudo npm install -g corepack -y
corepack enable
corepack prepare yarn@stable --activate --yes
sudo yarn global add pm2we have successfully launched temp-frontend-server. so now let’s launch a temporary backend server. give a name to your instance (temp-backend-server). select ubuntu as the operating system. And select
t2.mirco as instance type. Here we don’t have to create a new key, we can utilize the previous key that we have created while launching the frontend instance.In the network setting, we don’t have to change anything just select whatever I have shown below image to keep things simple. And lastly please click on the
advance details option.Scroll down to the bottom of the page, and copy the bash script that I have given below. and paste it in the USER-DATA text box. This bash scripting installs some packages so that we don’t have to install them manually. And click on the launch instance.
#!/bin/bash

sudo apt update -y

curl -fsSL https://deb.nodesource.com/setup_18.x | sudo -E bash - &&\
sudo apt-get install -y nodejs -y

sudo apt update -y

sudo npm install -g corepack -y

corepack enable

corepack prepare yarn@stable --activate --yes

sudo yarn global add pm2
Please wait for 5-8 minutes so that the instance comes in a running state. and then we will utilize instances for further steps.
Select temp-frontend-server. and copy the IP address of the instance. Now open Gitbash where you have downloaded your YOUR_KEY.pem file. And type the command.
ssh -i <name_of_key>.pem ubuntu@<Public_IP_add_of_Instance>It will prompt you for your permission just type
yesNow you are successfully logged your remote temp-frontend-server. now our first task is to clone my git repo. If you are working on your own project then clone your repo. So type the command in the terminal.
The Github repository link is here
git clone https://github.com/AnkitJodhani/2nd10WeeksofCloudOps.gitGo inside the directory.
cd 2nd10WeeksofCloudOps/clientNow, we need to change just one line in our frontend application that is built in React. So type the command
vim src/pages/config.jsThe above command opens the file in a text editor. Now press
I the button on your keyboard to edit the file. In this file, we have to change API_BASE_URL. So remove whatever is present in the API_BASE_URL variable.And add
https://api.ankitjodhani.club, In my case I have added this URL but in your case it is different. This means you need to use your OWN domain name. so your API_BASE_URL should be like https://api.<YOUR_DOMAIN_NAME>.XYZ I hope it makes sense. After updating the variable press ESC key on your keyboard and then type :wq and hit the Enter button.API_BASE_URL = https://api.ankitjodhani.clubAfter making these changes our frontend of the application will send all the API calls on the domain name
https://api.ankitjodhani.club And lastly, that will point to our backend server.Now type the command
npm install in the terminal to install all the required packages.npm install Type the command
npm run build to create the optimize static pages.npm run buildNow you have one more folder in the directory called build. You can verify that by tying
ls command0Now type the very essential command
sudo cp -r build/* /var/ww/html/sudo cp -r build/* /var/www/htmlThe above command takes all the static files from the build folder and stores them in
/var/www/html so that Apache can serve them.Here our
temp-frontend-server configuration is completed. Now let's set up the temp-backend-server. So select the temp-backend-server and copy the IP address of the instance. Again please open Git bash in the same directory where your stored key.pem file. And type the below commandssh -i name_of_your_key>.pem ubuntu@<Public_IP_add>We are successfully logged in inside the backend server. first, we will clone the repo.
git clone https://github.com/AnkitJodhani/2nd10WeeksofCloudOps.gitgo inside the
2nd10WeeksofCloudOps/backend cd 2nd10WeeksofCloudOps/clientHere we are going to create one file with the name
.envvim .envPress the
I button on your keyboard. And copy the code given below and paste the snippet into the code editor. This code contains information about the RDS instance. Please change your username and password according to whatever you kept while creating a database. And then click on the ESC button and type :wq and hit the enter buttonNow type the below commands in terminal
npm install
npm install dotenv
Now, let's start the backend server. ( very IMP )
sudo pm2 start index.js --name "backendApi"you can verify that by typing the command
sudo pm2 listYeah!!!😃 Successfully completed our backend server configuration. You can close the terminal
But before we end this section we need to do a few more steps. We have to create Machine images of these servers so that we can create a launch template. these steps are optional because anyhow we will take a backup from the AWS backup service and that will do the same thing. but that takes time. so it would be better if you follow the steps.
So please select
temp-frontend-server and click on the Action button in the top right corner. One drop-down menu will open. You have to select the images and template option and that will give one more drop-down menu from which we need to click on create image button.Give the name you your image (img-frontend-server). just deselect that delete on the termination button and click on the
create image button.You have to do the same thing for the
temp-backend-server as well. I have shown you each and every step in the below images.After a couple of minutes (10-15) you can see those images. Click on the
AMIs button on the left panel and you can see both images here.Note: Again we did the above setup in us-east-1 and we don’t have to do this setup for us-west-2 we will leverage aws backup service to copy these machine images in us-west-2.
🔹 Backup service
We create machine images in N.virginia ( us-east-1) region and now let’s again create images and copy these images to the Oregon region (us-west-2 ). So please type Backup in the AWS console search bar. And click on the service. Currently, I’m in the N.virginia region.
Let's first create a backup vault. Backup value is a kind of bucket where you can store your backups. So click on the
Backup Vault button on the left panel and then click on the create backup vault button on the top right corner.Give a name to your vault. And click on the
create backup vault button.Now our backup vault is ready. So let's create a backup plan. Click on the
Backup Plan button on the left side and click on the create backup plan on the top right corner.Here we can configure our backup plan. So click on the
build new plan and give a name to your backup plan. In the backup rule configuration, we can set up our backup rules. So give a name to your rule. Select the backup vault that we have created just now. And in the rest of the parameters select as I have shown you in the below image. Take note that in the backup window start time please select 10 minutes more than the current UTC time so that we can see the output of the backup quickly.Scroll down, and select the
destination region where you want to copy your resource. In my case, it is us-est-2 (Oregon region). And you can select the default backup vault if you don’t want to create a backup vault in Oregon just like me. And all the rest of the parameters select as I have shown you below in the image. And lastly, click on the Create plan button.Now it’s time to assign resources that we want to back up. Give any name in the resource assignment name field, in the resource selection please select
include specific resource type. And from the select resource type drop-down select EC2 and choose the instance ID of temp-frontend-server and temp-backend-server. I would recommend referring below image. And then click on the Assign resource button below.So we successfully set up our backup plan. Now backup can take place anytime and it will be completed maximum in 1 hour. So we have to wait to see that. So have coffee and patience.
To see the backup job click on the
Jobs button on the left panel and here you can see the backup job. It took 20 minutes to initiate the job so we have to wait.After some time you can see that jobs are completed. It means that our backups of both servers are stored in the vault that we have created in the N.virginia region. and you can see these backup images in the
AMIs section of the EC2 service. we have a total of 4 images and 2 running servers in the N.virginia region.After taking backup in the current region, in the next few minutes, it will initiate a job that copies the backup to the Oregon region. And you can see that by clicking on
copy jobs tab.and after some time you can see that our copy job is finished. This means backups of both servers are stored in the default vault of Oregon. And you can see both images in the EC2 dashboards
AMIs section Oregon region.🔹 Launch Template
Take note that we need to create a launch template in both regions primary and disaster recovery (secondary) us-east-1 and us-west-2. And now we have machine images in both regions.
First I will create a launch template in N.virginia (us-east-1). So click on the
launch template button on the left panel and click on the create launch template button.Give the name to your launch template such as
template-frontend-server as we are creating a launch template for frontend-server. let's give the version 1 in the version field. Here we need to select AMI so click on My AMIs tab and select the option owned by me. So now it will show you all the images that are present in your current region. If you are following the blog from starting then you will have a total of 4 images in N.virginia. coz two we created manually and two were created by backup service. Here you have to select the image that contains the frontend application. Either you can select the manual or the one created by the backup service. both are okay coz it contains the same data. Select instance type t2.microScroll down, attach the key pair, and in the network setting just select the security group that we created for the frontend server. in my case the name SG is
frontend-sg. And click on the advance details section at the bottom of the page.Scroll down to the bottom, and in the USER-DATA text box paste the code that I have given below. And then click on the
Create launch template button.#!/bin/bash
sudo apt update -y
sleep 90
sudo systemctl start apache2.service
we successfully created a launch template for the frontend-server. now let's create a launch template for the backend server.
Give a name to your launch template
(template-backend-server). Give version 1 in the version field, but make you select the correct AMIt that holding your backend application. And Select an instance type t2.microSelect the key pair, and in the network setting just select the security group that we have created for the backend server. in my case name of the SG is
backend-sg. And click on the advance details section at the bottom.Scroll down to the bottom, and in the USER-DATA text box paste the code that I have given below. And then click on the
Create launch template button.#!/bin/bash
sudo apt update -y
sleep 150
sudo pm2 startup
sudo env PATH=$PATH:/usr/bin /usr/local/share/.config/yarn/global/node_modules/pm2/bin/pm2 startup systemd -u ubuntu --hp /home/ubuntu
sudo systemctl start pm2-root
sudo systemctl enable pm2-root
We have created
two launch templates, template-frontend-server and template-backend-server in N.virginia.Note: Your task is to set up two launch templates in the Oregon region (disaster recovery region). Everything is completely similar just you have to change
AMIs. Please select the correct AMI for the frontend and backend. If you have difficulties finding AMIs you can compare the instance_id with temp-frontend-server and temp-backend-server. this will definitely help you.I hope you did the task, Now we can terminate those
temp-servers to save the bills.🔹 Auto scaling group (ASG)
The auto-scaling group is the functionality of EC2 service that launches instances depending on your network traffic or CPU utilization or parameter that you set. It launches instances from the launch template.
Note: we need to set up an Auto Scaling group in both regions us-east-1 (N.virginia) and us-west-2 (Oregon, Disaster recovery region). First, we are going to set up ASG in us-east-1.
Click on the
Auto scaling groups button which is located at the bottom of the left panel. And then click on the Create auto scaling group button.Give a name to your ASG. E.g
ASG-frontend . And select the launch template that we have created for frontend (e.g template-frontend-server ) in the launch template field. And click on the next button.In the network field, you have to choose VPC that we created earlier. And in AZs and subnet filed choose
pri-sub-3a and pri-sub-4b. these subnets we have created for frontend servers. And click on the next button.On this page we need to attach ASG with ALB so select the Attach existing ALB option and select TG that we have created for frontend e.g
ALB-frontend-TG. And then scroll down and click on the NEXT buttonHere you can set the capacity and scaling policy but I’m keeping
1,1,1 to save cost but in real projects, it depends on the traffic. Click on the NEXT->next->next-> and create ASG button.Let's set up ASG for the backend.
Give a name to your ASG. E.g
ASG-backend. And select the launch template that we have created for the backend (e.g template-backend-server ) in the launch template field. And click on the next button.In the network field, you have to choose VPC that we created earlier. And in AZ and subnet field choose
pri-sub-5a and pri-sub-6b. these subnets we have created for backend servers. And click on the next button.On this page we need to attach ASG with ALB so select the
Attach existing ALB option and select TG that we have created for the backend e.g ALB-backend-TG. And then scroll down and click on the NEXT button.Here you can set the capacity and scaling policy but I’m keeping
1,1,1 to save cost but in real projects, it depends on the traffic. Click on the NEXT->next->next-> and create ASG button.Now, We have two ASGs,
ASG-frontend will launch frontend servers and ASG-backend will launch backend servers. we have successfully set up ASG in the N.virginia region and we need to do the same setup in the Oregon region as well.So your task is to set up ASGs in the Oregon region (Disaster recovery region).
I hope you successfully completed the given task.
Now before we go further one more thing we need to do. We need to initialize our database and need to create some tables. But we can’t access the RDS instance or backend server directly coz they are in a private subnet and the security group won’t let us login into it. So we need to launch an instance in the same VPC but in the public subnet that instance is called
bastion host or jump-server. And through that instance, we will log in to the backend server, and from the backend server we will initialize our database.Click on the
instance button on the left panel and click on the launch instance button in the top right corner. Please terminate those temp-servers if you haven'tGive a name to the instance (
bastion-jump-server). Select Ubuntu as OS, instance typet2.micro, and select Key pair. In all the instance and launch template we have used only one key so it will be easy to login in any instance. And then click on the Edit button of the Network setting.In the network setting select VPC that we have created and in the subnet select
pub-sub-1a, you can select any public subnet from the VPC. and then select security group. We already have a security group with the name bastion-jump-server-sg and click on the launch instance.Once the instance becomes healthy, we can SSH into it. so select the instance and copy its public IP. Open Git bash or terminal in which folder your key.pem file is present and hit the below command.
scp -i <name_of_your_key>.pem <name_of_your_key>.pem ubuntu@<Public_IP_add_of_instance>:/home/ubuntu/key.pemThe above command will copy our login secret key file into the bastion host.
Now type the below command to login into the Bastion host. And copy the public IP of the Bastion host.
ssh -i <name_of_your_key>.pem ubuntu@<Public_IP_add_of_instance>We are successfully logged in inside the bastion host.
Hit the below command to change the permission of the key.pem file
chmod 400 key.pemNow we want login into the backend server so select backend server and copy its private IP address. You can identify the backend server by the security group attached to the instance.
Type the below command to log in to the backend server.
ssh -i key.pem ubuntu@<Private_IP_add_backend_server>Now we are logged in inside the backend server. just go into 2nd10WeeksofCloudOps/backend directory
cd 2nd10WeeksofCloudOps/backendWe need to install one package type below the command
sudo apt install mysql-server -yAnd type the below command to initialize the database.mysql -h book.rds.com -u <user_name_of_rds> -p<password_of_rds> test < test.dbNow you can close the terminal.
🔹 Route 53
Amazon Route 53 is a highly available and scalable Domain Name System (DNS) web service.
If you try to access the web app using
ALB-frontend DNS then you won’t see the website in functional mode because our frontend or loaded static pages try to call the API from your browser on the domain namehttps://api.<Your_Domain_name>.xyz In my case, https://api.ankitjodhani.club And that record we didn’t add yet in our domain name. so let’s do that.We are going to set up a Health check in route 53. So route 53 checks the health of the backend servers and if it is unhealthy ( hits by disaster ) then it will transfer the traffic to another region's (disaster recovery region, Oregon) backend server.
Head over to route 53 service. And click on the
health check button on the left panel.Click on the
create health check button.On this page, we can configure our Health check. Give a name to your health check, and select the endpoint to monitor it. select
HTTP and in the Domain name field give the DNS of the ALB-backend which is in US-EAST-1 because us-east-1 is our primary region. And fill in all the details as I have shown you in the below image. And then click on the next button.Our health check is set up successfully. it takes a few minutes to show whether our specified resource is healthy or not.
In the next few minutes, it starts showing you the health of the ALB-backend (backend-servers).
Now let's create a record in our domain name. click on the
hosted zone and select your public hosted zone or your domain. I already have one. And click on the Create record button in the top right corner.Select
failover record. And click on the next button.Here in the record name field write
api so that our record name becomes api.<Your_Domain_name>.xyz in my case, it is api.ankitjodhani.club . in the record type field select “A” and then click on the define failover record button.Firstly Select
Alias to application and classic Load balancer from the drop-down list, secondly, select us-east-1 as a region. And in the below drop-down list select DNS of the ALB-backend. As you know that us-east-1 is our primary region so select primary in failover type. And in the health check ID select the health check that we have created just now. And click on the Define failover record button. Follow the below image for more clarity.Click on
create record button.Now we need to set up one more
failover record with the same domain name but for a secondary region. Firstly Select Alias to application and classic Load balancer from the drop-down list, secondly, select us-west-2 as the region. And in the below drop-down list select the DNS of the ALB-backend. As you know that us-west-2 is our secondary region so select secondary in failover type. Make sure you don’t select anything in health check ID. And click on the Define failover record button. Follow the below image for more clarity.So we have two failover type records with sathe e name but one is pointing to the backend load balancer which is in us-east-1 region and the second one is pointing to the backend load balancer of the secondary region Oregon(us-west-1).
Now it’s time to access our website so take the DNS of the frontend load balancer (
ALB-frontend) and paste it into the browser. I am sure that you will see the website in fully functional mode. You can add and remove books.But there are some more improvements that we can do. So let's see those.
🔹 CloudFront
AWS CloudFront is a CDN service provided and fully managed by AWS. By utilizing CloudFront we can do the caching of our website at every edge location of the world. The user of the website faces less latency and gets high performance.
let's create Cloudfront distribution for our website. Head over to CloudFront.
Click on the
distribution button on the left panel and then click on the create distribution button on top right corner.In the origin name field select
ALB-frontend (us-east-1 primary region). Select Match Viewer in the protocol field. And scroll downIn viewer policy select Redirect HTTP to HTTPS and allow all the methods. But please make sure that you select
CashingDisabled and in cache policy and select AllViewr in origin request policy.Click on the
add item button and add an alternative domain name (threetier.ankitjodhani.club) and select the certificate that we have created in the Custom SSL certificate field.Scroll down and click button
create distribution.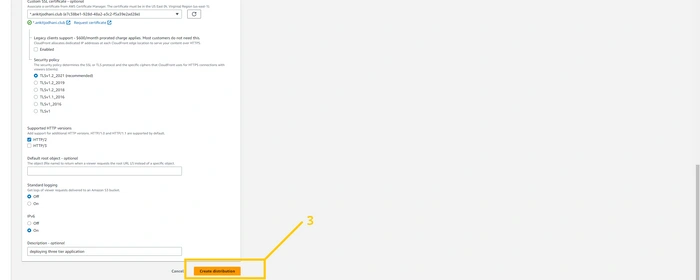
Now, click on the
distribution that we have created just now and click on the Origin tab. Here you need to select create origin the button in the top right corner.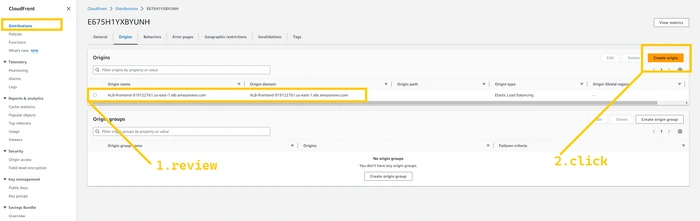
Click on the origin domain field and select the
ALB-frontend ( us-west-2 secondary region ), select math view in protocol and the rest of the parameters are all the same so click on the create origin button.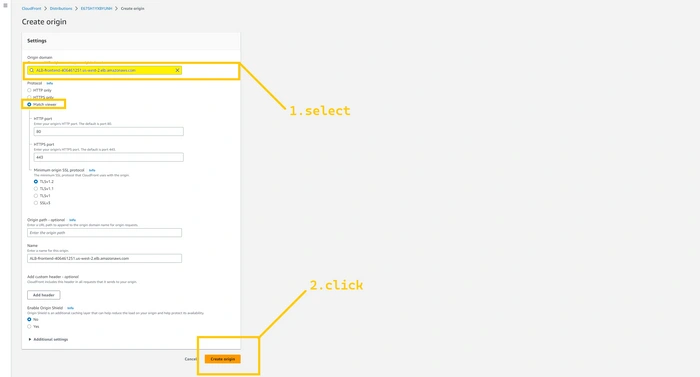
So now we have two Origins one is points to
ALB-frontend which is in us-east-1 and the second one is pointing to ALB-frontend which is in the secondary region Oregon (us-west-2). Now click on the create origin group button.
Here, In the Origins field select the first origin that is associated with
us-east-1 and click on the add button. And again click on the origin field and select the origin that is associated with us-west-2 and click on the add button. Give any name to the origin group (frontend_failover_handler) and select all the failover criteria as I have shown in the below image. Hit the button created origin group.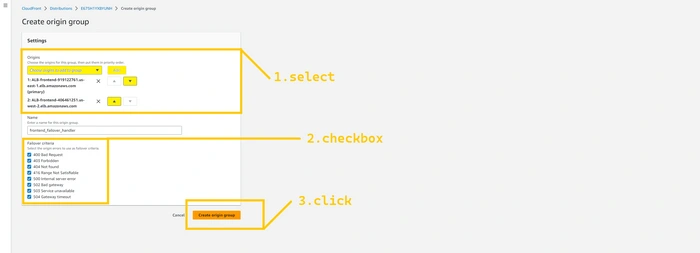
Now, click on the
behavior tab. And select the behavior and click on the edit button.Here we need to change the origin and origin group. Select the origin group that we have just created (
frontend_failover_handler). Scroll down and click on the save button.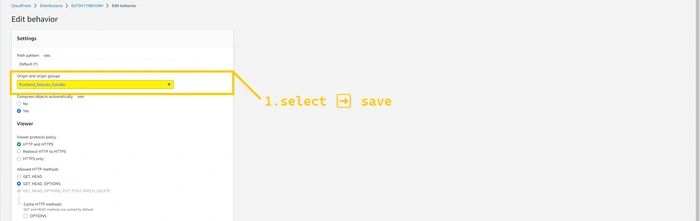
We need to wait till the distribution become available. It takes around 5-8 minutes. And then we can access our website through the DNS name generated by CloudFront. But we want to access the web app custom domain name. so again head over to Route 53 and select your public hosted zone. or your domain name hosted zone. and click on
create record button.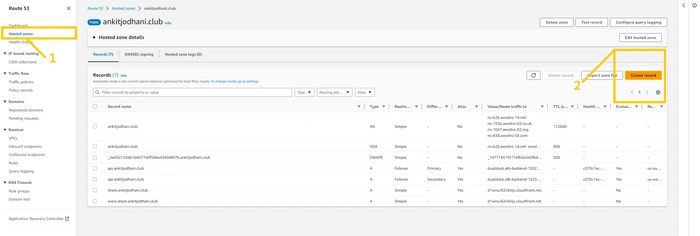
Select
simple record, and click on the button defined record. In the record name, add name threetier so our domain name becomes threetier.<Your_Domain_name>.XYZ, in my case, it is threetier.ankitjodhani.club. Select record type “A”. Select Alias to CloudFront distribution from the drop-down list in value/route traffic to field. And select the distribution that we have created just now. Lastly, hit the define simple record button. Route 53 takes sometime around 5-10 minutes to route traffic on the newly created record so please wait.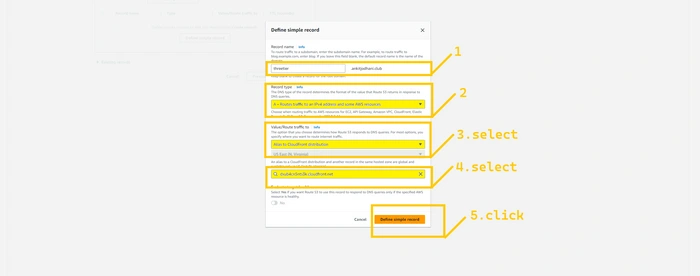
Now, let's check the final endpoint. Please hit the record name that you have set up. In my case that is
https://threetier.ankitjodhani.club. I am sure you can see the website in a running state.
We are almost done before we taste our application one small service but very essential service we want to utilize and that is WAF.🔹 AWS WAF (Web application firewall)
AWS WAF is a web application firewall that helps protect apps and APIs against bots and exploits that consume resources.
Search WAF in the AWS console, and click on the service.
Click on the
Web ACLs on the left panel and then click the button which is in the middle Create Web ACL.Give some meaning full name to the ACL list, in resource type select the AWS CloudFront distribution. And then click on the
Add AWS resource button and add the CloudFront distribution that we have just created.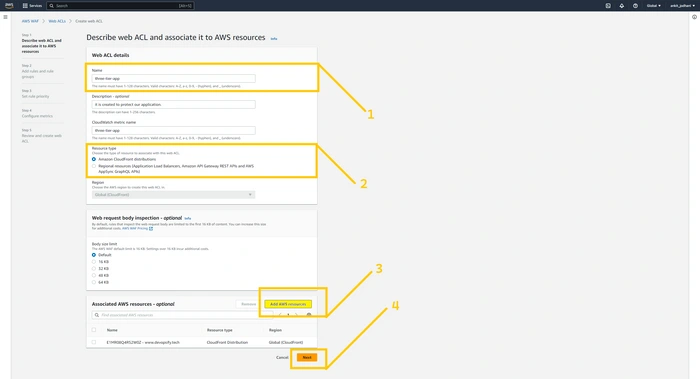
Here, hit the
add rule button on top and click Add manage rule group.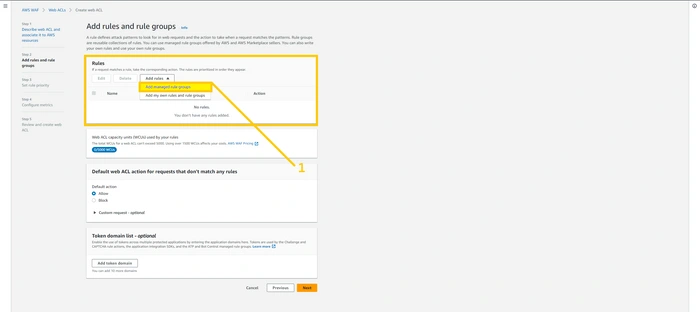
Over here we can add the rules to protect our web app front attackers. You can read the description and add the rules that suit your application security. Scroll down and
save it.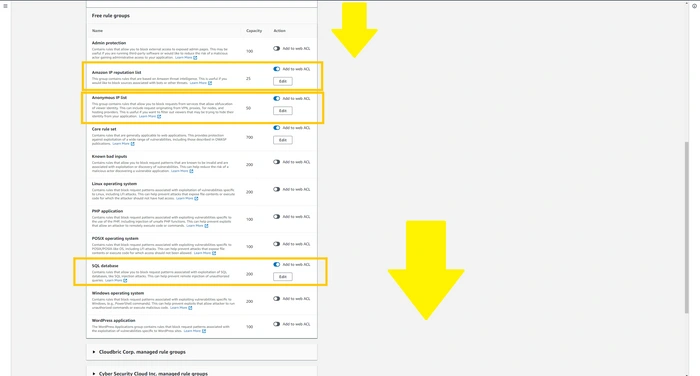
Select default action Allow and hit the
next button and that’s it. we secured web application. You can see Web ACLs in the list.🧪 Testing
It's time to test our architecture. Let's see if it works as we expected. Can we call it Resilient architecture? Did we implement the Warm Standby strategy properly?
We are going to do manual failover by changing the rules of the security group of the
ALB-frontend and ALB-backend. To make our frontend server and backend server inaccessible from the internet in US-EAST-1 region. So we can create a situation like a disaster.First let's do a modification in
ALB-frontend-sg.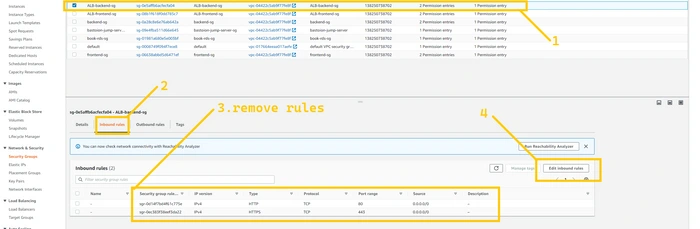
Select
ALB-frontend-sg. Click on the edit inbound rule. And remove all the HTTP and HTTPS rules from it. after doing this our CloudFront distribution won’t be able to access this ALB-frontend and it have to route traffic to another region (us-west-2) ALB-frontend.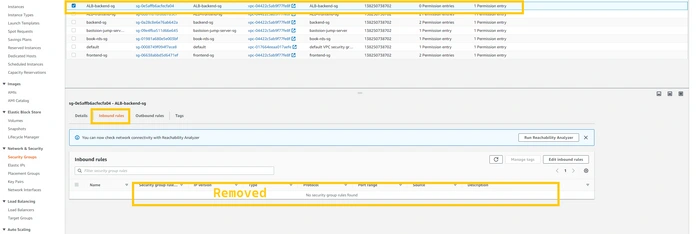
let’s do a modification in
ALB-backend-sg.Select
ALB-backend-sg. Click on the edit inbound rule. And remove all the HTTP and HTTPS rules from it. after doing this route 53 will find it unhealthy and it have to route traffic to another region (us-west-2) ALB-backend.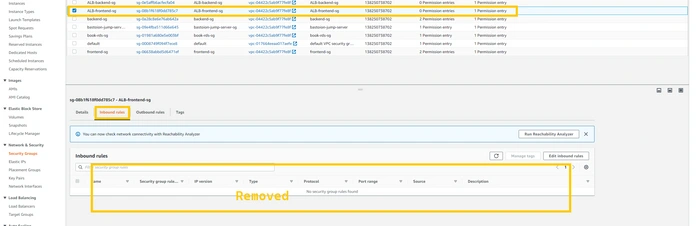
So let's see if CloudFront and Route 53 are routing traffic to a secondary region's server. Take the domain name and try pasting it into the browser.
If we can see the website in fully functional mode, it means we have properly set up and configured our architecture.
Note: Please wait for at least 10 minutes so that Route 53 can identify the unhealthy resource. CloudFront takes 60 to 90 seconds for every request to route traffic. So, please don't drop the website immediately.
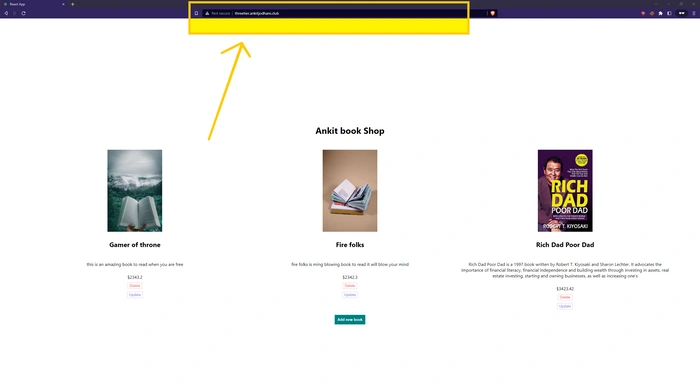
Yeahhh!! 🥳🥂 We Did it.
Our architecture working as we designed. But you can see that you can’t add a book here. And it is because of read-replica. Read replica allows only read-only operation. We need to promote read-replica which is in the DR region(us-west-2). so that it becomes a database instance. And that allow read and write both operation.

I know it is taking a long time to open the website. But we can improve that by changing some configurations in CloudFront. Click on the
origin tab. Select the first origin and click on the edit button.Click on the
additional settings tab. And decrease the number. So that CloudFront won’t wait too long for a response.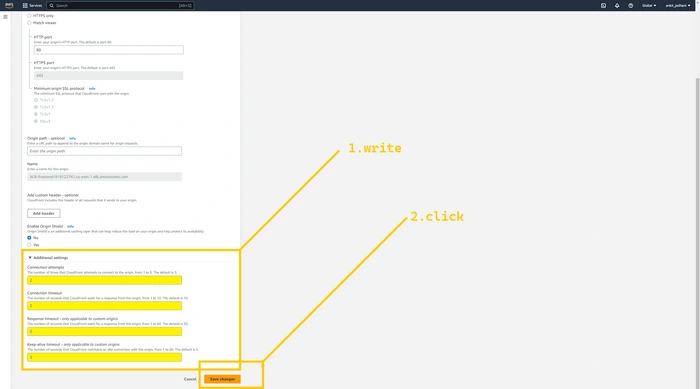
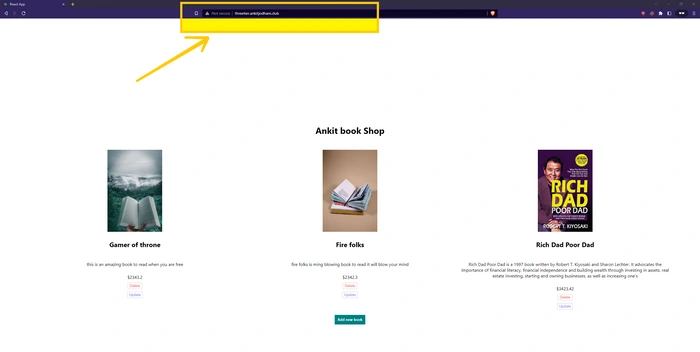
Now, if you try again you will feel very less latency compared to the previous one.
🧼 Resource cleanup
🔸 CloudFront
disabled (takes a lot of time)
delete
🔸 RDS
RDS instance or read replica delete in both regions (takes a lot of time)
snapshot
🔸 Route 53
Delete both private hosted zone (rds.com)
Delete all three records in the public hosted zone (ankitjodhani.club)
🔸 EC2
Delete ASG in both regions
Terminate Bastion host from us-east-1
Delete ALB in both regions
Delete TG from both regions
Delete the Launch template from both regions
Deregister AMIs which are created manually
🔸 ACM
Delete the certificate if you don't need it
🔸 Backup services
Delete resources from the backup vault in both regions
Delete backup vault from N.virginia
Delete Assign resources in the backup plan
Delete backup plan
🔸 VPC
Delete NAT gateways from both regions (takes around 5 minutes)
Release the Elastic IP
Delete VPC in both regions (17 resources will be deleted on one click)
🔸 WAF
Remove Web ACLs from WAF
🥳 Conclusion
In conclusion, the three-tier architecture implemented in our system ensures robustness and resiliency in the face of disasters or regional failures. With Route 53 and CloudFront handling DNS routing and failover mechanisms, our system can seamlessly switch to a secondary region, guaranteeing uninterrupted website availability. The use of Application Load Balancers and the RDS database further enhances scalability and reliability in processing user requests and storing data.
Ohh God 😅 And here it ends... 🙌🥂
if you reached here means you learned so much. and thank you so much for being part of this long journey.
I hope you like my blog. I spent 8 days creating a blog. I took 238 screenshots and spent 7 hours annotating them. Additionally, I dedicated 8 hours to building an architecture diagram with small animations.
if you like my work please message me on LinkedIn with "Hi and your country name"
🙋♂️ Ankit Jodhani.
📨 reach me at ankitjodhani1903@gmail.com
🔗 LinkedIn https://www.linkedin.com/in/ankit-jodhani/
Like this project
Posted Aug 12, 2023
Build Resilient Three-Tier Architecture Deploying the MERN Stack app on AWS: Achieving High Scalability, high Availability, and Fault Tolerance.
