
[Step by step guide to making payments on PayWave]
Paying with PayWave takes seconds. You can pay at a store counter, at an online checkout, or send money to a registered merchant straight from your phone. If you are making your first payment using PayWave, and you want to be sure you are doing it right, this is for you.
In this guide you would learn:
How to access the payment feature
Steps to initiate a payment
How to confirm a successful transaction
What to do when a payment fails
How to check your transaction history
Before you begin
Make sure you have:
The latest version of the PayWave app (iOS or Android)
A verified PayWave account
Enough balance in your wallet to cover the amount and any fee shown at confirmation
Your 4-digit transaction PIN
Note: If you haven’t set a transaction PIN yet, the app will ask you to create one the first time you pay.
How to access the payment feature
Open the PayWave app and log in with your password, fingerprint, or face ID.
On the Home screen, look at the row of quick actions below your balance.
Tap Pay.
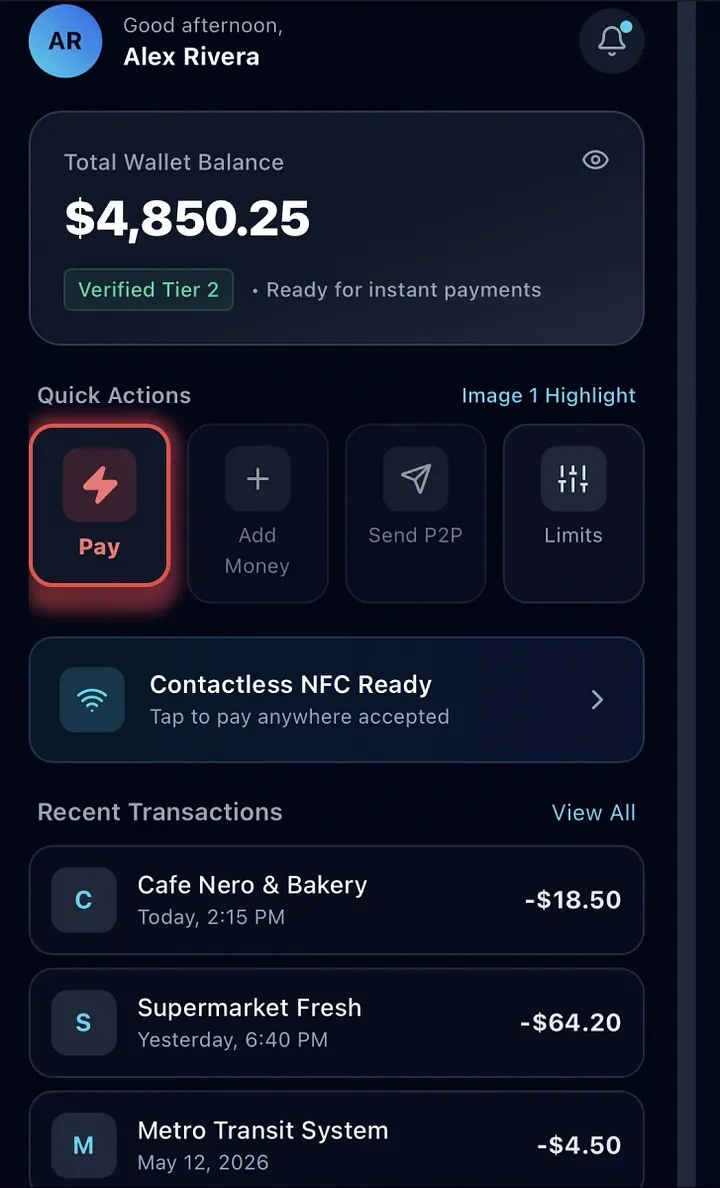
The Pay screen opens with two options:
Scan to Pay: pay by scanning a QR code displayed by the merchant.
Pay with Merchant ID: pay by typing the merchant’s ID or code.
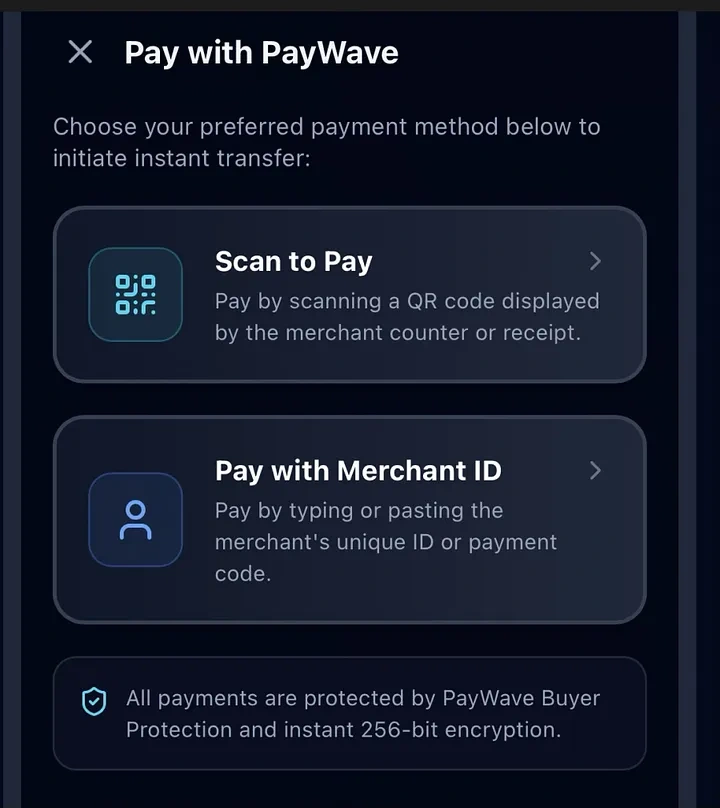
Tip: You can also reach the Pay screen from the bottom navigation bar by tapping the Pay icon in the center.
Steps to initiate a payment
Choose the method that matches how you’re paying.
Option A: Pay by scanning a QR code
Use this when the merchant shows a QR code at the counter, on a receipt, or on a screen.
On the Pay screen, tap Scan to Pay.
If prompted, allow PayWave to use your camera.
Point your camera at the merchant’s QR code. Hold steady until the code is recognized.
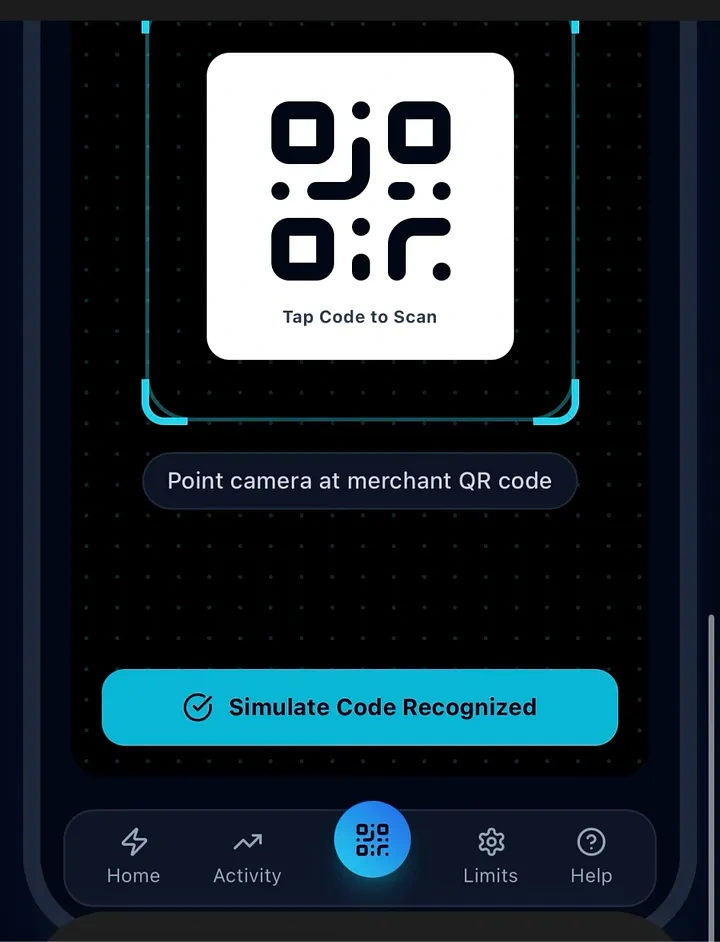
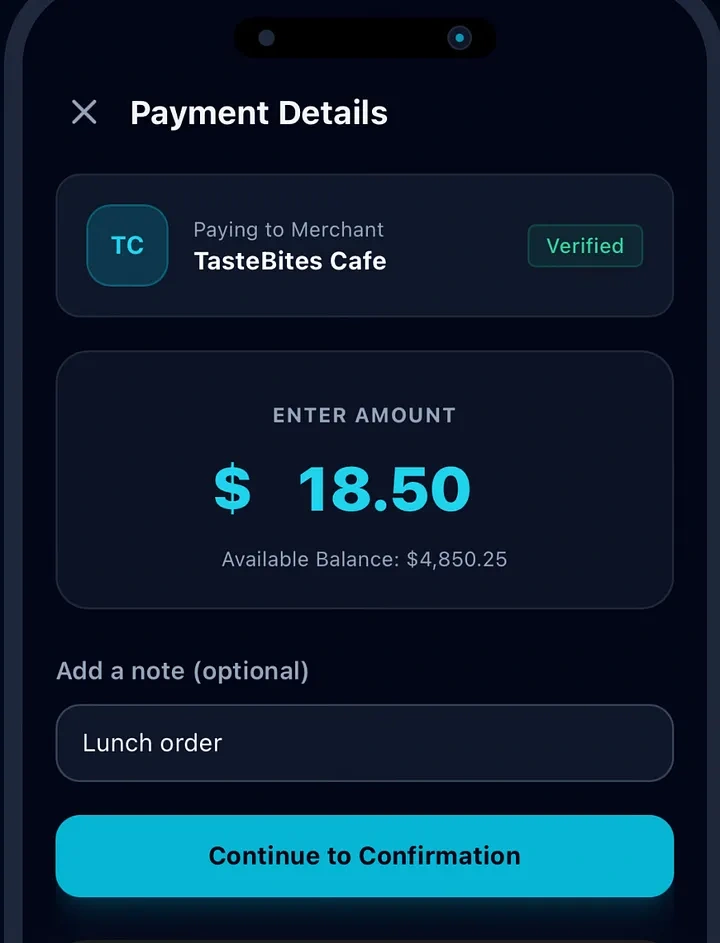
Check the merchant name that appears on screen. Make sure it matches the business you’re paying.
Enter the amount, if it isn’t filled in automatically.
Add a note if you like (optional), for example “Lunch order.”
Tap Continue.
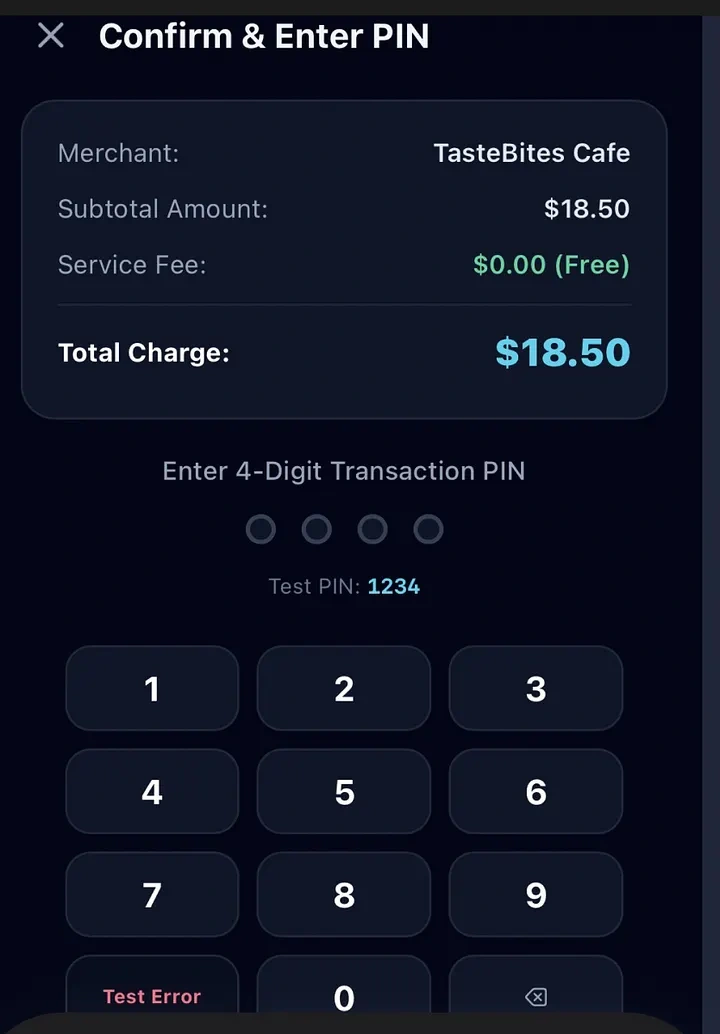
Review the confirmation screen, which shows the merchant, amount, fee (if any), and total.
Tap Pay, then enter your transaction PIN.
Option B: Pay with a Merchant ID
Use this when there’s no QR code, for example when paying over the phone or from an invoice.
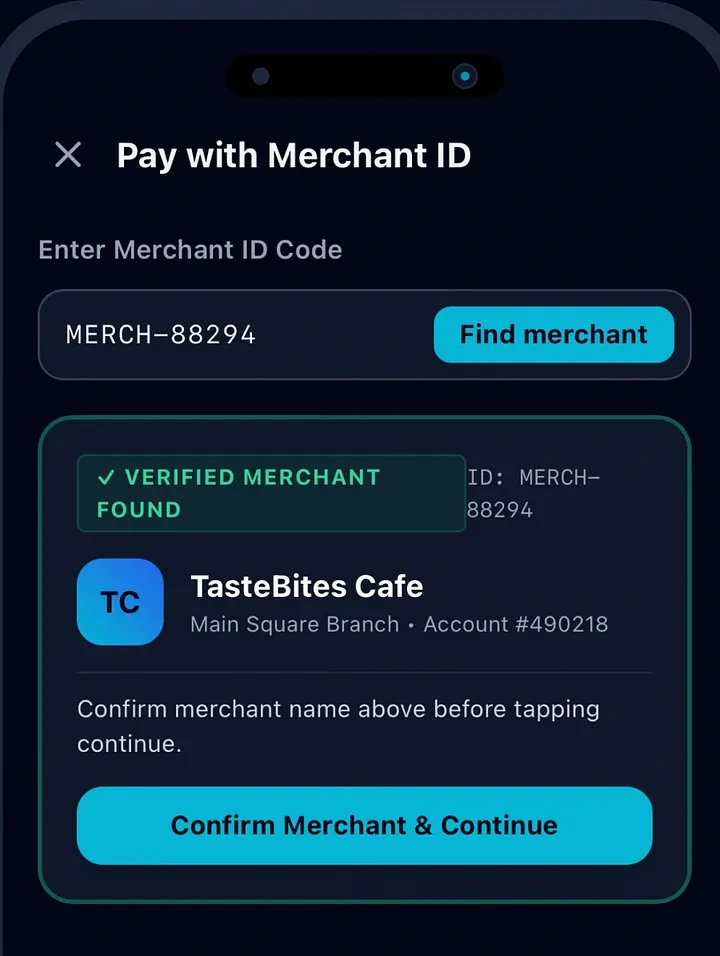
On the Pay screen, tap Pay with Merchant ID.
Type the merchant’s ID carefully, or paste it if you copied it.
Tap Find merchant. The merchant’s name appears.
Confirm the name is correct. If it isn’t, re-enter the ID. Do not continue.
Enter the amount and an optional note.
Tap Continue, review the confirmation screen, then tap Pay and enter your PIN.
Important: Always check the merchant name before you pay. Payments sent to the wrong merchant may not be reversible.
Understanding fees and limits
Fees: If a fee applies, it appears on the confirmation screen before you enter your PIN. You are never charged a fee that wasn’t shown.
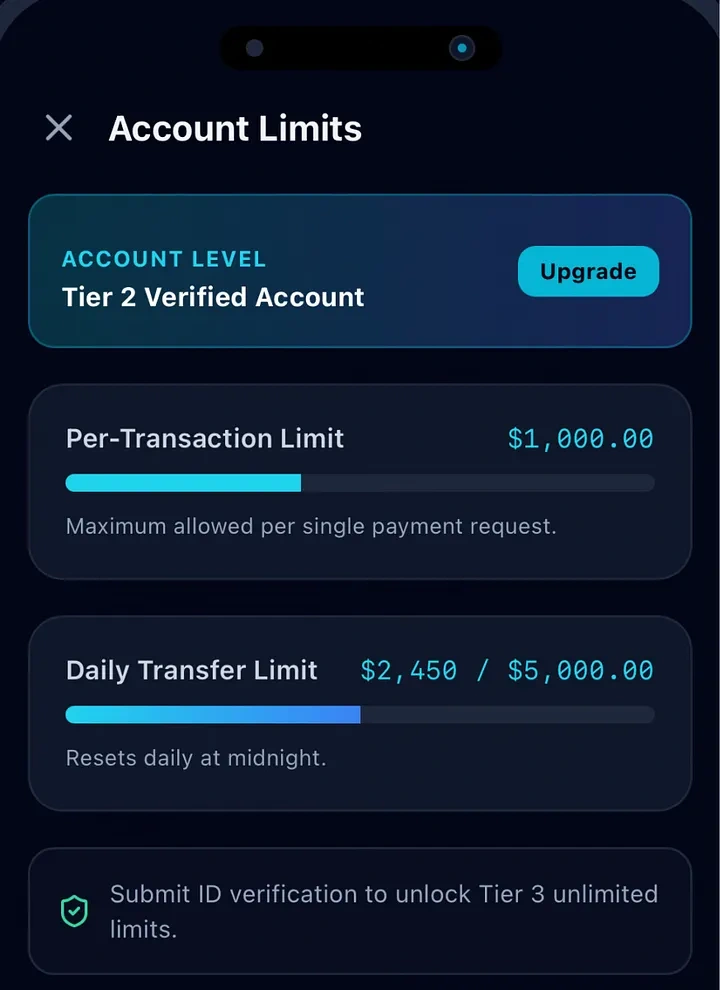
Limits: Your account has per-transaction and daily limits. To view them, go to Settings > Limits.
How to confirm a successful transaction
After you enter your PIN, PayWave processes the payment. This usually takes a few seconds.
What you’ll see
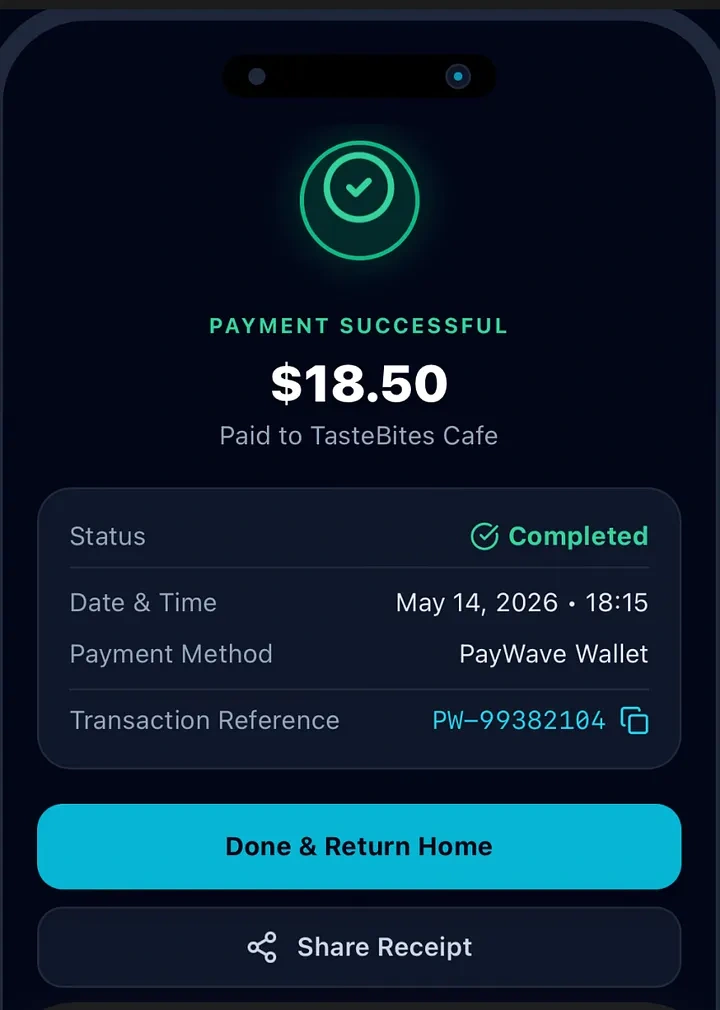
When the payment goes through, a Payment Successful screen appears showing:
The amount paid
The merchant name
The date and time
A transaction reference (a unique code for this payment)
You can also confirm any payment later:
Tap Activity in the bottom navigation bar.
Find the payment at the top of the list.
Check that the status reads Completed.
What to do when a payment fails
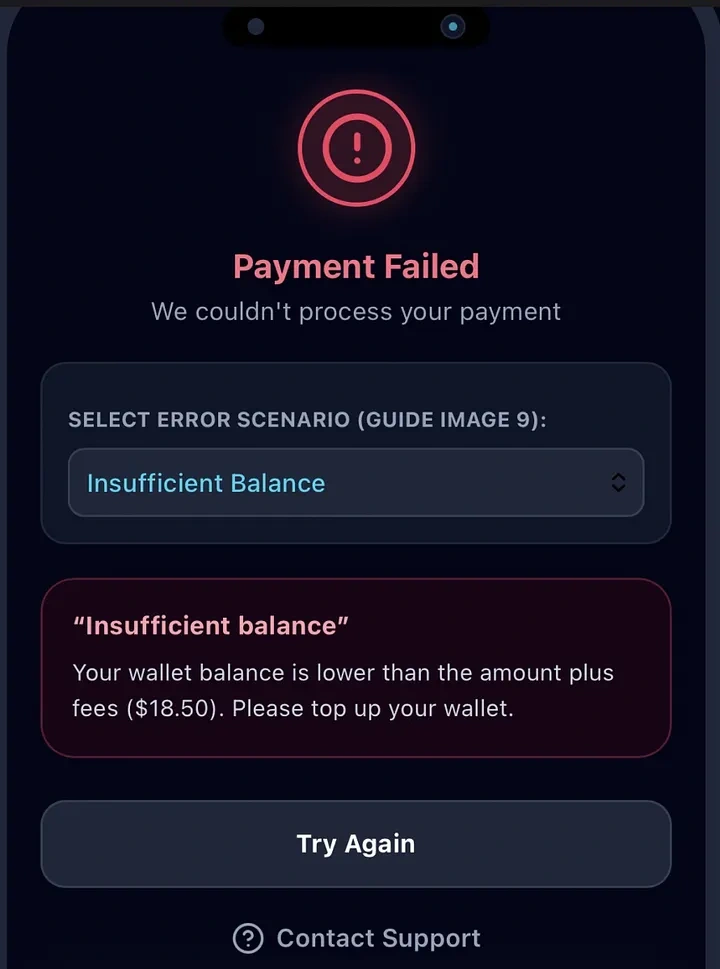
Payments can fail for simple reasons, and most are quick to fix. Before you try again, check Activity. If the status is Pending, don’t pay again, or you could be charged twice.
Quick checks
Check your connection. Switch between Wi-Fi and mobile data.
Check your balance. It must cover the amount plus any fee.
Update the app. Install the latest version from your app store.
Restart the app, then start the payment again from the beginning.
Common error messages and how to fix them
“Insufficient balance” Your balance is lower than the amount plus fees. Add money to your wallet or pay a smaller amount.
“Transaction limit exceeded” The payment is above your limit. Check Settings > Limits. Split the payment or wait for your limit to reset.
“Incorrect PIN” The PIN was entered wrongly. Re-enter it carefully. Too many attempts will lock your PIN.
“Unable to reach merchant” The merchant’s system is temporarily down. Wait a few minutes and try again, or use another payment method.
“Network error” Your connection dropped. Check Activity first. Retry only if the status is Failed.
“Payment declined” The payment was blocked for security or account reasons. Contact Support. Don’t keep retrying.
If you were charged but the merchant says they weren’t paid
This usually means the payment is still Pending.
Open Activity and tap the payment.
Screenshot the receipt, including the transaction reference.
Show it to the merchant.
Wait 30 minutes. Pending payments resolve on their own.
When to contact Support
Reach out if a payment stays Pending for more than 24 hours, you were charged twice, or you see a transaction you don’t recognize. Tap Help > Contact Support and include:
The transaction reference
Date, time, and amount
Merchant name
A screenshot of the error
How to check your transaction history
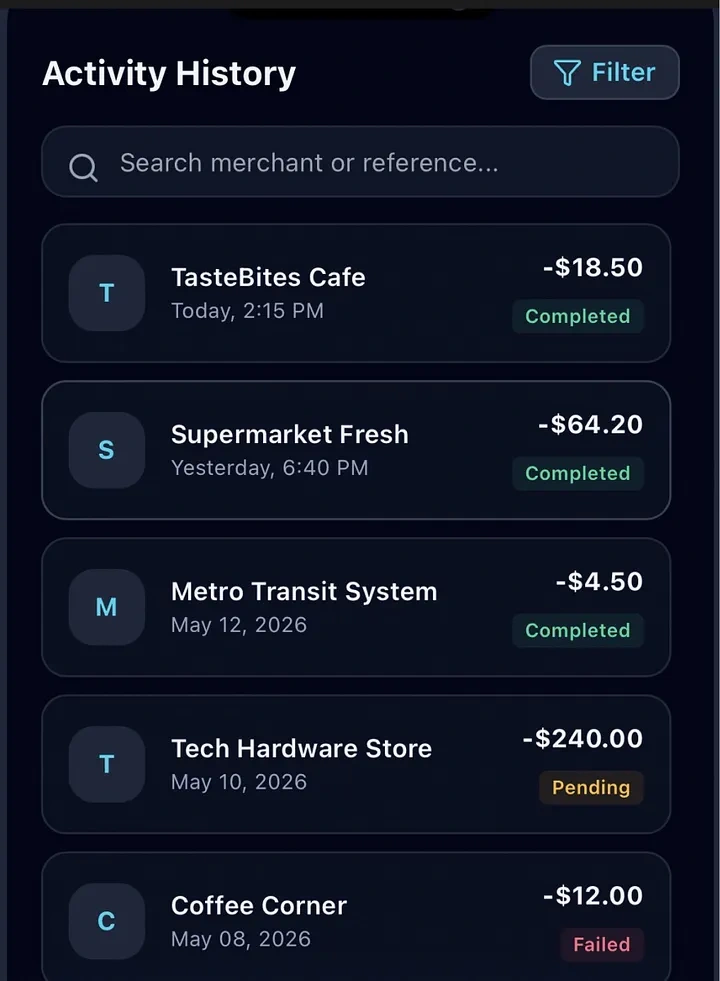
Your full payment history is in Activity.
Tap Activity in the bottom navigation bar.
Scroll through your transactions, newest first.
Tap any transaction to see its details, including the reference number, status, and fee.
Find a specific transaction
Search: Tap the search icon and type a merchant name or reference.
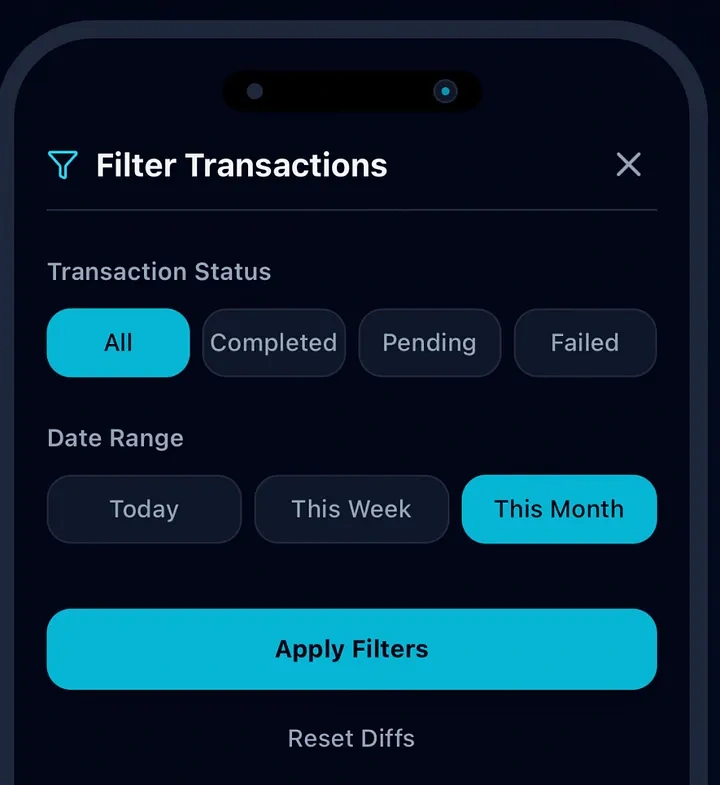
Filter: Tap Filter to narrow by date range, status, or amount.
Stay safe while paying
PayWave will never ask for your PIN, password, or one-time code by phone, SMS, or email.
Always confirm the merchant name before you tap Pay.
If you think your account has been compromised, go to Settings > Security > Freeze account and contact Support right away.
Need more help?
Tap Help > Contact Support in the app, and we’ll get back to you as soon as we can.
0 likes · 2 views · Nov 10, 2026
Step-by-step guide explaining how to access PayWave, initiate and confirm payments, handle failures, and check transaction history. Ps: PayWave is a mock-up app


