Deploying Databricks Feature Store on Azure with Terraform
Szymon Zaczek

Deploy your own Databricks Feature Store on Azure using Terraform
A tutorial on how to deploy one of the key pieces of the MLOps-enabling modern data platform: the Feature Store on Azure Databricks with Terraform as IaC.
Machine Learning Operations (MLOps) — that’s a trendy buzzword nowadays, isn’t it? Well, today we won’t be debating herein about the merits of why this is what you need for your business and what the different aspects of this that you should consider are. Instead, we want to share here what we’ve learnt during the process of setting up one of the pieces of the data platform that would truly empower data scientists and machine learning engineers — the Feature Store on Azure Databricks. Owing to its popularity, cloud-agnostic approach and a great user-experience due to the declarative syntax, we went with Terraform as the Infrastructure as Code (IaC) framework of choice, which has paid its dividends generously. Without further ado, let’s get to it.
Databricks Feature Store on Azure — essential resources
Within this blog-post we’ll feature the following services deployed on Azure cloud:
Databricks workspace
Azure Data Lake Storage account gen. 2
Key Vault
CosmosDB workspace with Core (SQL) API
Fully fledged data platforms may obviously feature more resources, but the ones used herein will get you the full functionality of the Feature Store, including its offline and online versions.
Requirements
Azure account with a Contributor or an Owner access to a given resource group
Bash and jq on the computer that runs the code (if you use Windows you can use the Git Bash application)
Azure CLI app installed on a machine that runs the script
Databricks CLI (optional, you can use an AAD token for authentication).
Feature store example notebooks
Within the code repository featured in this blog-post, we’ve included two slightly modified notebooks originally created by Databricks. Our modifications allow you to run the notebooks right after the infrastructure is deployed, so you can familiarize yourself with Feature Store functionalities straightaway. Since they’re extremely well documented, we’ll just let you explore them on your own. You can find them here.
Terraform state information
Herein, we assume running the Terraform code from your own computer, which will result in the fact that the state information will be kept locally. If you need to share this file with other team members or you already have pipelines in place for deploying infrastructure, you should resort to storing state info in a more accessible place, such as Blob storage. On how to do so, please refer to this official Azure tutorial.
Terraform workflow
Codebase
In order to deploy the Databricks Feature Store on Databricks, we’ll leverage two Terraform files that contain the code:
variables.tf
Naming of the resources that will get deployed
main.tf
The whole infrastructure specification along all of the individual resources and connections between them
The ready-to-use Terraform code is available in the Github repo. While you can have a look at it anytime, we’ll carefully guide you through all of it so you can understand both the code and services that will be a part of the DataBricks Feature Store. The full code can be found here:
Azure CLI login
Prior to running any Terraform code, you must authenticate to Azure cloud. This is done via Azure CLI, which must be installed on the computer that you’ll use to deploy the infrastructure. Instructions on how to do so can be found here.
When CLI is installed, make sure that you login to CLI by executing the following command and following the on-screen prompts:
Terraform initialization
The first step in the Terraform workflows is the initialization of a working directory. This also makes sure that all of the provider plugins specified in the code are properly installed and tracked in a local lock file. You can do this by calling this simple command:
Deploying into resource group that is not empty
If you want to leverage an existing resource group for this tutorial, you should at first import its definition to a local state file. In order to do so, you need to comment out the sections of the code that get evaluated (at this point) prematurely. Those specifications are as follows:
-
provider "databricks"
- data “local_sensitive_file” “aad_token_fle”
- data "databricks_current_user" "me"So the code for those pieces should look as follows:
After you’ve commented those sections out, copy the ID of your Azure subscription (you can check it via the Azure portal or via Azure CLI). Then, run the following command:
The successful run of the import statement will result in the creation of a state file, in which the resources managed by Terraform are meticulously tracked. Depending on your needs, sometimes you may need to modify the state file, for instance if you want to delete all of the resources that were created via a given Terraform code but you don’t want to delete the whole resource group. Then you can remove the temporary resource group from the state file (azurerm_resource_group.rg) and destroy all of the resources by running terraform destroy. If you want to deploy the resources into this resource group again, just run the above terraform import command once more. Please be aware, that you should never need to modify the state file manually — state modifications should be always done via arguments supplied to terraform state command.
If there are resources in this resource group that are not imported into Terraform they will remain intact, no matter what you do in the code (unless you decide to destroy the resource group from Terraform — in such case removing the resource group from the state file would be the better option).
Providers
The following code is used for the providers declaration:
Throughout this tutorial, we use 2 different Terraform providers:
azurerm and databricks. As you can see, there is an additional option specified for key_vault within the azurerm provider and that is purge_soft_delete_on_destroy. Since the infrastructure showcased here was never intended to be used in real production workflows, by leveraging this option we make sure that key_vault content is purged along with its deletion.The provider for Databricks is more interesting though. Since the goal here was to set up everything required for the Feature Store usage from one codebase, it was necessary to create a secret scope within Databricks that is backed by Azure Key Vault. In order to do so, you must authenticate to the Databricks provider using either Azure CLI or AAD token. You can’t use Databricks Personal Access token (standard authentication method) for this purpose because it does not authorize you to access native Azure resources in any way, such as Key Vault. Authentication via Service Principal is not supported as of now. For more info, please refer to: https://registry.terraform.io/providers/databricks/databricks/latest/docs/resources/secret_scope
The authentication via AAD token is handled as follows:
“null_resource” . “get_aad_token_for_dbx” resource is used for Azure CLI call that retrieves a token including flag — resource 2ff814a6–3304–4ab8–85cb-cd0e6f879c1d, which is Azure’s programmatic ID for Databricks workspace. The output of Azure CLI call is piped to jq command: jq -r .accessToken > %s which outputs token value to %s. The whole CLI call and a pipe is wrapped within the native Terraform format() command, which maps %s to the name of the file that is used for keeping the AAD token. As specified in variables.tf file, it is aad_token.txt.Once the token is written to a local file, it can be referenced via a
data block that is specified here as ”local_sensitive_file” “aad_token_file”.This data block is referenced in the
provider “databricks” block, where we specify its content as a token, while also taking care of redundant file formatting that might have got into the file, depending on our operating system of choice. This trimming is done via the trimsuffix function.Prior to handling the actual resources, let’s make our life a little easier later on and declare some meta-data.
Additional meta-data
By specifying those two data blocks, we’ll be able to reference a few arguments throughout the code, such as tenant_id and object_id that are connected to our user account on Azure and our home path of the Databricks Workspace. By specifying depends_on = [azurerm_databricks_workspace.dbx] in databricks_current_user, we ensure that the Databricks user is not evaluated until the Databricks Workspace is actually deployed.
Resource group
As already mentioned, you can leverage an existing resource group for deploying your Feature Store but you can also create a brand new one directly from Terraform. If you import your resource group though, if you don’t want to change any of its specification, make sure that its definition from the Terraform code is exactly the same as the definition of an existing resource group, including any tags. You can check them either on the portal or when you run the
terraform plan or terraform apply command. If the resource group is not modified in any way in the message received after running one of those commands, your definition completely matches the definition of an already existing resource group. Otherwise, you can either modify your code or overwrite the definition of the resource group.Storage account
Although a dedicated storage solution is not necessary for spinning up Databricks with its Feature Store, it is generally a good idea to keep your data separate from the Databricks Workspace. It does not limit your capabilities at all, but rather provides much more flexibility to the architecture you’re building. In such a case it’s a great idea to leverage unmanaged Delta tables — this means that Databricks would only handle the metadata (such as the path on the underlying storage) of the Delta table and not the data itself. For more info on this, please refer to: https://learn.microsoft.com/en-us/azure/databricks/lakehouse/data-objects#--what-is-an-unmanaged-table.
Due to the inherent advantages of Azure Data Lake ver. 2 over Azure Blob Storage, it’s a good idea to leverage it as the underlying solution for storing large amounts of data. In order to achieve this,
account_kind and is_hns_enabled in azurerm_storage_account resource must be specified to StorageV2 and true, respectively.Please notice how the attributes of resources are reused here. Instead of manually inputting
resource_group_name and its location, we just take advantage of the fact that those attributes are specified in the state and we just provide a reference to them here.Containers provide the hierarchy for the data that is kept on Azure Storage solutions. It can be treated as a parent directory in a given Storage account, so the path to
<storage-name>/<container-name> will map to the top level of the container. From within Terraform code, containers can be created using azurerm_storage_data_lake_gen2_filesystem resource.Databricks workspace
Deploying the Databricks workspace is done within the
azurerm provider and not the databricks provider — the latter is for interacting with the workspace itself and requires the workspace to be created first. Parameter sku controls whether you’ll be using a standard or premium workspace. The comparison of their functionalities and pricing can be found here: https://www.databricks.com/product/azure-pricing.Please note that this only deploys the workspace. Deployment of a workspace automatically creates a new resource group that is managed by the Databricks workspace. Inside this resource group there will appear resources that will be provisioned by Databricks whenever new resources are needed. So when you start a new cluster, a new set of resources for a given VM type will get deployed therein.
Azure Key Vault
Since Databricks provided a way to use secrets from the Azure Key Vault directly within the Databricks Runtime, let’s leverage this for storing the keys required for providing connection credentials. In order to do so, we need to provision a Key Vault first.
Access to a Key Vault may be handled in two ways, either via an access policy or a Role Based Access Control. We chose the former, due to its simplicity. The way Terraform code is specified here creates a full set of secret permissions for the authenticated user to
azurerm provider, since object_id parameter is set to data.azurerm_client_config.current.object_id. In order to create an access policy for a different user, group or service principal, change this value.Please also note that
depends_on option in azurerm_key_vault_access_policy is set to [azurerm_key_vault.kv]. This is done to make sure that the policy is created after the underlying Key Vault has already been provisioned.Registering a Key Vault as a Secret Scope in Databricks Workspace
Making Key Vault secrets accessible from the Databricks Workspace is very easy when it’s done via Terraform. All that is needed to be done is hookup the
resource_id and dns_name as a keyvault_metadata in databricks_secret_scope resource. But please remember, that in order for this setup to work, you need to authenticate to the databricks provider in a way that provides access to both Databricks Workspace and Azure Key Vault, as described in the section Providers. Registering a Key Vault inside Databricks Workspace as a secret scope is exactly the reason why the authentication is done via an AAD token.Please also note that in such a case, access to secrets is not managed via Databricks but via the access control on a Key Vault. The way of controlling this access is described in the section above (Azure Key Vault).
Cosmos DB — Online Feature Store backend
There are 3 different backends available for the Online Feature Store on Azure Databricks:
Azure Cosmos DB
Azure MySQL
Azure SQL Server
From those three options, Cosmos DB provides the most features (https://learn.microsoft.com/en-us/azure/databricks/machine-learning/feature-store/online-feature-stores) and that’s why it’s used here.
There are some limitations when it comes to using Cosmos DB as a Feature Store backend though, namely:
it is only supported for clusters that have Databricks ML Runtime installed with a version higher than 11.1
it can only be used with Core (SQL) API
network connectivity must be set to all networks
Apart from that, the connection between Databricks Runtime and Cosmos DB is handled by a separate OLTP connector that needs to be installed on the cluster — we’ll revisit this issue later on. If all of those downsides did not discourage you from using Cosmos DB as a Feature Store backend — let’s continue.
Standard Cosmos DB SQL hierarchy consists of the following entities:
Cosmos DB Workspace > database > container > table > items
So at first, the workspace must be created. Cosmos with Core (SQL) API can be provisioned from within Terraform by specifying
kind = “GlobalDocumentDB” and setting tags to:Once the Cosmos DB account is created, we can create databases and containers. Please note that
throughput is set within containers and by changing this value, you can set how much computing power will be reserved for your workloads, so it also controls the costs of the resource.Once the Cosmos DB basic setup is done, we can go forward with establishing the connection between Databricks Workspace and the database. For this purpose, we’ll need a cluster that will serve as our computing engine on Databricks.
Databricks cluster
The tweaking of a cluster specification is something that you shouldn’t (initially) spend too much time on. It can always be changed and adjusted as you go on with your workflows. You can also create as many clusters as you want — creation itself does not cost anything, you only pay when the clusters are running. Therefore it’s a very good idea to set up an auto-termination option so you won’t pay for the clusters sitting idle overnight, were you to forget to shut them down. You can also choose what VM types to utilize and the amount of workers that will be spinned up. If you need to, you can also specify autoscaling for your clusters but as far as POC purposes go, the cheapest VMs available will be sufficient. Herein, you can also choose a Spark version that will be available to your workloads. In order to have a Feature Store library preinstalled on the cluster, you should refer to https://learn.microsoft.com/en-us/azure/databricks/release-notes/runtime/releases#feature-store-compatibility-matrix to check which version of Databricks Machine Learning runtime you should use. As displayed in the code, Databricks Runtime 11.2 for Machine Learning was used while preparing this blogpost.
Apart from the cluster hardware and runtime specification, with
databricks_cluster resource you can also add spark configuration properties, which can be leveraged for customizing runtime experience. Herein, spark_conf is used to provide access key to the ADLS2 account. Please notice, that at first a format command is used, in order to reference azurerm_storage_account.adls2.name within the string and then it’s assigned the key value itself. Since this assignment is done via referencing properties of objects that were created earlier on, the storage key is never exposed in the code itself — it is evaluated at the runtime, whenever you hit terraform apply.Owing to adding the ADLS2 keys to the clusters’ spark configuration, you can access data sitting on this storage via the Azure Blob Filesystem driver. It works in such a way that storage paths are mapped to the abfss path. For instance, you can list objects sitting in one of the containers we created earlier on by executing the following command on Databricks the workspace (but remember that you must use a cluster with the storage key added to the spark config):
We find using a dedicated storage account an optimal way to work with Delta tables on Databricks. The full control over all of the storage functionalities provide great flexibility to the platform users.
Installing Cosmos DB driver on Databricks cluster
Now that the cluster and a dedicated Cosmos DB workspace for our Feature Store are both ready, we need to set up the connection between those two resources. The connection is handled by Azure Cosmos DB OLTP Spark connector shipped on the Maven platform. This library is not preinstalled on the cluster though, and requires a manual installation on the cluster. However, owing to
databricks_library resource this is very easy to do from the script. We just need to specify the source of the library (maven) and its coordinates along with the appropriate cluster id.Now, the connection between resources for the Feature Store is ready to be established. For this purpose, we need to provide Cosmos DB credentials to the Databricks cluster, which will be accessed via the OLTP connector that we just installed. Those credentials can live in any secret scope in the Databricks workspace but since we earlier created a secret scope that has Azure Key Vault as its backend, let’s just leverage it.
Inserting Cosmos DB keys to Azure Key Vault
When the Cosmos DB account is created, its access keys are available as parameters that can be reused throughout the Terraform script, similarly to what we’ve done with ADLS2. Therefore, let’s just put the required access key in our Key Vault.
Please note the naming convention for the secrets: both of the access keys (read and write) have a suffix of
authorization-key. This is not done by accident. In fact, the Feature Store library expects that the access keys will have this particular suffix, regardless of what else is there in the name. We find this peculiar, especially since you always need to reference the secret name in the code but without this suffix the Feature Store library just hides this suffix addition from the user. For more info, please, refer to the original docs: https://learn.microsoft.com/en-us/azure/databricks/machine-learning/feature-store/fs-authentication#--authentication-for-looking-up-features-from-online-stores-with-served-mlflow-models. You can also have a look at the Python code for this connection in the notebooks uploaded to the repo along the Terraform code.Databricks token for real-time inference
One of the notebooks available in the repo features testing real-time inference, by calling an endpoint that will serve your Mlflow model. In order to authenticate such a connection, we’ll use a Personal Access Token for Databricks workspace. Its creation can be done via
databricks_token resource. Once it’s provisioned, let’s insert it into Key Vault just as we’ve done for other credentials.Upload notebooks to Databricks workspace
Once the resources are properly setup, we just need to have a working example of how the Feature Store operates. To achieve this, we just need to upload git-versioned notebooks to our Databricks workspace. This is done with a
databricks_notebook resource. For dealing with paths, we’ll leverage the powerful format function available in Terraform. The source specifies the local path to the file and path is the target path on Databricks workspace. We can use ${path.module} for getting the filesystem path to where our code sits. For parsing the path on the Databricks workspace, we can leverage data.databricks_current_user.me.home, which is the attribute of data that we specified earlier on. By leveraging it, the beginning of the path will be equal to our user’s home path on the Databricks workspace.Databricks workflows
So far, what we’ve done was focused on getting the setup for an interactive experience with Databricks. That’s the default one, when you go around, produce code and execute lines of code as you go. However, Databricks was never intended to only be an interactive platform — it also supports scheduled jobs that are necessary for any production-case workloads. Those are run on job clusters, which are distinct from interactive ones and they are in fact cheaper to use. They exist only for the duration of running a given piece of code. They also require their full setup prior to the job start and if your job fails, the cluster will need to be provisioned again.
Workflows are created with a
databricks_job resource. Basically it’s the same setup as what was done for interactive clusters within one resource. The only real difference in the code is the addition of the notebook_task, which specifies the path to the notebook containing the Python code that will be run within the workflow. Once the Terraform code is successfully run, this is what the task specification for this workflow looks like in Databricks UI: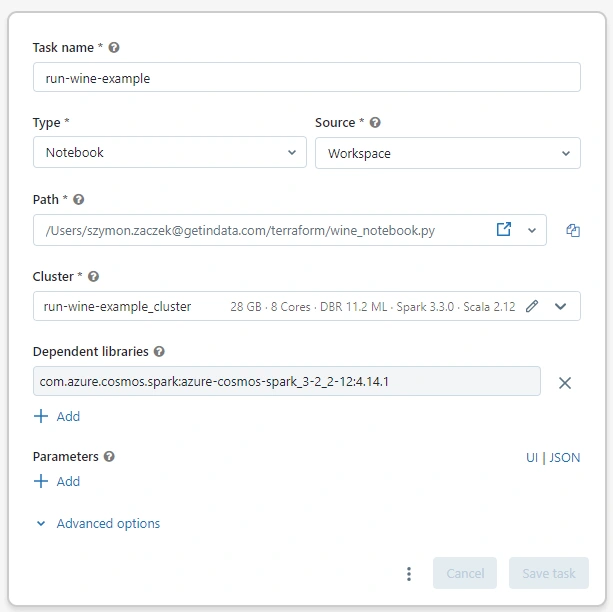
Execute the script
So, that’s it for the description of the whole Terraform code. If you’re deploying into an existing resource group, you’ll need to uncomment the code that was commented out in section Deploying into a resource group that isn’t empty, that involves the following entities:
- provider “databricks”
- data “local_sensitive_file” “aad_token_fle”
- data “databricks_current_user” “me”
Now we can investigate what resources Terraform will attempt to create by calling:
terraform planYou should receive a prompt detailing what will happen in the resource group if you go forward with resources deployment. If there are any changes that you want to make to your code, go ahead and do them now.
If you’re ready, it’s time to deploy all of the services. Please go ahead and run the command:
terraform applyAt first you will receive the same prompt that was shown to you after running
terraform plan. However, you’re also now asked whether you want to go forward with the deployment. If you are, type yes, click enter, and wait a bit for Terraform to do its job and provision all of the resources.Once the deployment is done, you can go ahead and explore the notebooks that got uploaded to the Workspace. They highlight the functionalities of the Feature Store using the setup made from Terraform code. You can also run the workflow that was created — it will appear in the Workflows tab in the UI.
Summary
And there you have it! We hope that this blog post not only showed you how to deploy the Databricks Feature Store but that it also highlighted that working with Terraform is just effective and simple, mostly owing to its very well-thought through declarative syntax. Especially when there are quite a few pieces on the cloud that need to have connections established in-between them. Of course, since state management in Terraform is up to the end-users, it sometimes may be troublesome to get it right but we still find it to be a very low price for what we’re getting in return.
We hope this tutorial helped you start off your Feature Store within the Databricks platform. If you would like to read about how the Feature Store is leveraged within MLOps workflows, what are the use-cases of the Databricks platform in the modern data world or why we like Terraform so much please, let us know.
Like this project
Posted Jul 30, 2025
Deployed Databricks Feature Store on Azure using Terraform as IaC.