PyCAT-Napari Bio-image Analysis Platform
Christian Neureuter
PyCAT-Napari
PyCAT (Python Condensate Analysis Toolbox) is an open-source application built on napari for analyzing biomolecular condensates in biological images. It provides a comprehensive suite of tools for fluorescence image analysis, particularly focused on condensate detection, measurement, and characterization. PyCAT aims to provide a low/no-code solution, accessible to researchers with varying levels of programming experience.
Table of Contents
Features
PyCAT-Napari provides a comprehensive suite of tools for biological image analysis, with a focus on in-cellulo and per-cell analyses.
Category Capabilities Image Processing and Segmentation - Versatile toolbox with common image processing and analysis functions.
- Specialized condensate segmentation and object filtering algorithms.
- Optimized for in-cellulo analysis in challenging biological datasets. Quantitative Region Analysis - Simple and intuitive layer and ROI mask design.
- Extensive ROI feature analysis, including area, intensity, shape, texture, and more.
- Advanced colocalization analysis:
- Object-based metrics: Jaccard Index, Dice Coefficient, Mander’s coefficients, and distance analysis.
- Pixel-wise metrics: Pearson’s R, Spearman’s R, Li’s ICQ, and more.
- Modified Costes analysis: Automated thresholds and statistical significance testing.
- Correlation function analysis: Auto- and cross-correlation functions with Gaussian fitting. Integrated Analysis Pipelines - Condensate Analysis Pipeline: Tailored for in-cellulo biomolecular condensates.
- Colocalization Analysis Pipeline: Combines object-based and pixel-wise methods for robust colocalization studies.
- General ROI Analysis Pipeline: Flexible pipeline for exploratory measurements.
- Fibril Analysis Pipeline: Specialized for analyzing beta-amyloid fibers and fibril structures.
System Requirements
Compatibility Matrix
Platform Python Status Notes Windows 10/11 3.9 Tested Logo display issue Mac M1/ARM 3.9 Tested Requires specific torch Mac Intel 3.9 Untested* Should work Linux 3.9 Untested* Should work
*While untested, these platforms should work with standard installation.
Minimum Requirements
Python Version: 3.9.x (Required)
⚠️ Important: PyCAT-Napari is currently only compatible with Python 3.9. Other versions are not supported in this release. Future releases may aim to expand to more versions.
RAM: 8GB (16GB recommended)
Disk Space: ~100MB (including dependencies)
GPU: Not required (CPU-only processing)
Getting Started
PyCAT requires Python 3.9 and a package/environment manager. We recommend using Mambaforge/Miniforge for package and environment management, but we include instructions for alternative methods. Before installing PyCAT-Napari, follow this quick assessment to determine your setup needs:
Initial Setup Check
1. Do you have Python installed?
Check Python Installation
Run this command in your terminal (mac)/command prompt (anaconda prompt)/powershell(windows):
If you get a version number: ✅ You have Python installed
If you get an error: ❌ See Python and Package Manager Installation Guide
2. Do you have Conda or Mamba installed?
Check Your Environment Manager
If you get a version number: ✅ You have conda/mamba installed
If you get an error: ❌ See Python and Package Manager Installation Guide
3. Are you familiar with Python environments?
If yes: ✅ Proceed to Installation
If no: ❌ Read our quick environment guide below
Python Package and Environments Info
Think of environments like separate containers for different projects - they help avoid conflicts and keep things organized. Don't worry, they're simpler than they sound!
Python environments help you:
Keep projects separate
Avoid version conflicts
Ensure reproducibility
Package Manager Choice
💡 Why Miniforge?
Miniforge is a lightweight distribution of Conda, offering faster package installation and fewer pre-installed packages Mambaforge is being deprecated in favor of Miniforge. Key Advantages:
Quicker dependency resolution
Minimal initial install (no unnecessary extras)
Fully compatible with conda commands (just use
mamba in place of conda)Already have Anaconda? That's fine! You can skip the Miniforge installation and use your existing setup.
Basic environment commands:
Installation
Basic Installation
Create and activate a new environment:
Windows
Note: On Windows, due to some platform-specific rendering quirks, the application logo may not display correctly. This is purely cosmetic and does not affect functionality.
Mac M1/ARM
Optional Features
You can install PyCAT with additional tools, features, and packages. For example, dev, test, and doc tools. The devbio-napari package adds numerous additional image analysis tools. Learn more at devbio-napari documentation.
💡 Tip: You can designate multiple optional dependencies by separating them with a comma
Alternative Installation Methods
If you encounter issues with the standard installation, use our tested environment files located in the config/ folder. We provide complete environment files that match our development package setup (no dev tools installed though, please install those separately if youre trying to install a dev version for a fork or pull request) to provide you with the same environment we developed and ran in. To use these environment files, just download the yaml file from the config folder on the github repo, then cd to the location of the downloaded file in your terminal, then run:
Verifying Installation & Optional Testing
After installation, verify PyCAT-Napari is working correctly:
1. Basic Checks
If you encounter any failures, check:
Python version (must be 3.9.x)
Environment activation
Complete installation of dependencies
Check the issues
Still having problems installing or running the program? Open a github issue. If you need urgent help, reach out to us and we will try to get back to you as soon as possible.
Usage
PyCAT-Napari offers two ways to analyze your data: through a user-friendly GUI or programmatically via Python code. PyCAT was developed as a low/no-code solution to image analysis so usage of the GUI is recommedned. API usage has not been thoroughly tested however many core functions are modular and should work via API.
GUI Application
Launch PyCAT's graphical interface with:
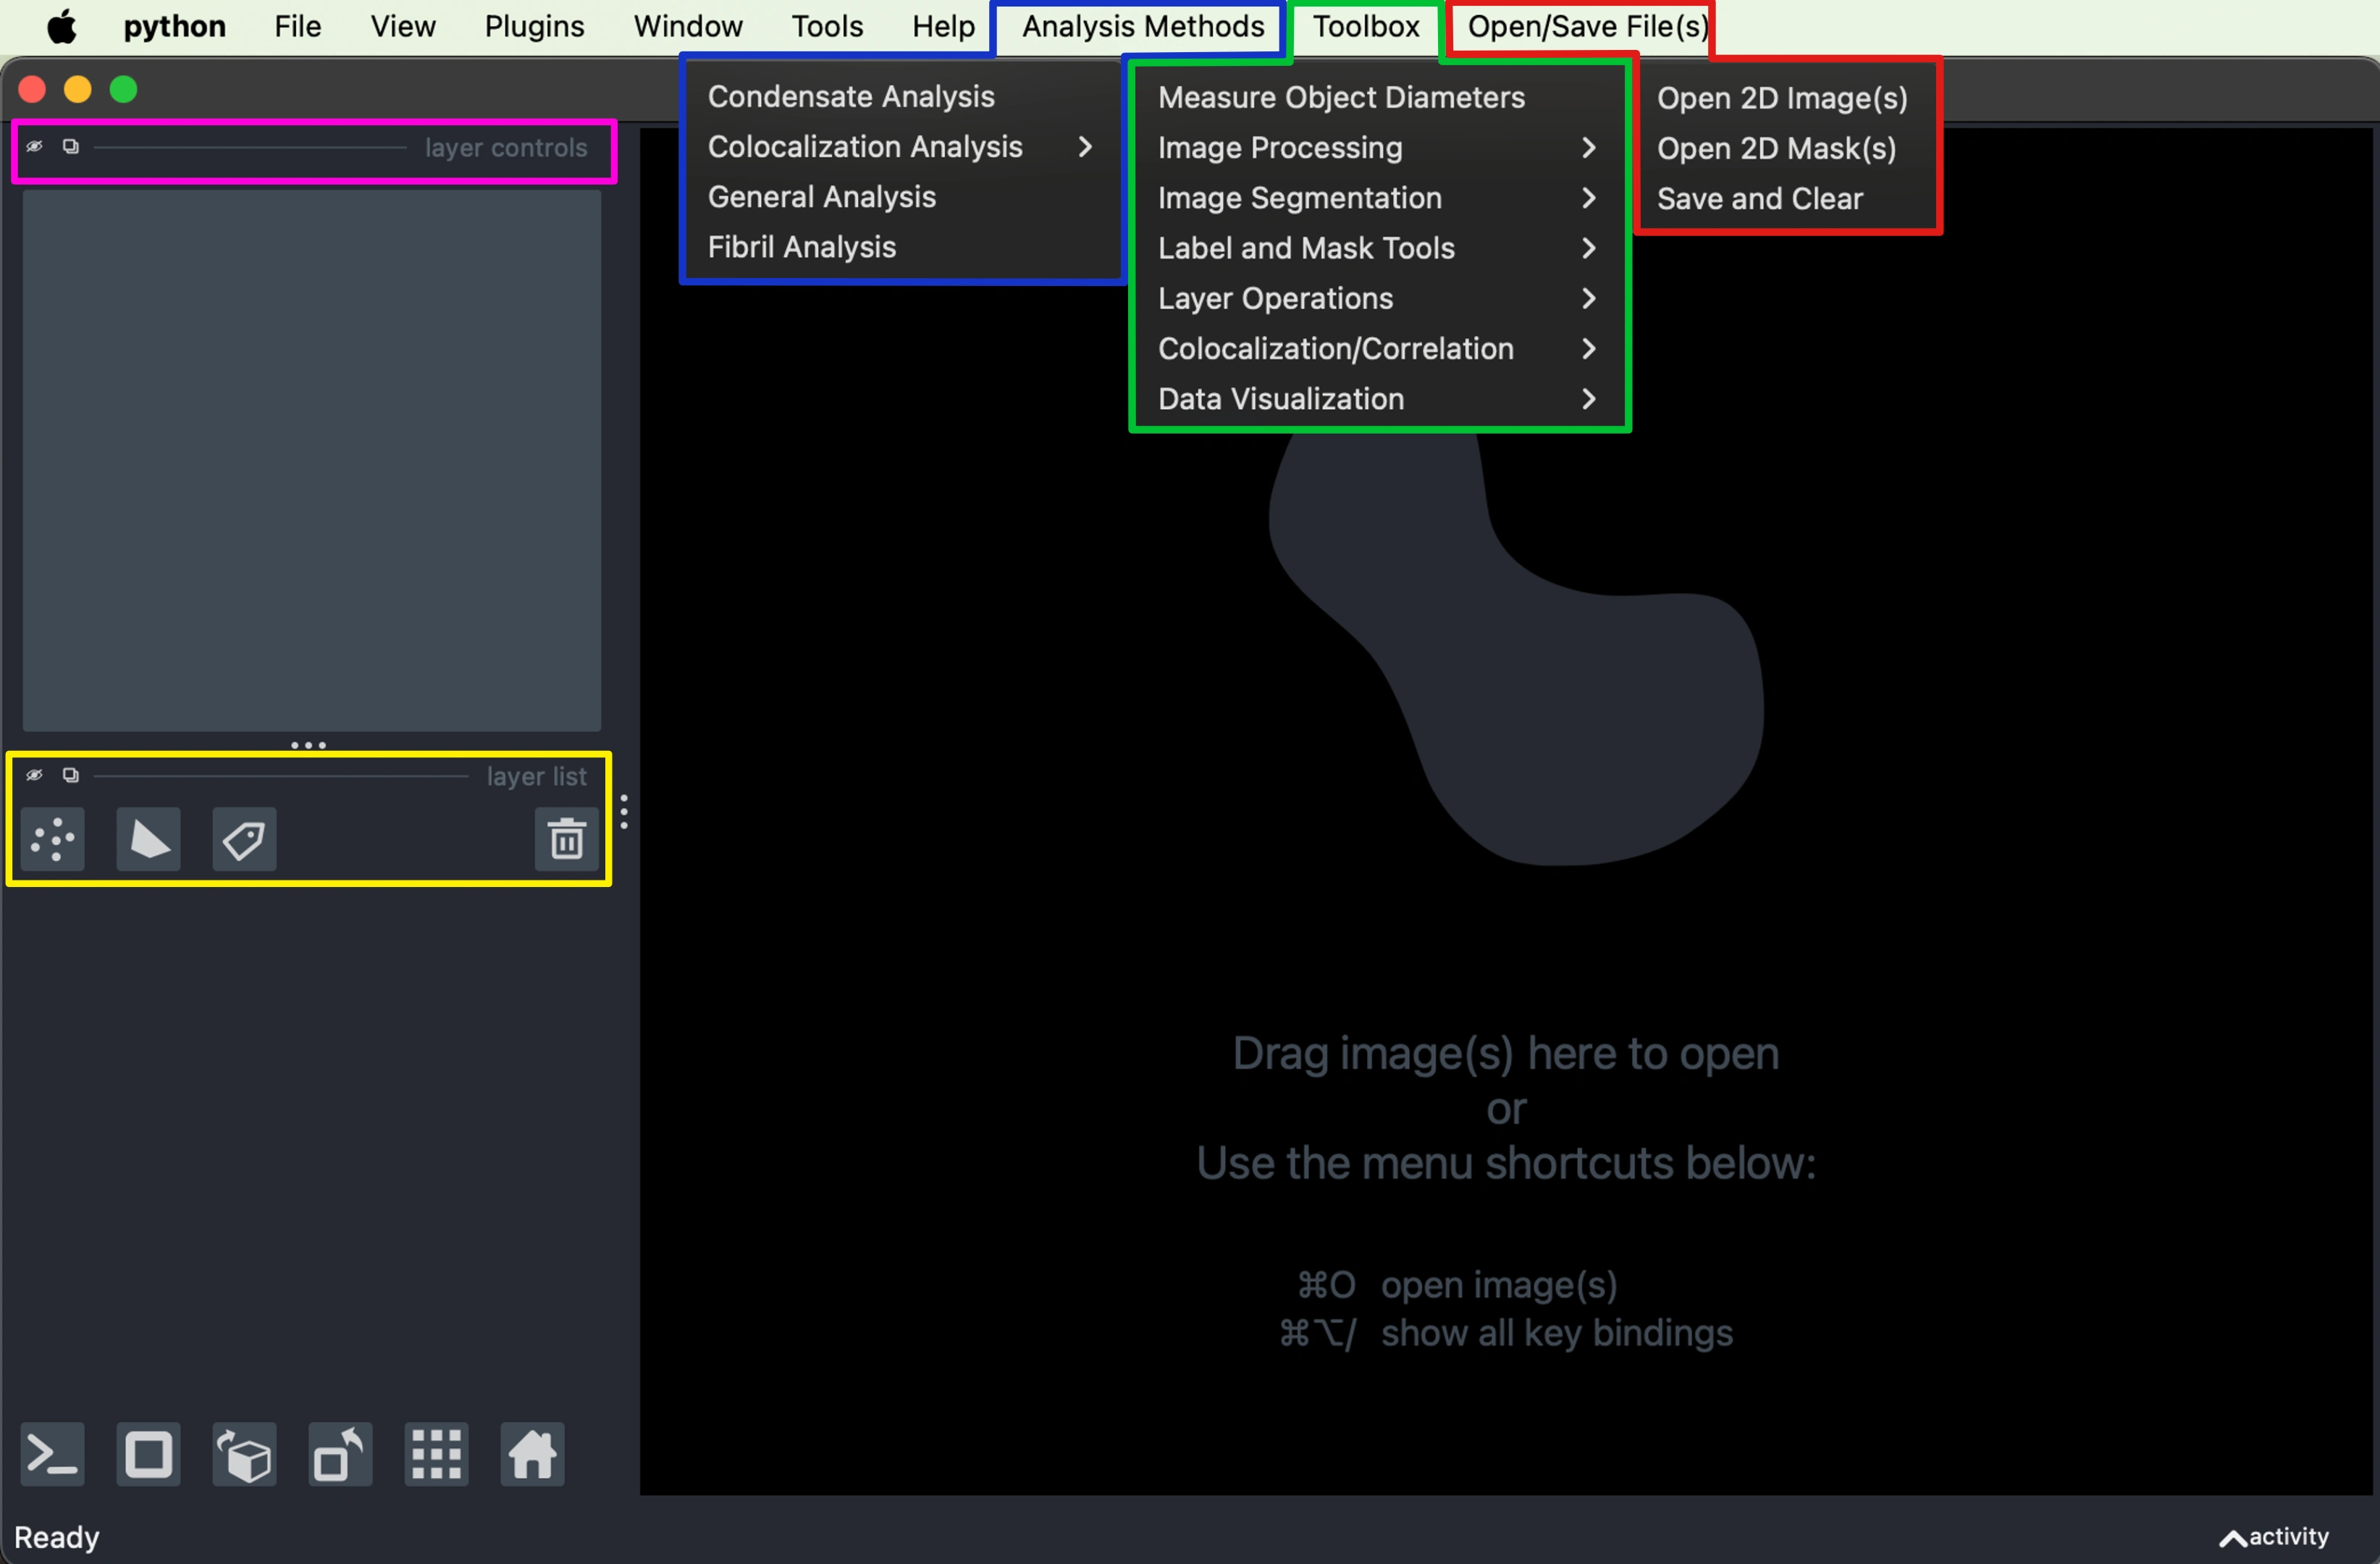
A blank Napari viewer with added menu items on the right will open up for you. In the image above the added menus have been expanded and color coded.
🟦 Analysis Methods - provides pre-made pipelines offering tools and outputs depending on the given method that you choose.
🟩 Toolbox - is a menu full of all of the individual functions and tools in PyCAT, for novel algorithm experimentation and analysis workflow customization.
🟥 Open/Save File(s) - handles image and data input/output for PyCAT, using AICSImageIO to read various microscope and metadata formats, and storing the information in PyCAT’s internal data structure.
Note: you must use this and not the integrated Napari IO under the typical file open file save or the integrated drag and drop feature since they are not integrated with PyCATs internal data structure.
PyCAT-Napari integrates seamlessly with the Napari interface, providing users with a powerful and intuitive environment for image analysis. Napari's interface is designed to be user-friendly, resembling popular pixel or raster photo editors like MSPaint or Photoshop. So, if you've ever used a photo editor, the tools should be simple enough to acclimate to.
🟨 Layer Tools - where users can easily add or remove various layers such as images, shapes, and labels from the viewer. This feature allows for quick management of the visual elements, including the ability to hide or show layers using the eye icon.
🟪 Shape and Label Tools - which include node tools for manipulating shape layers, as well as paint brush, eraser, and bucket tools for label layers. Users can also apply colormaps to images and change opacity to view overlapping images.
Basic GUI Workflow
Once you have the application open, choose your analysis method from the menu. This populates the dock with a pre-made analysis pipeline, even if you're doing your own algorithmic exploration, it is recomended to use
General Analysis for more robust integration with the internal PyCAT data strcutre.PyCAT excels at in-cellulo nuclear condensate analysis. An example pair of images are included in the folder assets/example analysis images/. The following is a basic example of a
Condensate Analysis with this data. For a more comprehensive walkthrough of this example, please see our expanded tutorial in our full API DocumentationLoad Data
Open/Save File(s)
Click
Open/Save File(s) > Open 2D Image(s)Note: you must use this and not the integrated Napari IO under the typical file open file save or the integrated drag and drop feature since they are not integrated with PyCATs internal data structure.
Supported formats: TIFF, CZI, PNG, JPG
Multiple files can be loaded simultaneously, multi-channel images or multiple selected files will be added the the viewer as separate layers
Assign names to each channel in a dialog box for easier layer tracking
In addition to the images, 2 shapes layers will be added for measuring object sizes
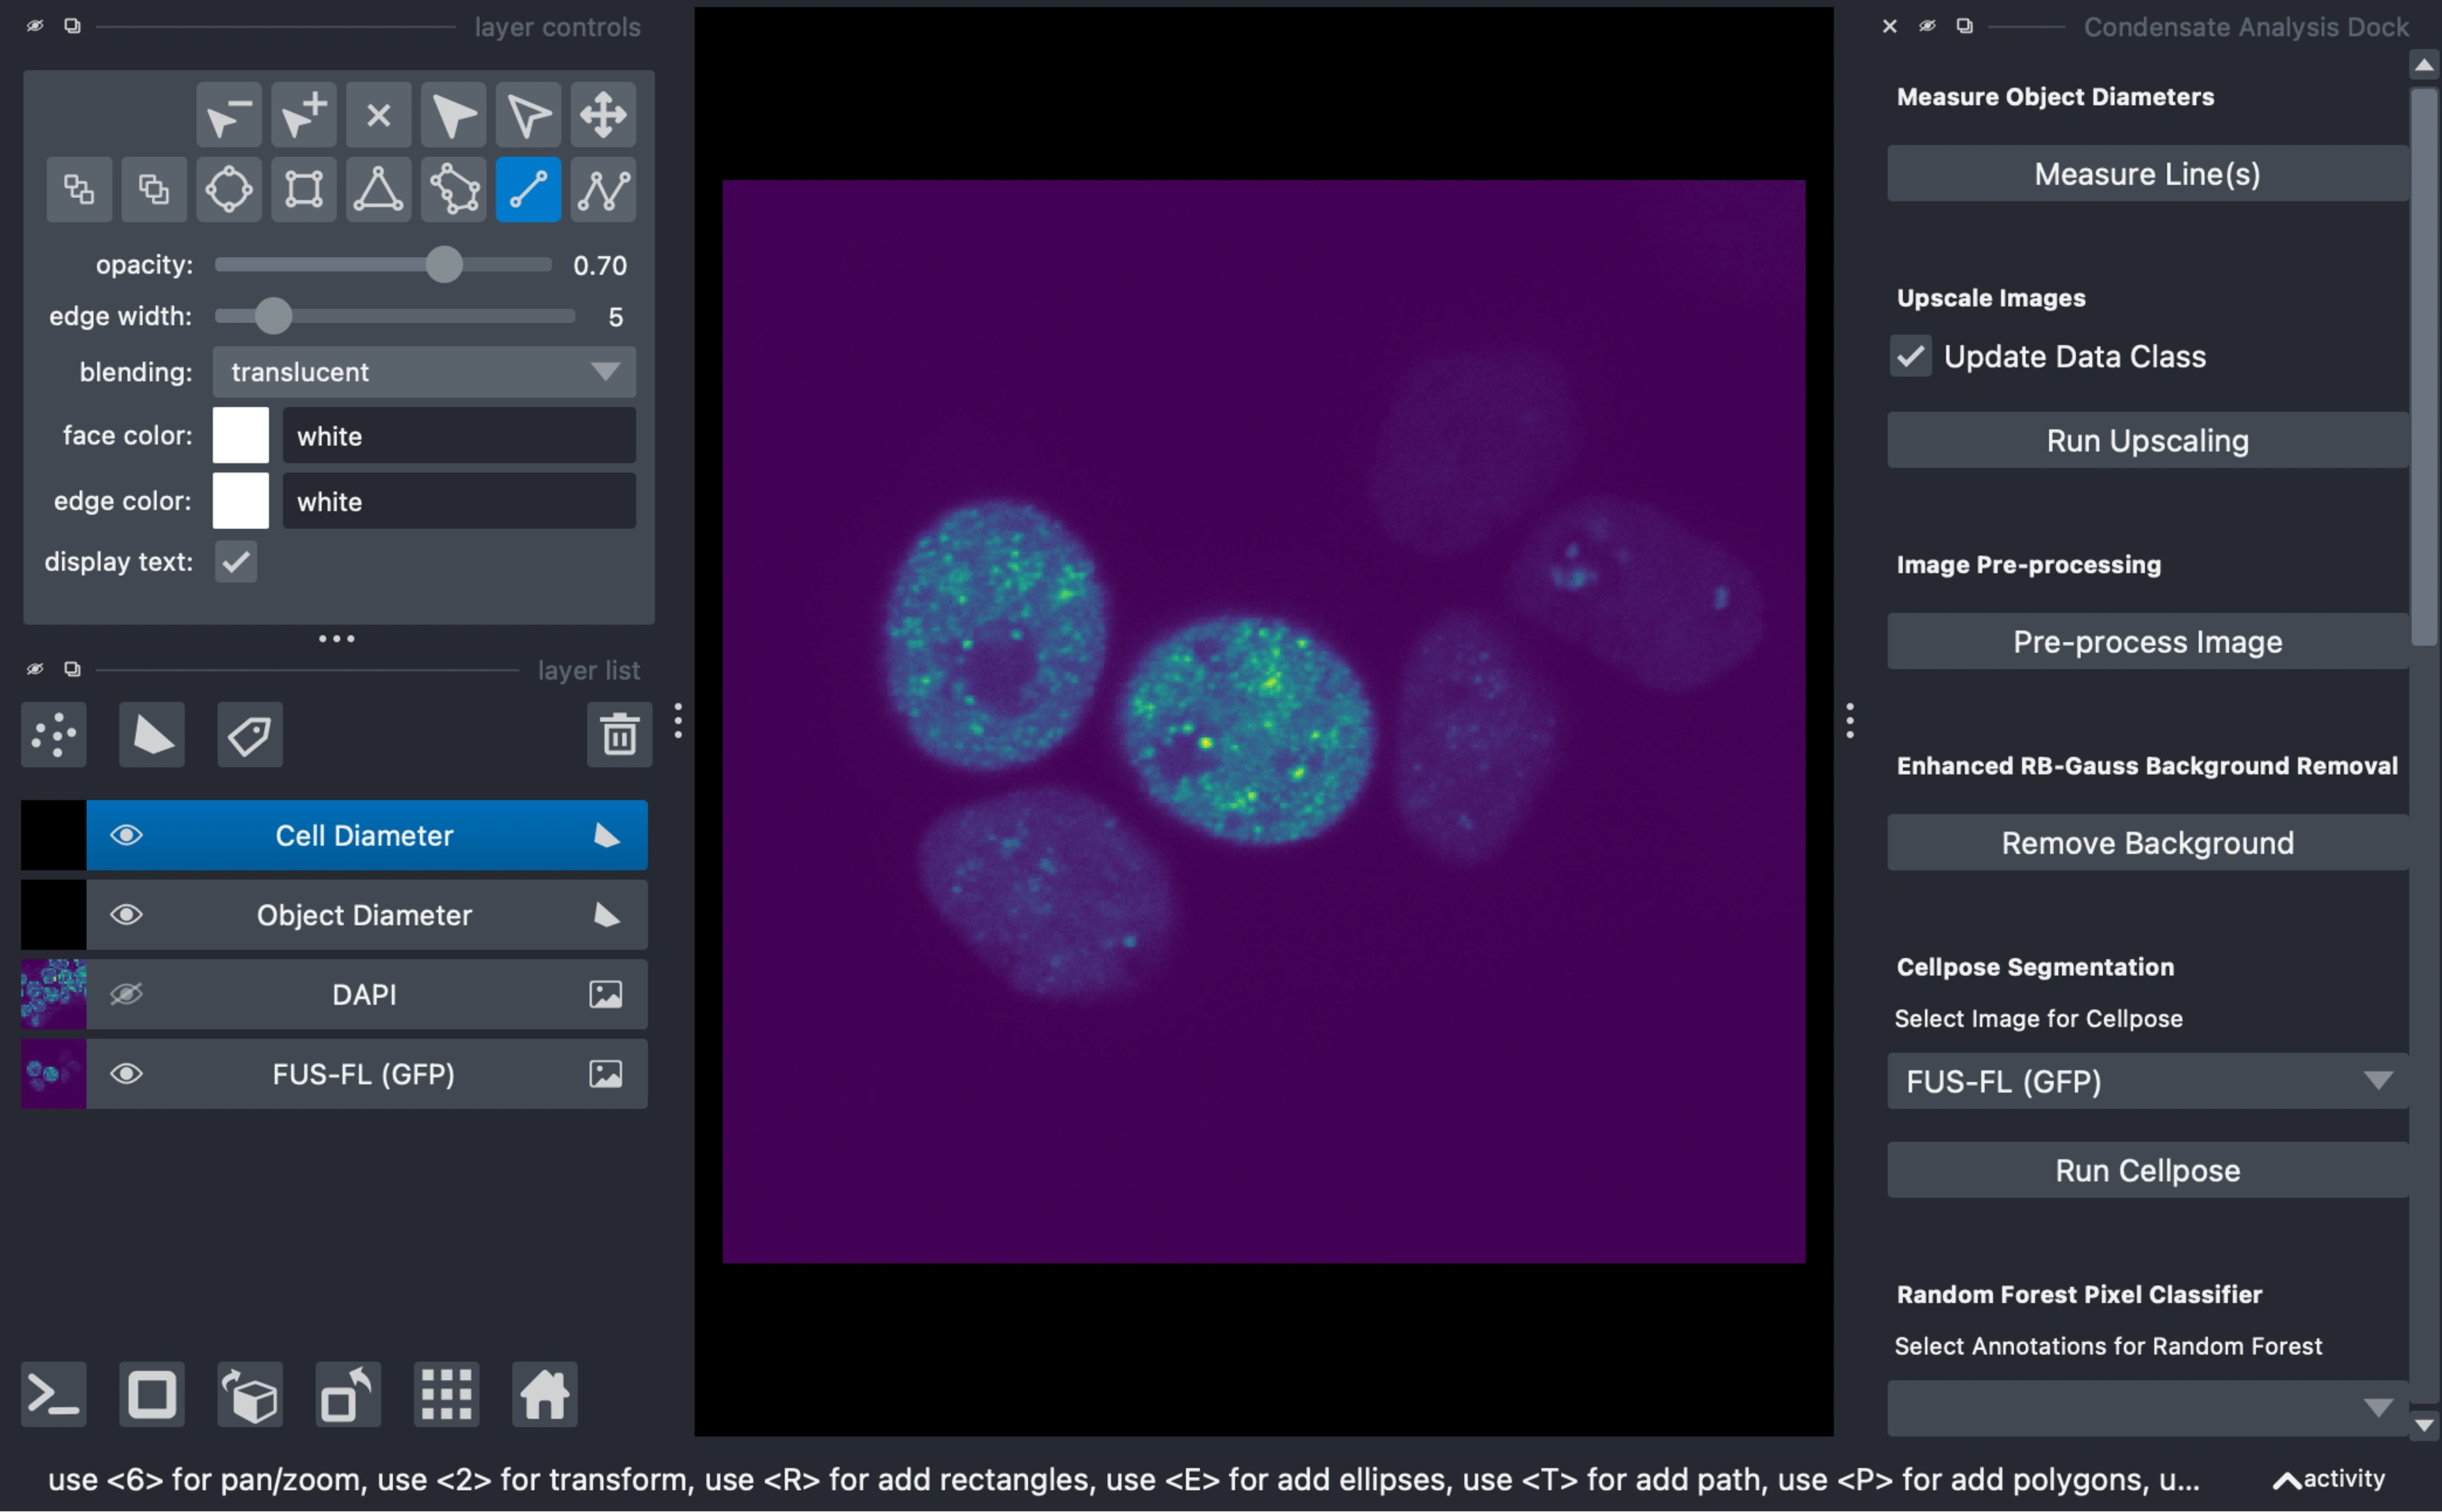
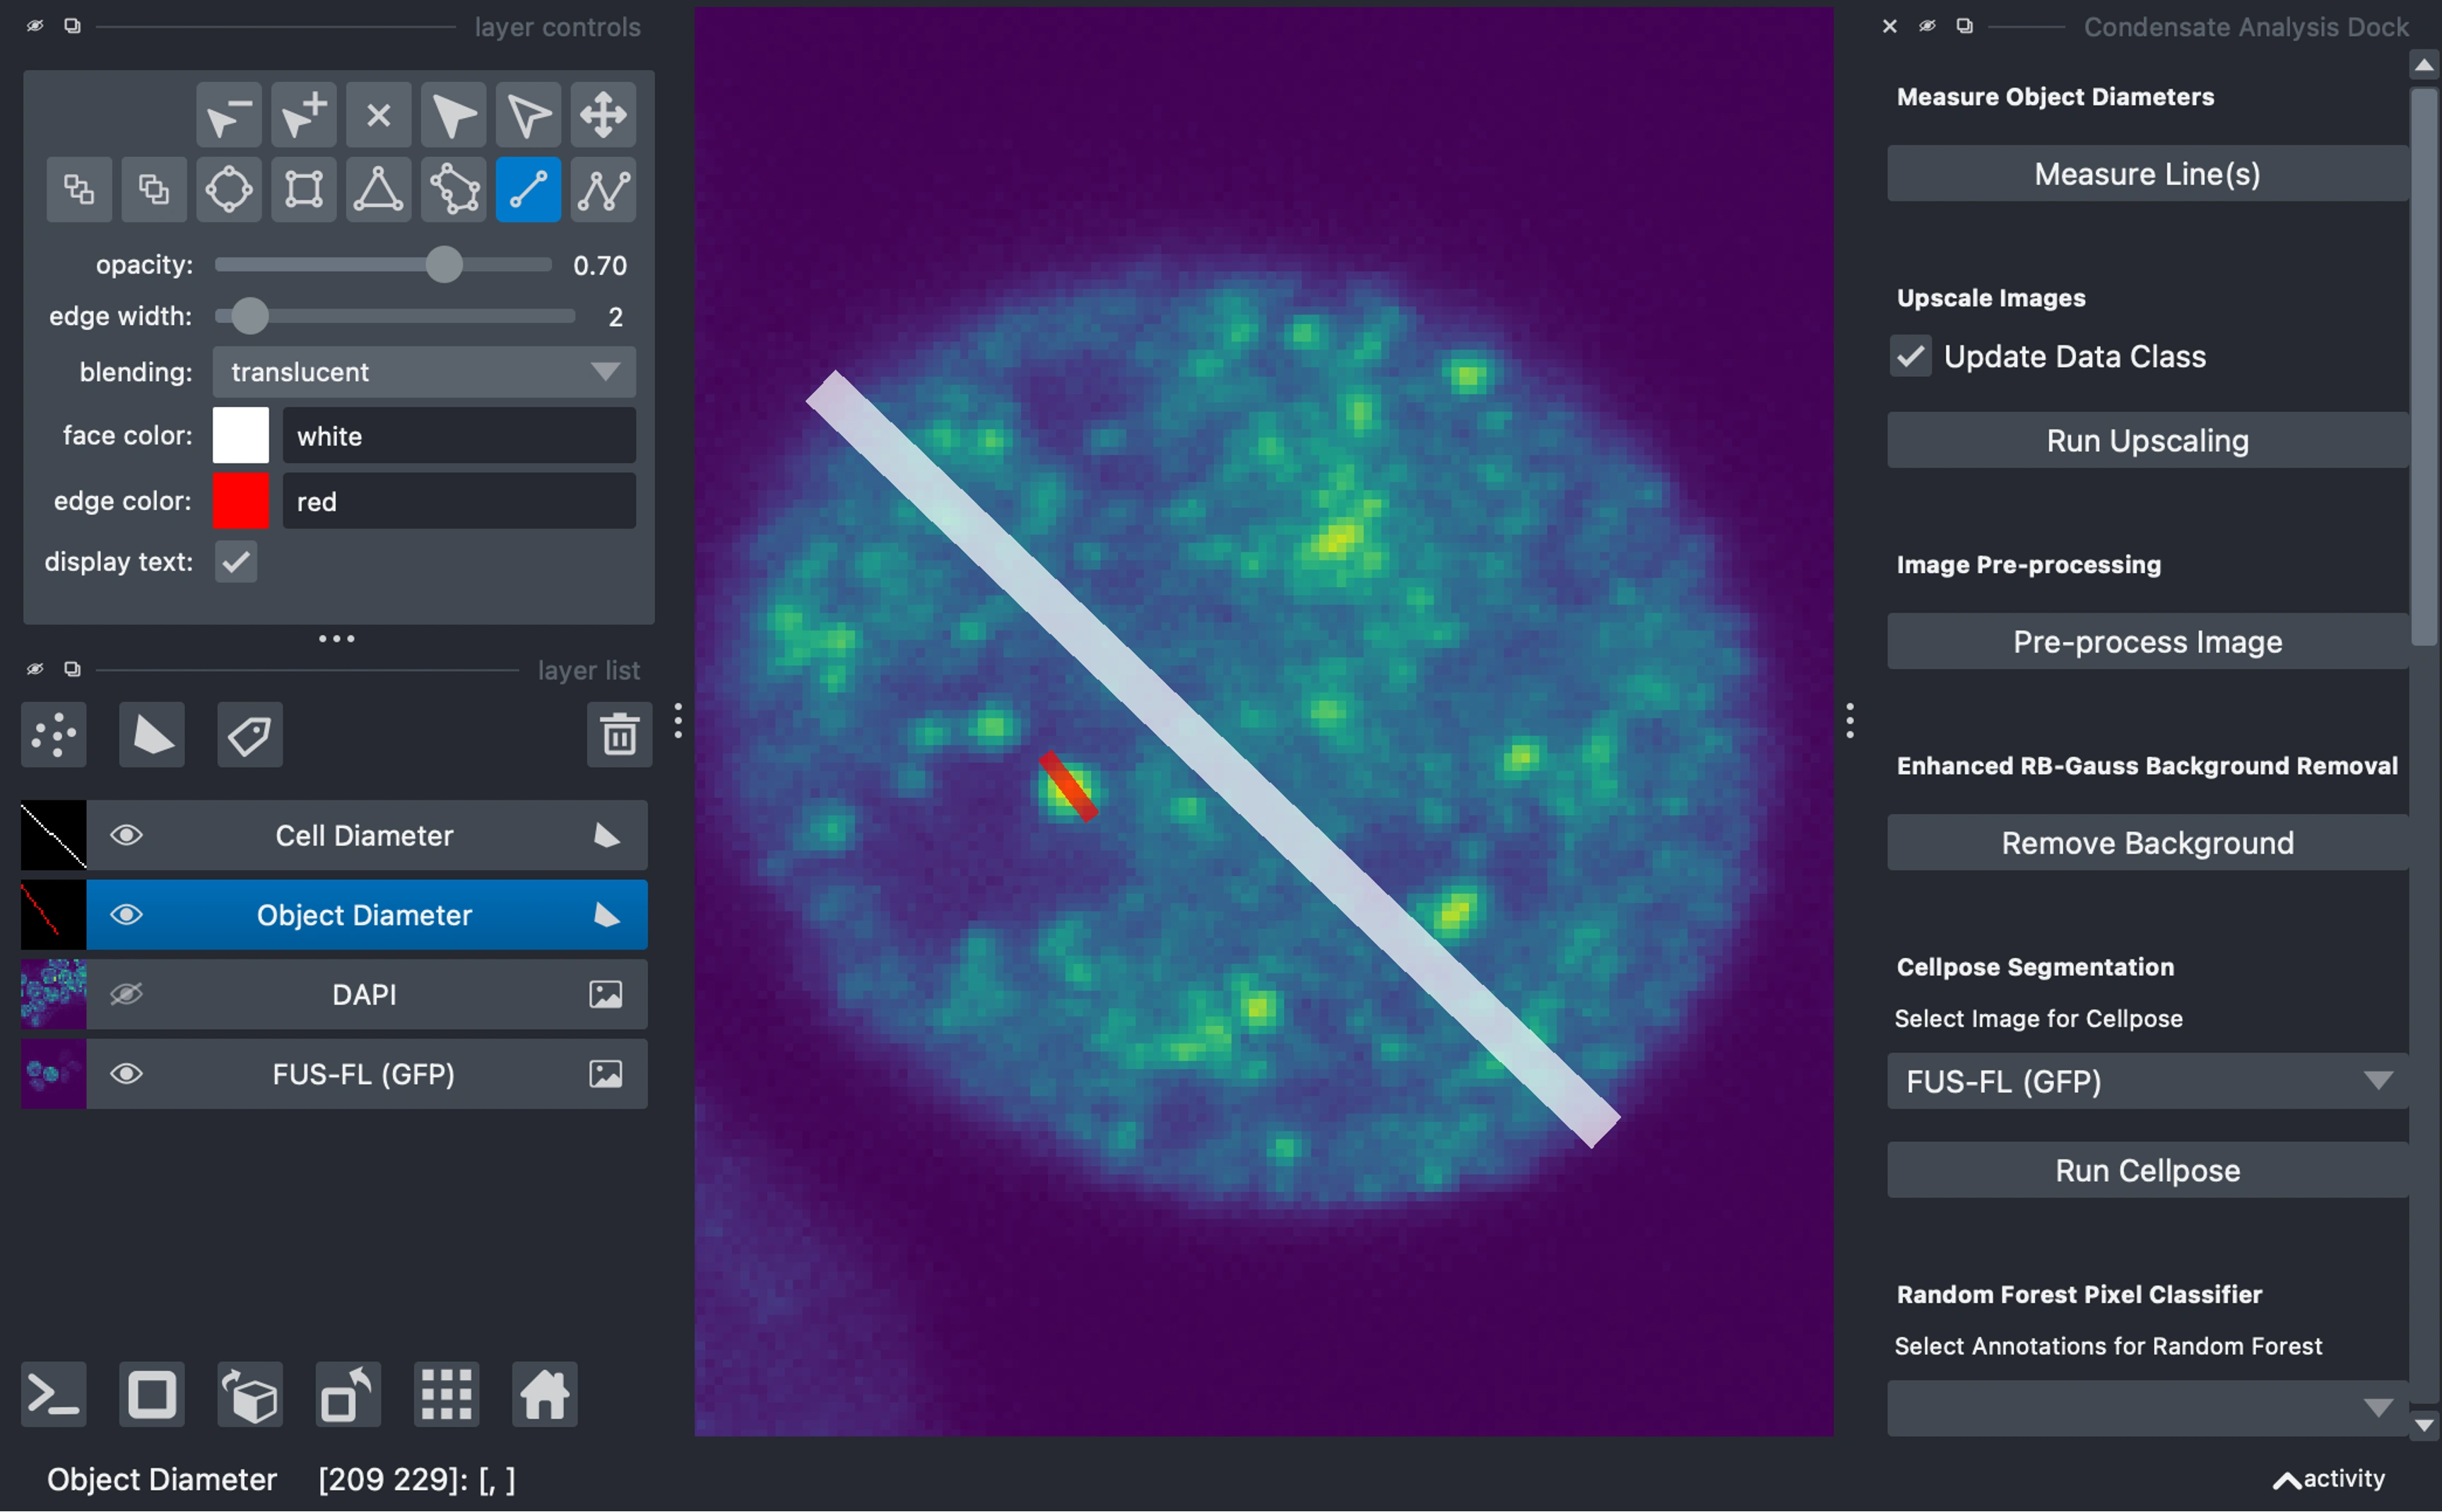
View, Process, and analyze images
Draw Measurement Lines
Draw lines across characteristic objects on the shapes layers:
Cell Diameter: For cell or nuclei diameters (or if in-vitro ~size of background features)
Object Diameter: For condensate or subcellular object diameters
Click "Measure Lines" to calculate diameters in both pixels and microns (if metadata is available).
Upscale Images (Optional)
If you are upscaling your images, you can multi-select the layers in the viewer and then click
Run Upscaling buttonUpscaling can be useful for segmentation and pre-processing algorithms, however, it can also introduce noise artifcats, and should be considered appropriately and applied consistently.
Preprocess Images
Preprocessing operates on the active image layer (blue highlighted layer in layers panel on the left side)
In the example, we do this on the GFP image
Preprocessing steps include:
White top-hat filtering
Laplacian of Gaussian enhancement
Wavelet-based noise reduction
Gaussian smoothing
Contrast-limited adaptive histogram equalization (CLAHE)
Background Removal
Background removal operates on the active image layer (blue highlighted layer in layers panel on the left side)
In the example, we do this on the GFP image
Background removal consists of:
Rolling ball background removal
Gaussian background subtraction and division
Gabor filtering
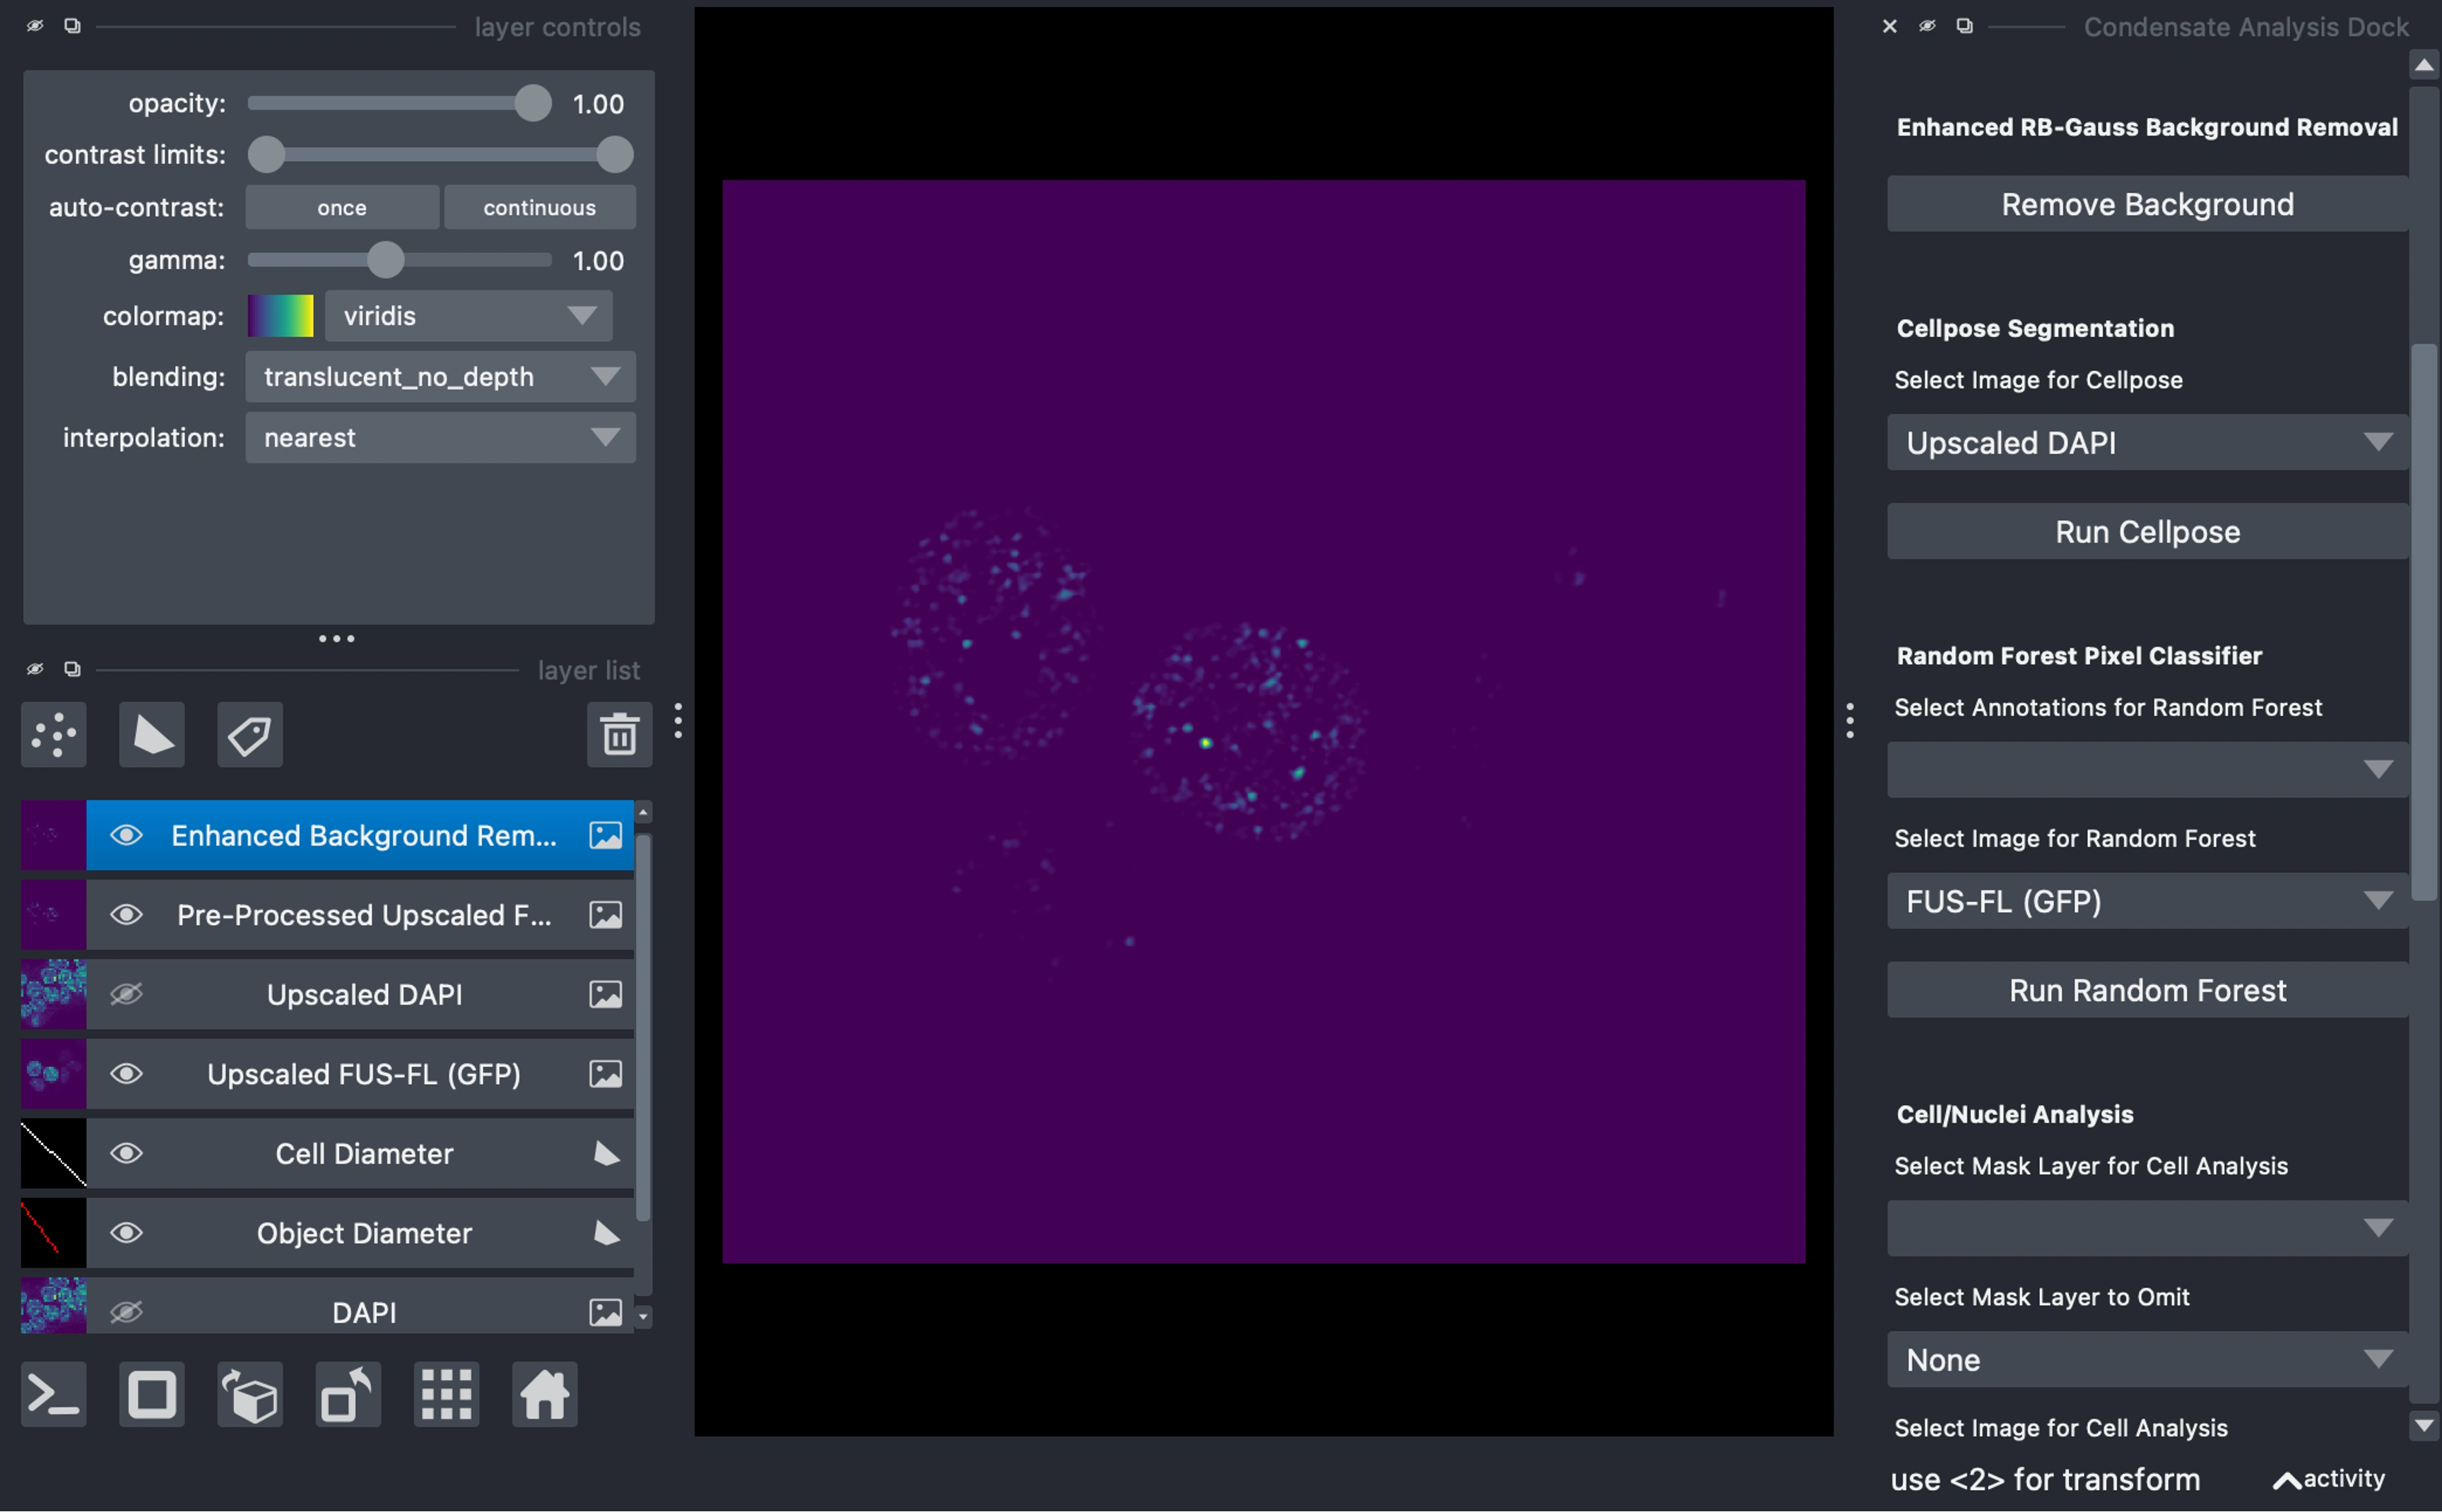
Primary Mask Generation
Use Cellpose or Random Forest for cell/nuclei segmentation:
Select the primary object image (DAPI, Hoechst, etc.) for segmentation in the respective dropdown.
Click
Run CellposeSee full walkthrough for example of RF classifier
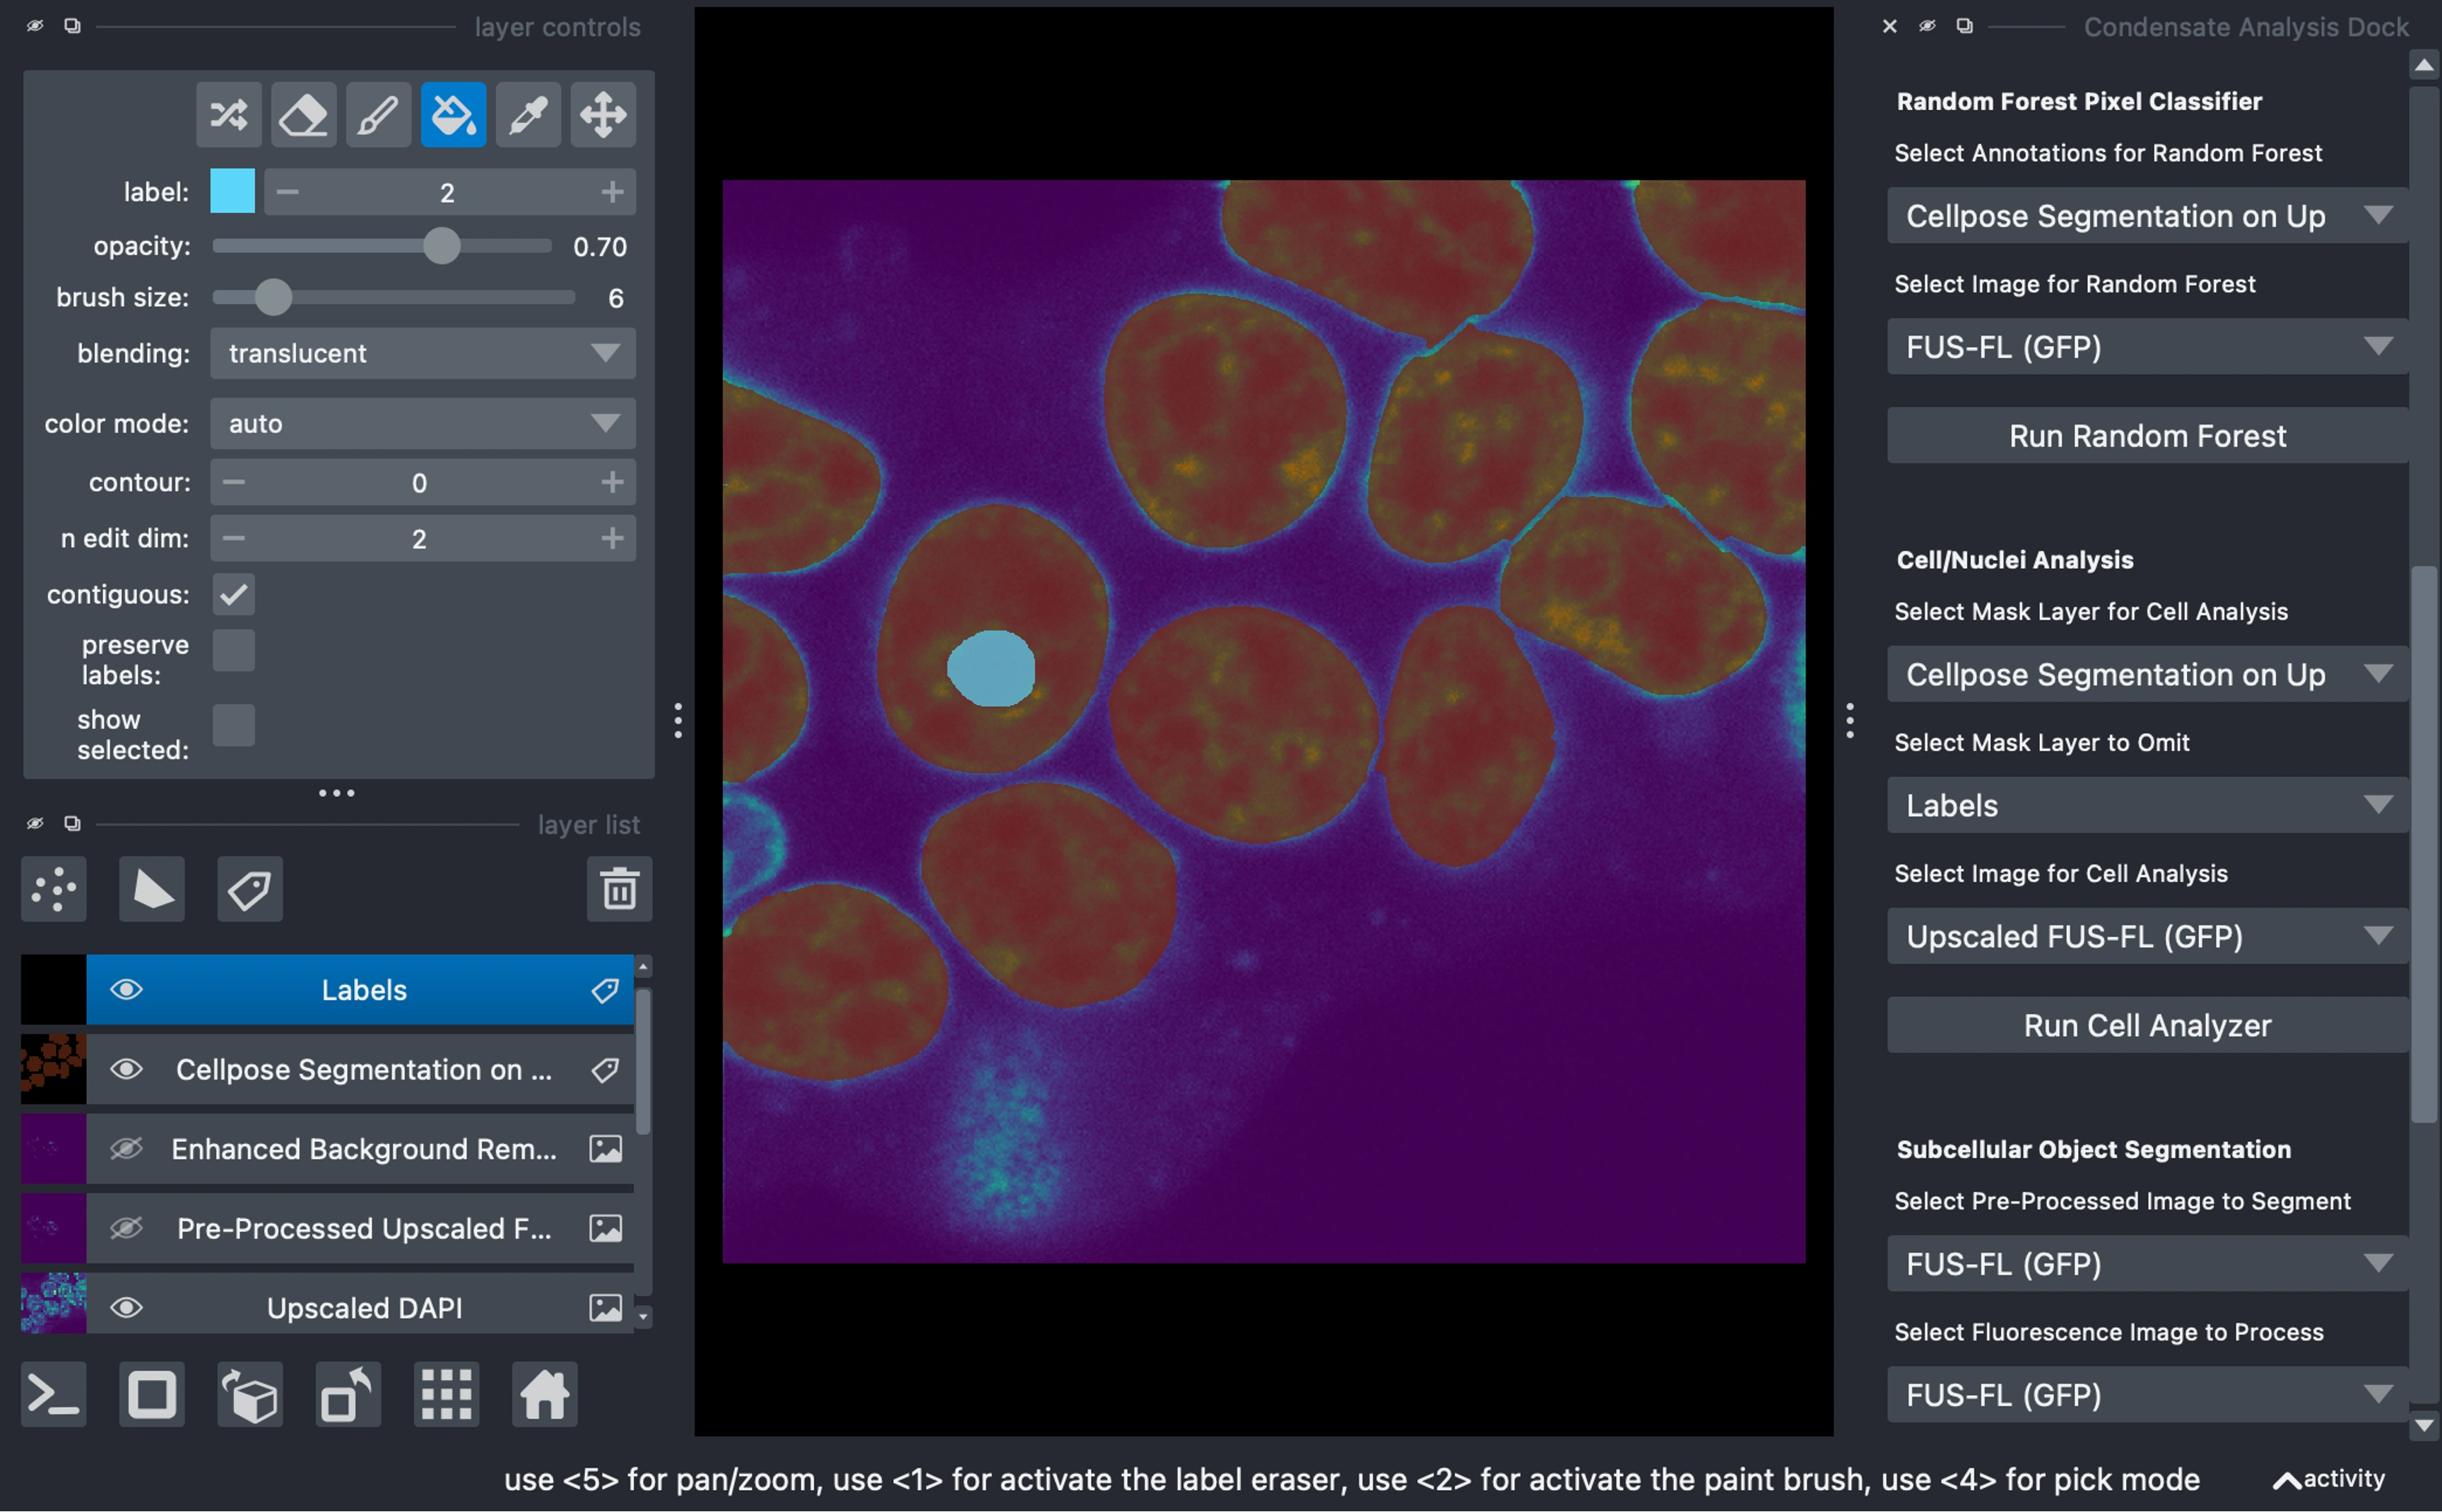
Cell/Nuclei Analysis
Measure various properties of the primary object mask
In the example, we do this on the GFP image (we always measure off of the unaltered image or in the case of this example the unaltered, upscaled, image)
Optional Mask to exclude
Create a blank labels layer to mark structures to omit (e.g., nucleoli, cytoplasm, etc.).
Select the primary mask, objects to omit (optionally), and the image to measure on.
Click "Run Cell Analyzer."
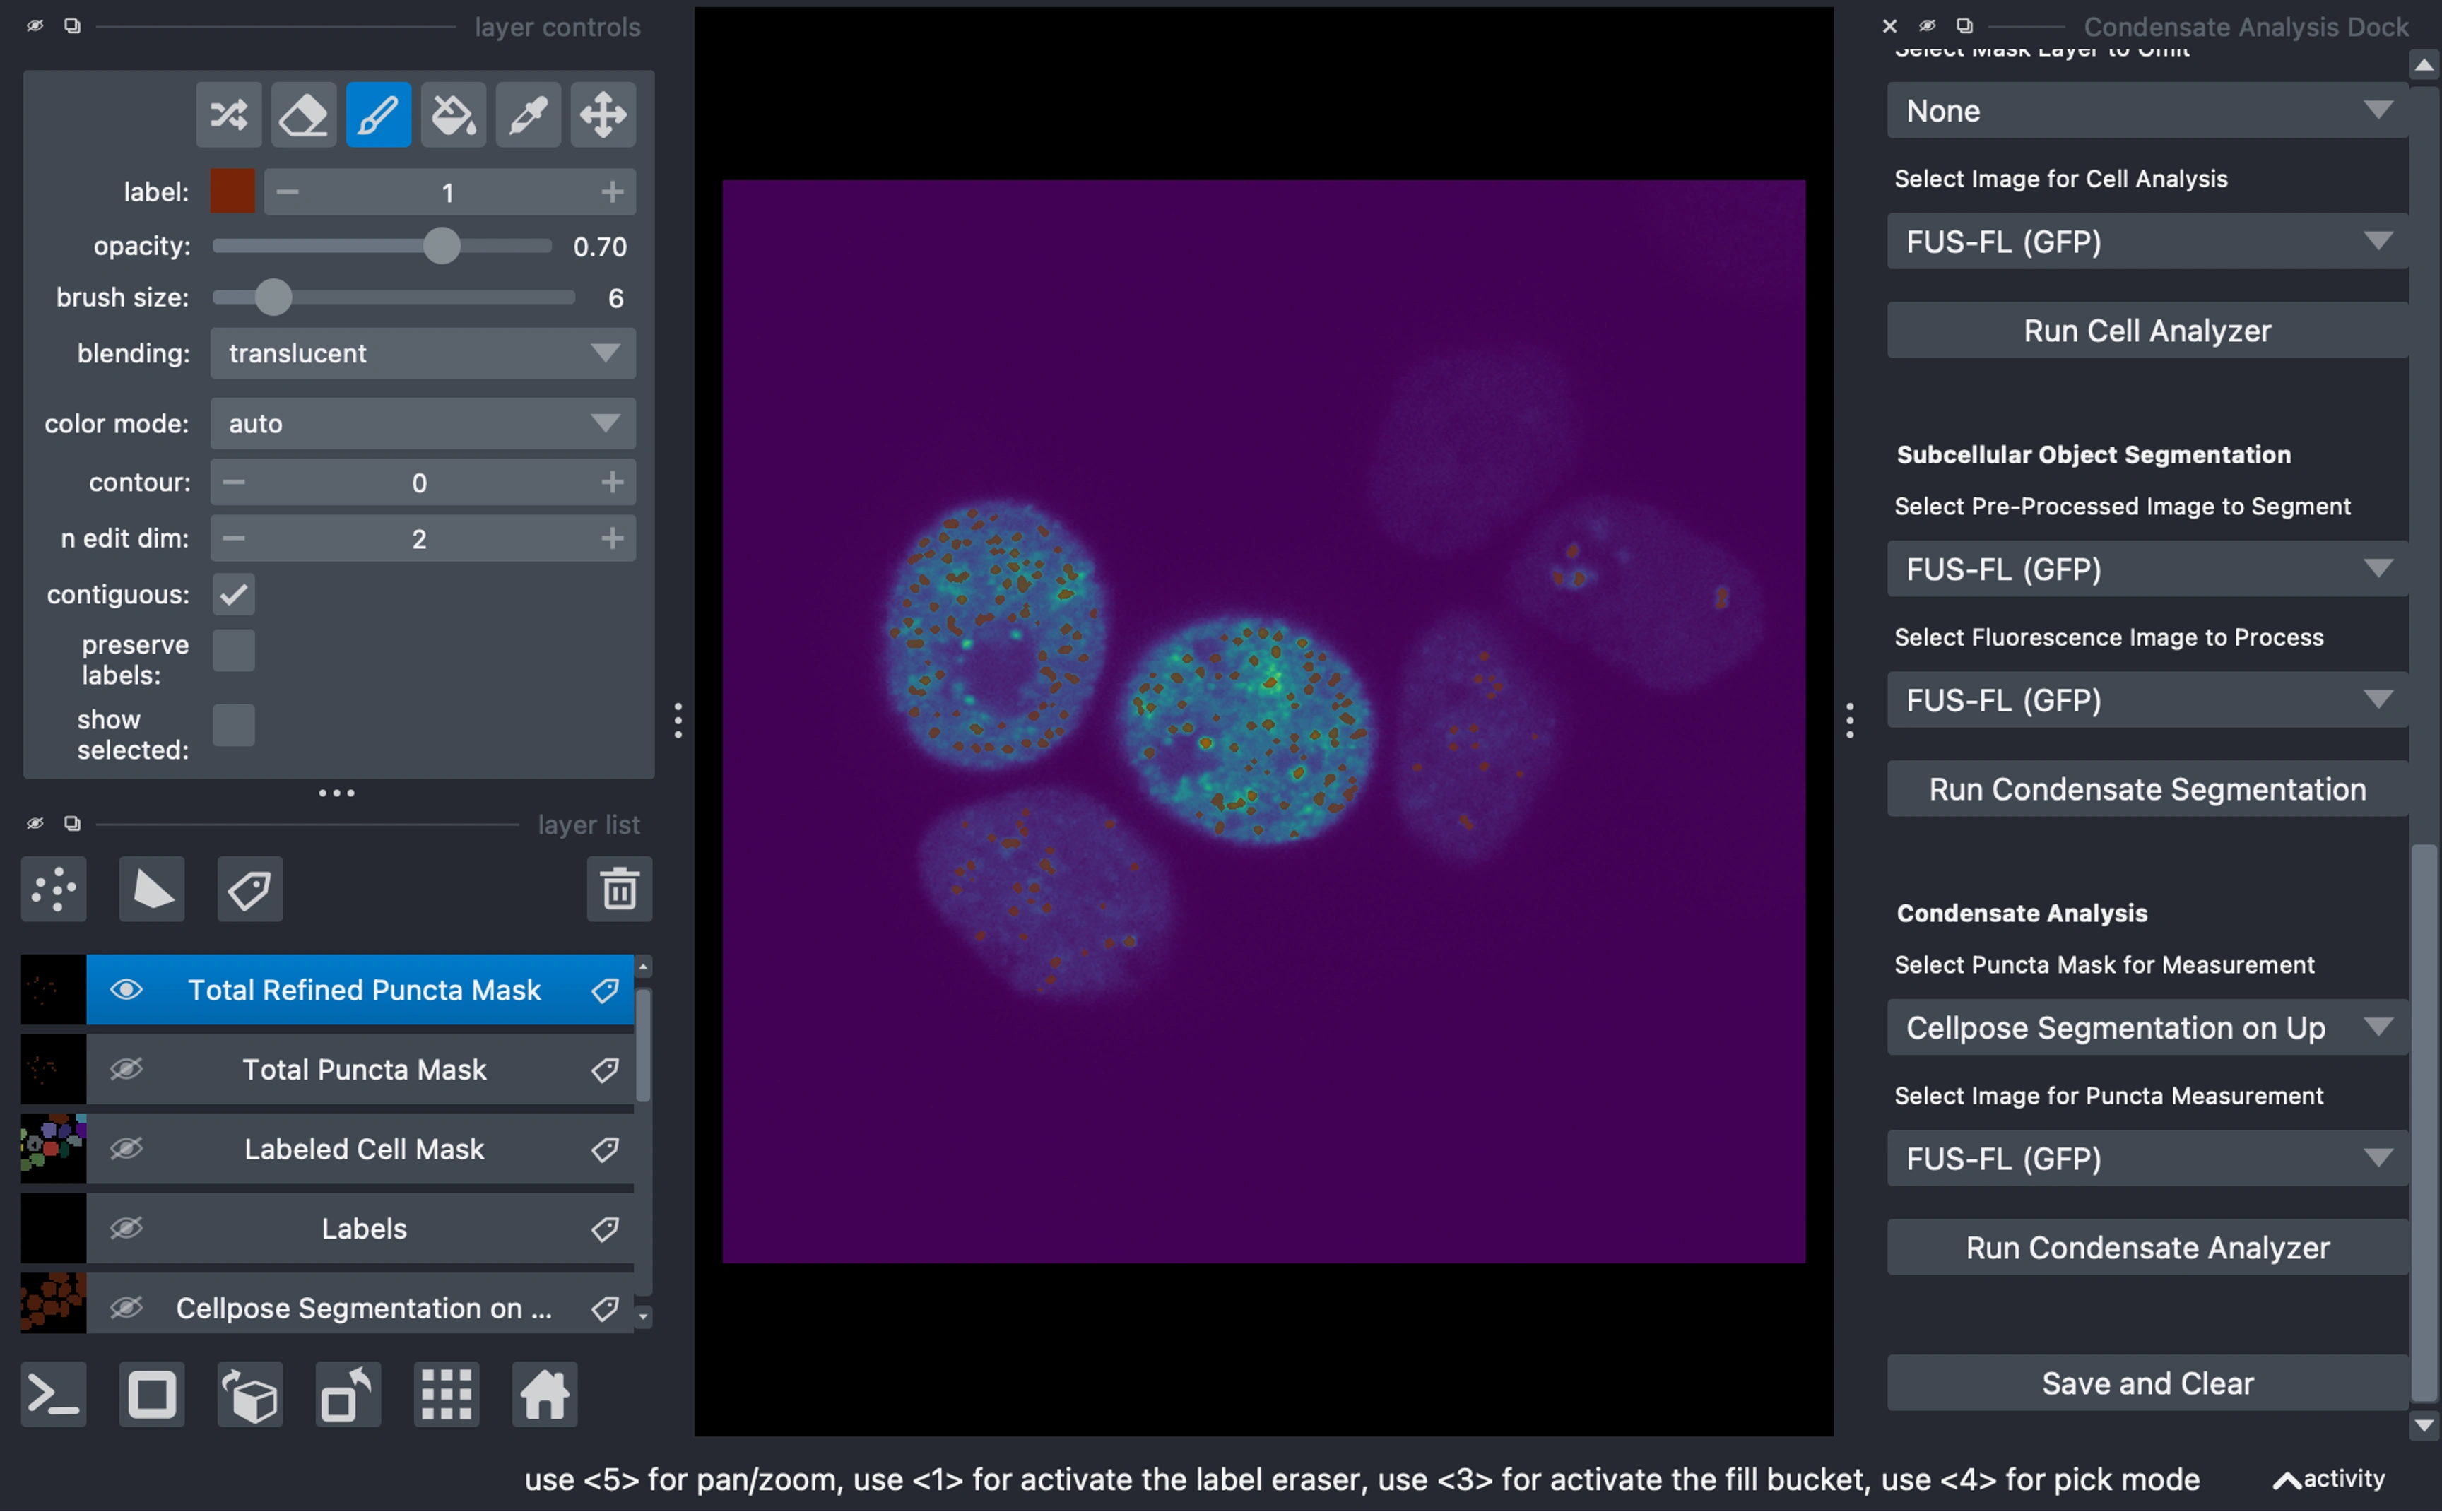
Condensate Segmentation
Choose the most processed image for segmentation and the unaltered image (in this examplke, the upscaled gfp image) to measure from, in the respective dropdowns
Click
Run Condensate SegmentationTwo masks are generated:
Total Puncta Mask: Over-segmented, unfiltered result.
Total Refined Puncta Mask: Object-filtered for balanced accuracy.
Condensate Analysis
Choose a mask and make any final manual tweaks.
Select the measurement image (in this examplke, the upscaled gfp image) and click
Run Condensate AnalyzerOutputs include:
Cell Data Frame: Individual cell/nuclei/primary mask metrics
Puncta Data Frame: Metrics for individual condensates or subcellular objects
Visualization layers:
Labeled puncta mask for each cell (where the objects share the same label as their parent cell)
Side-by-side image with raw and segmentation overlay for domstrative purposes
Exporting Data
Save Results and Clear the Viewer
To export analyzed images, data, and masks, navigate to
Open/Save File(s) > Save and ClearSelect from all active layers, and internal dataframes to export:
Images as .tiff
Masks as .png
Data Frames (cell and/or puncta) as .csv
Choose between
Clear Only Saved or Clear All to reset PyCAT for the next analysis.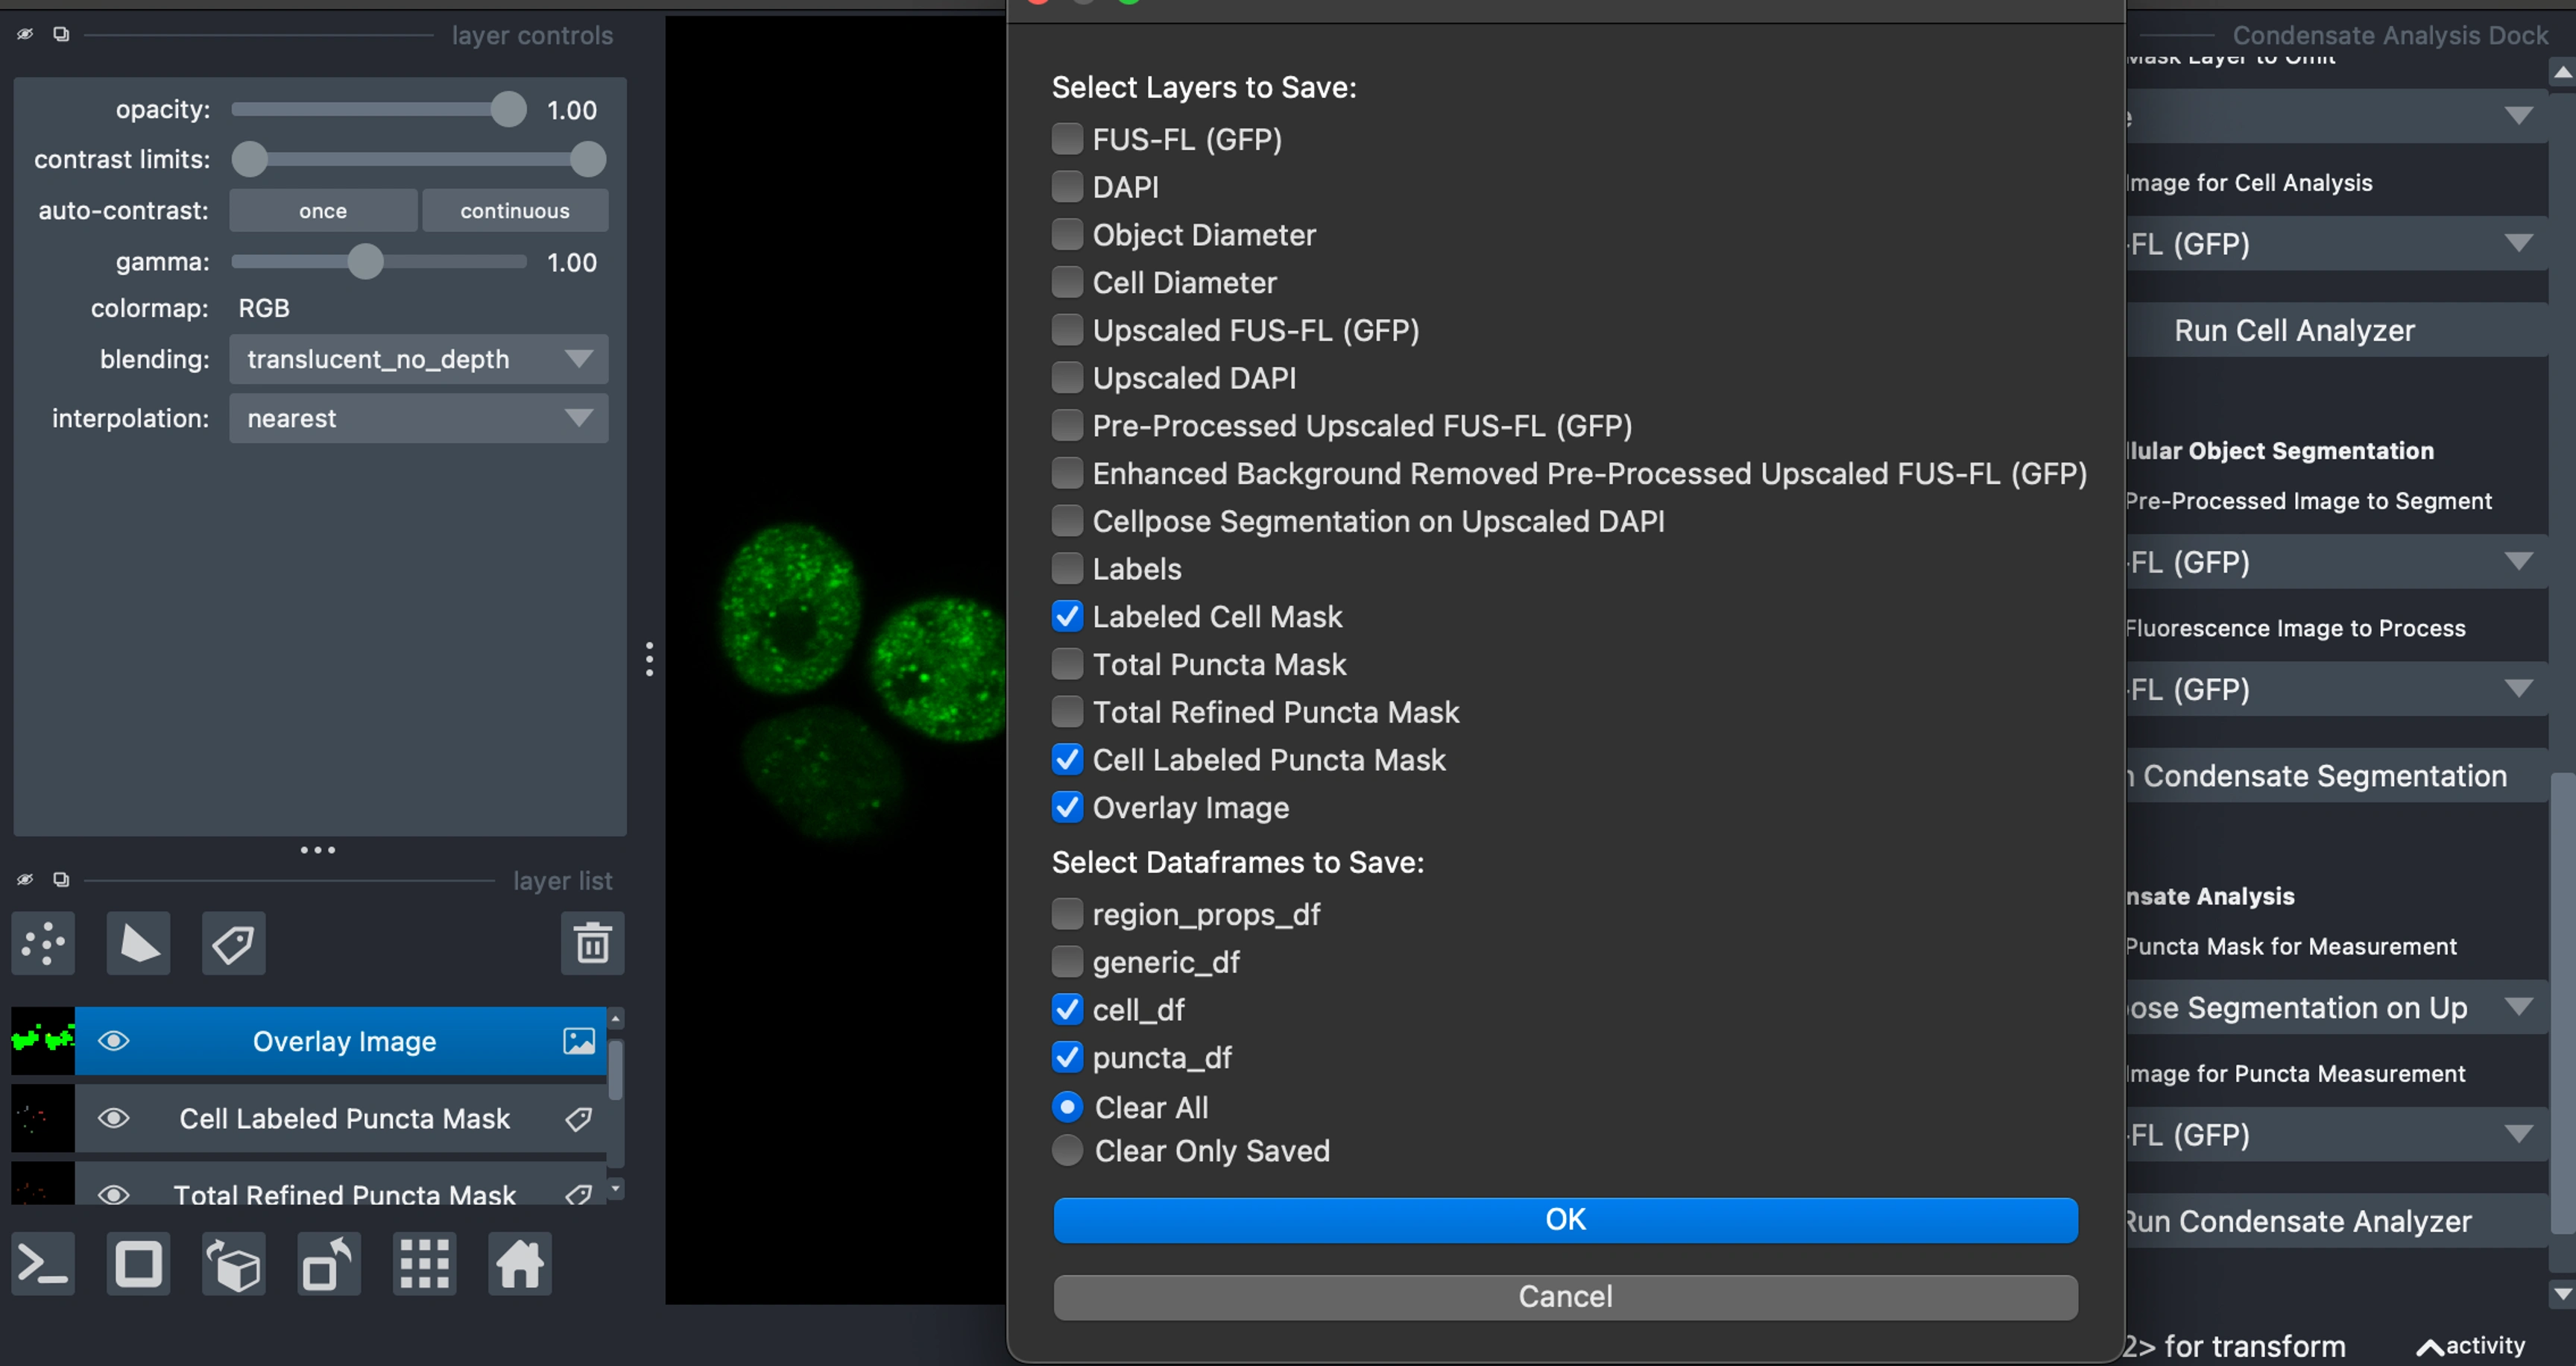
Programmatic API
For automated analysis or integration into existing workflows:
💡 Tip: PyCAT is designed primarily as a low/no-code solution for image analysis, making the GUI the recommended interface for most users. While the API offers modular access to core functions, it hasn't been extensively tested, so users should proceed with caution when integrating it into programmatic workflows. Running the PyCAT GUI should not be done in jupyter notebooks as there are PyQT and UI related issues that can cause downstream bugs.
Documentation
For more detailed and comprehehnsive documentation on everything from installation, to contributing, to our API documentation, see our full Read the Docs Documentation.
Current documentation includes:
Installation Guide
Usage Guide
Full tutorial for the included analysis walkthrough
Full feature descriptions
API reference
Development Guide
Contributing Guide
Support Information
Roadmap/Future Improvement plans
Notebooks
The notebooks included are examples of how to read, combine, and compare data output by PyCAT. They are for coding and methodology examples and are not as structured, documented, or tested as the main PyCAT application, but we thought they would be more useful than not.
Analysis Examples
pycat_plotting.ipynb
Loading and combining of output dataframes from multiple subfolders
Generate scatter plots for multiple datasets
Estimate saturation concentrations (C-sat) by boud, constrained, fitting of a generalized ReLU function parameterized by the x_0 intercept
Add interactive data cursors identifying plot points to files and cells
Create plots with customizable parameters
Data Processing
int_truncated_dfs.ipynb
Filter datasets by intensity ranges
Process cell and puncta dataframes
Combine CSV files from multiple directories
Generate truncated datasets based on custom parameters
Export filtered results for further analysis
Synthetic Data Generation Notebook
Synthetic Data Generation NB.ipynb
Load cell mask
Generate a ground truth object mask
Generate a Perlin noise, background flourescence image
Apply the cell mask to the noise and object mask
Combine the background and objects where object intensity is determined by object size and local background intensity
Development
Setting Up Development Environment
Clone the repository:
Create development environment:
Install development dependencies:
Running Tests
Contributing
We welcome contributions! See CONTRIBUTING.md for guidelines.
Key areas for contribution:
Bug fixes and feature improvements
Documentation and examples
Test coverage expansion
Platform compatibility testing
License
PyCAT-Napari is licensed under the BSD 3-Clause License. See LICENSE for details.
Third-Party Libraries
See THIRD_PARTY_LICENSES.txt for details about dependencies.
Citation
This program was developed by Christian Neureuter as part of the Condensate Biophysics Lab (Banerjee Lab) at SUNY at Buffalo. This is just a placeholder citation until it is submitted for publication.
If you use PyCAT-Napari in your research, please cite:
Support & Troubleshooting
Common Issues
Installation Problems
Verify Python 3.9 installation
Check platform-specific requirements
Use provided environment files
GUI Issues
Check PyQt5 installation
Update graphics drivers
Verify you're not running the program from jupyter notebook
Analysis Errors
Confirm input file format
Check memory availability
View traceback in napari or check your terminal for console errors
Performance Issues
Slow processing, or spinnning wheel in Windows/Mac is normal for condensate segmentation
Unfortunately, PyCAT 1.0 was not able to have much performance optimization due to timeline constraints of the project
Check the terminal for the progress printouts of the analysis
If the above suggestions did not help, you can use the info below to open an issue or contact the maintainers. Modern AIs (ChatGPT, Claude, etc) are very good at troubleshooting installtion issues and error messages, and may be your best option for a fast solution to any non-critical issues.
Getting Help
Search existing issues
Open a new issue
Contact us at banerjeelab.org
Project Status & Roadmap
Current Version: 1.0.0
Recent Updates
See CHANGELOG.md for detailed version history.
Roadmap
Extended file format support (including migration to BioIO) and integration with native napari IO
GPU acceleration/parallelization, and multi-threading, e.g. performance optimizations
3D, Z-stack, time series support
Expanded analysis methods and more individual tools
ML classifiers and segmentation models trained on annotated data output by PyCAT
See our full Roadmap Page for more detailed information and wish list
Acknowledgments
This project was developed by Christian Neureuter in the Condensate Biophysics Lab (Banerjee Lab) at SUNY Buffalo.
Key Dependencies
napari - Image visualization
scikit-image - Image processing
numpy - Numerical computing
pandas - Data analysis
Special Thanks
Banerjee Lab members for testing and feedback
napari community for viewer framework
Open source community for supporting libraries
For additional details, troubleshooting, and advanced features, see our full documentation.
Like this project
Posted Aug 29, 2025
Developed PyCAT-Napari (Python Condensate Analysis Toolbox) for biomolecular condensate analysis in biological images.
Likes
0
Views
9
Timeline
Jun 5, 2023 - Jun 3, 2024