How to implement authorization in a Gorilla application
Dumebi Okolo
Introduction
In this tutorial, you will learn how to use the Cerbos client to configure authorization policies in a Gorilla application.
We will explain what Gorilla and Cerbos are, how to use Cerbos to implement Attribute-Based Access Control (ABAC), and how they work together to create a secure access control system for Gorilla web applications. As an added bonus, we’ll also use Postman to interactively test our policies.
By following these steps, you can improve the security and adaptability of your data access control!
What is Cerbos?
Cerbos is an open-source authorization engine for cloud-native applications that simplifies and enhances access control. Its stateless architecture eliminates the need for centralized state management. Cerbos provides dynamic policy evaluation based on current user attributes, resource properties, and environmental conditions, enabling fine-grained access decisions. It is scalable, high-performing, and supports policy as code. Cerbos empowers organizations to enforce comprehensive security policies while maintaining flexibility and scalability in dynamic environments, making it a modern and robust solution for access control.
What is the Gorilla framework?
Gorilla is a toolbox designed specifically for the Go programming language, offering a variety of handy and customizable tools for creating web applications that run on the internet. It's a fantastic resource for anyone looking to build web applications using Go, providing a range of features and components to make the process smoother and more efficient. Whether you're a seasoned developer or just starting out, Gorilla can be a valuable asset for crafting robust and dynamic web applications with Go.
Access control in modern web development
Access control plays a vital role in modern web applications by boosting security, setting user permissions, safeguarding data, enhancing efficiency, and streamlining convenience. It acts as a gatekeeper, determining who can access resources, thereby reducing the chances of unauthorized entry to sensitive information. This control mechanism provides detailed oversight over individual actions and resource access, guaranteeing that only authorized individuals can reach specific areas or data.
Cerbos as a Policy Decision Point (PDP)
Cerbos functions as a Policy Decision Point (PDP), managing access requests by following policies and enabling detailed access control through attributes. Using Cerbos, you can establish specific access rules based on user details, resource characteristics, and environmental factors. This capability lets you create precise access controls that match your application's unique requirements and security standards.
Understanding Cerbos and ABAC
Access control is important for the security of your company's resources. RBAC (Role Based Access Control) is an effective way of doing this, but it has limitations. It can be complex and inflexible, making it difficult to manage and secure as your company grows and needs change. For example, if you have a "Finance Manager" role, it might unlock everything financial, which isn't always ideal if some managers need access to specific projects only. As your company becomes more specialized, you'll need to create more RBAC roles, which can be challenging to manage.
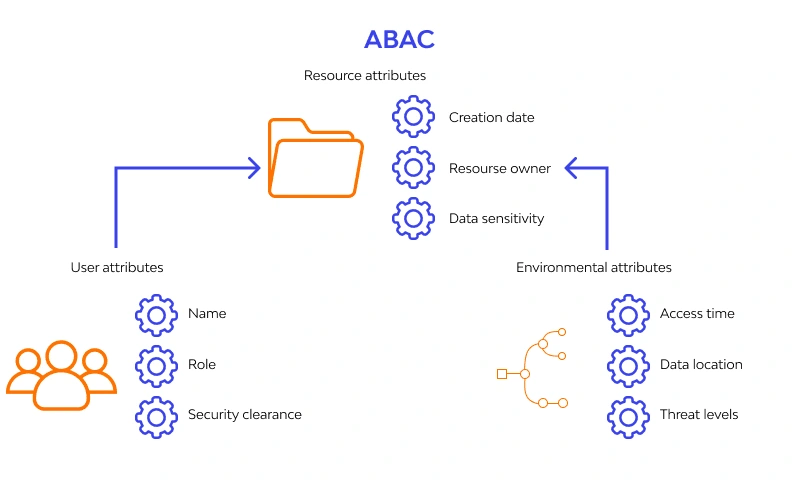
That's where ABAC comes in. ABAC is like a high-tech keycard system that takes into account various factors when granting access. It considers who is requesting access, like their department, job title, and security clearance, as well as what they are trying to access, like file type, importance, or project association. It also considers when and where the access request is being made, like the time of day, location, or device being used. By considering these factors, ABAC enables you to create smarter rules that provide more precise and adaptable access control.
To demonstrate how ABAC works, let's take the example of a data scientist, Professor X, who requests access to a confidential patient dataset. Using a policy engine like Cerbos, the ABAC policy would define the criteria for granting access. Professor X's department must be "Research," and their security clearance level must be "Level 3" or higher. The dataset must be tagged for "Project A," and access can only be granted during regular business hours (9 am - 5 pm). Cerbos checks all these attributes, and if Professor X meets all the criteria, access is granted; otherwise, access is denied.
Overview of the Cerbos policy language
The Cerbos policy language is a tool used to define access rules based on attributes and resources. It is a straightforward language that can be written in either YAML or JSON formats. Policies can be stored in version control systems, making it possible to track changes over time. Cerbos policies help define access rules for resources, with resource names, actions, and principal names supporting hierarchical structures. The Cerbos Policy Decision Point (PDP) is a lightweight service that can be deployed as a sidecar or accessed over Unix domain sockets for extra security and reduced overhead. It is a stateless service that is designed to provide secure access control decisions based on defined policies.
Creating a Gorilla project using Cerbos for authorization.
To demonstrate authorization in Cerbos, we will build a small university attendance sheet updater with the following parameters:
The Admin (school authority) has access to Read, Create, Delete, and Update a student’s record
The Users (student rep, assistant student rep, and course lecturer) have varying access depending on their roles
All the code (and some additions) for this tutorial can be found in this github repo.
To use the Gorilla framework, you must first ensure that there is a working version of the Go programming language installed on your computer with a functional IDE to enable code editing.
To learn more about this, visit the official Go documentation.
After you have done this,
Create a new Gorilla project:
Install Gorilla:
With a correctly configured Go toolchain, obtain the Gorilla kit:
Create a new Go file, e.g.,
main.go:and add the following code to import the required packages:
Importing the packages
To use some the packages under our import and avoid being thrown an error by Go,
On the terminal, run:
Once this is successful, run again:
The line "go get github.com/gorilla/sessions" downloads and installs the Gorilla sessions package, adding the dependency to our application.
Then finally,
The line
"go get github.com/cerbos/cerbos-sdk-go/cerbos" downloads and installs the Cerbos package, adding the dependency to our application.Create the directories to house the Cerbos policy file:
Start up the Cerbos Docker container
We will be using Docker Desktop. If you do not have Docker installed on your desktop, you can follow the installation guide for different operating systems.
We will be using our command terminal (on Windows). On the terminal, run:
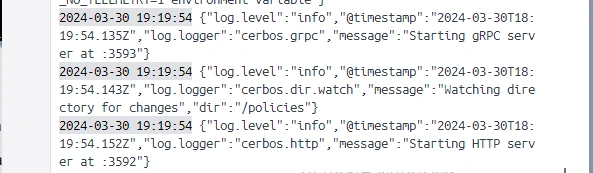
This is a modification of what is seen in the Cerbos Quickstart guide. It will mount the Cerbos Docker container.
You should see a message like this on the terminal if this process was successful:
Define Authorization roles
Next is to create our policy files:
resourcePolicy.yaml and derivedRoles.yaml located in the policies folder to define and hold the roles and attributes that Cerbos will use to make authorization decisions. The policy file is where you specify the rules and constraints that determine whether a particular action is allowed or denied. We will be defining policies that allow various access to a students’ attendance register depending on who is trying to access the page. There are two primary principals: the USER and the ADMIN. However, there are three categories for the user: the REP, ASISTANT_REP and the COURSE_LECTURER. Each of the categories have different access levels, depending on who they are. The admin has access to all features.We will create two policy files. One to define the derived roles or categories of our user principal. The other to define our role (and consequently attribute) based policies.
derivedRoles.yaml
resourcePolicy.yaml file.
You can check out the Cerbos Playground to help you generate policies.
Gorilla Request Handler
We will build out a simple Gorilla handler function in our
main.go file to handle access to the attendance sheet, check access with Cerbos, and handle errors.The line:
var c, err = client.New("localhost:3593",cerbos.WithPlaintext())Creates a new Cerbos client instance.
The
client.New function takes two arguments: the hostname and a list of options.localhost:3593 is the hostname and port number of the Cerbos server. You should replace this with the actual hostname and port number of your Cerbos server.cerbos.WithPlaintext() is an option that enables plaintext communication with the Cerbos server. This option is for our testing environment only, and would not normally be enabled in production.Run the Gorilla application:
Testing
We can now test the access control policies by using Postman to make API calls. This allowed us to verify how the policies behaved in different scenarios and confirm that the security measures are working correctly.
Start the Cerbos PDP Container
Start the Cerbos PDP container and mount the policy files (
resourcePolicy.yaml and derivedRoles.yaml).Configure the Cerbos PDP server address to
localhost:3593: in your main.go file, ensure that the line, var c, err = client.New("localhost:3593", cerbos.WithPlaintext()) is included.Import the Postman Collection
Open Postman and import the following Postman collection. This collection includes requests for testing the
/dashboard endpoint with different user roles and attributes.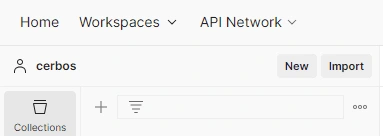
Click on the “import” button and paste the code in the linked file into it.
Run the Postman Collection
Click the "Run Cerbos integration tests" button in Postman to run the imported collection.
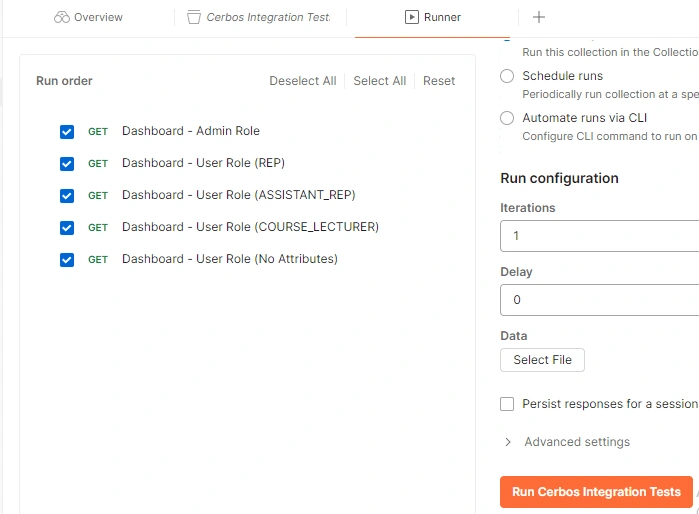
Verify the Test Results:
Postman will send requests to the
/dashboard endpoint with different X-Cerbos-Principal header values, simulating users with various roles and attributes.The test scripts in the collection will assert the expected behavior based on the Cerbos policy rules defined in the
resourcePolicy.yaml and derivedRoles.yaml files.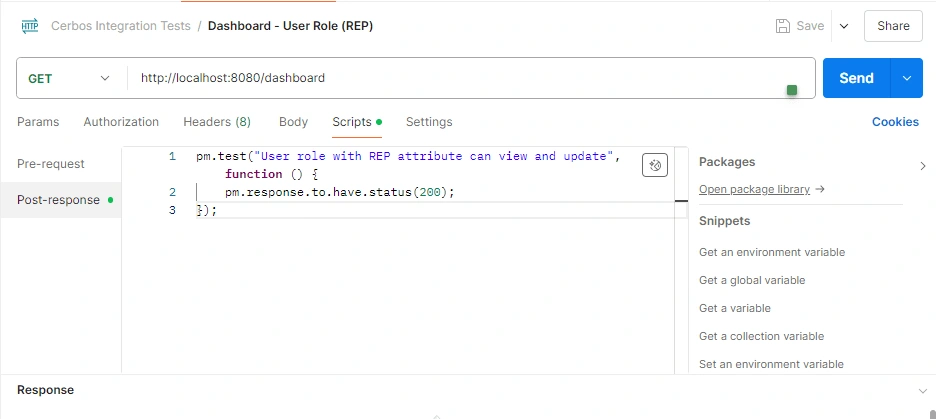
If a test fails, you will see the failure message in the "Test Results" tab of Postman.
If the test passes, it means that the Cerbos PDP is correctly enforcing the access policies based on the user's roles and attributes. You will see the status display at
200, meaning it was successful.
Apart from Postman, there are other options like Insomnia, Paw (now RapidAPI), or cURL for testing API calls.
Conclusion
Today, organizations place a high priority on ensuring secure access control. Attribute-Based Access Control (ABAC) is a widely adopted method that provides a robust solution for precise access control in applications.
By implementing ABAC with Cerbos in any application, you can establish strong access policies based on attributes and resources. This integration can also empower your company or startup to effectively enforce security measures, guaranteeing that only authorized users can access sensitive resources.
Further reading and References
For further reading and understanding of Cerbos integration, Gorilla Mux, and ABAC, you can explore the following sources:
The references used in this article:
Dev Genius Article on Gorilla Mux: How to use gorilla/mux - Dev Genius
Like this project
Posted Oct 29, 2024
In this tutorial, you will learn how to use the Cerbos client to configure authorization policies in a Gorilla application.