Full-Stack To-Do App Development with React and AWS Amplify
Chidozie Uzoegwu
Build-A-Full-Stack-To-Do-Web-App-with-React-and-AWS-Amplify-Gen2
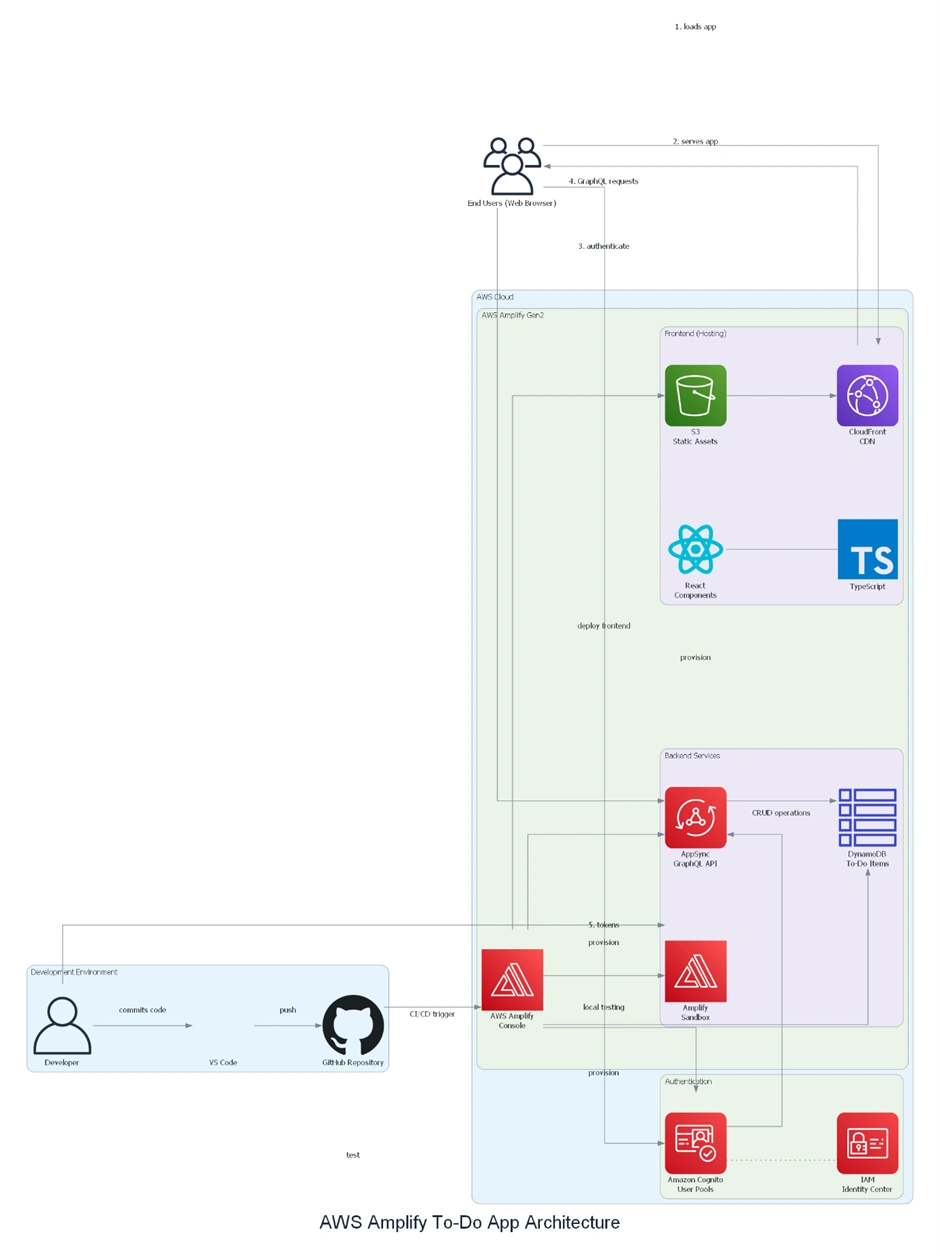
Architectural Diagram
This diagram illustrates the entire full-stack architecture of a React-based To-Do application using AWS Amplify Gen2. Code developed locally in VS Code is committed to GitHub, triggering a CI/CD pipeline that deploys a React TypeScript frontend via S3 and CloudFront for secure content delivery. Amazon Cognito manages user authentication, integrated with IAM Identity Centre for centralized permissions. AWS AppSync provides a GraphQL API that enforces access rules and enables real-time updates, while Amazon DynamoDB stores To-Do items in a serverless NoSQL database. Developers can test changes in Amplify Sandbox environments before merging, and AWS Amplify Console handles continuous integration and deployment. This setup yields a secure, scalable, and maintainable solution with minimal operational overhead.
Introduction to Amazon Amplify Gen 2 and Its Benefits
Amazon Amplify Gen 2 is a revamped framework that streamlines full-stack web and mobile app development on AWS. It provides a code-first experience, meaning you define your app’s backend (data models, authentication, storage, etc.) in code (TypeScript) and Amplify provisions the AWS resources automatically. Amplify Gen 2 is built on the AWS CDK, so it can create cloud resources that scale without you needing to manage them directly.
In practical terms, Amplify lets you rapidly set up cloud-connected backends (databases, APIs, authentication) and a front-end, with libraries and UI components to integrate them. This is great for beginners because you can focus on your application logic instead of plumbing AWS services together. In this guide, we’ll walk through building a Full-Stack To-Do App with React using Amplify Gen 2. We’ll cover:
Setting up your AWS account
Initializing a React project
Building a backend with a to-do API and database
Adding authentication
Creating the React frontend UI
Connecting everything
Deploying the app
Each step is explained in beginner-friendly terms with code snippets and screenshots for clarity.
Setting Up an AWS Account and Configuring Amplify
Before writing any code, you need an AWS account and to configure Amplify with the proper permissions. If you don’t have an AWS account, sign up for one and log in to the AWS console. For Amplify Gen 2, it’s recommended to use AWS IAM Identity Center (SSO) to manage credentials and permissions for Amplify. This involves a few one-time setup steps:
Enable IAM Identity Center (formerly AWS SSO) and AWS Organizations (if not already enabled). This lets you manage users and their access centrally.
Create a Permission Set for Amplify: In IAM Identity Center, go to “Permission sets” and create a new permission set (choose “Custom permission set”).
Attach the AmplifyBackendDeployFullAccess policy to this set.
This AWS-managed policy grants Amplify permission to create and manage the backend cloud resources on your behalf. For example, in the screenshot below, you can see the AmplifyBackendDeployFullAccess policy being selected for a new permission set:
Create an IAM Identity Center User (e.g. “amplify-admin”) and assign the above permission set to that user (and assign the user access to your AWS account). This user will be used for Amplify deployments. AWS will prompt to set a password for the new user via email.
Configure AWS CLI Credentials:
On your local machine, configure AWS credentials to use that IAM Identity Center user. For example, you can use the AWS CLI v2 to authenticate via SSO and create a profile. Once configured, ensure your AWS profile (set in
~/.aws/config) has the AmplifyBackendDeployFullAccess permissions.
(If you prefer not to use SSO, you could create an IAM user with equivalent policies, but the above is the recommended approach for Amplify Gen 2.)For this project, we already had our AWS IAM user with full access activated for CLI operations.
After these steps, you have an AWS account ready with Amplify permissions. This setup only needs to be done once. Now we can move on to setting up the Amplify project.
Initializing a New React Project and Integrating Amplify
With AWS ready, let’s set up the React front-end project and Amplify backend. Amplify Gen 2 offers a quick start template for a to-do app, which is the fastest way to get going. You can find the documentation here. We’ll use that to scaffold our project, but you can also start from scratch.
Option A: Use Amplify’s Starter Template (QuickStart)
Amplify provides a GitHub template that already contains a React app (built with Vite) and Amplify backend configuration for a basic to-do app. This saves time writing boilerplate. We’ll follow this approach in detail:
Create the project from the template:
Click the “Create repository from template” link on Amplify’s QuickStart page (or navigate to the AWS Amplify GitHub template). This lets you create a new repository on your GitHub account with all the starter code. The template uses React + Vite and includes an
amplify/ folder with predefined backend resources (a to-do database and authentication). Give your new repo a name (e.g., “amplify-todo-app”) and create it.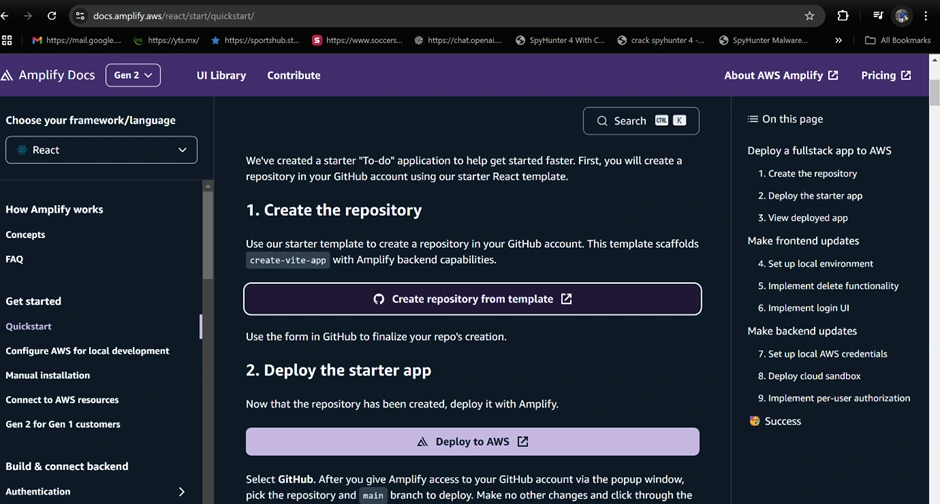

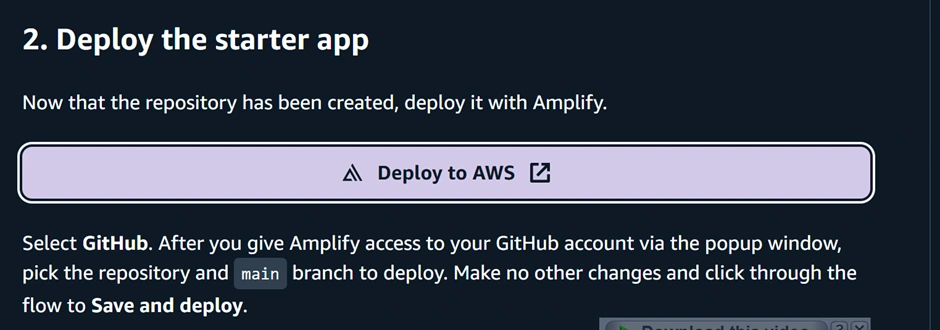
Deploy the app with Amplify Hosting:
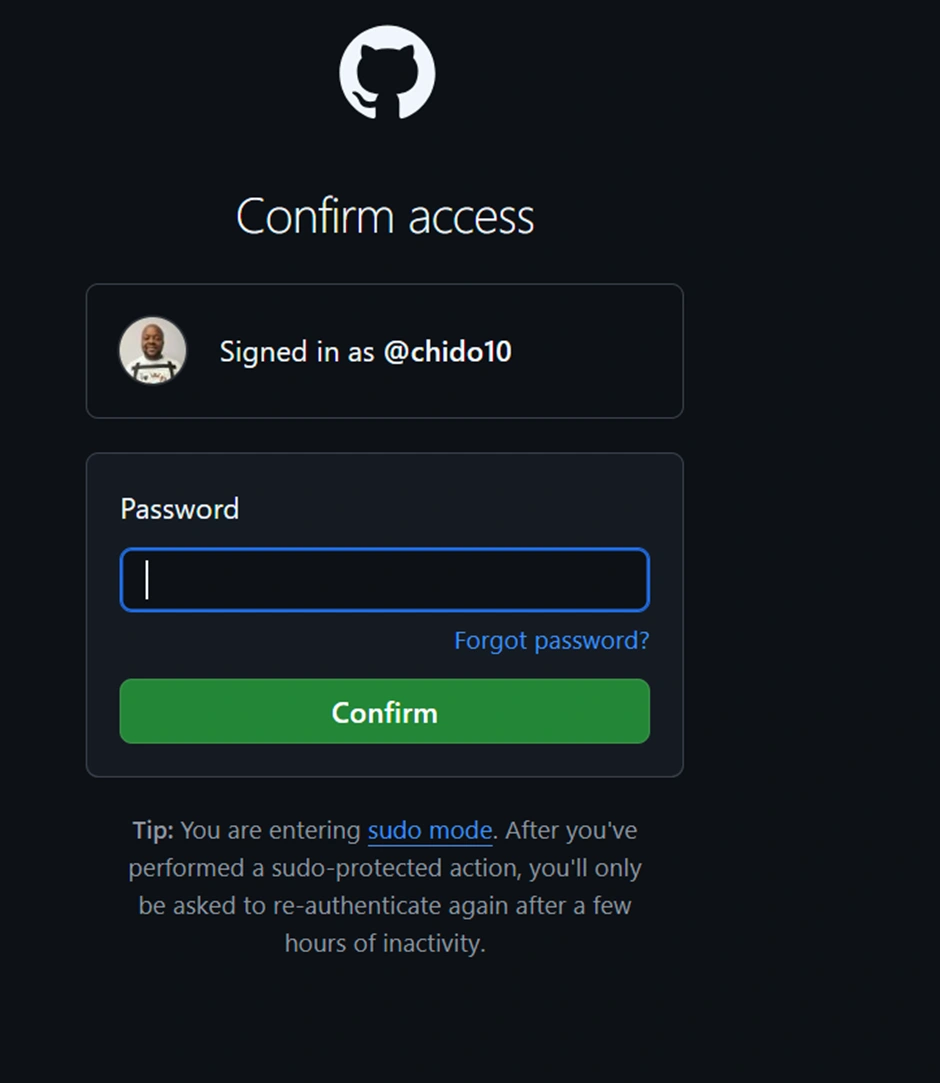
Now go to the AWS Amplify Console (in AWS Management Console). Click “New app” > “Host web app”. Amplify will guide you to connect a repository. Choose GitHub as the source and authorize Amplify to access your GitHub (if you haven’t before). Then select the repository and branch (e.g., the main branch of the repo you just created) and continue. Accept the default settings and click “Save and deploy.” Amplify will set up a continuous deployment pipeline and start provisioning the backend and building the frontend. The screenshot below shows the Amplify Console’s connect process where you select your repo and branch:
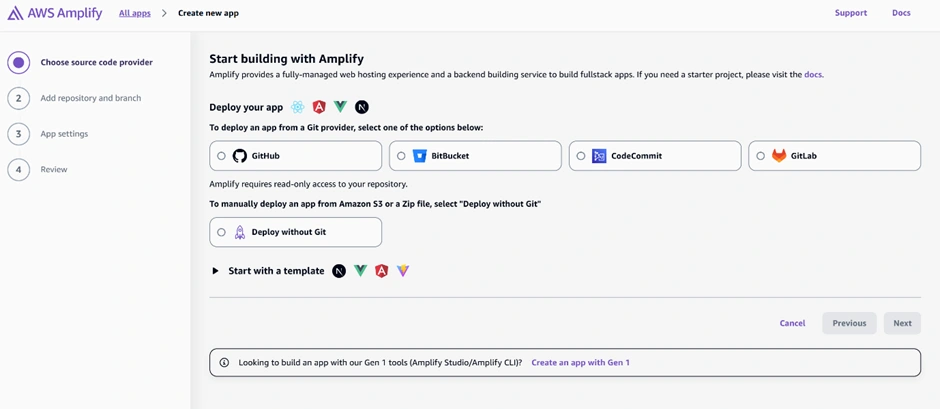
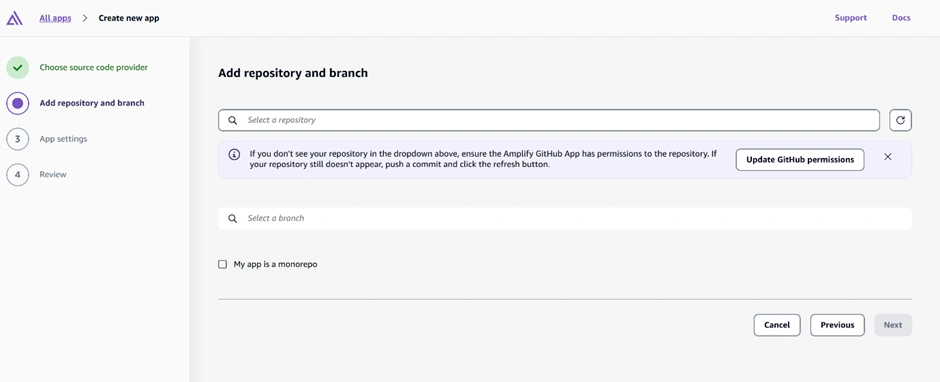
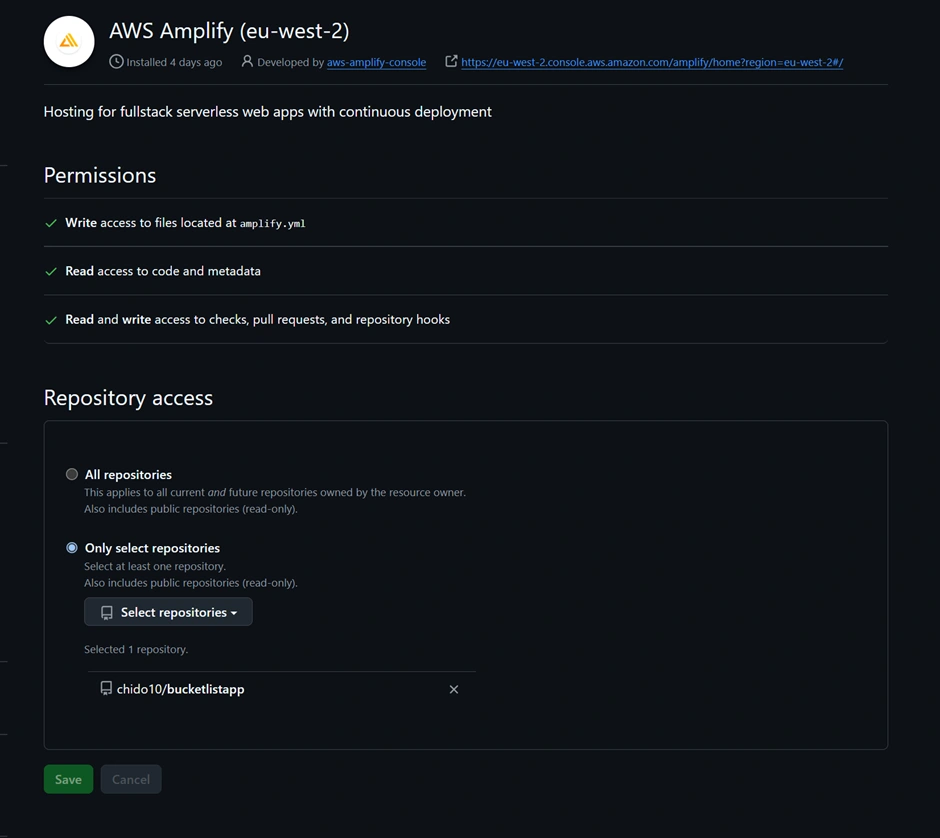
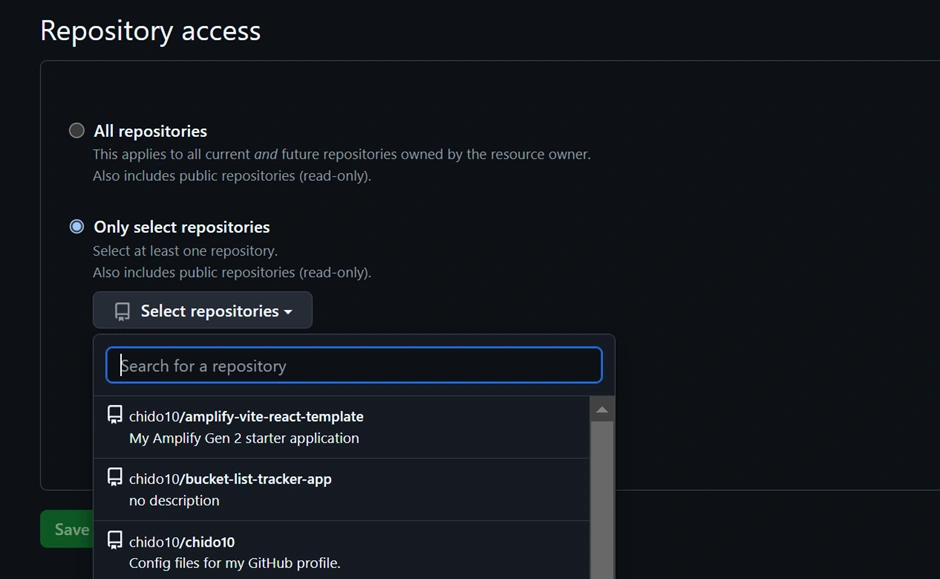

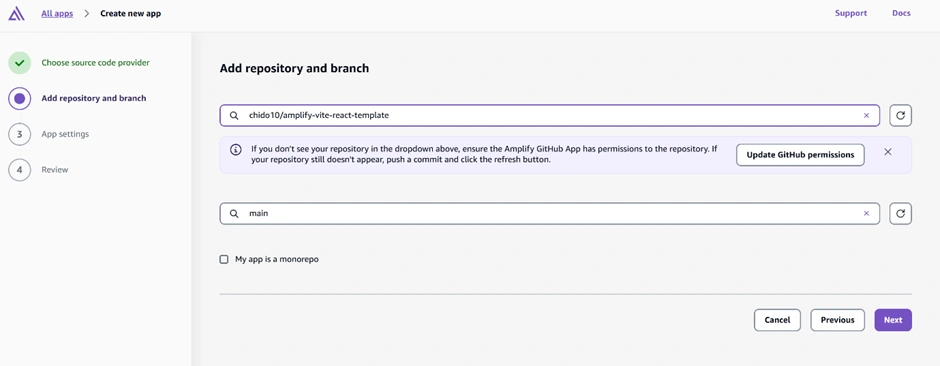
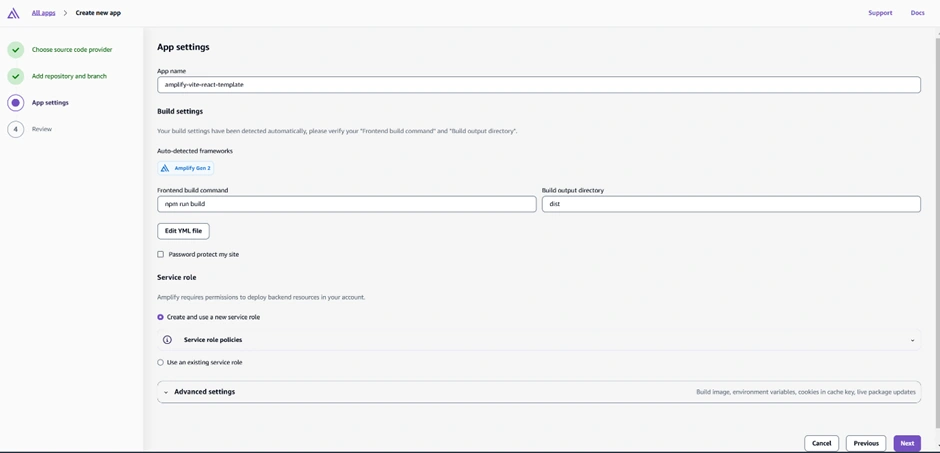
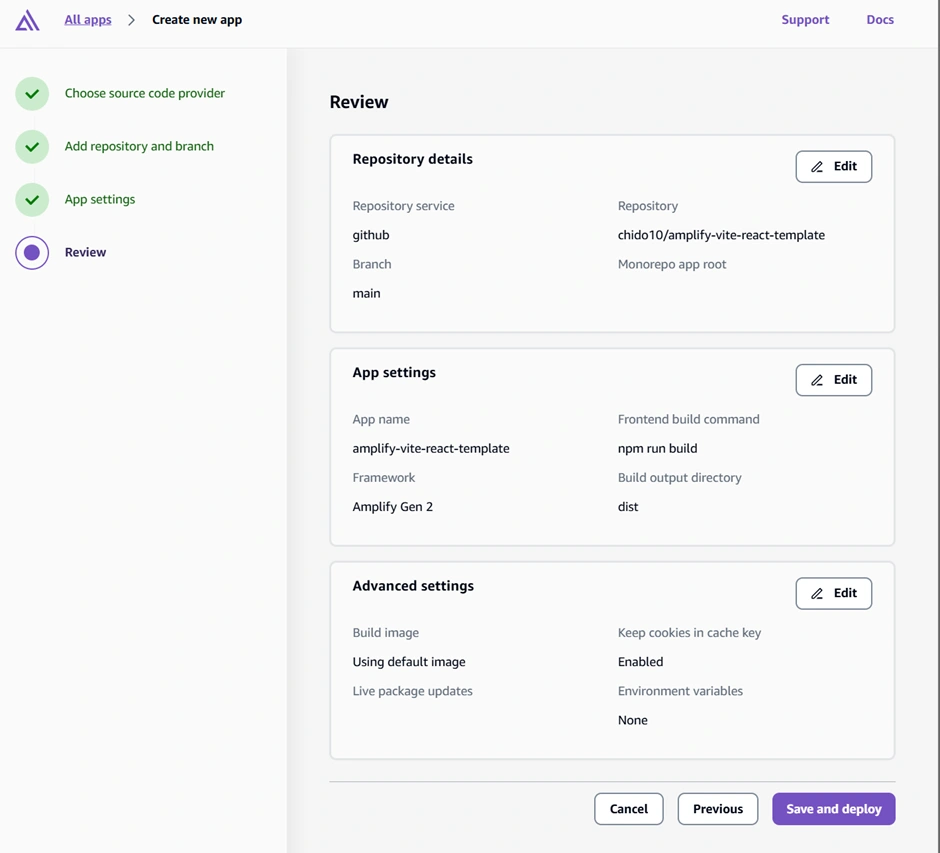
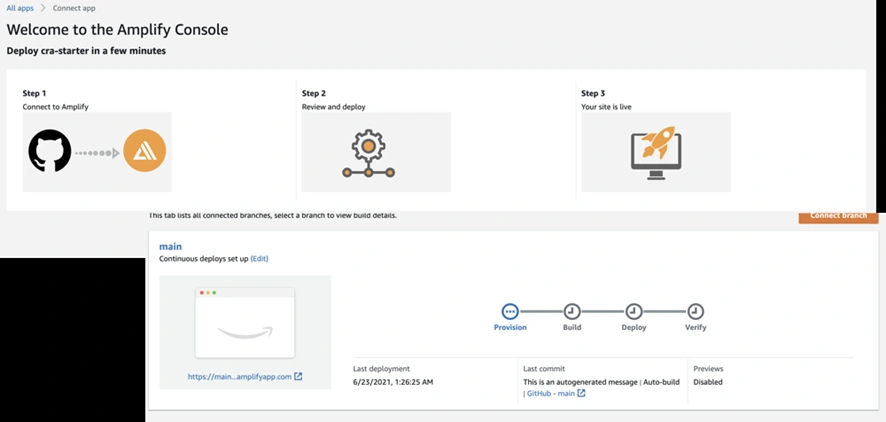
The Amplify Console “Create new app” wizard – here you connect your GitHub repo (step 1) and select the repository and branch to deploy (step 2). Amplify will then provision your backend and set up a CI/CD pipeline (steps 3 and 4). In this example, the pipeline stages (Provision, Build, Deploy, Verify) are shown for the main branch deployment.
Wait for deployment:
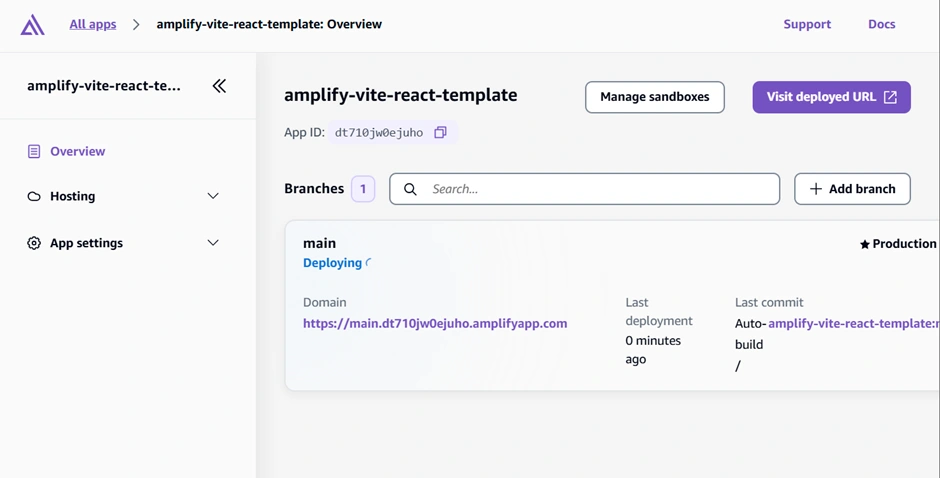
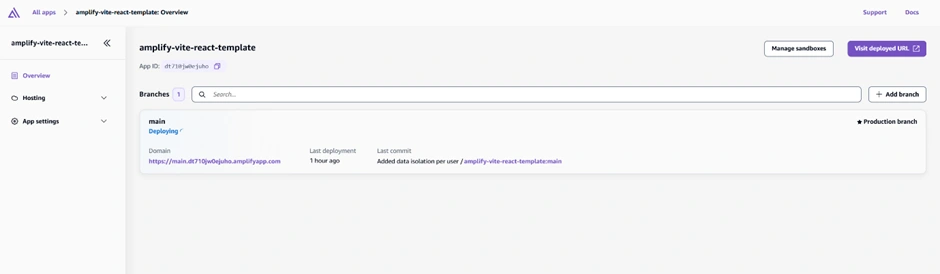
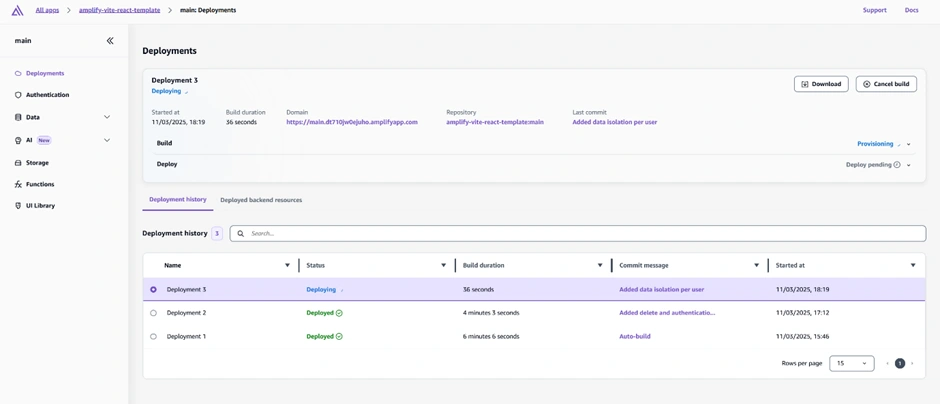
Amplify will provision the necessary AWS resources (this may take a few minutes). Behind the scenes, Amplify is using CloudFormation/CDK to set up a DynamoDB table for to-dos, an AppSync GraphQL API, and a Cognito User Pool for auth (since the template includes auth and data). You can watch the progress in the Amplify Console’s “Deployments” section. Once it’s done, you’ll see a green “Deployed” status. The front-end is now hosted at a domain like
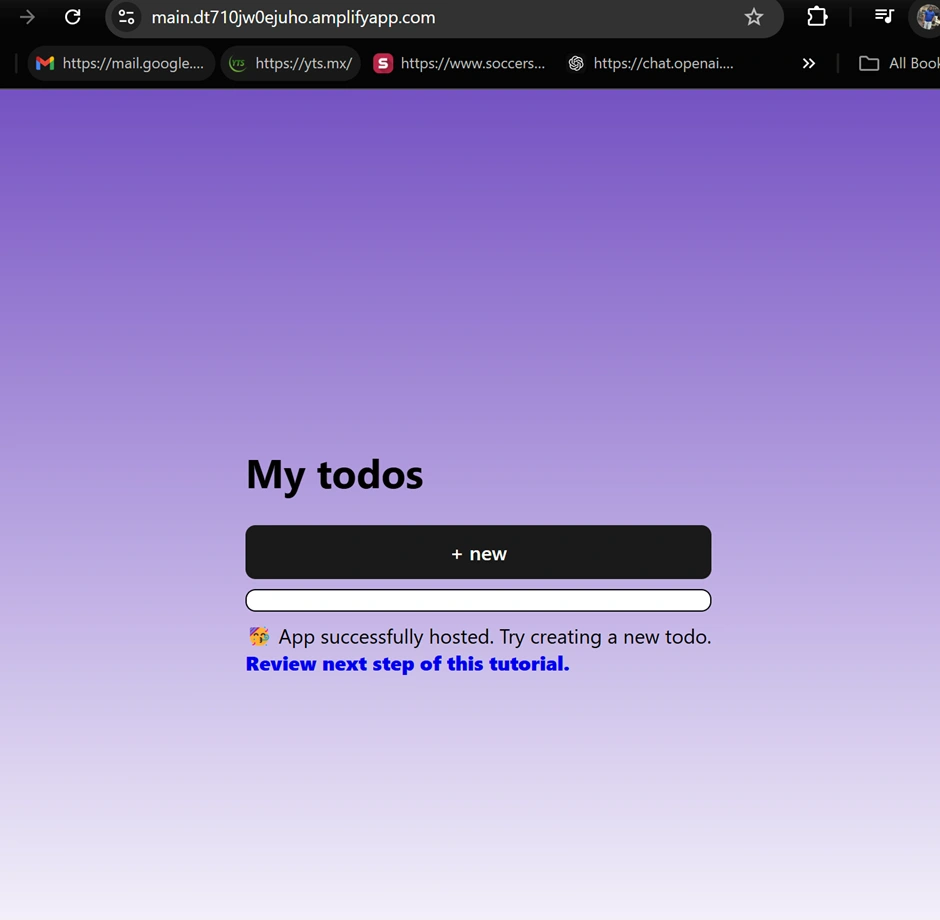
https://main.branchid.amplifyapp.com (Amplify provides a default domain). You can click “Visit deployed URL” to see the live app. It should load a basic to-do app interface (with a prompt to sign in, since auth is enabled). At this point, the app’s backend (API, database, auth) is up in the cloud, and the front-end is hosted. 🎉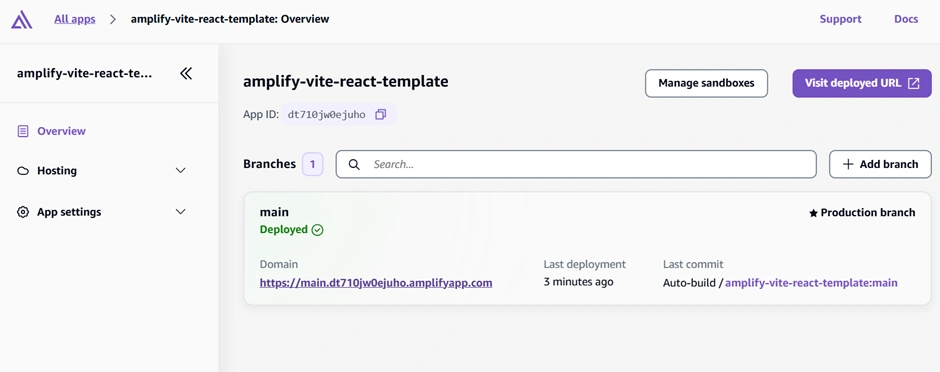
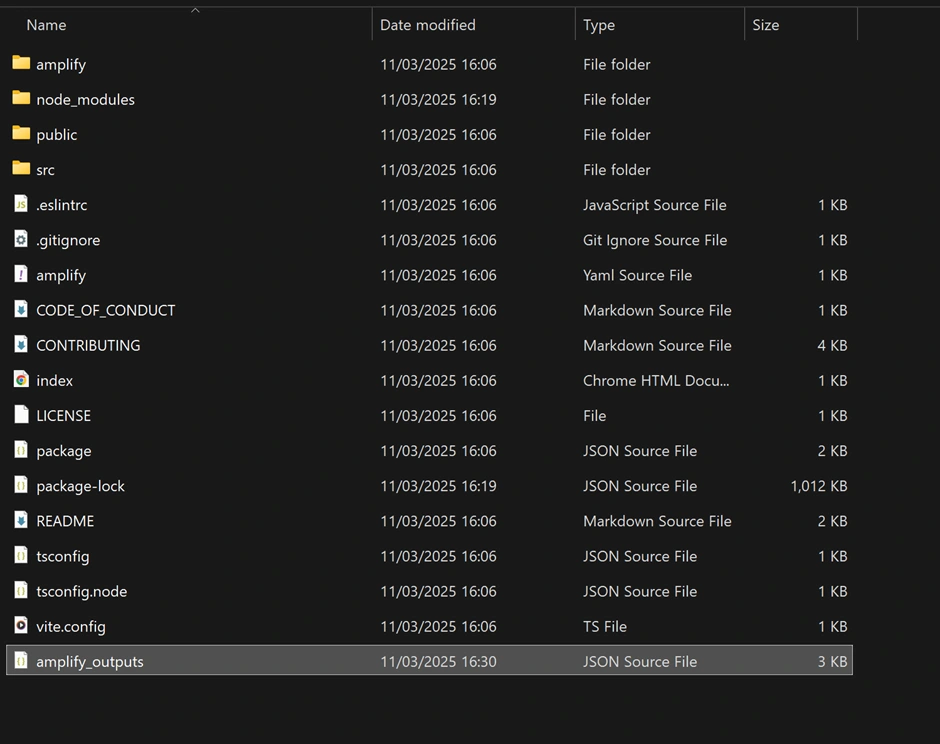
Examine the project structure:
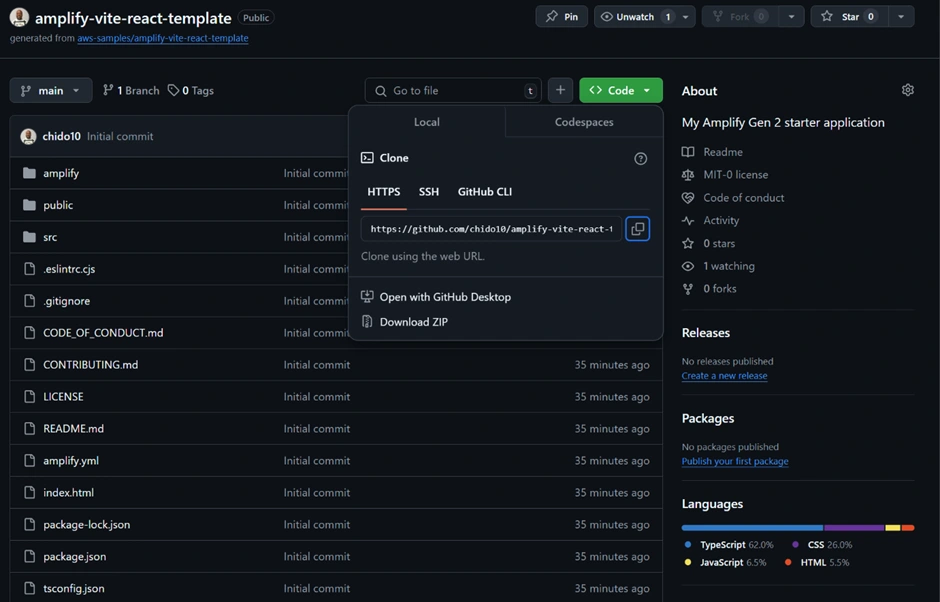
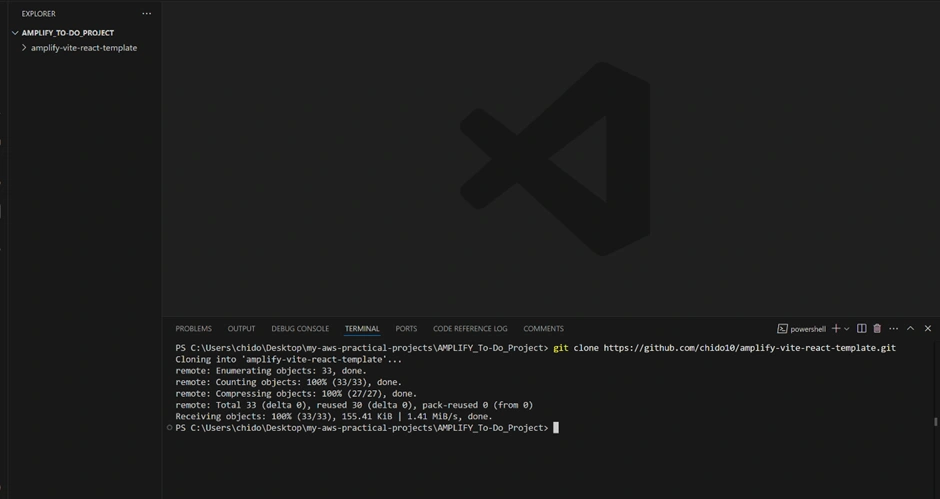
It’s good to understand the code you just deployed. If you open the GitHub repository (clone it to your machine or view on GitHub), you’ll see the project layout. To clone your repository to your local IDE, go to your GitHub page of the cloned template from Amplify and copy the HTTPS code. Enter your IDE, making sure you are in the directory and folder you want the code to live, and enter the git clone command with the HTTPS link you copied as shown below.

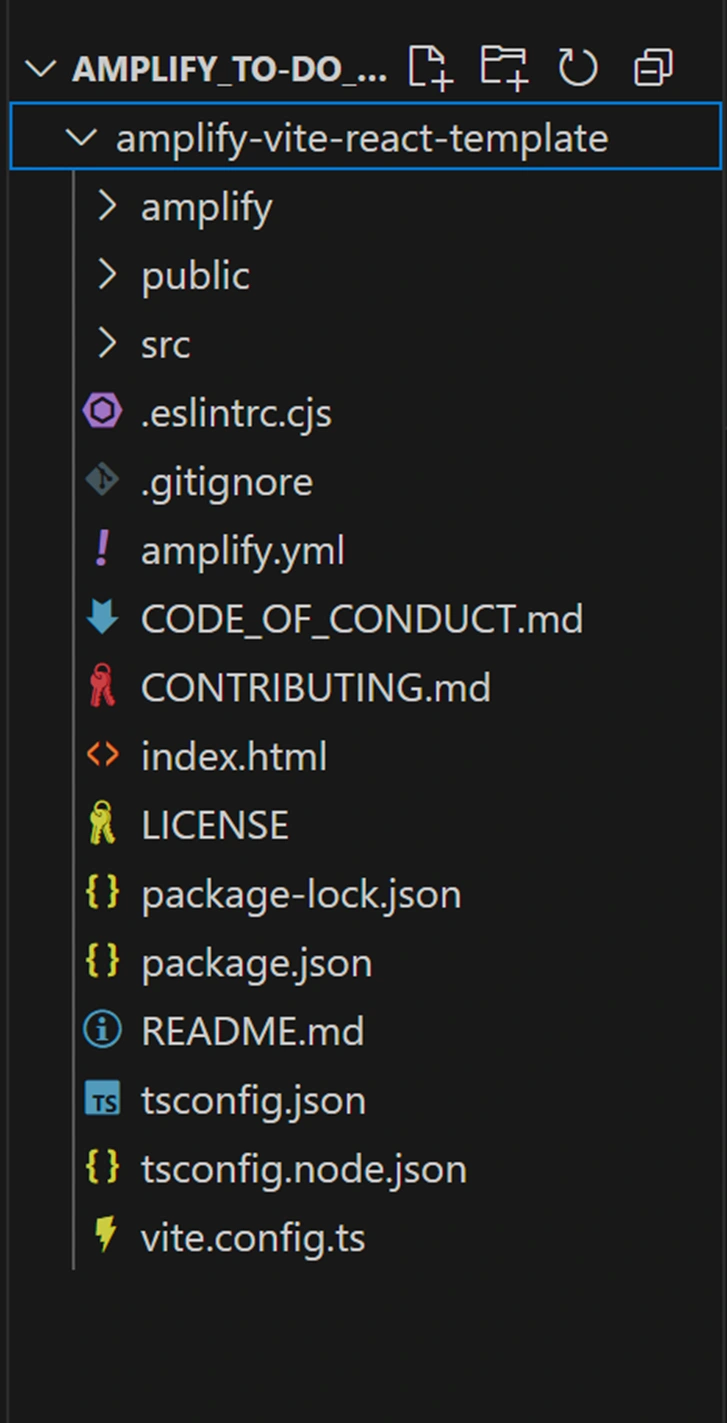
Project Structure:
This structure is created by Amplify’s code-first approach. The
amplify/ directory contains your backend “stack” defined in TypeScript – you can add to this to create new backend resources. The src/ is your React application. Amplify Gen 2 projects keep frontend and backend code together for a cohesive full stack project.Option B: Manual Setup (from scratch)
Alternatively, you could initialize a React app yourself (e.g. using
npx create-react-app or Vite) and then add Amplify to it. This involves installing Amplify libraries (npm install @aws-amplify/backend@latest @aws-amplify/backend-cli@latest) and running npm create amplify@latest to scaffold the amplify/ folder. Then you’d define your data model in code and deploy. This approach gives more insight into each step, but for beginners the starter template (Option A) is simpler, as it gives you a working app to start with. In this guide, we followed the template approach, since it quickly gets us to a point where the app is running, and we can focus on features.Installing the Dependencies
Node.js projects require that we install their dependencies to ensure all necessary packages are available for the application to function properly. This is an essential step, as the
package.json file lists all the dependencies required for the project.To install these dependencies in our working directory, we use the following command:
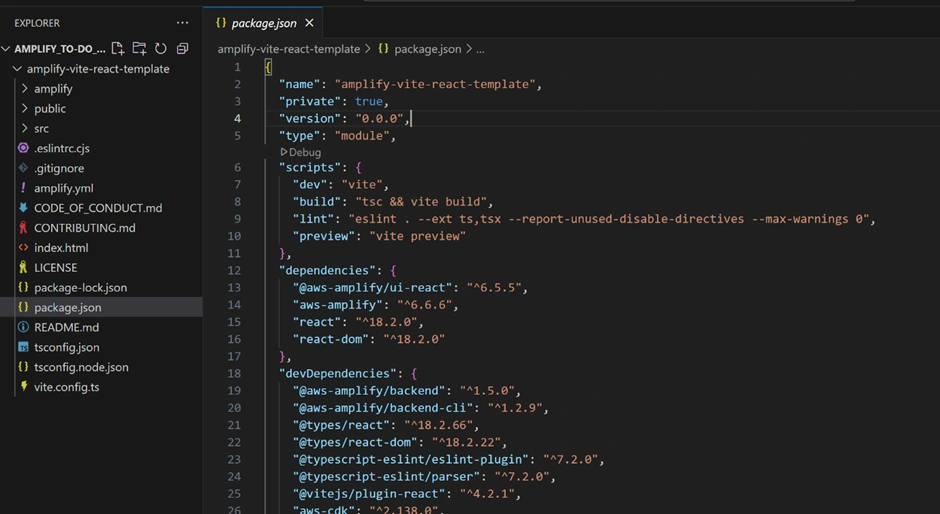
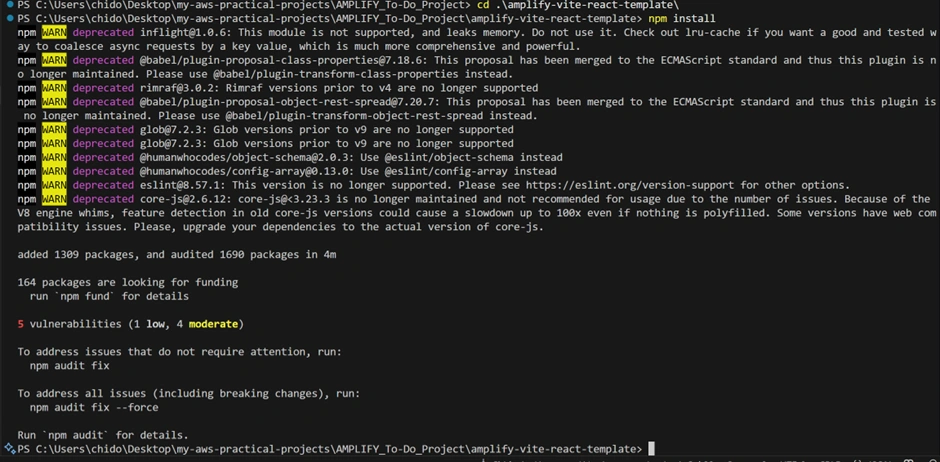
This command reads the
package.json file and installs all the required packages into the node_modules directory. Additionally, it ensures that the versions specified in package-lock.json are maintained, ensuring consistency across different environments.Implementing Authentication
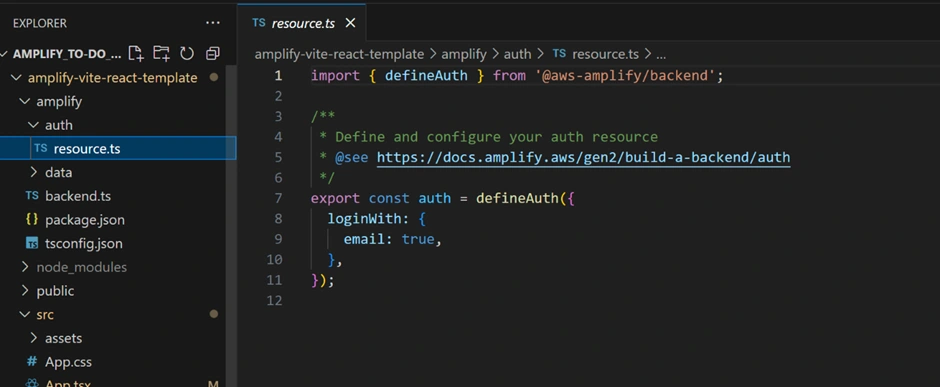
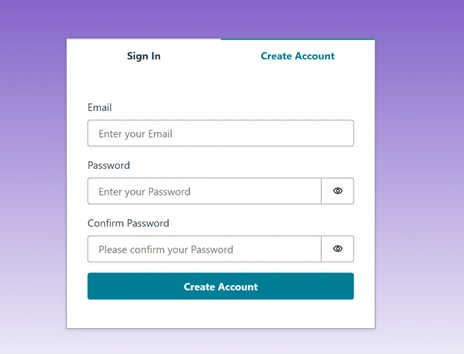
Our to-do app requires user authentication so that each user can have their own to-do list. The Amplify starter project already configured an Auth category in the backend (
amplify/auth/resource.ts) using Amazon Cognito. By default, it is set up to allow users to sign up and sign in with an email and password (you could extend it to social providers or multi-factor auth later).Since the backend is ready, we just need to add a sign-up/sign-in UI in our React app and hook it up to Amplify. Amplify UI offers a pre-built Authenticator component for React that provides a full auth flow (sign up, sign in, reset password, etc.) with minimal code. We will use this component.
In the React source, open
src/main.tsx. This is where the React app is initialized. We need to wrap our <App /> component with the <Authenticator> from Amplify UI and configure Amplify with our backend settings. For example: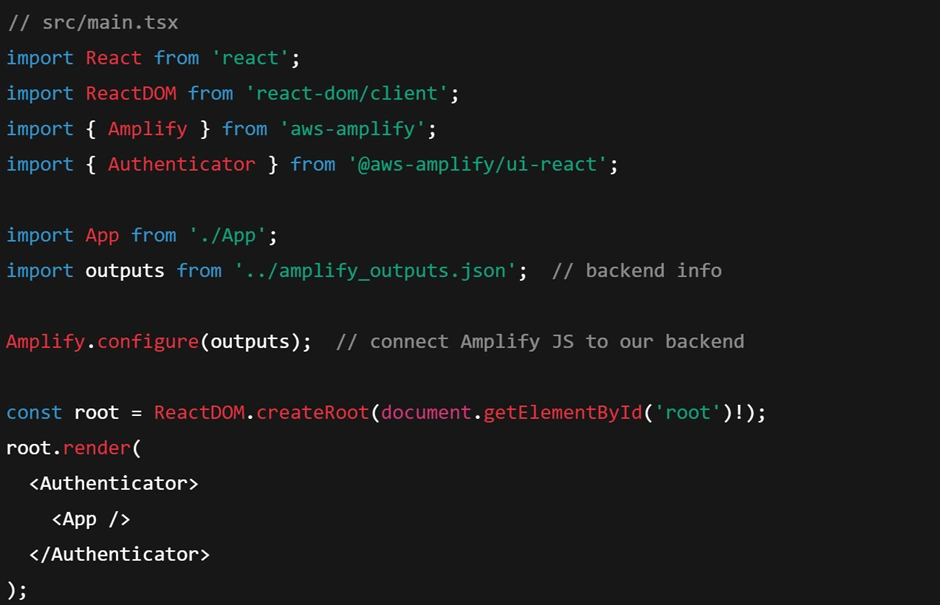
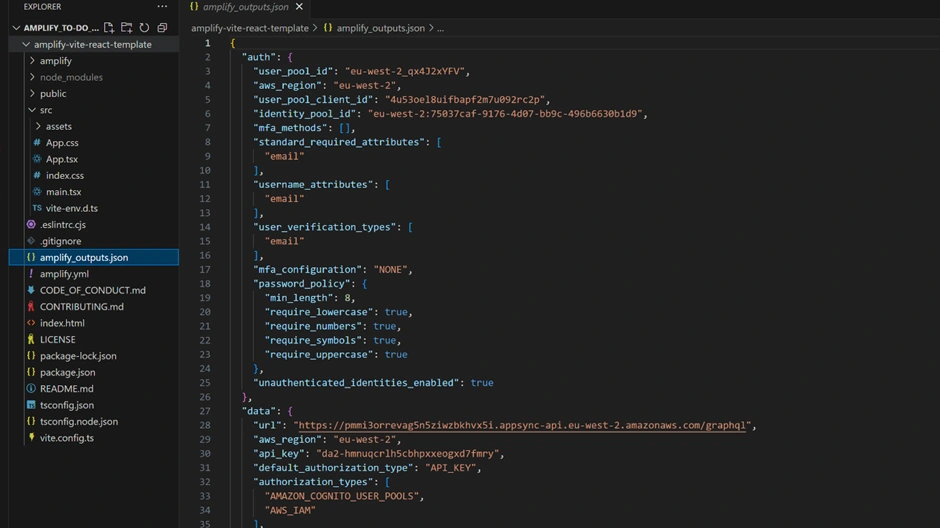
What’s happening here?
We import the
amplify_outputs.json which contains all the identifiers and endpoints for our cloud resources (API URL, region, User Pool ID, etc.).We call
Amplify.configure(outputs) to initialize the Amplify client library with those details.Then we render
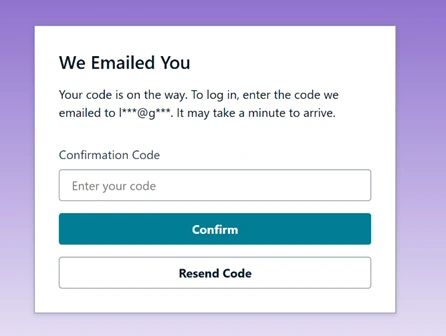
<Authenticator> – this automatically provides a login screen if the user is not signed in, and if they are signed in it will show the App content. Amplify UI handles the state transitions, form validation, and integration with the Cognito auth service.This means you don’t have to manually code the forms for login – Amplify does it for you. Now, if you run the app locally or refresh the deployed app, you will see a sign-in/sign-up form appear. A new user can register with email and password, then log in. After logging in, the app will show the to-do list interface. (If you’re running locally for development, see the “How to run the app locally” next section on how to download
amplify_outputs.json to connect to the backend.)How to Run the App Locally
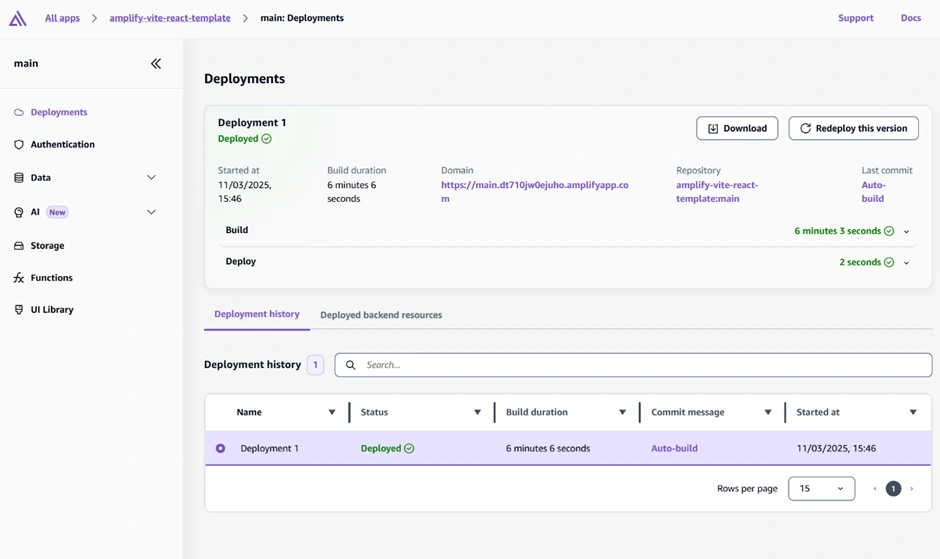
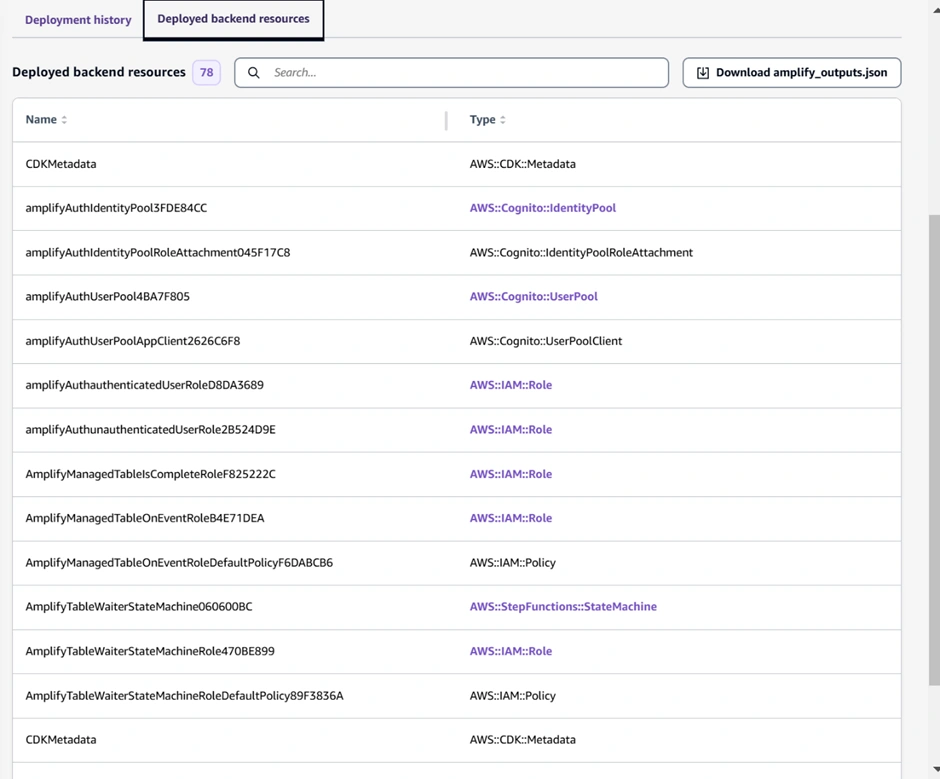
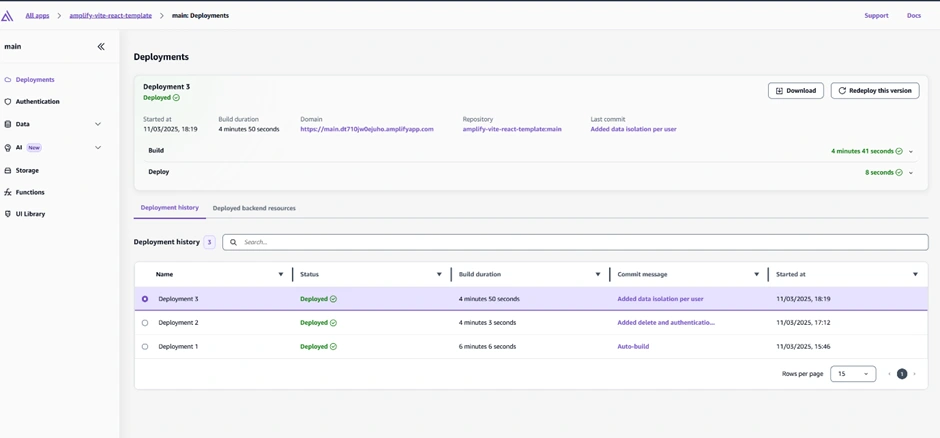
To develop and test the app on your machine, clone the repository and install dependencies (if you have not done so as described already). In the Amplify Console, go to your app’s main branch page, and find the “Download amplify_outputs.json” button under “Deployed backend resources.”
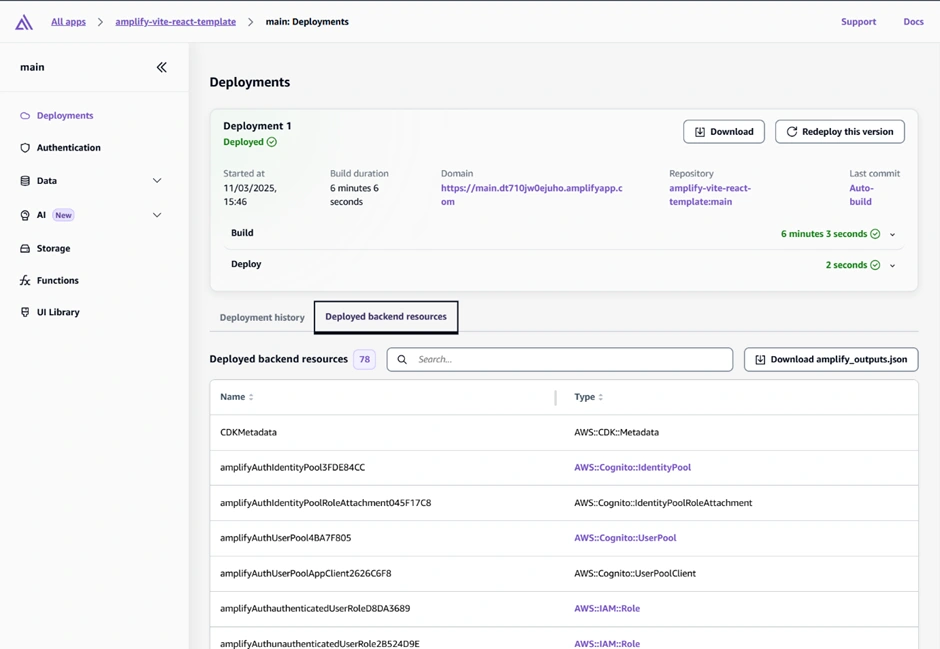
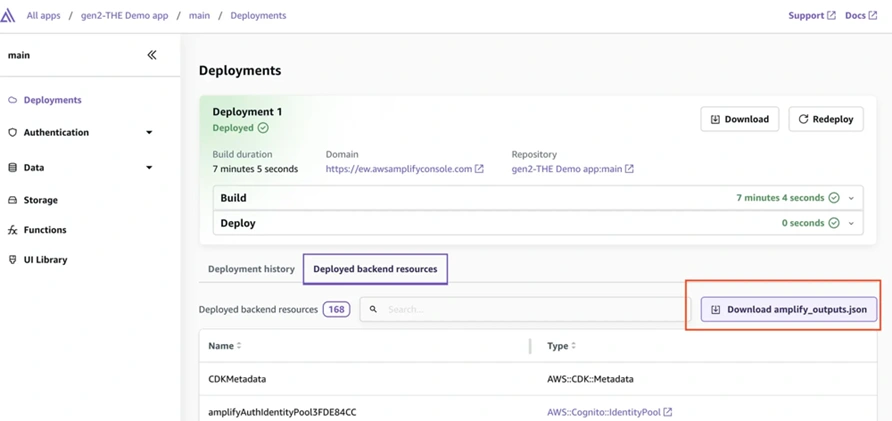
Amplify Console after deployment – under Deployments > Deployed backend resources, use the “Download amplify_outputs.json” button to get the configuration file for your backend. This file is needed to run the app locally and is used by Amplify’s library to know the backend’s details.
Download that JSON file and place it in the project’s root folder (as shown in the structure above). This file lets your local front-end know how to talk to the cloud backend. Then run
npm install (if you haven’t done so already as described) and npm start (or npm run dev for Vite as in our case). Your app will compile and open at http://localhost:3000 or http://localhost:5173 (for Vite). You should see the to-do UI.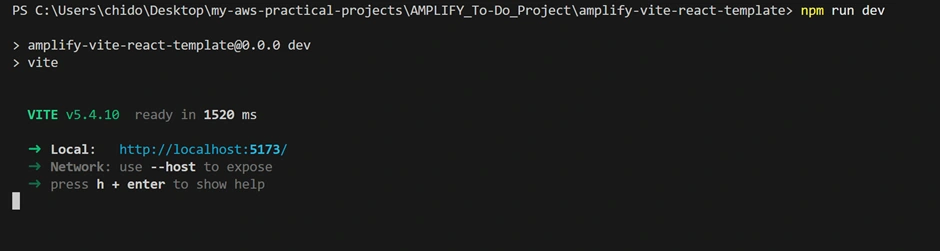
Implementing the Login UI
This guide explains how to set up and customize the login user interface (UI) in your Amplify-powered React application. The login UI lets users sign up, sign in, and manage their credentials using Amplify’s pre-built Authenticator component. The QuickStart below provides guide on how to update the code to include a log in UI.

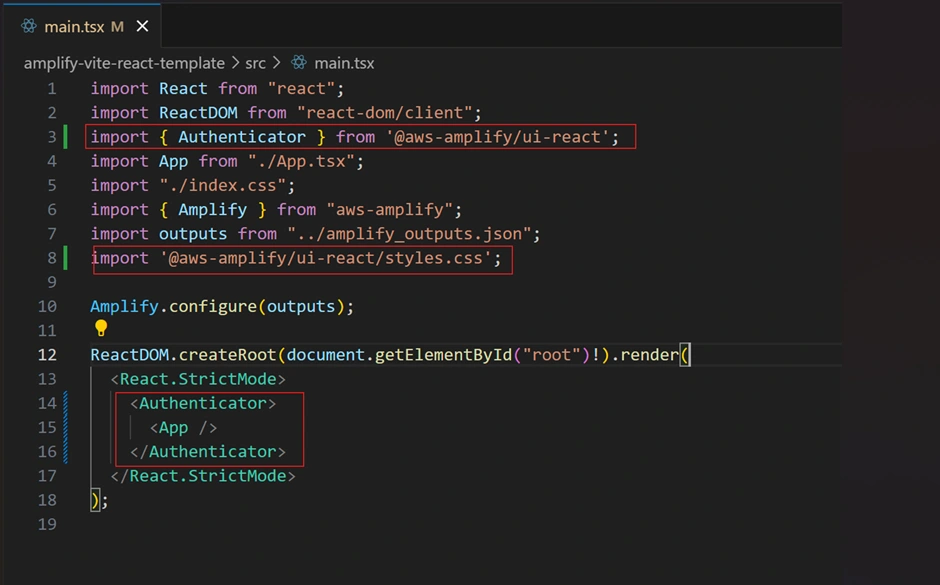
Wrapping Your Application with the Authenticator Component
The key to implementing the login UI is wrapping your main application component with Amplify’s
<Authenticator> component. This component automatically provides a complete authentication flow (sign-up, sign-in, password reset, etc.) without writing the forms manually. We must import the Authenticator UI as shown below if we want users to first log in using their user profiles, in our own project is email as shown above.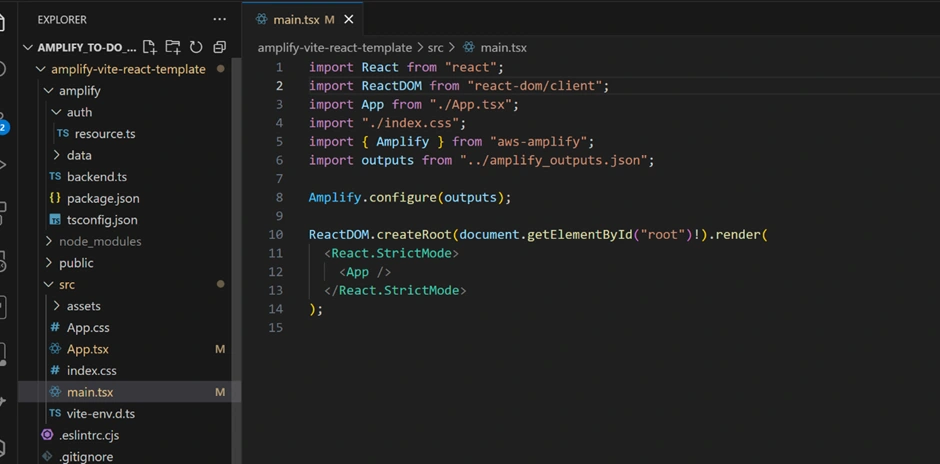
What It Does:
When a user visits your application, if they are not signed in, the Authenticator will show the login screen. Once authenticated, the main app content (rendered inside
<App />) is displayed.How to Customize:
While the default look works well for most projects, you can also customize styles and text by using Amplify UI theming options.
Customizing the Login UI Appearance:
Change Themes: Amplify UI allows theme customization via its theming API. For example, you can import a default theme and override specific color or font properties.
Custom Components: If you prefer a different layout or additional fields, you can extend or replace parts of the default Authenticator UI with your own React components.
Testing the Login UI Locally:
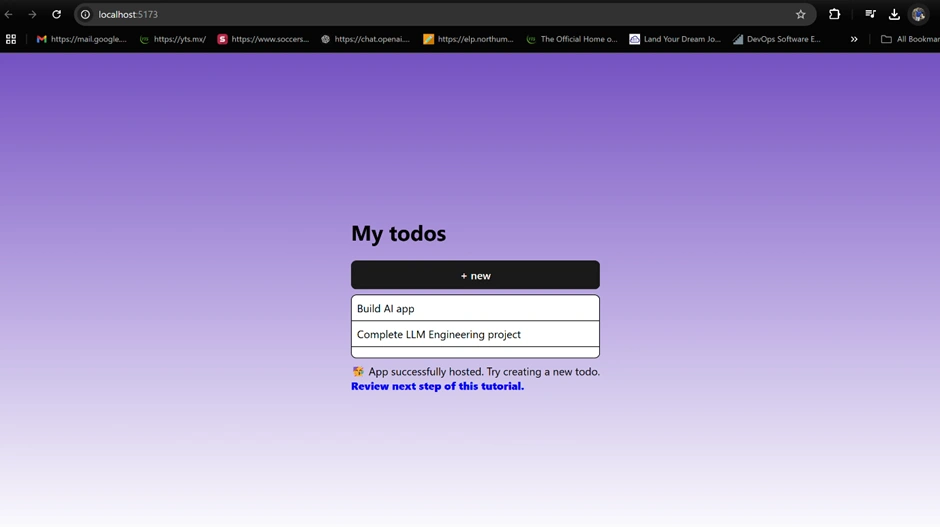
After setting up the login UI, start your development server (
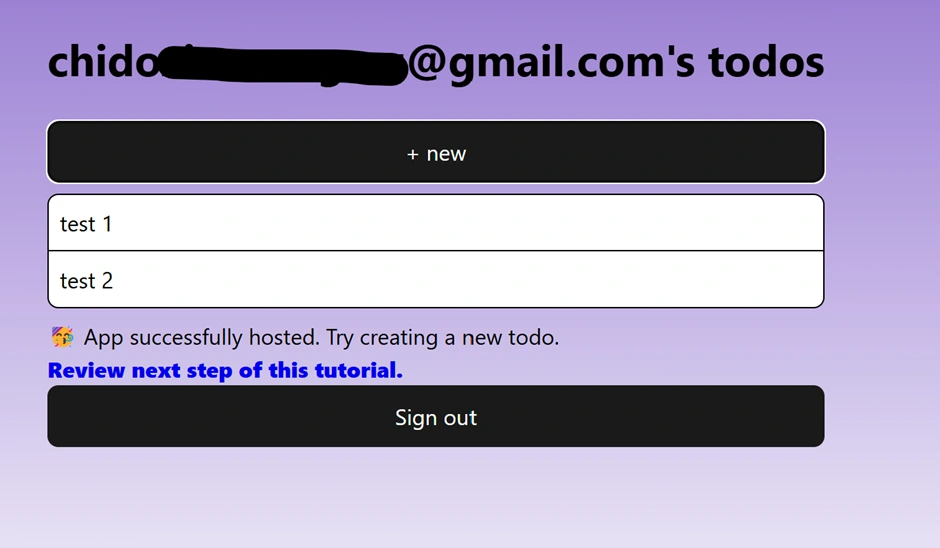
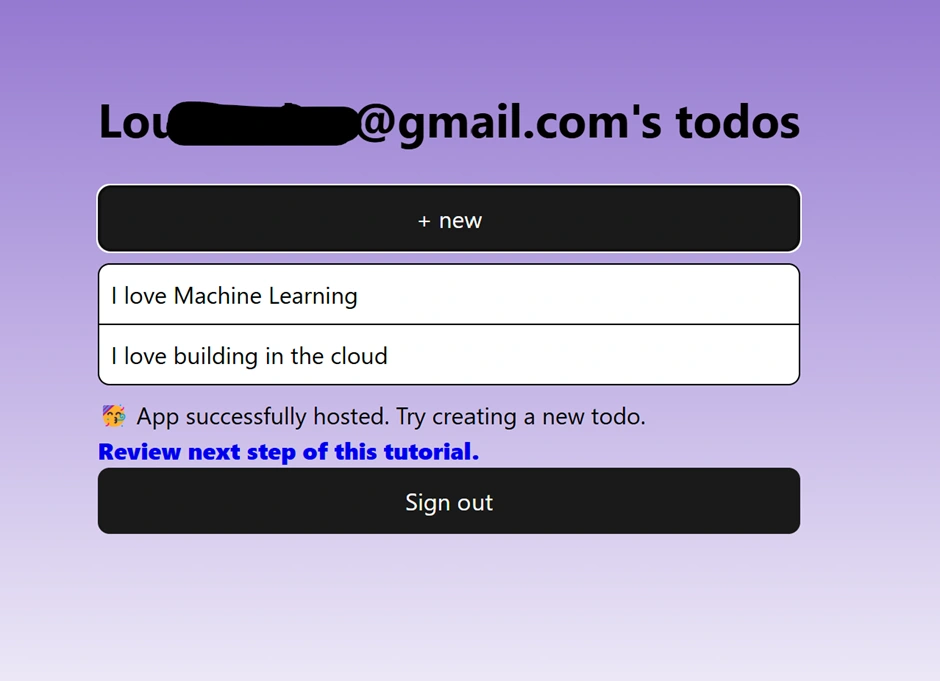
npm run dev or refresh your browser where your local host is running). Open your browser and navigate to your local host address. You should see the login interface provided by Amplify. Interact with the Authenticator, try signing up or signing in. The UI should smoothly transition from the login forms to your main app upon successful authentication. We also added two more Todo’s to the list.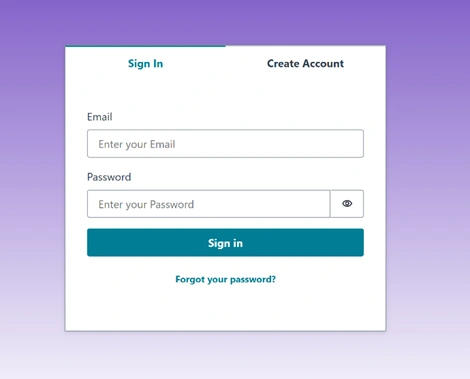
By following these steps, you’ve implemented a robust login UI using Amazon Amplify’s Authenticator component in your React app. This implementation handles all the heavy lifting for user authentication while allowing you the flexibility to customize the appearance and behaviour as needed.
Creating the To-Do App Backend (API and Database)
With Amplify, creating a backend for your app is declarative. In our to-do app, the backend consists of a GraphQL API and a database (Amazon DynamoDB table) to store to-do items. We didn’t have to manually set those up – they were defined in the code and deployed by Amplify when we launched the app. Let’s break down how the to-do backend is defined and how you could customize it:
Data Model Definition (Todo items):
In the
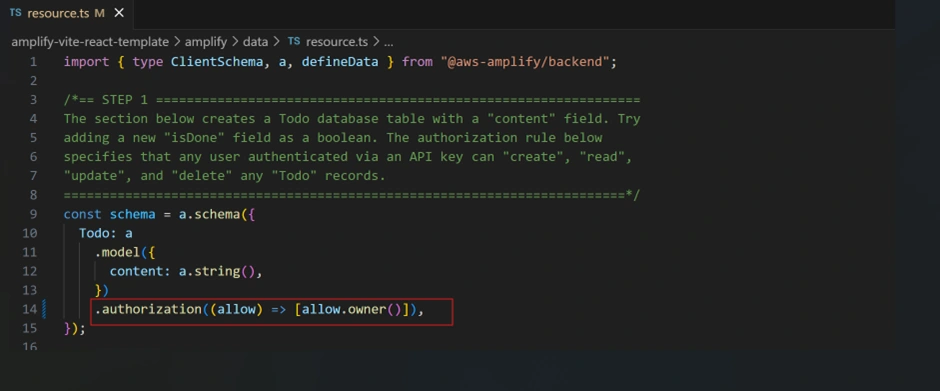
amplify/data/resource.ts file, you’ll find a schema defined using Amplify’s Data Modeling API. For example, a simple Todo model could be defined like: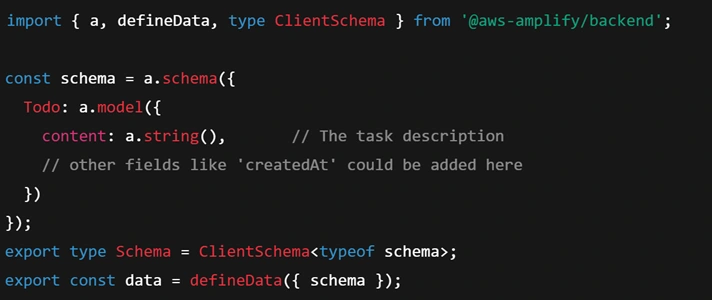
This code says we have a model Todo with a string field
content. When Amplify deploys, it creates a DynamoDB table for Todo items and generates a GraphQL API (via AWS AppSync) with queries, mutations, and subscriptions for the Todo model. The front-end can use Amplify’s DataStore or API client to interact with this model – for example, create new todos, list todos, etc., without writing any server code. The starter project’s todo model was set up for real-time updates, meaning whenever a todo is added or deleted, all clients get updated via WebSocket (AppSync subscriptions).Authorization Rules:
By default, the to-do API in the template was open to any authenticated user (all logged-in users see all todos). We likely want each user to see only their own todos. Amplify makes this easy with owner-based auth rules. In code, we can update the model to add an ownership rule. For instance, Amplify uses the concept of an “owner” field (usually the user’s identity) to restrict data access. In our Todo model definition, we could specify:

And configure the data to use user authentication as its default auth mode. For example:

This change means each Todo item will have an owner (the user who created it), and only that user can read or delete it. In the Amplify QuickStart, this step was done in a “cloud sandbox” environment and then deployed to the main backend – but conceptually, it’s part of designing your backend. After implementing such a change, you would run an Amplify CLI command (in Amplify Gen 2,
npx ampx sandbox for testing in a temporary environment, then commit and push to deploy) to apply it. However, we will do this in the next steps.Functions and Other Services:
Our app is simple, so we just need an API and DB. But note that Amplify can also add Lambda Functions, Storage (S3 buckets), and more to your backend easily. All would be defined in the
amplify/ directory. For example, adding a file storage would create an amplify/storage folder with its config, etc. The Amplify CLI (amplify pull, ampx commands) helps generate these resources.Amplify Sandbox: Testing Your Backend Changes
In AWS Amplify Gen 2, a sandbox environment serves as an isolated, per-developer cloud environment designed to facilitate rapid development and testing of application features without impacting shared or production environments.
Key aspects of Amplify sandbox environments include:
Isolation for Developers: Each developer operates within their own sandbox, preventing interference with others' work and ensuring a stable collaboration environment.
Ephemeral Nature: Sandboxes are temporary and can be created or destroyed as needed, aligning with iterative development practices.
Rapid Iteration: Developers can quickly test changes, as the sandbox automatically redeploys cloud resources upon code modifications, streamlining the development process.
To utilize a sandbox environment, navigate to your Amplify Gen 2 application directory and execute Sandbox. In the terminal, within the root folder of your Amplify project, run:
Why do this?
npm ampx sandbox leverages Amplify Gen2’s local setup to create a temporary (sandbox) environment in the cloud that mirrors your backend configuration. You’ll be prompted for some inputs, such as “Select an AWS profile” or “Use the default environment name?” This environment will be separate from any existing main or dev environment.Observe the Terminal Messages:
The image from the terminal output after you run
npm ampx sandbox might show messages like:“Initializing new Amplify sandbox…”
“Packaging backend resources…”
“Deploying to sandbox environment…”
If you see a warning or an error, such as an AWS credential issue or a missing package, address it by following the prompt. For example, you might need to select the correct AWS profile or install missing dependencies.
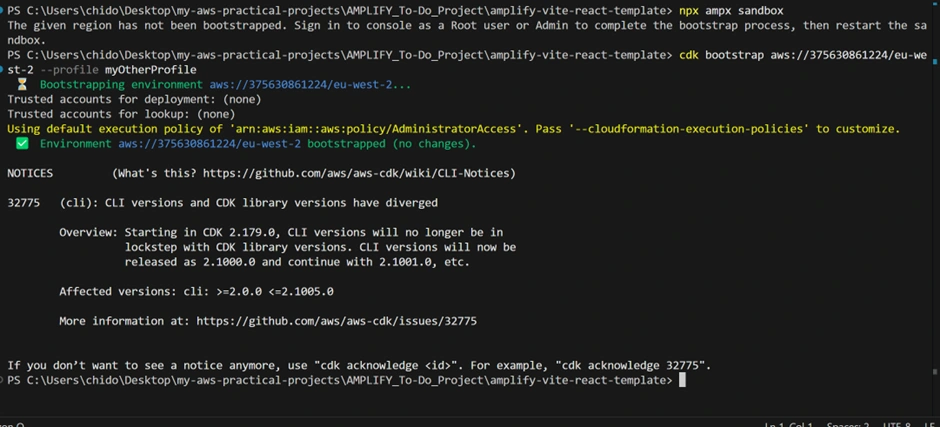
Error Handling:
In some cases, you may get an error message along the lines of:
“Error: Could not detect an AWS profile. Please run aws configure or select a valid profile.”
This error happens because the Amplify CLI cannot find valid AWS credentials in our environment. We have two accounts in our environment and so we need to be specific with the account we are specifying by bootstrapping it first.
How to fix it:
Just like we described from the beginning of this project, make sure to set up your AWS credentials properly (using
aws configure sso or aws configure). After configuring, re-run npm ampx sandbox. You will get a confirmation from Amplify as it pops with the message:
Confirming the Sandbox Creation
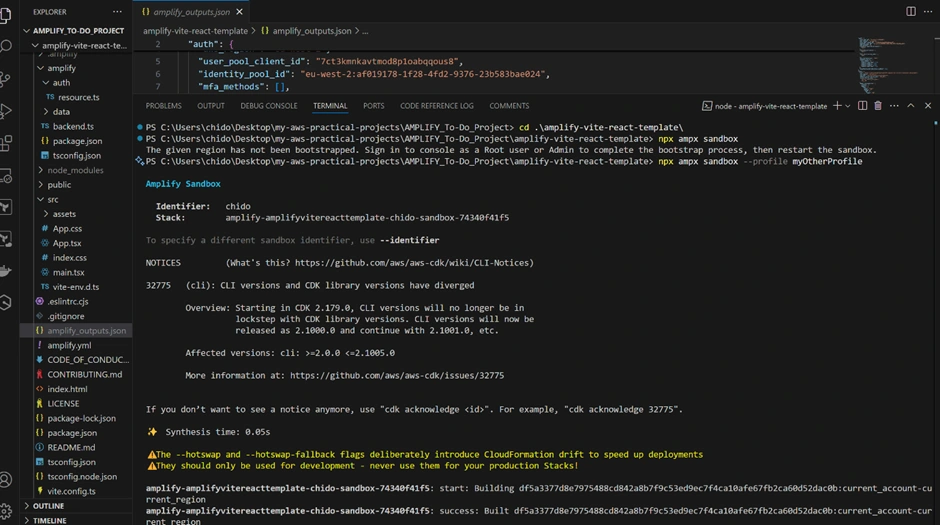
Once the sandbox is successfully created, you will see a message in the terminal stating Amplify Sandbox with your AWS username and its stack. This means Amplify has provisioned a temporary set of resources (like AppSync API, DynamoDB tables, etc.) just for the sandbox environment, all named differently from your main environment.
Working With the Sandbox
Sandbox URL and Management
After deployment, Amplify usually provides a link to a Sandbox Management Page or CloudFormation stack details. Clicking that link takes you to a simplified Amplify console page for the sandbox environment. From here, you can:
Browse your data model changes.
Test queries in a GraphQL Playground.
Confirm that your new fields or models behave as expected.
Handling Errors and Corrections
Typical Sandbox Error: “Resource Already Exists”
Sometimes, if you attempt to re-deploy the sandbox without cleaning up previous resources, you might see an error like:
“A resource with the same name already exists in your account.”
Solution:
Either change the environment name (when prompted by
npm ampx sandbox, type something unique like “sandbox2”), or delete the previous sandbox environment in the Amplify Console before re-creating it.AWS Credentials or SSO Session Timeout
Another common issue is an expired SSO session if you’re using AWS IAM Identity Center. If you see:
“Session token is expired. Please refresh your SSO credentials.”
Solution:
Re-run
aws sso login --profile <YourProfile> or aws configure sso to refresh the session, then re-run the sandbox deployment.Invalid GraphQL Schema
If your
resource.ts has syntax errors or invalid schema rules, Amplify might throw an error. For instance:“Schema validation error: Field ‘content’ is invalid.”
Solution:
Fix your schema in
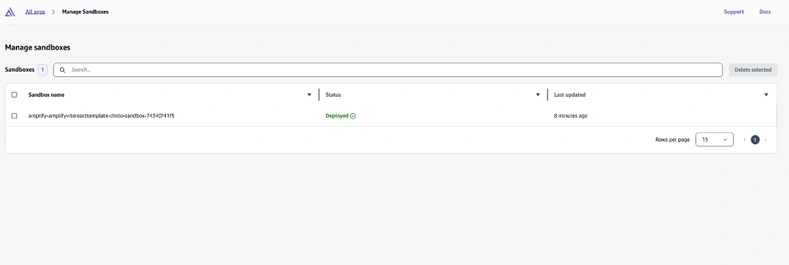
amplify/data/resource.ts, making sure each field type is supported (e.g., a.string(), a.int(), etc.). Then rerun npm ampx sandbox.Confirming Your Sandbox is Deployed
If you open the Amplify Console, you should see a new environment in the Environments list or a mention of Sandbox resources. It shows the Amplify Console with the newly created environment named “sandbox-dev” (or whichever name you used); in our case, it is “amplify-amplifyvitereacttemplate-chido-sandbox-74340f41f5”.
Testing Changes
You can connect your local React app to the sandbox by downloading the
amplify_outputs.json specific to the sandbox or configuring your front-end to point to the new endpoint. This lets you test out the new schema changes in a local environment without messing with your main or production environment.Deleting or Merging
Once you’re satisfied with your changes, you can either discard the sandbox (delete it, if you want to throw away the changes) or merge them into your main environment by committing the changes in the
amplify/ folder and pushing to the repository. At that point, your main environment will be updated with the changes validated in the sandbox.By following these steps you’ve successfully deployed and tested changes in an Amplify Sandbox environment. Errors like invalid credentials or existing resources can be quickly corrected by either updating credentials or choosing a unique environment name. Confirmation that the sandbox has been deployed is shown by the terminal success message and the new environment displayed in the Amplify Console. This workflow ensures you can experiment with new data models or features without risking your live application.
Implementing Per-User Authorization (Sandbox Environment)
We would want every user to have a separate environment when they log in into our ToDo app and this is what this next step is going to do. Implement per-user authentication and authorization.
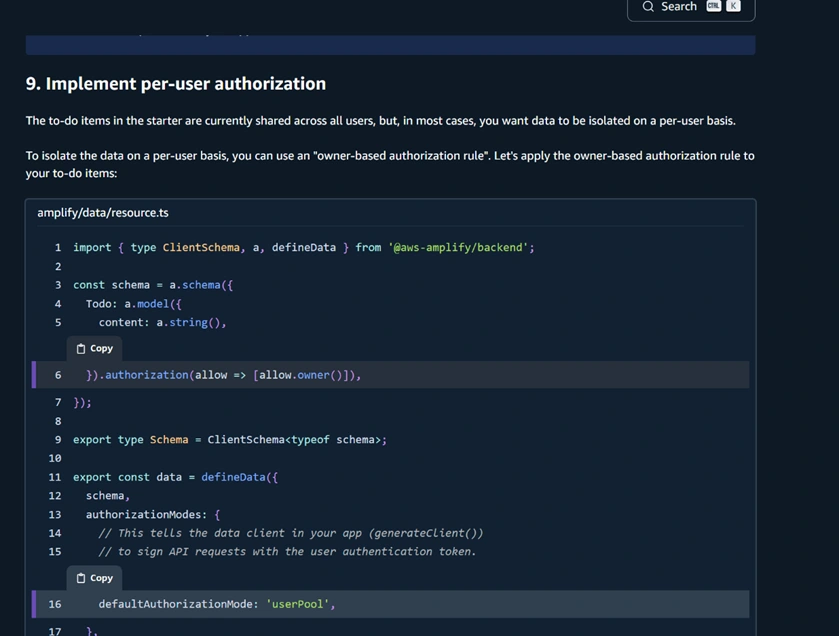
Open the schema file located at:
amplify/data/resource.tsUpdate the schema to implement per-user authorization. This isolates each user's to-do items:
Configure Authorization Modes:
Ensure your schema's authorization mode is set to use AWS Cognito (userPool) by default, with an optional public API key for temporary access (useful for initial testing):
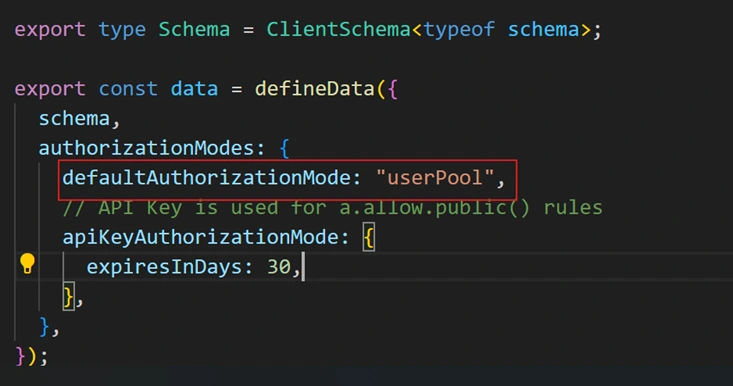
This configuration means authenticated users have isolated access via Cognito.
Update React Frontend (useAuthenticator):
Navigate to your React component (
src/App.tsx) and import Amplify’s authentication hook: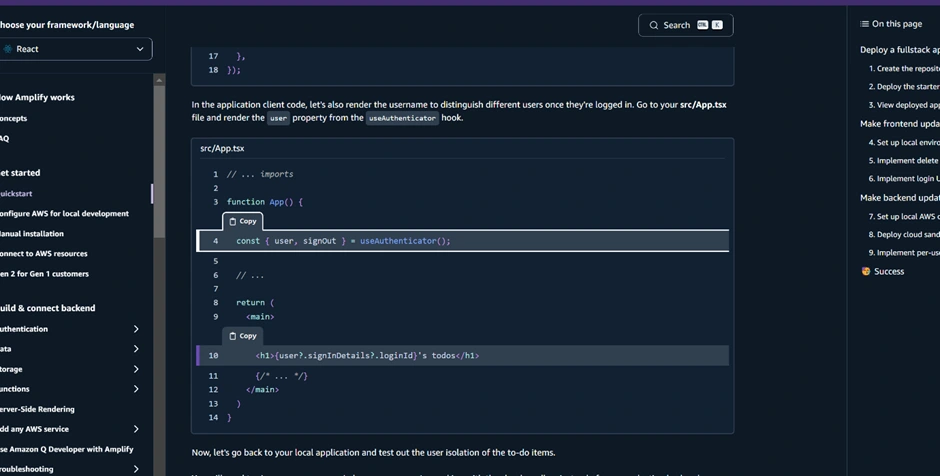
This displays a personalized UI by fetching the currently authenticated user details.
Confirming Sandbox Deployment:
Once your sandbox environment is deployed successfully, your terminal displays a confirmation message and creates an
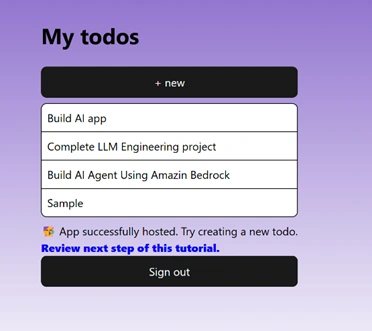
amplify_outputs.json file, containing your backend details.Building the React Frontend UI
The frontend of our app is a React application (in TypeScript) that interacts with the Amplify backend. The key parts of the UI include:
A list of to-do items
An input or button to add a new to-do
The ability to delete items
The Amplify starter project already provided a basic UI in
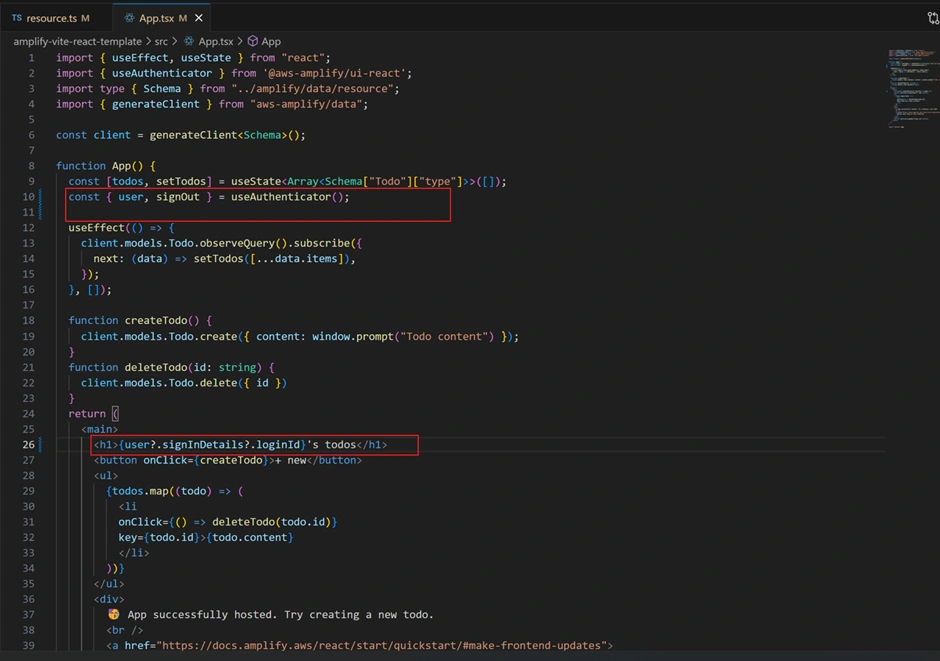
App.tsx, which we can refine. Let’s outline what the React code does and how to modify/extend it:Displaying Todos:
In
App.tsx, the code likely uses Amplify’s generated data client to fetch and subscribe to todos. Amplify Gen 2’s data library can generate a client (e.g., client.models.Todo) to interact with the Todo model. The starter app, for example, has: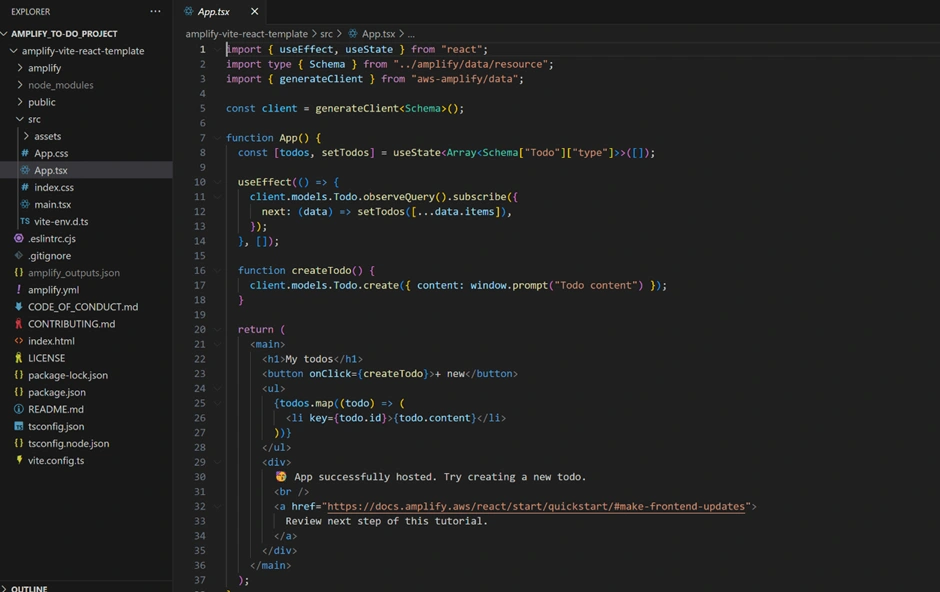
(The exact code can differ but Amplify handles real-time updates via subscriptions as noted.)
The result is that the UI always has the latest list of todos in the
todos state. We render this as a list of <li> items. Each to-do item displays its content text. If we implemented owner-based auth, users would only receive their own items from the API.Adding a New Todo:
The UI includes a “New” button or form. In the template, there was likely a create Todo function that calls
client.models.Todo.create({ content: "task text" }) to save a new item. This triggers the backend to save to DynamoDB and notify all subscribers (including our app) of the new item, updating the list in real time.Deleting a Todo:
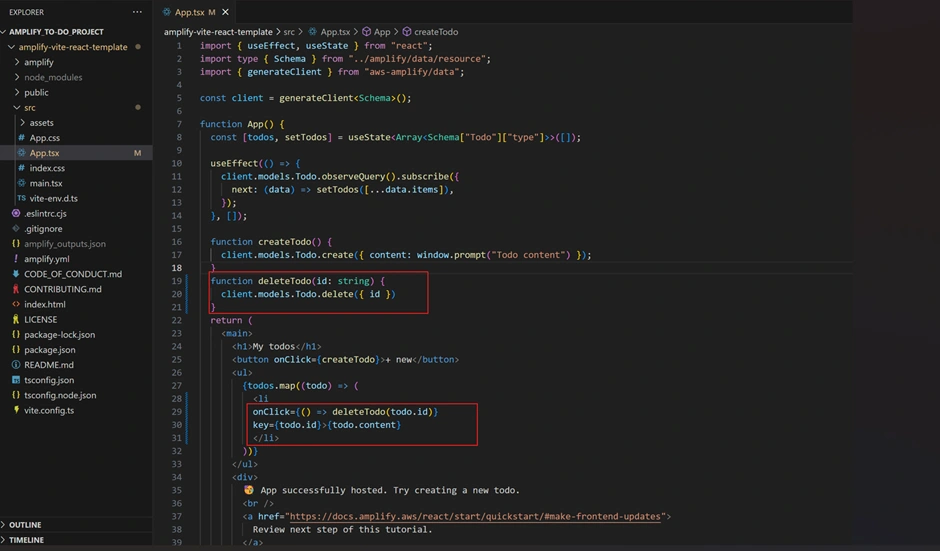
We can implement a delete by adding an onClick to each item. In the QuickStart, they added a
deleteTodo(id) function that calls client.models.Todo.delete({ id }). In the UI, they set each <li> to listen for click and call delete on its own ID. Our app can do the same – for instance, clicking a to-do could remove it. (In a real app, you might use a trash icon button for clarity instead of clicking the list item text.) Therefore, we updated the App.tsx with the code below to add the delete functionality.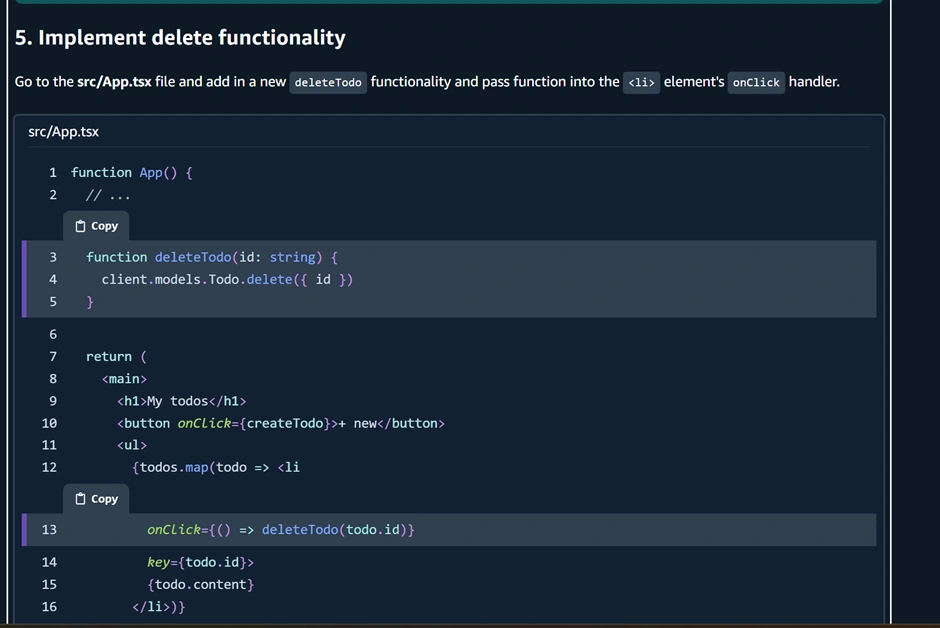


UI Components and Styling:
We can style the app as we like. Amplify provides some UI primitives (like buttons, etc.), but since this is a simple app, basic HTML elements or your own CSS are fine. The template included some CSS (e.g., centering content, giving the app a max width, etc.). You can open
index.css to adjust styles. For example, you might style the <h1> (title), the list items, and the new-task button to make the app look nice.At this stage, our React app should allow a logged-in user to see their list of tasks, add new tasks, and delete tasks. All interactions go through the Amplify API – when you add a task, it calls the cloud API to save it, and when you delete, it removes it from the cloud. Thanks to Amplify’s libraries, these calls are straightforward and the state updates automatically via the subscriptions.
Connecting the Frontend to the Backend
Much of the connection is handled by Amplify behind the scenes, but it’s worth summarizing how the pieces communicate:
Amplify.configure:
We mentioned earlier that the
Amplify.configure(outputs) call ties your app to the backend. The amplify_outputs.json file includes things like the GraphQL endpoint URL, the region, and the unique IDs of the resources. Amplify’s JS library uses this to know where to send API requests and how to talk to your Auth service. Always ensure you have the latest amplify_outputs.json when working in development, especially if you made changes to the backend.Authentication Flow:
When a user signs in via the Authenticator component, Amplify’s Auth library (part of
aws-amplify JS) stores the user’s credentials (JWT tokens) in memory. It will automatically attach these credentials to requests to authorized APIs. For example, our GraphQL requests include the user’s token, so the backend knows the identity (these ties into the owner-based auth rule we set, so it knows which user is owner).Data Flow:
Amplify generates convenient methods to call the API. In Gen 2, instead of writing GraphQL queries manually, we use the
client.models.Todo helpers (as seen with .list(), .create(), etc.). Under the hood, these make GraphQL calls to AWS AppSync. The responses come back as JavaScript objects (Todo items) that our app can use directly. Real-time updates use WebSocket connections managed by Amplify; when a new Todo is created or deleted, the AppSync API broadcasts and the Amplify library invokes our subscription callback to update state.Working Offline:
(Beyond the scope of this intro app, but Amplify DataStore could enable offline editing and syncing for the data. Gen 2’s DataStore integration is seamless with the GraphQL API. For a simple app, we won’t dive into this but know that Amplify has features for it if needed.)
In summary, once configured, the front-end doesn’t need to know about AWS specifics – it uses the Amplify API (e.g.,
client.models.Todo) and Amplify handles the rest. This is a huge productivity boost for full-stack development.Deploying the Application with Amplify Hosting
We already deployed our app once using Amplify’s hosting service. Let’s review deployment and how to maintain your app going forward:
Continuous Deployment via Git:
Amplify is watching the connected repository branch (e.g., main). Whenever you push changes to that branch, Amplify will automatically rebuild and deploy the updates. For example, if you modify the React code (say, change some UI text or fix a bug) or even make changes to the Amplify backend code, you just commit and push to GitHub. Amplify will detect the push, trigger the build pipeline (which installs dependencies, builds the app, runs
amplify push if backend changes, etc.), and then deploy the new version to the live site. This CI/CD workflow means you don’t manually FTP files or run deployment scripts – Amplify handles it.Amplify Console:
In the Amplify web console, you can monitor deployments. You’ll see a history of builds, can view logs if something fails, and verify the status of backend provisioning. The Console also has sections for the backend resources (for example, a Data section where you can manually browse the items in your DynamoDB table, and an Authentication section to see Cognito users). This is useful for debugging and managing data. For instance, after adding some to-dos, you can go to Data > Data Manager in Amplify Console to see the records in the Todo table (each with an ID and content, and maybe an owner if you enabled that).
Custom Domains and Hosting Options:
By default, your app is hosted at an Amplify domain. If this were a real project, you might add a custom domain (Amplify Console makes that relatively easy – there’s an option to connect a custom domain and it will configure Route53 for you). Amplify Hosting also enables features like password protection for branches (useful if you have a dev or staging branch) and pull-request previews (so each PR can spin up a temporary deployment).
Updating Backend:
If you change your backend code (in the
amplify/ directory) – e.g., add a new model or function – those changes will also get deployed when you push. Amplify uses a concept of Cloud Sandbox for safe development: you can test backend changes in an ephemeral environment (ampx sandbox) and then merge them. When you commit these changes, Amplify will update the cloud resources accordingly. Always commit the Amplify changes along with your frontend so that the backend and frontend stay in sync.In short, deploying with Amplify is very convenient. We’ve effectively been deploying continuously in this tutorial. Now our application is live and accessible, backed by scalable AWS services via Amplify.
Finally we will deploy for the last time after testing our application locally. We will use:
After that, we can then
git push to push our latest code to GitHub and then trigger the CI/CD automatically to our Amplify too.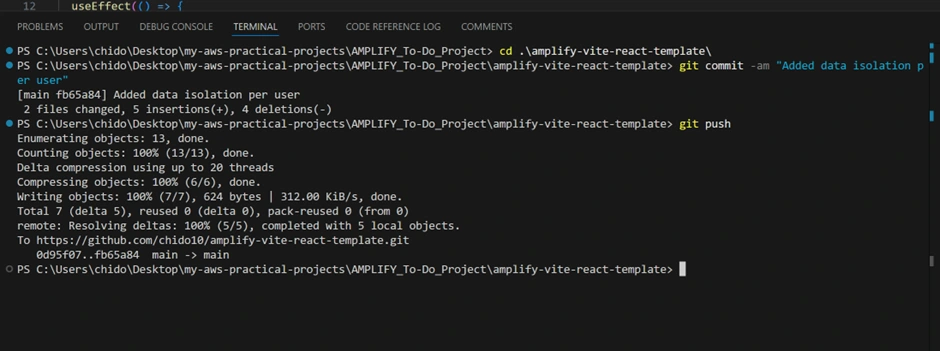
Afterwards, we tested our app to ensure the functionalities we implemented were properly integrated. We used two different email accounts to check if per-user account authorization worked as intended, verifying that each user's to-do items were isolated and not visible to other users.
Best Practices and Project Structure for Scalability
As your project grows, here are some best practices to keep it maintainable and scalable:
Organize Amplify Resources by Category:
Amplify already does this by having subfolders like
auth, data, storage, functions under the amplify/ directory. Continue this pattern. For example, if you add another data model, it might go into the existing data/resource.ts (since Amplify supports multiple models in one schema). If you add Lambda functions, they will appear in amplify/functions/. Keeping infrastructure code version-controlled (which Amplify does) means your whole team can collaborate on it and you can rollback if needed. The Amplify project structure is designed to collocate related resources – e.g., you could place a post-confirmation trigger Lambda right next to your Cognito auth resource code.Frontend Component Structure:
Break your React UI into components as it grows. For a simple app,
App.tsx can handle everything, but as you add features, create new component files and perhaps use a state management library if needed. Amplify’s UI library has many pre-built components that you can use (for example, Amplify UI React has theming, and primitives like <TextField>, <Button>, etc., which match AWS Amplify styles).Environment Management:
Amplify Gen 2 introduced the concept of cloud sandbox environments for developers. This means each developer can deploy their own isolated backend to test changes without affecting others or the production data. In practice, you might have a “dev” branch that uses a sandbox, and a “main” branch that is production. Amplify Console can manage multiple backend environments (it still uses the branch model – each branch can have its own backend or share). Use this to your advantage: test breaking changes in a sandbox first. The Amplify CLI (
ampx) makes it easy to spin up these envs. When ready, merge to main to update prod.Secrets and Configuration:
If your app needs secrets (API keys for third-party services, etc.), Amplify provides a way to store environment variables and secrets securely in the Console, rather than hard-coding them. Use that for any sensitive info. Also, avoid committing secrets to your repo.
Monitoring and Logging:
Amplify and AWS provide logging for backend functions and APIs (CloudWatch Logs for Lambdas, etc.). If you add complex logic, ensure you have logging in place. For AppSync (GraphQL), you can enable logging and view in CloudWatch if debugging is needed.
Keep Amplify CLI Updated:
Amplify is actively developed. Using the latest Amplify CLI (or the
@aws-amplify/backend-cli in Gen 2) ensures you have the latest features and fixes. Also, track Amplify’s announcements or docs for any changes (e.g., new data field types or new UI components).Project Structure for Monorepos or Teams:
If your frontend and backend are managed by separate teams, Amplify allows a separation where backend code lives in one repo and front-end in another, if needed. For most small projects, keeping them together (as we did) is fine. But it’s good to know Amplify is flexible if your use case grows (see Amplify docs on monorepo setups or separate team workflows here).
By following these practices, your to-do app can evolve from a simple demo into a production application. Amplify will handle scaling concerns (your DynamoDB tables can scale to accommodate more items, AppSync can handle more requests, etc., without changes on your part). Finally, when your app is fully built and tested, you’ve already deployed it – there’s no extra “release” step. You might consider enabling Amplify’s custom domain for a professional URL and perhaps setting up analytics or other categories Amplify supports.
Conclusion
In this step-by-step guide, we built a full-stack To-Do application with AWS Amplify Gen 2 and React. We started with an introduction to Amplify Gen 2’s advantages (code-first, integrated hosting, scalability). We then set up our AWS account using best practices (IAM Identity Center and Amplify’s required IAM policy) to securely enable Amplify deployments. Next, we initialized a React app – using Amplify’s starter template for convenience – and integrated Amplify’s libraries. We configured authentication using Amplify’s Authenticator UI, allowing users to sign up and log in easily.
On the backend side, we defined a Todo model and let Amplify handle creating the database and API, even adding fine-grained authorization so each user’s data is private. We built out the React frontend to list, create, and delete to-do items, leveraging Amplify’s API for real-time updates. The app was then deployed on Amplify Hosting, giving us a live URL and a continuous deployment pipeline tied to our repository.
Throughout, we highlighted best practices like organizing code, using cloud sandbox environments for development, and keeping configuration in code for version control. You should now have a working understanding of how to develop with AWS Amplify Gen 2. This simple To-Do app can serve as a foundation — you can extend it by adding features (perhaps file uploads with Amplify Storage, or a due date field to the Todo model, etc.). The Amplify documentation and community can be great resources as you explore more.
Happy coding and enjoy the productivity that Amplify brings to full-stack development!
Like this project
Posted Aug 30, 2025
Developed a full-stack To-Do app using React and AWS Amplify Gen2.
Likes
0
Views
9