Bango Payments
Aniket Ghavte
Avalanche Interchain Bridge
worked as - Founding Software Developer
Building a Cross-Chain Bridge: What I Learned Shipping Bango Payments
I've been deep in the Avalanche ecosystem lately, and one of the most interesting things I built is Bango Payments — a small but real cross-chain bridge that lets you move tokens from Avalanche C-Chain over to Bango L1 (Bango's own chain) so you can use them inside the Bango app.
I'm writing this so you can see what the product does, how the bridge actually works under the hood (especially the ICTT contracts), and why I made some of the choices I did. Think of it as a mix of "what I built" and "how the plumbing works."
What Is Bango Payments?
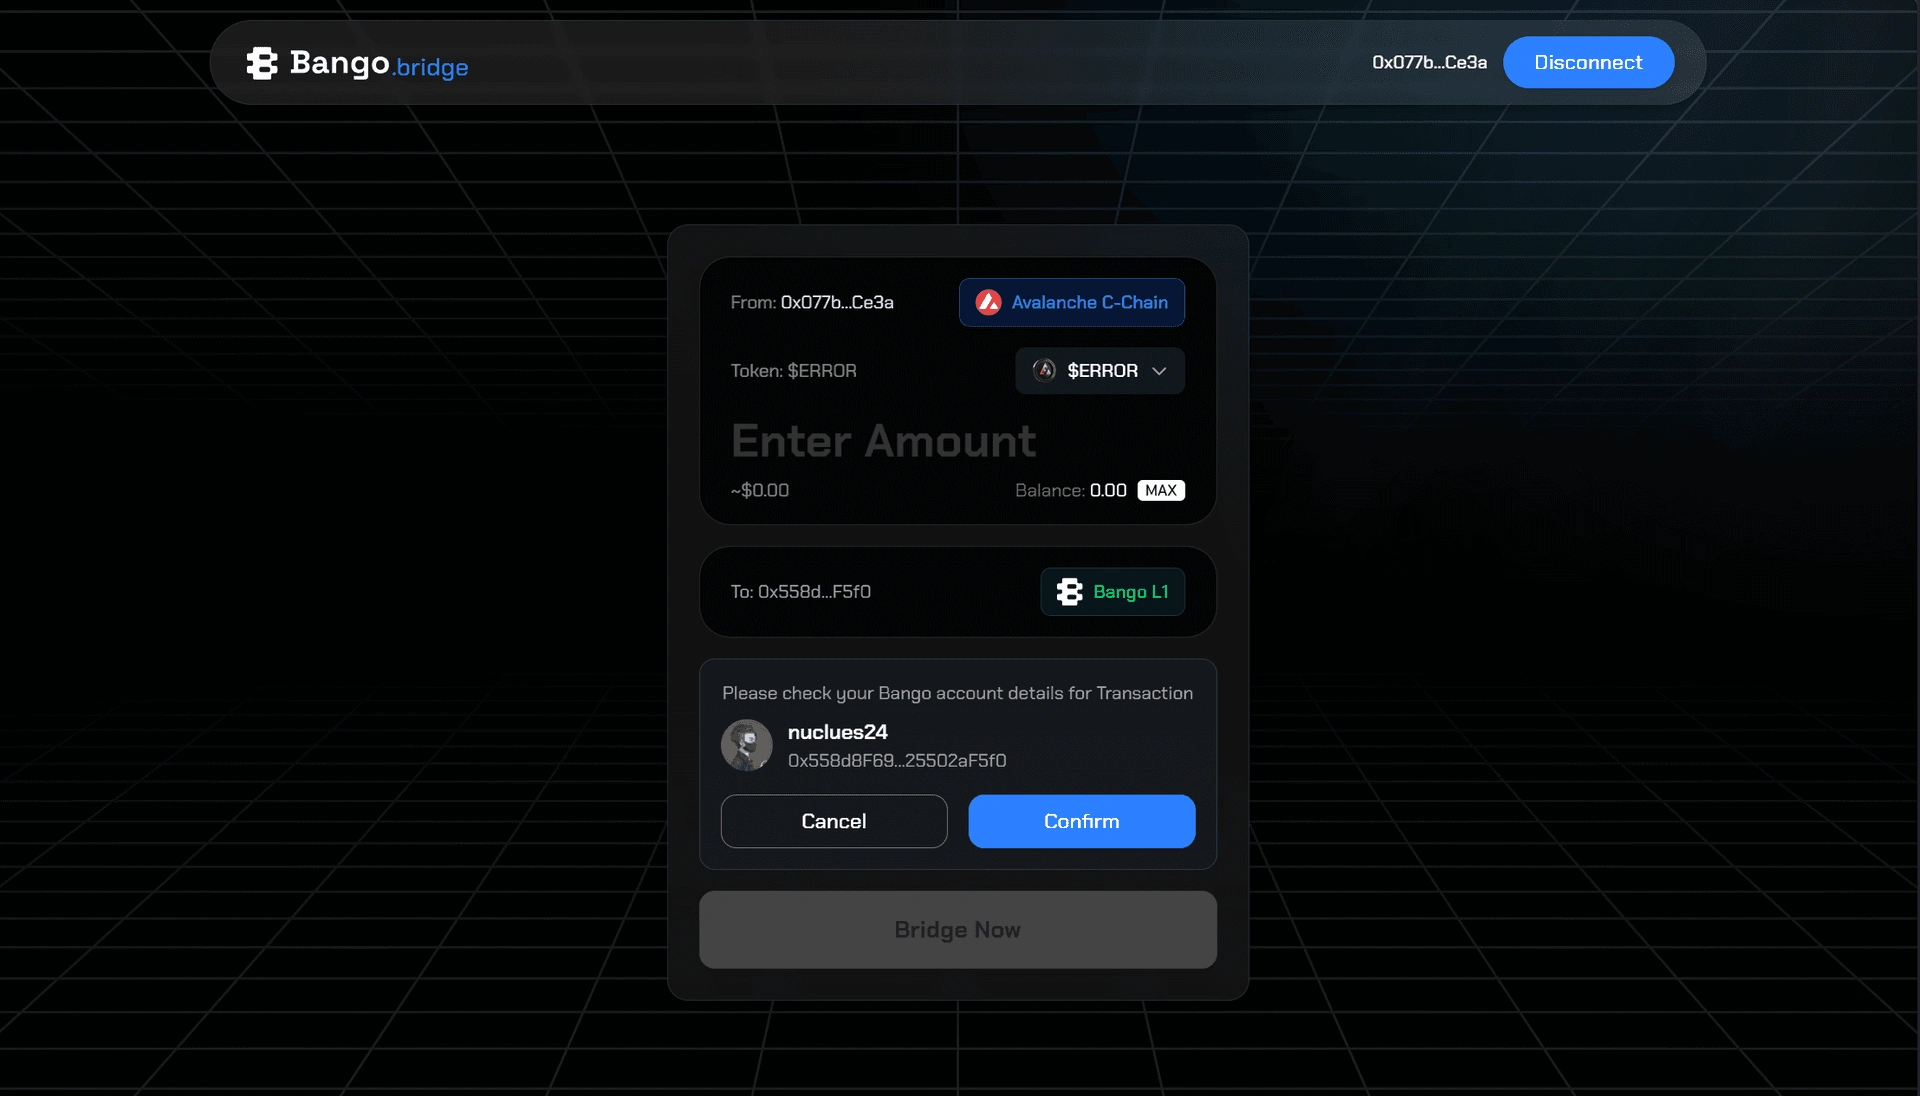
In one sentence: Bango Payments is a web app where you connect your wallet, pick a token and amount, confirm your Bango account, and bridge those tokens from Avalanche to your wallet on Bango L1.
So you're not sending to a random address — you're sending to your Bango account. That account is tied to your identity in the Bango app (username, profile, etc.), and the app fetches your Bango wallet address for you. You just log in, confirm it's you, and hit "Bridge Now."
Right now we support USDC and $ERROR on Avalanche. You see your balance, enter an amount (or hit Max), get a rough USD value from live prices, and after you confirm, one transaction on Avalanche kicks off the cross-chain transfer. A couple of minutes later, the tokens show up on Bango L1.
Why a Bridge? (And Why This One?)
If you've used DeFi or any multi-chain app, you know the pain: your funds are on Chain A, but the app you care about lives on Chain B. You need a safe, predictable way to get tokens from A to B.
Bango runs on its own L1 (chain ID 5506). To use the app, you need assets there. So the "product" here is: get your Avalanche tokens onto Bango L1 with minimal friction. No manual address copying, no guessing which chain you're on — the app knows your Bango account and guides you through one flow.
I wanted it to feel like a product, not a generic bridge UI: login with Bango, see your destination address, confirm, and bridge. The blockchain part does the heavy lifting; the front-end tries to stay out of your way.
How It Works (From a User's Perspective)
Here's the flow in plain words:
Connect your wallet (e.g. MetaMask, WalletConnect). The app checks you're on Avalanche C-Chain (or asks you to switch).
Log in with Bango (we use an auth token in the background). The app fetches your Bango profile and the wallet address where your bridged funds will land.
Confirm it's you — you see your username and that destination address so you know exactly where the tokens are going.
Pick a token (USDC or $ERROR), enter an amount, and see the approximate USD value (pulled from DexScreener).
Hit "Bridge Now." You sign an approval (if needed) and then the bridge transaction. After that, you get a tx hash and a link to Snowtrace; the actual cross-chain magic happens on the protocol side.
Wait a couple of minutes — the ICTT layer moves the tokens to Bango L1 and credits your Bango wallet.
So from your point of view: connect → login → confirm → choose token & amount → one or two signatures → done. The rest is infrastructure.
The Bridge Under the Hood: ICTT (Inter-Chain Token Transfer)
This is the part I really want to explain, because it's what makes the bridge possible.
ICTT is the protocol we use to move tokens from Avalanche C-Chain to Bango L1. It's a contract-based design: one set of contracts on the "home" chain (Avalanche) and another on the "remote" chain (Bango L1). When you call the right function on the home side with the right parameters, the protocol takes care of locking/burning and minting/releasing on the other chain.
Two Sides: Home and Remote
Home chain (Avalanche C-Chain, 43114) — Here you hold your tokens (e.g. USDC or $ERROR). The ICTT home contract lives here. You don't send tokens to a random bridge wallet; you approve the home contract and then call send() on it, telling it: "this amount, this destination chain, this recipient address on that chain."
Remote chain (Bango L1, 5506) — This is where your Bango wallet lives. The ICTT remote contract (the "destination token transferrer") lives here. When the protocol finalizes the transfer, this contract credits your Bango address.
So "bridge" in practice means: you call send() on the home contract with the remote chain ID, remote contract address, and your Bango address; the protocol moves the tokens cross-chain and the remote contract updates your balance.
What Goes Into One Bridge Transaction?
For each token we support, we have a fixed ICTT config: home chain ID, home contract address, remote chain ID, remote contract address, and the blockchain IDs (bytes32) that the protocol uses internally to route the message. Those aren't just "chain IDs" in the EVM sense — they're the identifiers the ICTT protocol uses to know which chain and which contract to talk to.
When you click "Bridge Now," the app:
Checks you're on the right chain (Avalanche for "Avalanche → Bango").
Checks your token balance and, if needed, requests an ERC-20 approve() for the ICTT home contract.
Builds the send() payload with: destination blockchain ID (Bango L1), destination token transferrer address (the remote contract), recipient (your Bango wallet address), fee fields (we use zero for these), required gas limit on the destination side, multi-hop fallback (we use zero address for direct transfer).
Calls send(input, amount) on the home contract with that payload and the token amount (in wei/smallest units).
After that, it's all protocol: the home side and the cross-chain messaging layer handle the rest; the remote contract on Bango L1 credits you. We don't run validators or relayers — we're just calling the same ICTT contracts that the ecosystem uses.
Why This Design?
Because the destination is always "your Bango wallet," we can hide a lot of complexity. You don't paste addresses or pick "remote contract" — the app gets your Bango address from the backend and plugs it into the ICTT send() call. So the UX is "bridge to my Bango account," and the contracts do "bridge to this address on this chain."
What I Built in Code (Without Boring You)
Front-end: Next.js 15 (App Router), React 19, TypeScript. One main "Bridge" flow: connect wallet, fetch Bango user, confirm, then token + amount and "Bridge Now." Token list, balances, and chain are all wired to the same state so you can't really submit an invalid combination.
Web3: Wagmi v2 + Viem. Wagmi for connection, chain ID, balances, and chain switching; Viem for reading (balance, allowance) and writing (approve, send()). So the "blockchain" part is: read state, then send one or two transactions with proper error handling.
Token validation: Not every token in the world is bridgeable. We have a small config layer (in the repo it's things like tokenValidation and the ICTT config in transferFunds) that says "these addresses are the Avalanche tokens we support, and here are their home/remote contract addresses and chain/blockchain IDs." The UI only lets you bridge those. That keeps the contract calls correct and avoids weird states.
Security: Recipient address comes from our backend (after you're logged in with Bango), not from user input. We check balance and allowance on-chain before sending, and we verify you're on the right chain for the direction you chose. So we're not trusting the client with "where do you want to send"; we're trusting the Bango API for "who are you" and then mapping that to one destination address.
Prices: We use DexScreener to show you approximate USD value for the token you're bridging. Nice for confidence; not used for any on-chain logic.
So the "product" is: a focused bridge UX on top of existing ICTT contracts, with clear constraints (supported tokens, one destination type) so the code stays understandable and the behavior predictable.
A Few Things I'd Do Differently (Or Next)
Reverse direction (Bango → Avalanche): Right now we only do Avalanche → Bango. The other direction would mean switching to Bango L1 in the wallet and calling the "remote" side as the new "home" for that flow. Doable, but it's a separate flow and UI state; I'd treat it as a second feature.
More tokens: Adding a new token is "add ERC-20 metadata + ICTT config (home/remote addresses and blockchain IDs)." The pattern is there; it's mostly configuration and testing.
Better status: Right now you get "tx submitted" and an explorer link. A "pending / confirming on Bango L1" state would require listening to the protocol's events or a small backend that tracks message delivery. I'd add that for a v2.
Wrapping Up
So that's Bango Payments in a nutshell: a small bridge product that gets your tokens from Avalanche to Bango L1 so you can use them in the Bango app, with the heavy lifting done by ICTT — home contract on Avalanche, remote contract on Bango, and one send() call with the right parameters. The fun part for me was making that feel like a single, coherent flow (login → confirm → bridge) instead of a generic "paste address and hope" bridge.
If you're into cross-chain stuff or building on Avalanche, I'm happy to go deeper on any part — the contract ABIs, the config shape, or the front-end flow. Drop a message; I'd love to hear what you're building too.
Tech stack (for the curious): Next.js 15, React 19, TypeScript, Tailwind, Wagmi v2, Viem, Reown AppKit (WalletConnect), TanStack Query. Server Actions for Bango API and DexScreener; cookie-based auth for "login with Bango."
Like this project
Posted May 21, 2026
Developed Bango Payments, a cross-chain bridge facilitating token transfers between Avalanche C-Chain and Bango L1.
Likes
0
Views
1