
RAG, or retrieval-augmented generation, is a technique for using external knowledge for additional context that passes into the large language model (LLM) to improve the model's accuracy and relevance. It’s a much more reliable way to improve the generative AI result than constantly fine-tuning the model.
Traditionally, RAG systems rely on user text queries to search the vector database. The relevant documents retrieved are then used as context input for the generative AI, which produces the result in text format. However, we can extend them even more so that they can accept and produce output in voice form.
This article will explore initiating the RAG system and making it fully voice-activated.
Building a Fully Voice-Activated RAG System
In this article, I will assume the reader has some knowledge about the LLM and RAG systems, so I will not explain them further.
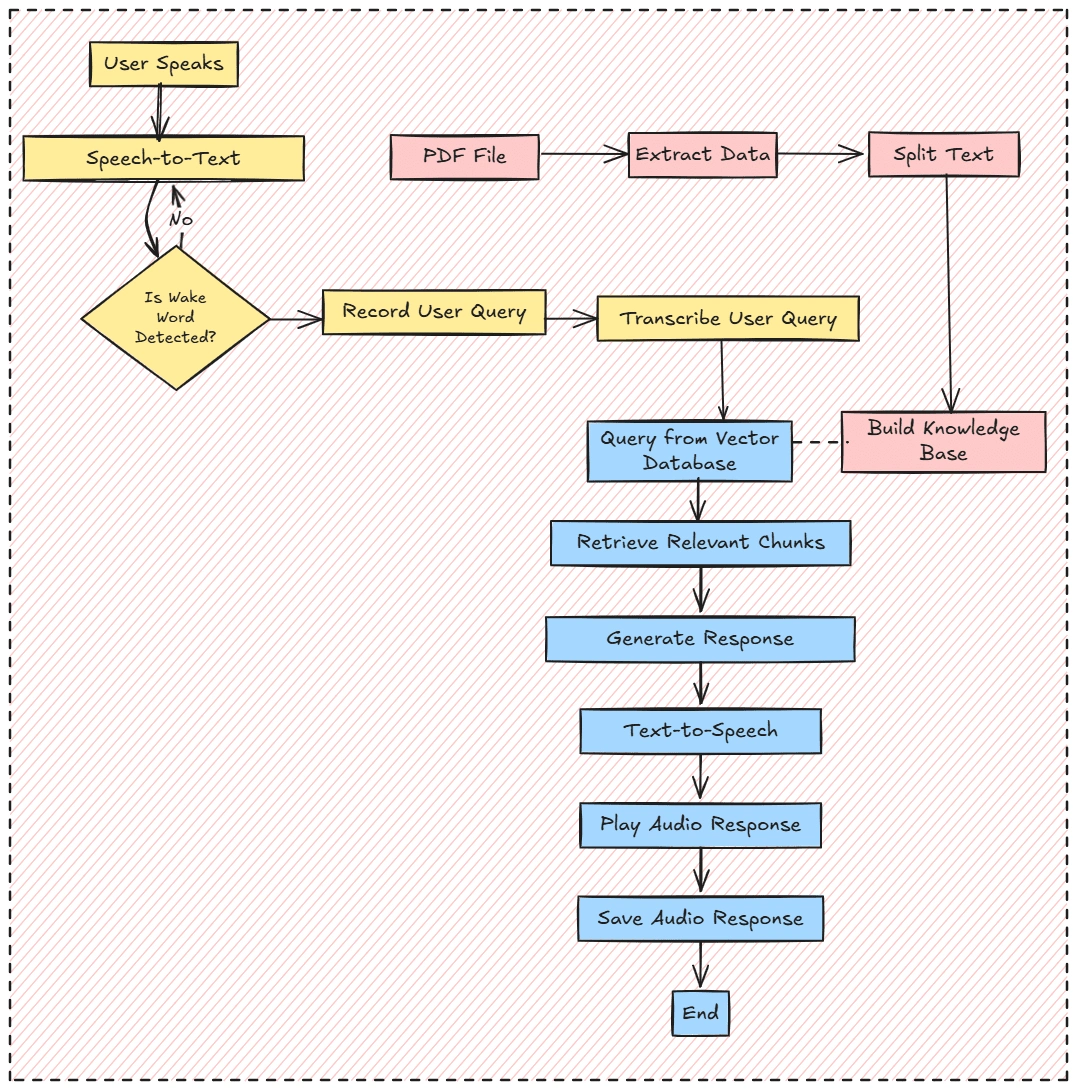
To build a RAG system with full voice features, we’ll structure it around three key components:
Voice Receiver and Transcription
Knowledge Base
Audio File Response Generation
Overall, the project workflow will follow the image below.
If you are ready, let’s get started to prepare all we need for this project to succeed.
First, we will not use the Notebook IDE for this project, as we want the RAG system to work like things in production. Therefore, a standard programming language IDE such as Visual Studio Code (VS Code) should be prepared.
Next, we also want to create a virtual environment for our project. You can use any method, such as Python or Conda.
With your virtual environment ready, we must install all the necessary libraries for this tutorial.
If you have GPU access, you can also download the GPU version of the PyTorch library.
With everything ready, we will start building our voice-activated RAG system. The project repository containing all the code and dataset is in this repository.
We will start by importing all the necessary libraries and the environmental variables with the following code.
All the variables will be explained when it’s used in their respective code. For now, let’s just keep it as it is.
After we import all the necessary libraries, we will set up all the functions necessary for the RAG systems. I will break it down individually so you can understand what happened in our project.
The first step is to create a feature to record our input voice and transcribe the voice into text data. We will use the sound device library for audio recording, and for audio transcribing, we will use OpenAI Whisper.
The above functions will become the foundation for accepting and returning our voice as text data. We will use them multiple times during the project, so keep it in mind.
We will create an entrance feature for our RAG system with the functions to accept audio ready. In the next code, we create a voice-activation function before accessing the system using
WAKE_WORD. The word can be anything; you can set it up as required.The idea behind the voice activation above is that the RAG system is activated if our recorded transcribed voice matches the Wake Word. However, it will not be feasible if the transcription needs to match Wake Word exactly, as the possibility of the transcription system producing the text result in a different format is high. We can standardize the transcribed output for that. However, for now, I have an idea to use embedding similarities so the system is still activated even with slightly different word compositions.
By combining the
WAKE_WORD and SIMILARITY_THRESHOLD variables, we will end up with the voice activation feature.
Next, let’s build our knowledge base using our PDF file. To do that, we will prepare a function that extracts text from the file and splits it into chunks.You can replace the chunk size with your intended. There are no exact numbers to use, so experiment with them to see which is the best parameter.
The chunks from the function above will then be passed into the vector database. We will use the ChromaDB vector database and SenteceTransformer to access the embedding model.
Then, we need to prepare the generation feature to complete the RAG system. In this case, I will use the Qwen-1.5.-0.5B-Chat model hosted in the HuggingFace. You can tweak the prompt and the generation model as you please.
Lastly, the exciting part is transforming the generated response into an audio file with the text-to-speech model. For our example, we will use the Suno Bark model hosted in the HuggingFace. After generating the audio, we will play the audio response to complete the pipeline.
That’s all the features we need to complete the fully voice-activated RAG pipeline. Let’s combine all together to make a cohesive structure.
I have saved the whole code in a script called app.py, and we can activate the system using the following code.
Try it yourself, and you will acquire the response audio file that you can use to review.
That’s all you need to build the local RAG system with voice activation. You can evolve the project even further by building an application for the system and deploying it into production.
Conclusion
Building an RAG system with voice activation involves a series of advanced techniques and multiple models that work together as one. By utilizing retrieval and generative functions to build the RAG system, this project adds another layer by embedding audio capability in several steps. With the foundation we have built, we can evolve the project even further depending on your needs.
0 likes · 20 views · Feb 28, 2025
This article will explore initiating the RAG system and making it fully voice-activated.


