Upgrading to Nuxt 3: Strategies for Micro-Frontend Architecture…
Micro-Frontend Migration Approaches: From Nuxt 2 to Nuxt 3

Photo by Simon Berger on Unsplash
Reasons
There is a new version of Nuxt available (Nuxt 3) that is handier and requires less configuration
Nuxt 3 requires Vue 3
Both of these improve DX and maintainability over time
Last and more important: Vue 2 will no longer receive support from version 7
Content
The Architecture
The Problem
The Strategy
The Workflow
Other Considerations
The Architecture
Let’s see what we have:
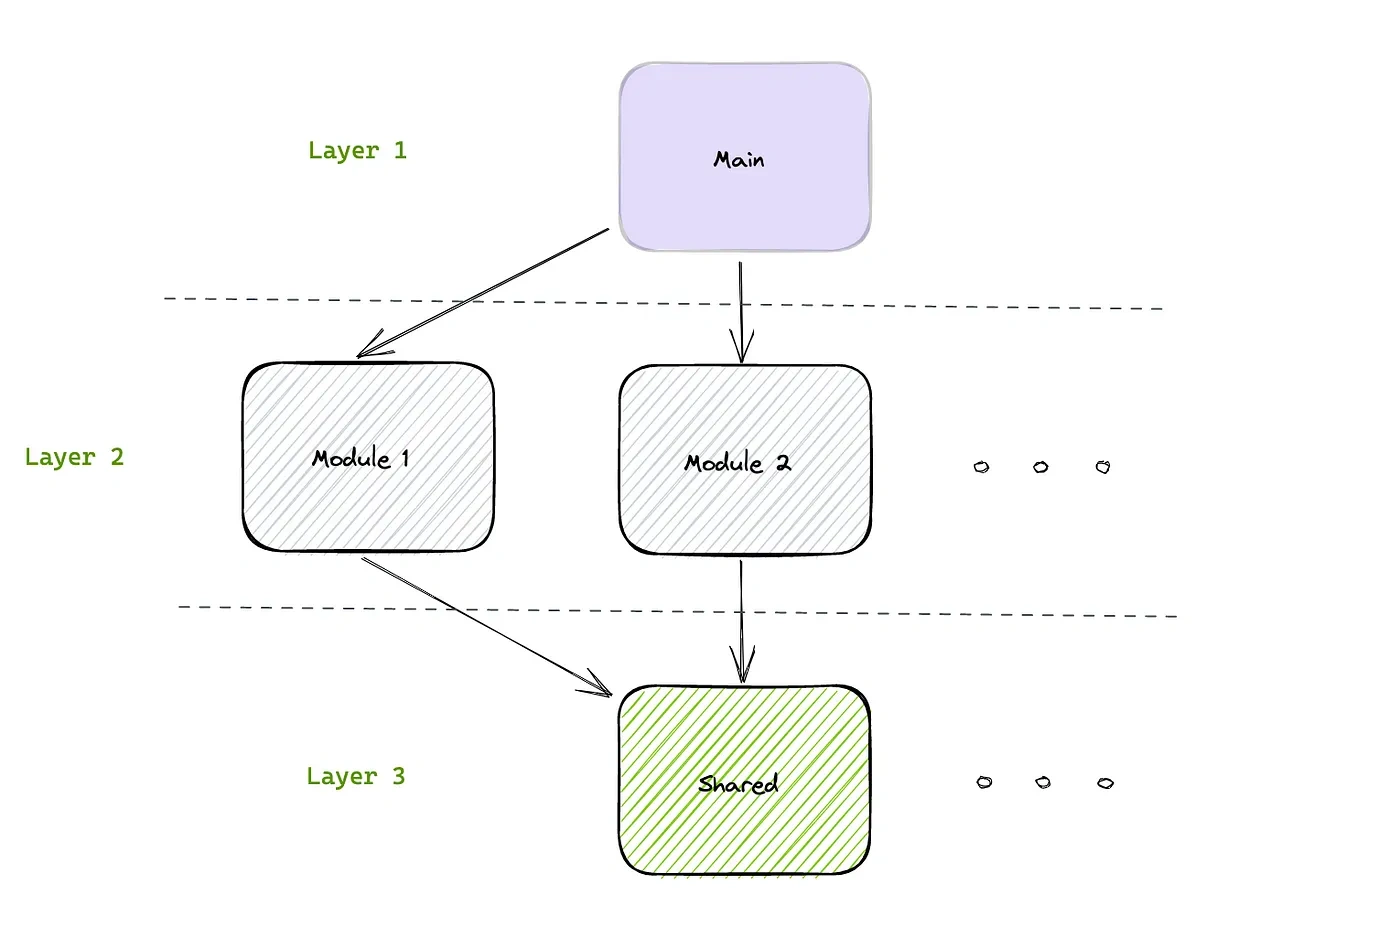
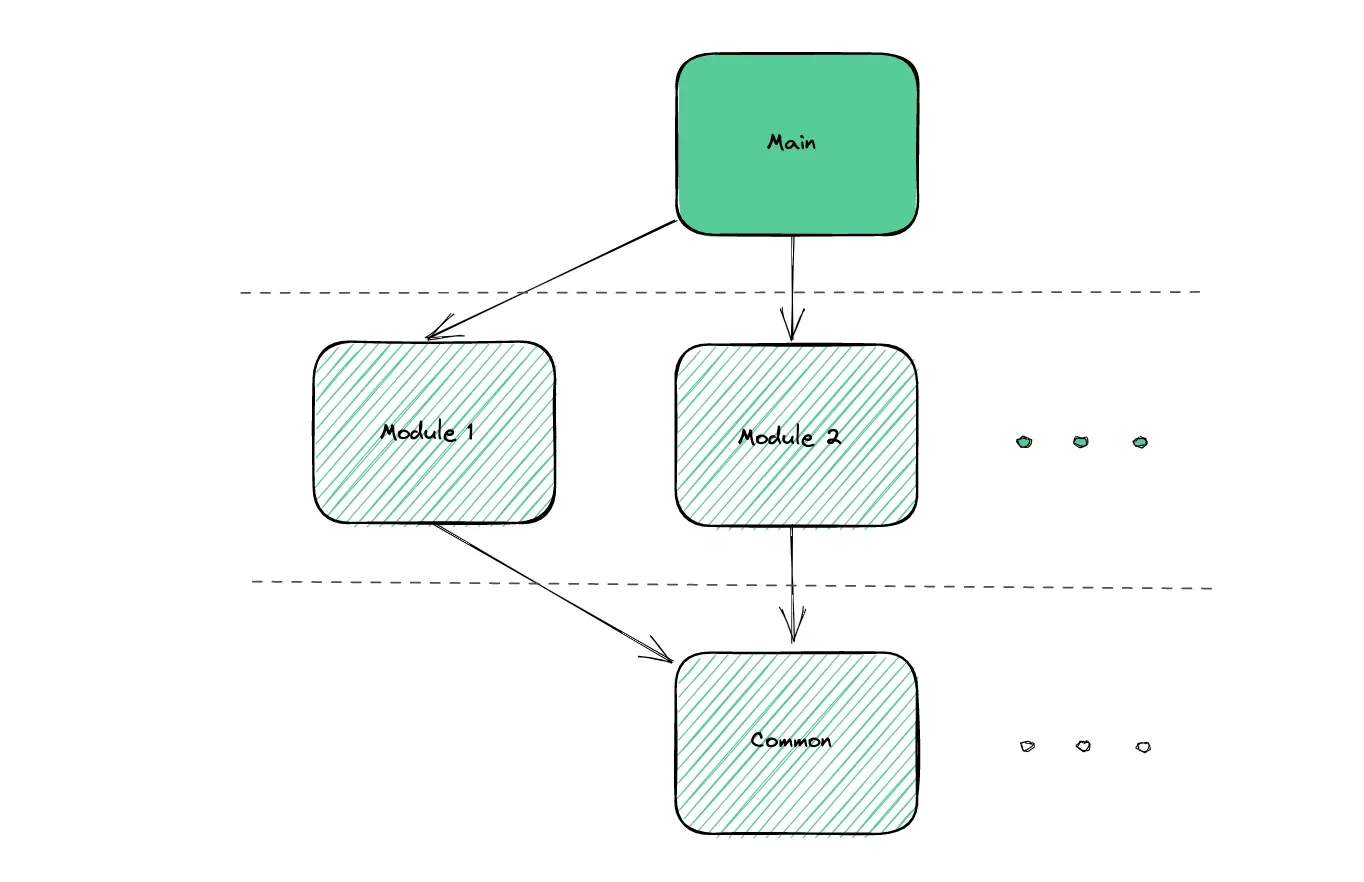
Layer 1 or Main Layer, Layer 2 or Module Layer, and Layer 3 or Shared Layer
This is a pretty common micro-frontend distribution, consisting of 3 layers:
Layer 1 or Main Layer exposes modules through a single window to the user.
Layer 2 or Module Layer contains different domains or modules from our application, payments, blogs, and so on.
Layer 3 or Common Layer is responsible for sharing reusable code within modules. Here we can find our Design Systems and cross-module utilities, for example.
In our particular case, our main repository exposes modules to the rest of the world and contains our internal APIs using Vue 2 and Nuxt 2, the other repositories are normal Vue 2 SPAs (Single Page Applications).
We use Module Federation (MF), to share and consume code between repositories using a “remote” and “host” pattern where the remote exposes code, and the host uses it as if it were from itself.
The Problem
Although Module Federation discloses a huge potential it also offers a weakness: it leads us to a tightly coupled micro-frontend architecture:
If we update a common dependency between any repository we could break the whole app 🫠🤯
This is true especially when using different versions of Vue as we move from version 2 to version 3.
The Strategy
So let’s see the options we have:
Expose components in the remote as Web Components, so the host receives it as native and framework-independent code.
Upgrade to Vue 3 and use a compatibility package that supports Vue 2 code inside of it.
Web Components Advantages:
make it easier for future updates not having to write Web Component configuration once again
allows upgrading repositories in Layers 2 and 3 without a specific order
allows using different frameworks if needed
Although the first option sounds promising, components lose their styles when we share web components made on Vue 2 (See example). On the other hand, a compatibility package just works and it’s doable if we implemented it from top to bottom in our architecture, otherwise, we end up exposing Vue 3 components inside Vue 2 repositories which isn’t allowed.
Vue 3 app supporting Vue 2 code using a compatibility package
Note: Vue 3 solved the styles problem and this option shouldn’t be discarded for future upgrades
That being said the process should be divided into 2 stages:
Stage 1
Use the compatibility package in every repository from top to bottom
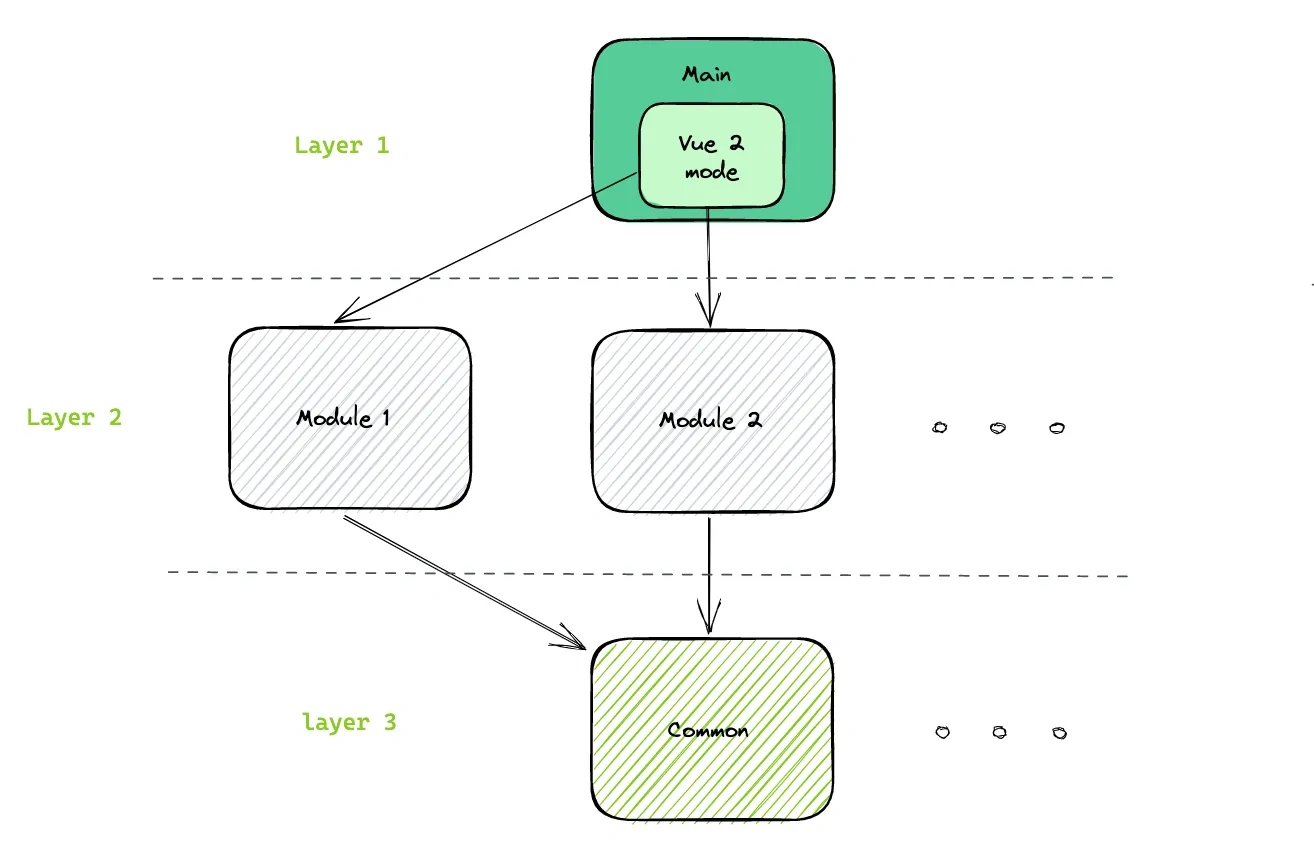
Use the compatibility package and fix errors in Layer 1
Use the compatibility package and fix errors in each repository on Layer 2
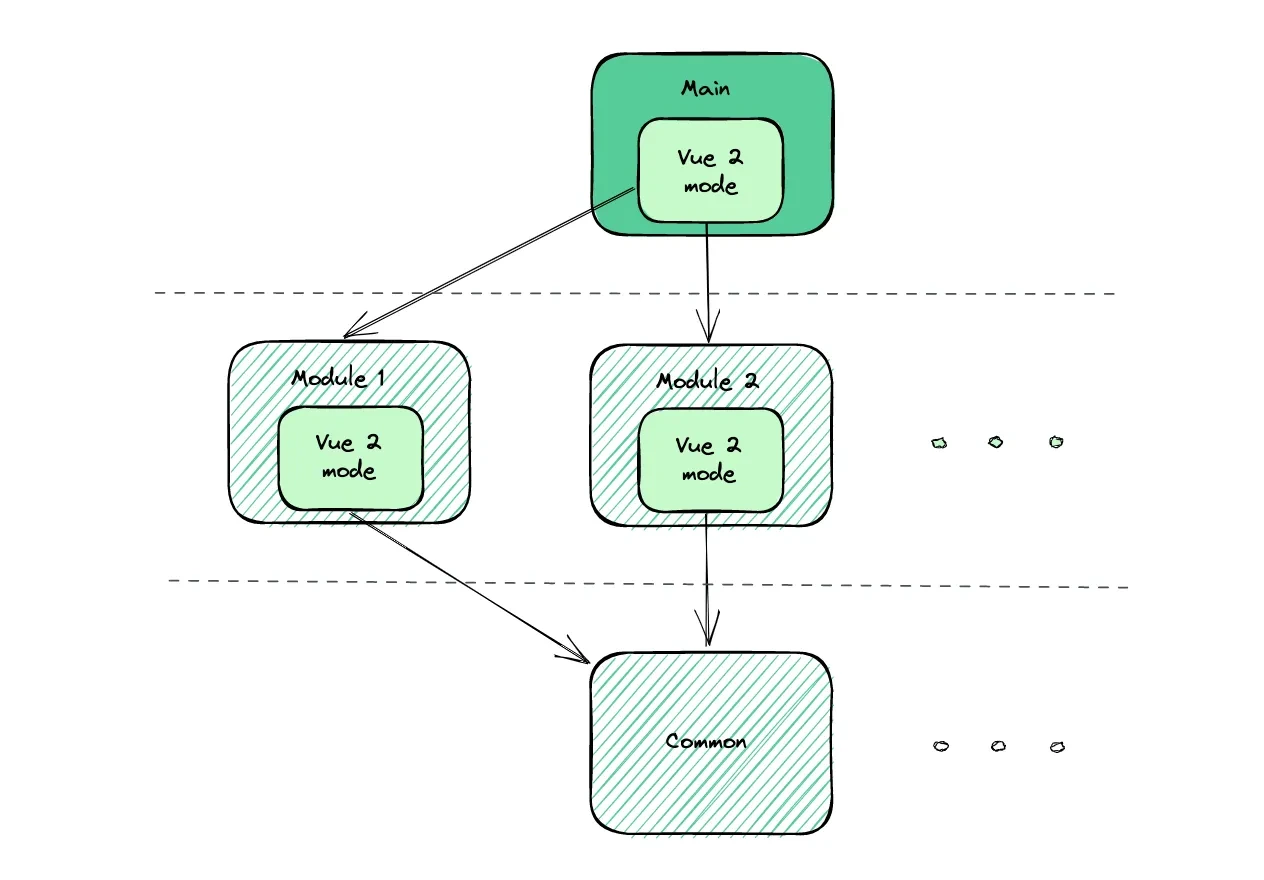
Upgrade repositories in Layer 3 to Vue 3 (doesn’t require compatibility package)
Stage 2
Upgrade the repositories from bottom to top to Vue 3 style and remove the compatibility packages once it’s not required
Upgrade each repository in Layer 2 and remove the compatibility package
Remove the compatibility package in Layer 1
The Workflow
At the same time we work in the migration process we should allow a continuous workflow for other teams to work on their normal tasks, once again we have 2 options:
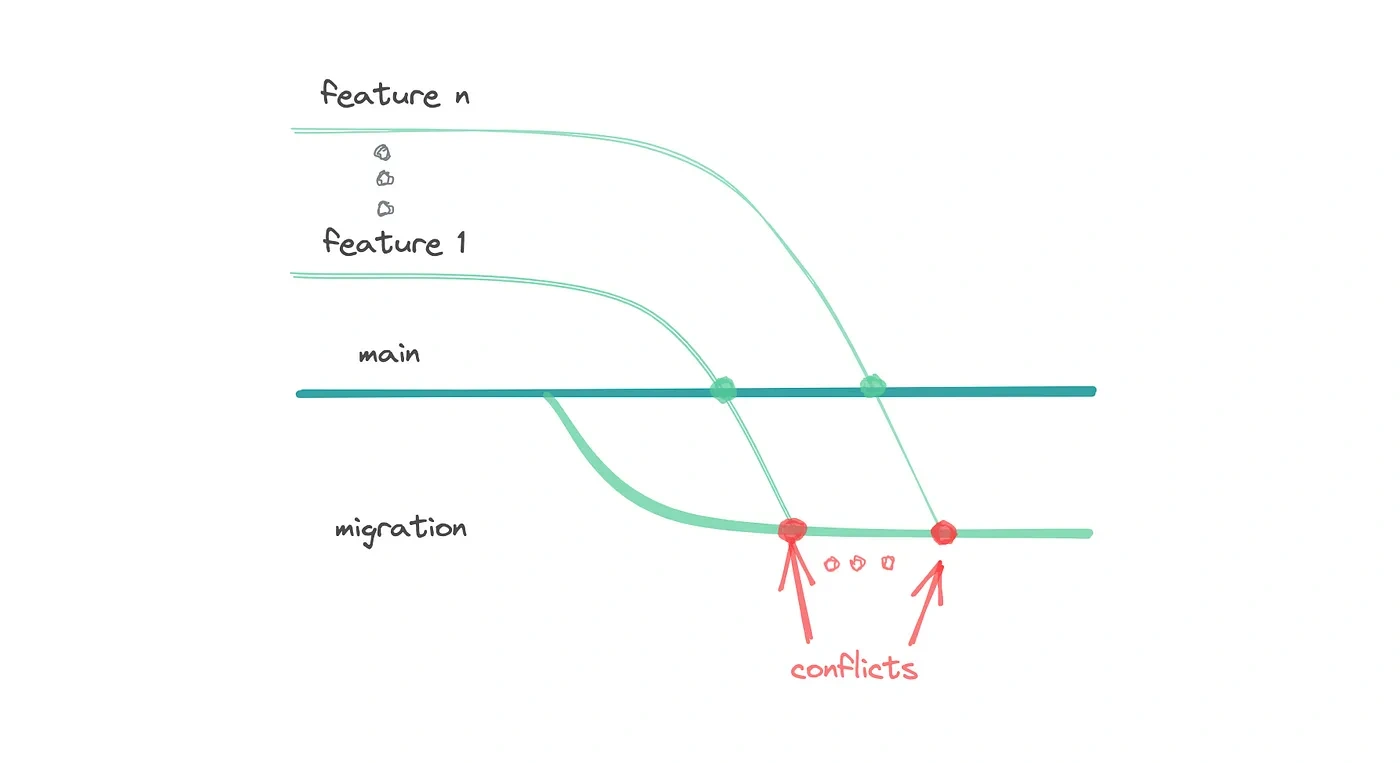
make the migration inside the current repository through a new branch
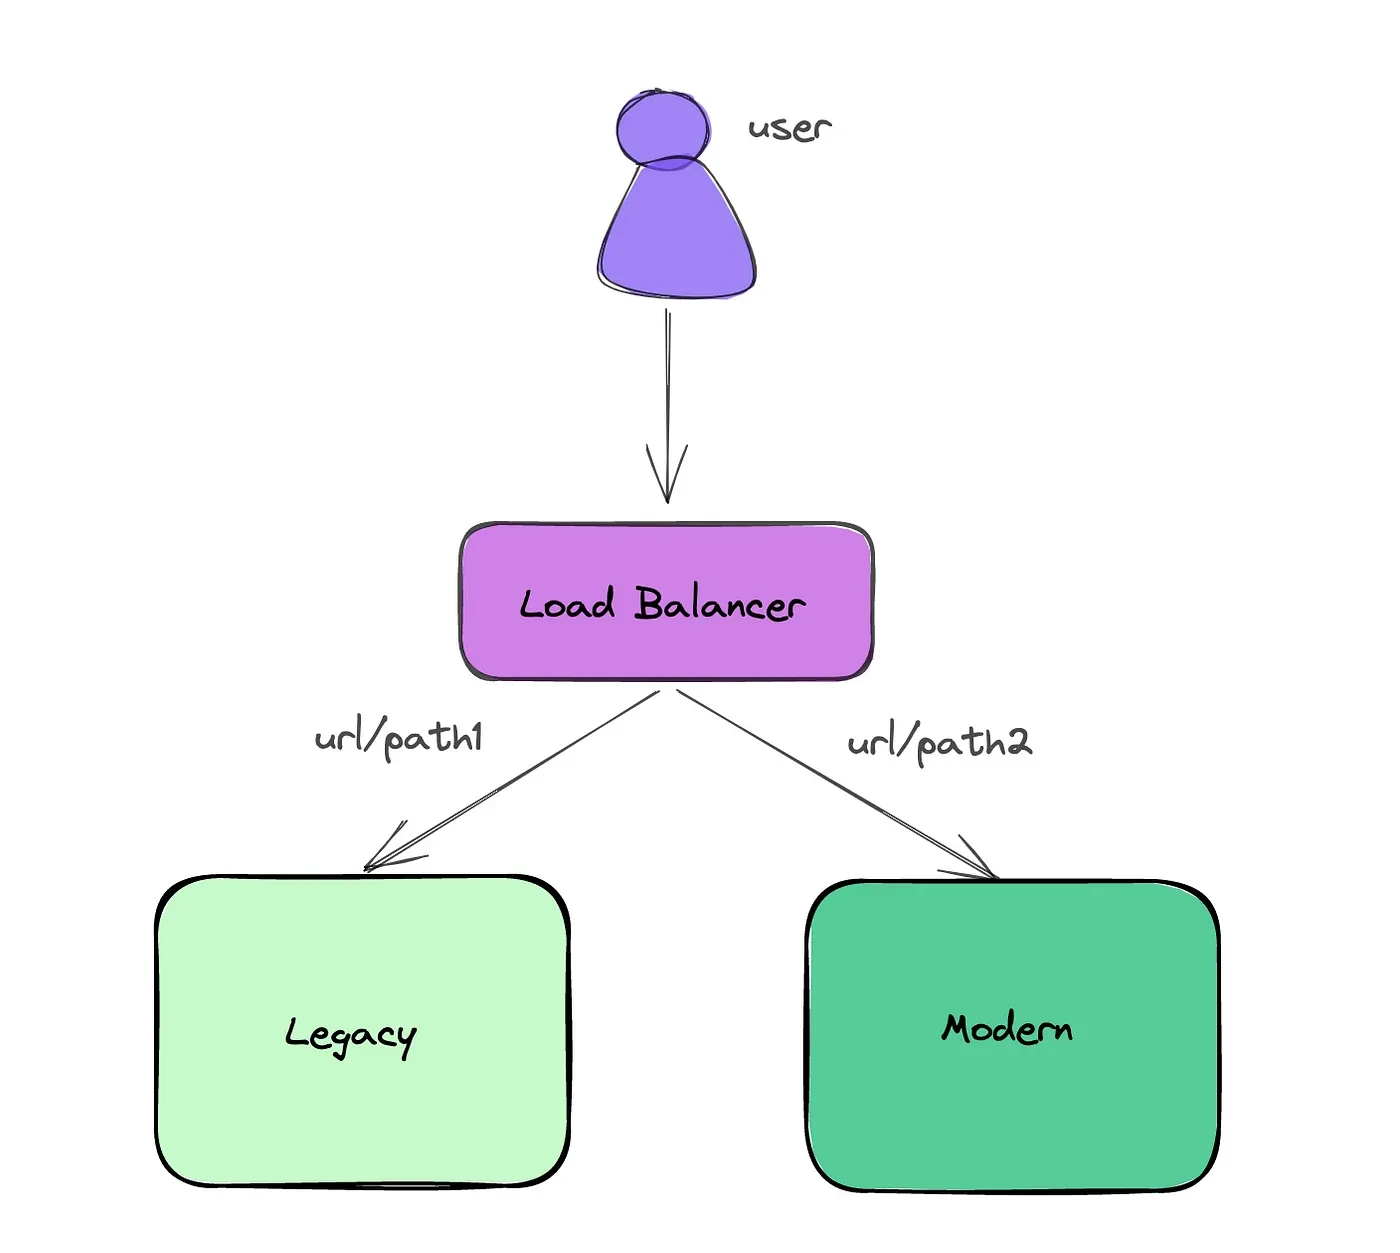
make a new repository and migrate progressively our code
First Approach
Advantages
Doesn’t require building a new infrastructure because we are using what we have
Disadvantages
as other teams introduce features we are prone to invest a decent amount of time in resolving conflicts when we pull them to our migration branch
we test if it works only when we merge our branch at the end
we are isolated from other team’s work
In summary, it’s suitable for small projects: when dependencies are few and teams are small.
Second Approach
Advantages:
when we move code to the new repository we remove it from the old one reducing the number of conflicts
increase collaboration: other teams can accomplish their tasks in the new repository
we quickly ensure that our new repository is working because we are using it in parallel with the old one
Disadvantages
requires a reverse proxy to point to the old or the new repository
requires building a new automatic pipeline for the new repository
developers should use 2 repositories for the same project
In summary, it’s suitable for medium to large projects: when dependencies and teams are many.
In our case, we are multiple teams working through the whole architecture and we already have a reverse proxy implemented, so the additional effort would be building a new pipeline for the new repository, and for that reason, this is our way to go.
Other Considerations
Bundler
We use Webpack 5 in all our repositories but at this time the information on the web is scarce on how to use it in a Nuxt 3 app. Because Vite is the default and offers a better Developer Experience we choose this one.
Node Version Update
We are currently using Node 14 but Nuxt and Vue 3 require version 16 or higher, we are going to use version 18.
Conclusions
As we are a medium size team and we use a lot of dependencies within our app we decide to:
Use a compatibility package to update our code
Create new repositories to migrate progressively and collaboratively
In the process upgrade our node version and replace Webpack with Vite
Build Apps with reusable components, just like Lego
Bit’s open-source tool help 250,000+ devs to build apps with components.
Turn any UI, feature, or page into a reusable component — and share it across your applications. It’s easier to collaborate and build faster.
Split apps into components to make app development easier, and enjoy the best experience for the workflows you want:
Learn more:
Like this project
Posted Nov 12, 2024
Upgrading to Nuxt 3: Strategies for Micro-Frontend Architecture and Workflow Optimization
Likes
0
Views
200
Clients

Morningstar


