The Complete Guide to Shopify Integration on Uphance
Linking your Uphance account to your Shopify store enables you to:
Connect your Uphance product SKUs to your Shopify variants to sell available inventory online.
Jumpstart your Uphance product setup by uploading basic product, variant, and SKU data from Uphance to Shopify.
Automatically sync your Available To Sell (ATS) inventory levels from Uphance to Shopify as a result of updates within your Uphance account.
Reduce your inventory counts in Uphance as a result of new orders on your Shopify store.
How it works
After connecting your Uphance account to your Shopify store, you'll have the option to link your Uphance product SKUs to Shopify variants.
For products in Uphance and Shopify that are "linked" the inventory levels in Shopify can be kept up-to-date with inventory levels in Uphance, allowing you to sell your excess inventory through your online store.
Uphance also monitors sales that are made on your Shopify store to reduce inventory levels in Uphance appropriately.
Connecting to Shopify
Connecting to your Shopify allows real-time data sync between Uphance and your Shopify retail stores for your products. Your Uphance and Shopify retail "available to sell inventory" will be linked so that when they are received from your supplier they will be reflected in Shopify. Before the links can be set up, you will need to enable the "Shopify Connection".
You can manage the connection between your Uphance account and your Shopify store from the Shopify integration settings page within Uphance under Apps>My Apps>Shopify.
Make sure you are signed in to your organization owner’s Uphance account.
Navigate to Apps from your Uphance dashboard.
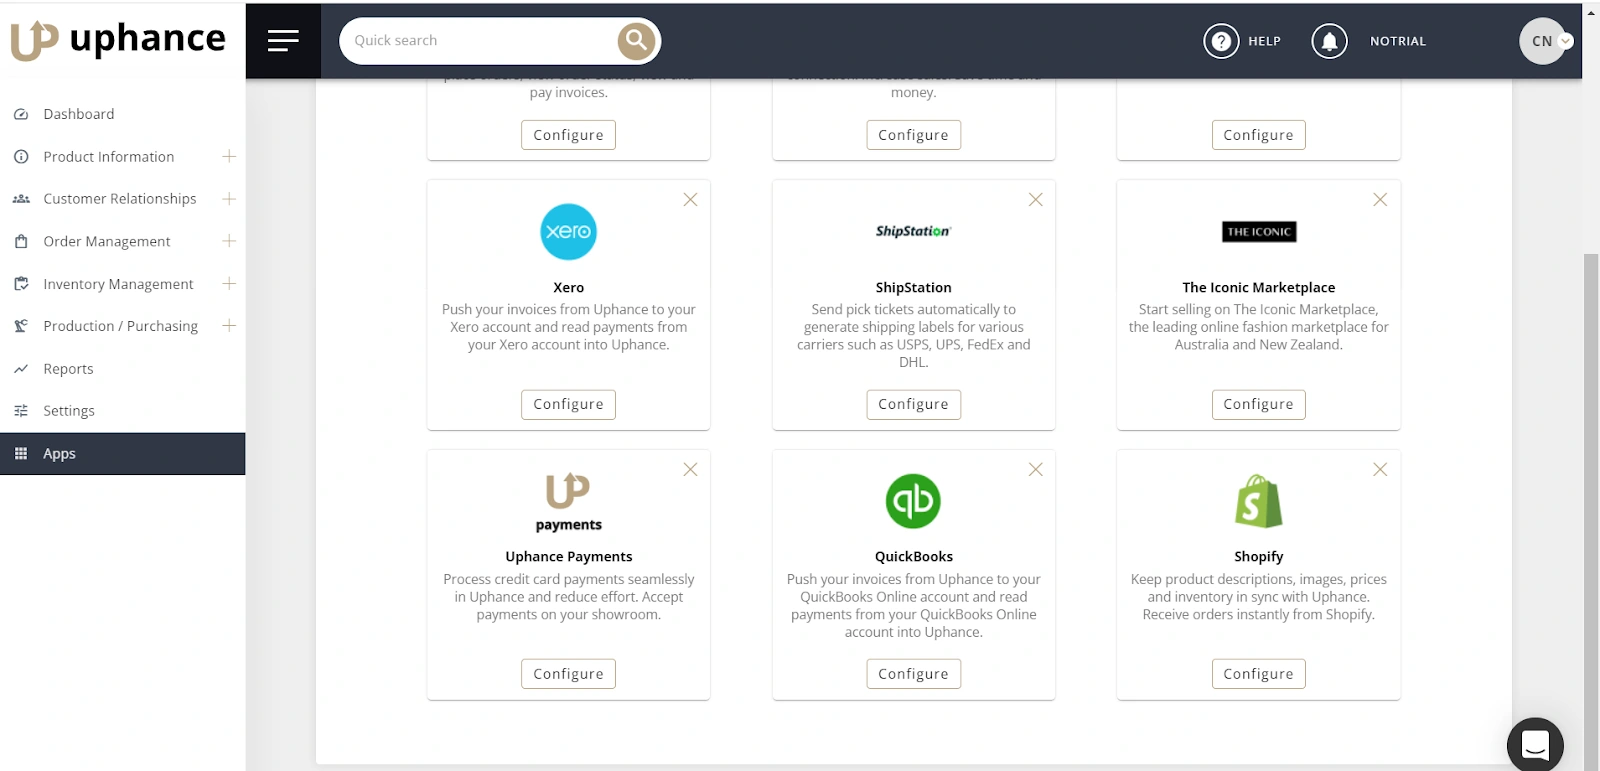
Click the Add button if this is the first time you’re integrating Shopify. If you have already installed the Shopify app, click Configure.

Click Add store or Add another store to set up your Shopify store.
Enter the first part of your Shopify store URL in the Your Shopify store name field. As shown above, the URL for our store is https://demobrand.myshopify.com/. For this illustration, we typed “demobrand” and the rest is completed for us.
Enter a "Friendly store name" which is what will identify your store on the top tabs if you have more than one.
Click the "Connect to Shopify" button.
You will be redirected to Shopify pages. Please follow their on-screen instructions to log in to your Shopify account and completely integrate it with Uphance.

If you have more than one retail store to sync to, click "Add another store" on the tabs at the top. This will allow you to customize set-up profiles for each store if they are different (e.g. product delivery from different warehouses, different order fulfillment strategies, etc.).
To access and "manage" your Shopify store, you would enter the full URL in your browser followed by /admin: https://demobrand.myshopify.com/admin.
Additional Configurations
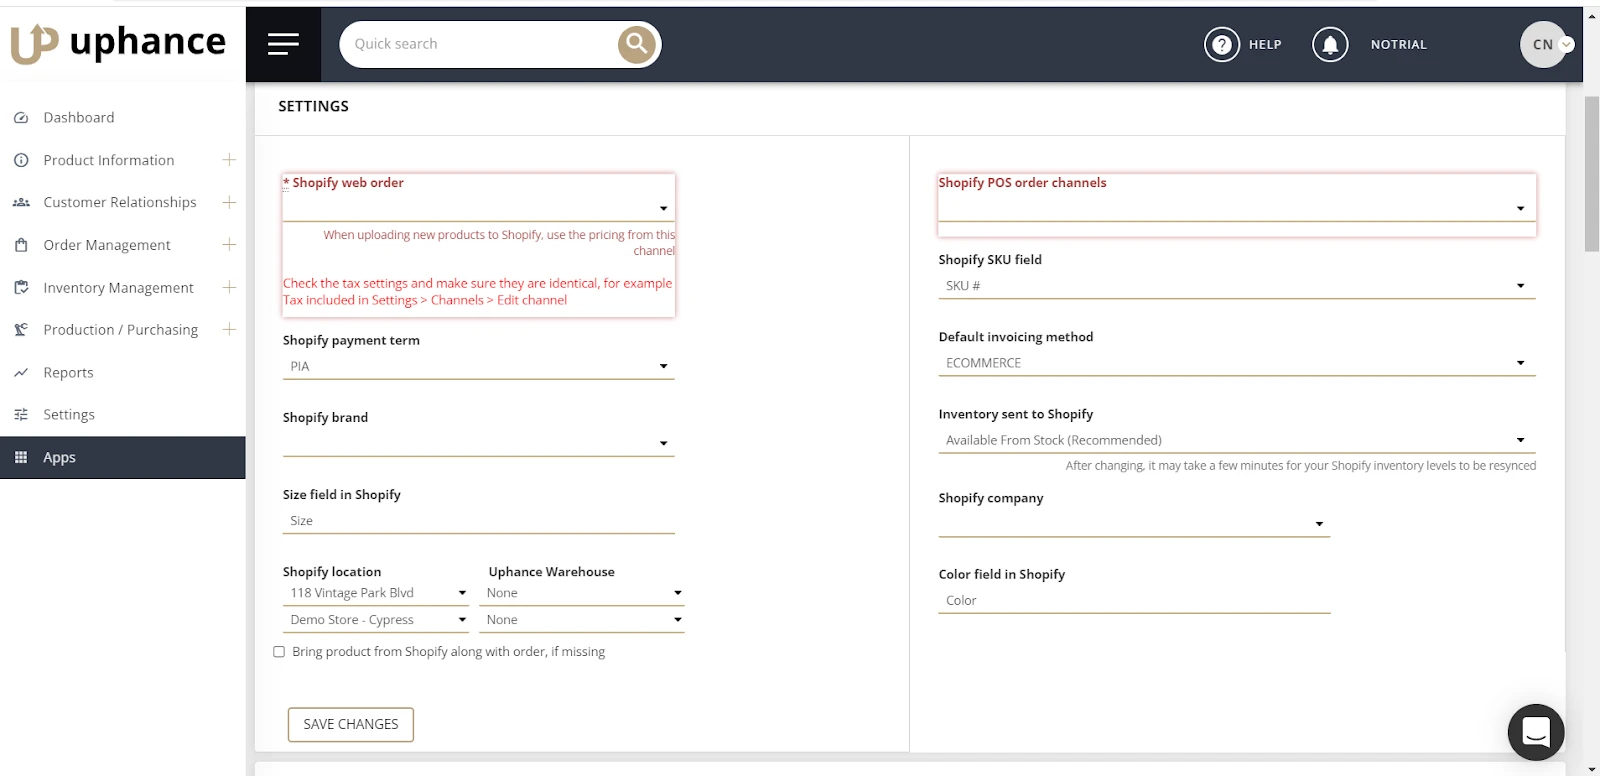
There are many settings within the Shopify Configuration screen. These play a significant part in how your orders and inventory will be handled. We will discuss each of these configuration settings individually and the impact they could have on your business processes.
Order fulfillment
Order fulfillment on Uphance can be automated and seamless when you integrate Shopify with Uphance. However, you’ll need to ensure that your Shopify location is correctly configured and assigned to the right warehouse.

To do this;
Navigate to Apps from your Uphance Dashboard.
Scroll to the Shopify App and click Configure.
From the configuration page, scroll to the Settings tab.
From the Settings tab, select Shopify Location, and the corresponding warehouse where orders should be fulfilled from.
In Uphance
Sales Orders and Customers (including new ones) that are created in Shopify are automatically created for you in Uphance. Uphance will display the order on your Sales Order screen with a green icon next to it so that you will know it is a Shopify order.
In addition, as soon as the order comes in, Uphance will create an invoice and payment (marked as paid). Order Totals are always taken from Shopify.
Uphance will automatically reduce your available quantity as soon as your order is received. However, Uphance waits for you to submit the shipping (Pick and Pack) within Uphance before assuming the order is fulfilled and reducing the quantity in stock.
Payment Terms
All sales orders from Shopify should have PIA (payment in advance) default payment term, enabling Uphance to confirm the order automatically. If the default payment term is not set to PIA for the customer in Uphance, the Sales Orders will be received in Uphance as a Draft Sales Order.
In addition, if the customer has a Default payment term chosen in Payment Terms within their profile, it will be applied to the Shopify order pulled to Uphance via the Pull Orders button within the Settings>Integrations>Shopify page.
Please see our Knowledge Article on Customer Profiles and Invoices & Payment Terms for more information on Default Payment Terms for customers. If your customer's profile is created in Shopify, it will be pulled into Uphance when you place the first order. Then, you may edit the user's profile within Uphance to set their default payment term.
Quantity to sync to Shopify
This is the quantity level to sync to Shopify. Usually, you will want to leave this as the default setting, "Available to sell from stock" (described in Manage Shopify Inventories).
Shopify pricing channel
If you use Uphance to quickly upload a new product to Shopify, prices for the product will be taken from this channel. This setting is not involved in the automatic update of inventory levels. For additional information see the Uphance Knowledge Article on Channels.
Uphance Warehouse
Select which Warehouse you want products delivered from to your retail store. For additional information see Uphance documentation on Multiple Warehouses.

Shopify Locations (Warehouse Mapping)
Specify which Shopify location is associated with this Retail Store configuration.

Color and Size
Specify the name of your Color and Size fields within your Shopify system. These are the fields that Uphance will update and link with your SKUs and variations.
Next Steps
Now that your Uphance account is connected to your Shopify store, you can proceed to link your individual products so that Uphance knows how to keep ATS inventory levels in sync.
If this is your first time syncing with Uphance, you can perform bulk uploads of your products into Uphance and then manually update the links. Or, if you do not have products, we recommend creating the products in Uphance and pushing them to your Shopify store.
Linking Uphance and Shopify products
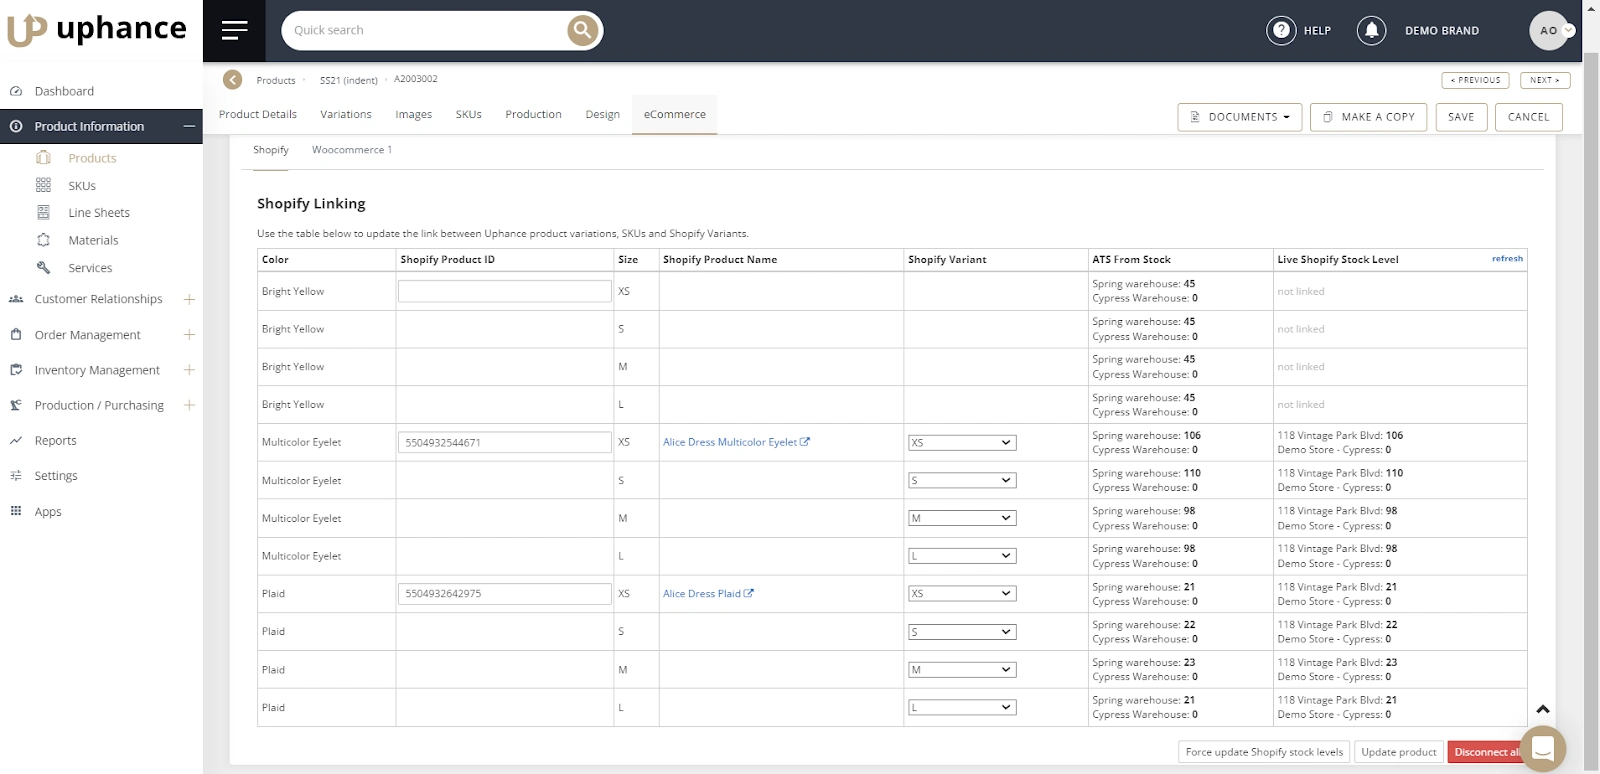
Uphance will only keep inventory levels in sync for Uphance SKUs that are "linked" to Shopify product variants. You can link up existing Uphance products to Shopify products or, if it's a new product that you haven't yet entered manually into Shopify, you can upload the basic product details from Uphance to Shopify. Both of these operations can be accomplished by navigating to the product details page and clicking the eCommerce tab at the top of the page. Then, select the "Shopify" tab.
SKU and Variants
Each Uphance product variation can be linked to a particular Shopify product. If you have several products in your Shopify store that is represented by a single product in Uphance, you can link them by entering a different Shopify product ID for each Uphance product variation.
Choosing Your Strategy For Linking Orders
If you have products already created within your Shopify, you can link them to your Uphance account and "pull" your data over. While Uphance makes every effort to link these products to the appropriate variant, there may be some manual work required to get them set up.
However, if you have not yet created your product in your Shopify store, we recommend creating them within Uphance first and "pushing" them to Shopify for these two primary reasons:
Uphance serves as the central hub of activity for your products, housing rich content that can be published to the showroom, which is your B2B eCommerce platform, or to your retail eCommerce store on Shopify. With Uphance, you can manage all your content in one place and distribute it quickly and efficiently to your other platforms without duplicating efforts. In addition to detailed formatted descriptions, you can now host and publish multiple images per product variation with Uphance.
You can design and develop your products in Uphance long before you are ready to sell. It will allow you to add your raw materials, costing, etc. during the product setup phase. Once the product is designed, you can sell wholesale using samples. Then you'll produce/manufacture and much later make the products available for retail sale on Shopify.
Push Strategy
Uploading a new product to Shopify
If you haven't yet added the product to Shopify, you can start the process quickly by uploading the product from Uphance to Shopify. This will create a new product in Shopify with the correct product options and variants linked to each SKU within Uphance.
After uploading, you can finish setting up the product in Shopify and remove any variants that aren't intended for sale.
To upload a product from Uphance to Shopify:
Navigate to the product details page within Uphance by scrolling to the Product Management tab on the left-hand side of your dashboard and clicking Product Information.
Click Products from the drop menu.
Click the eCommerce tab.
Select the Shopify tab.
Click the "Upload product to Shopify" link.
When creating the product, only active variations will be sent to Shopify. If you have already linked your Uphance products to Shopify, you can make updates by;
Navigate to Product Information from your Uphance dashboard.
Click Products from the drop menu.
Click the Shopify tab in the top section of the page.
Make your changes to any of the existing products.
Scroll to the bottom of the page and click Force update Shopify stock levels, or Update products.
Pull Strategy
Connecting an Uphance product to an existing product in Shopify
If you have existing products in Shopify, you can "link" them product to the matching product in Uphance.
To do so you will need to locate the product "ID" in Shopify. This can be done by navigating to the product in the Shopify admin area, then copying the number from your browser's address bar.
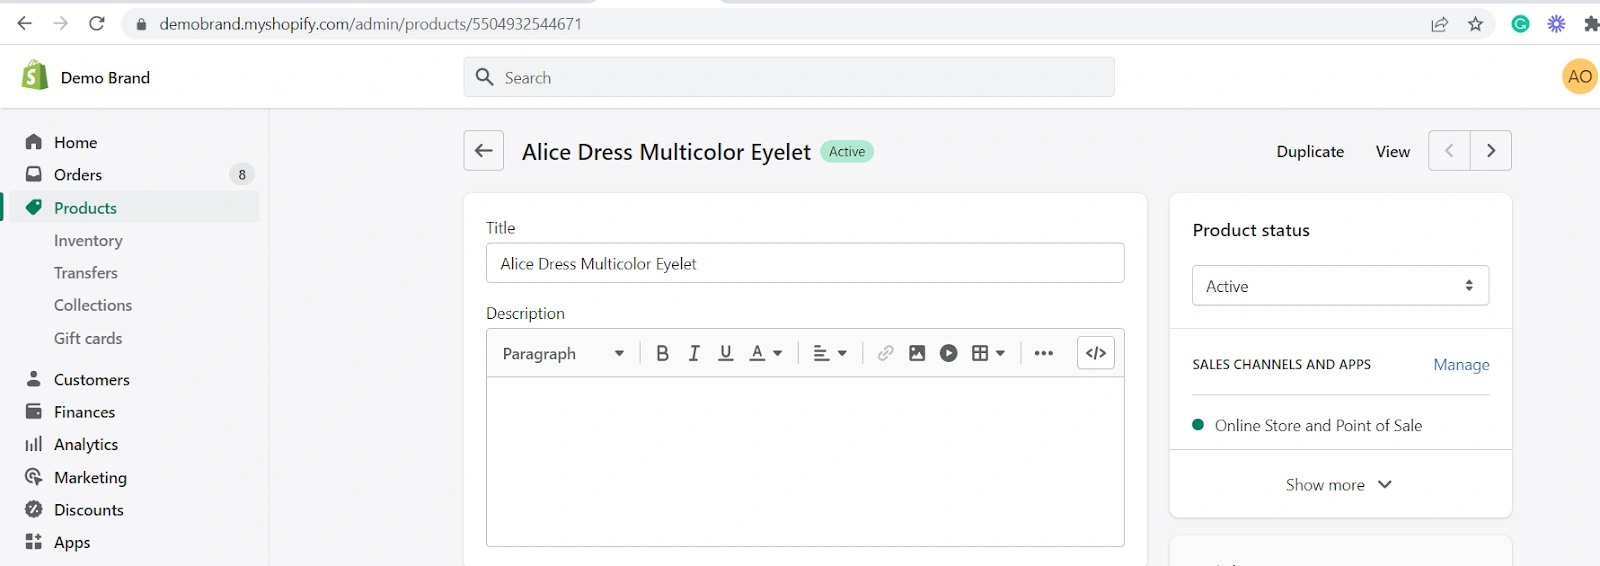
When you have this ID number, take the following steps to link the Uphance product to Shopify:
Navigate to the Product details page within Uphance by clicking Product Information from your dashboard and then selecting Products.
Click on the eCommerce tab.
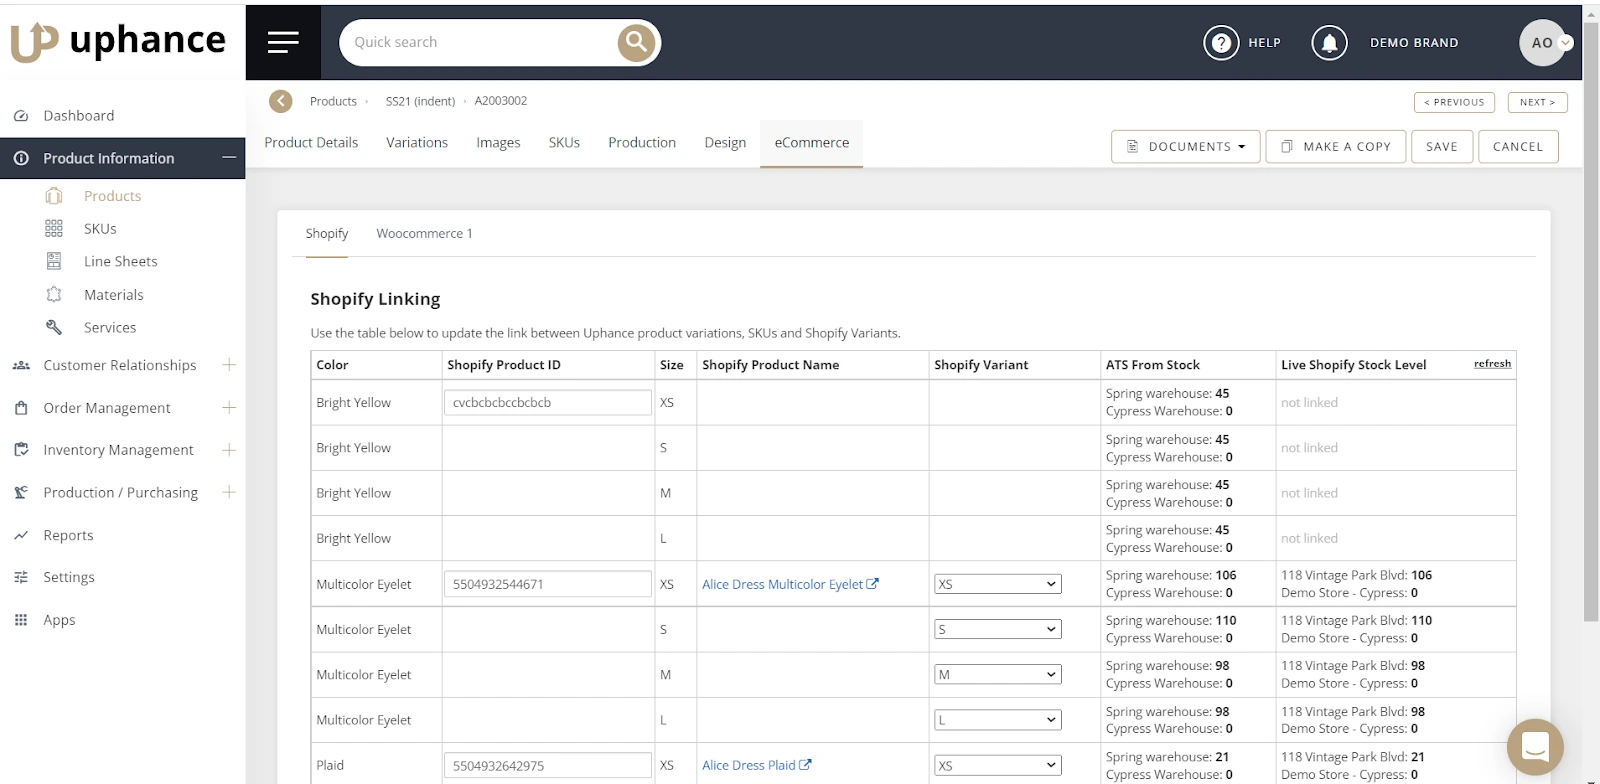
Click the Shopify tab at the top of the page.
Locate the specific product you’d like to update.
Click the Shopify Product ID section.
Paste the Shopify product ID into the text field.

Scroll to the bottom right of the page and click the Update Product button to successfully link the Uphance product with a corresponding Shopify product.

If inactive variations exist in Shopify, Uphance will not take any actions.
Uphance will inspect the product within Shopify and try to match the Shopify product variants to individual Uphance SKUs by color and size. If your colors and sizes are named differently within your Shopify store, Uphance won't be able to automatically link them and you'll need to manually select the correct Shopify variants using the drop-down menus.
NOTE: If you manually create your product within Uphance in order to link it, you may want to give the product the same name. Uphance allows you to manually type the name of your product and if you are naming it something different in your Shopify, you may not be able to recognize them when browsing through your Seasons/Collections in either system. See also "Bulk Upload".
If you have multiple Shopify products represented by a single product within Uphance, enter the first Shopify product ID using the steps above. Uphance will link all variations to the first Shopify ID, but you'll then be able to update each Uphance variation with the correct, individual Shopify product ID.
You will know they are both linked correctly when you see the ATS from the Stock quantity and Live Shopify Stock Level quantity correctly reflected for your product and variant instead of the words "not linked" as shown above.
Update Product
The Update Product button will update your images, descriptions, and variation data in Shopify.
Cover and Common images are not sent to Shopify for products that were created via the Create multiple products method.
Disconnect All
Click the Disconnect All button (Figure 2) to remove the link between that product and your Shopify account.
Not Connecting
If the product is not connected to Shopify, you will also get an on-screen prompt..
Managing Shopify Inventory
Available to sell (ATS) from stock
As you work within your Uphance account, inventory levels are constantly monitored and any changes are immediately synced to your Shopify account.
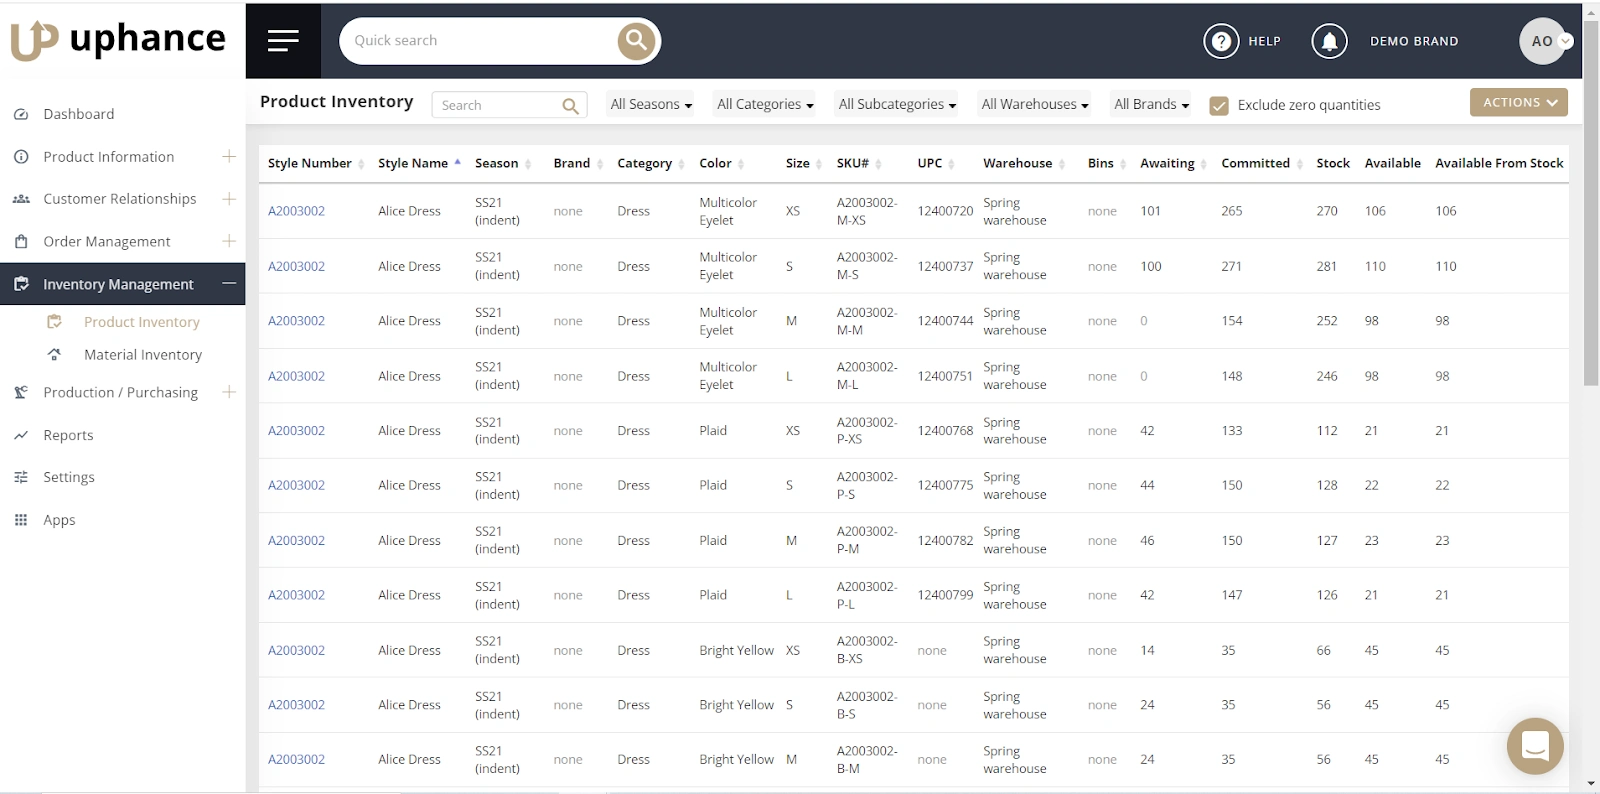
In Uphance, your excess inventory (not destined for any wholesale customer) is known as your "available" inventory. You can view these levels on the Available by SKU Report page.
Because "available" includes pending production (stock that you haven't yet received from your manufacturer), Uphance keeps track of an additional level, "available from stock" which doesn't include this pending production. This is the quantity you can immediately send to your online customers. You can view currently "available to sell from stock" levels on the Available from stock by SKU (available from stock) report page.
Essentially, the Available field shown on the Product's SKU tab is a calculated value. Available takes the Stock, adds in the Awaiting, and subtracts the Committed. (Available= Stock + Awaiting - Committed).
The Available from Stock field shown on the SKU tab is also a calculated value. Available from Stock takes the Stock and subtracts the Committed. (Available from Stock = Stock - Committed).
Alternatively, by editing your Shopify integration settings, Uphance lets you sync your entire in-stock quantities to Shopify. You may want to do this if you want to prioritize online orders over your wholesale order book. When you sell in this way, you may need to cancel or reduce quantities from wholesale orders before they are shipped. When you create pick tickets for wholesale orders, Uphance will tell you what is available in your inventory.
Incoming online orders
Uphance watches for new orders on your Shopify store and immediately adjusts inventory downwards for ordered products. Your "stock" inventory levels in Uphance will reduce and consequently the "available" inventory levels will also reduce.
You'll also be able to see a "Shopify Order" grouped inventory adjustment on the Update Inventory page, as well as individual (SKU level) adjustments in the inventory changelog.
Syncing Shopify Inventory Levels
From time to time, you may want to update (or re-sync) your inventory levels within Shopify. While these inventory levels should be real-time (immediate), there could be situations, albeit rare, where they may get out of sync for a wide variety of reasons.
If this is the case, you have the ability to manually sync your inventory levels.
Manually syncing inventory levels
You can manually copy your "available to sell from stock" inventory levels from Uphance to Shopify for a particular product:
Navigate to the product details page for your product within Uphance.
Click the eCommerce tab.
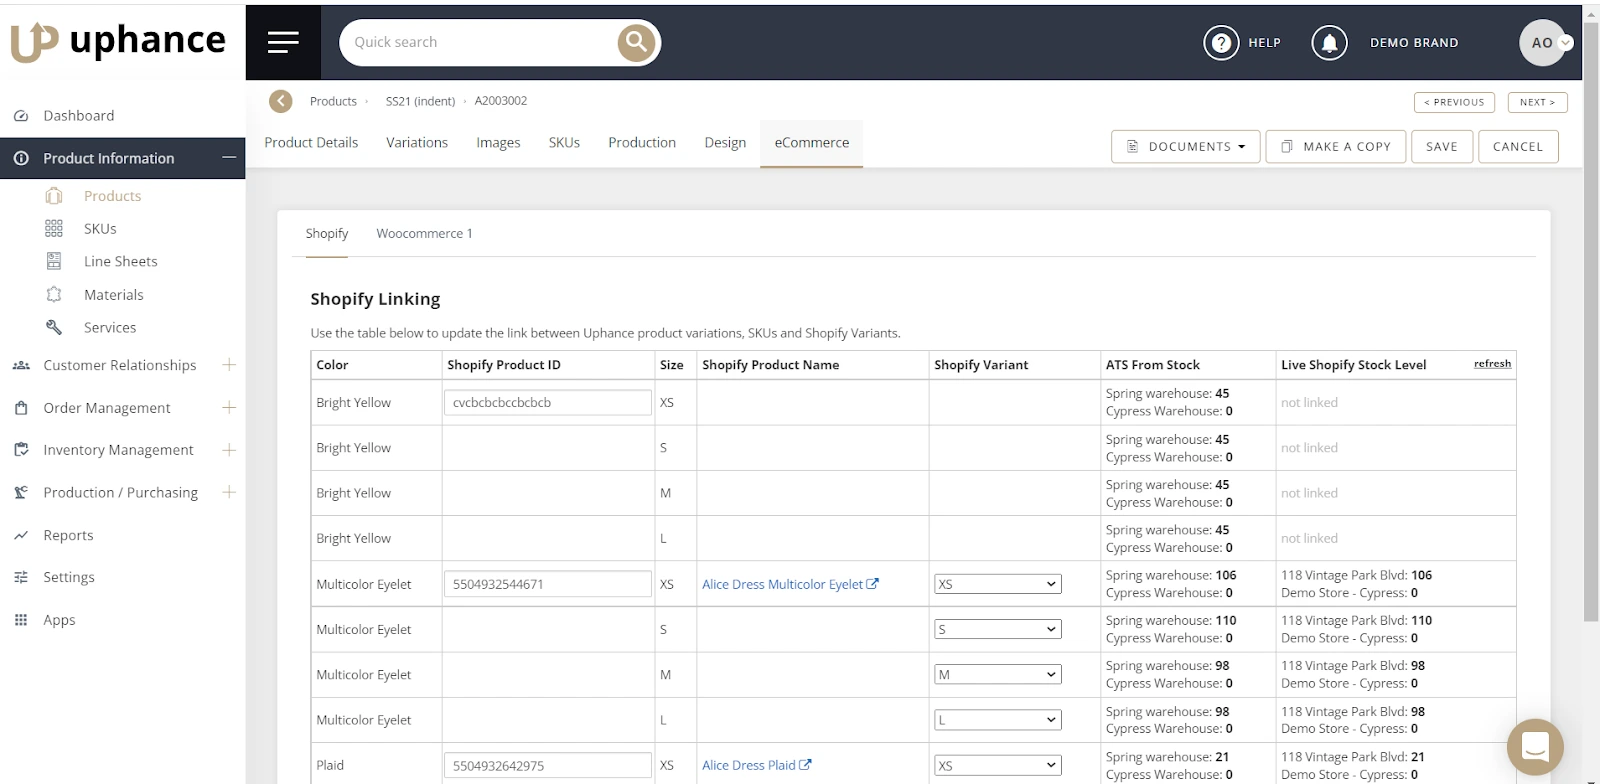
Click the Shopify button at the top of the page.
Click the "Force update Shopify Stock Levels" button.

Within a few seconds, "available to sell from stock" inventory levels will be copied across to your Shopify store. During normal operation, changes to inventory will be updated in Shopify automatically.
If you have stock levels defined in Shopify that are different from what you have defined in Uphance, be sure you want the Uphance inventory stock levels pushed to Shopify (overwriting) before you click this button.
Disabling Shopify inventory syncing
To disable syncing of inventory levels between Uphance and Shopify click the "disconnect" link on the Shopify integration settings page. Uphance remembers how products are linked between Uphance and Shopify so it is safe to disconnect temporarily.
Bulk Updates For Shopify Syncs
Products Overview
You will want to initially "seed" Uphance with the products and orders in your online retail store using the "Pull" bulk upload method for your existing seasons so that you do not have to individually enter them manually into Uphance. For all future products and seasons, we recommend using the "push" method whereby you create the products first in Uphance and then push them to Shopify.
When you are ready to perform an eCommerce sale for a direct consumer, you can use the "Push All Products" feature.
In addition, if you make any changes to your products (prices, descriptions, images, etc.), you can hit the "Update in Shopify" button to push those updates to Shopify.
One-time Seeding from Shopify
If you already have products in your Shopify retail store that you want to upload into Uphance, you would
Navigate to Apps from your Uphance dashboard.
Locate the Shopify app tab and click Configure.
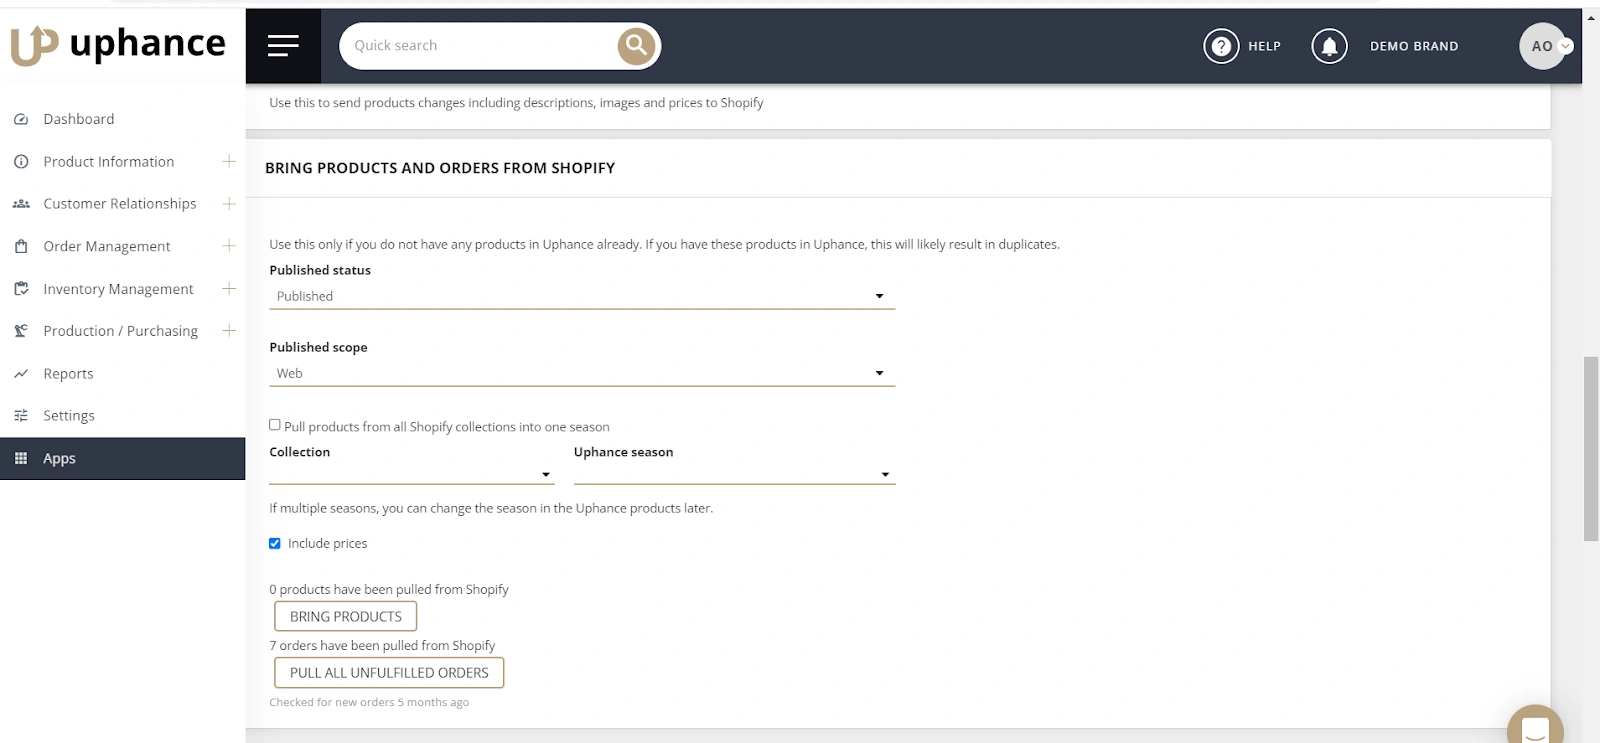
Navigate to the “BRING PRODUCTS AND ORDERS FROM SHOPIFY” Section.
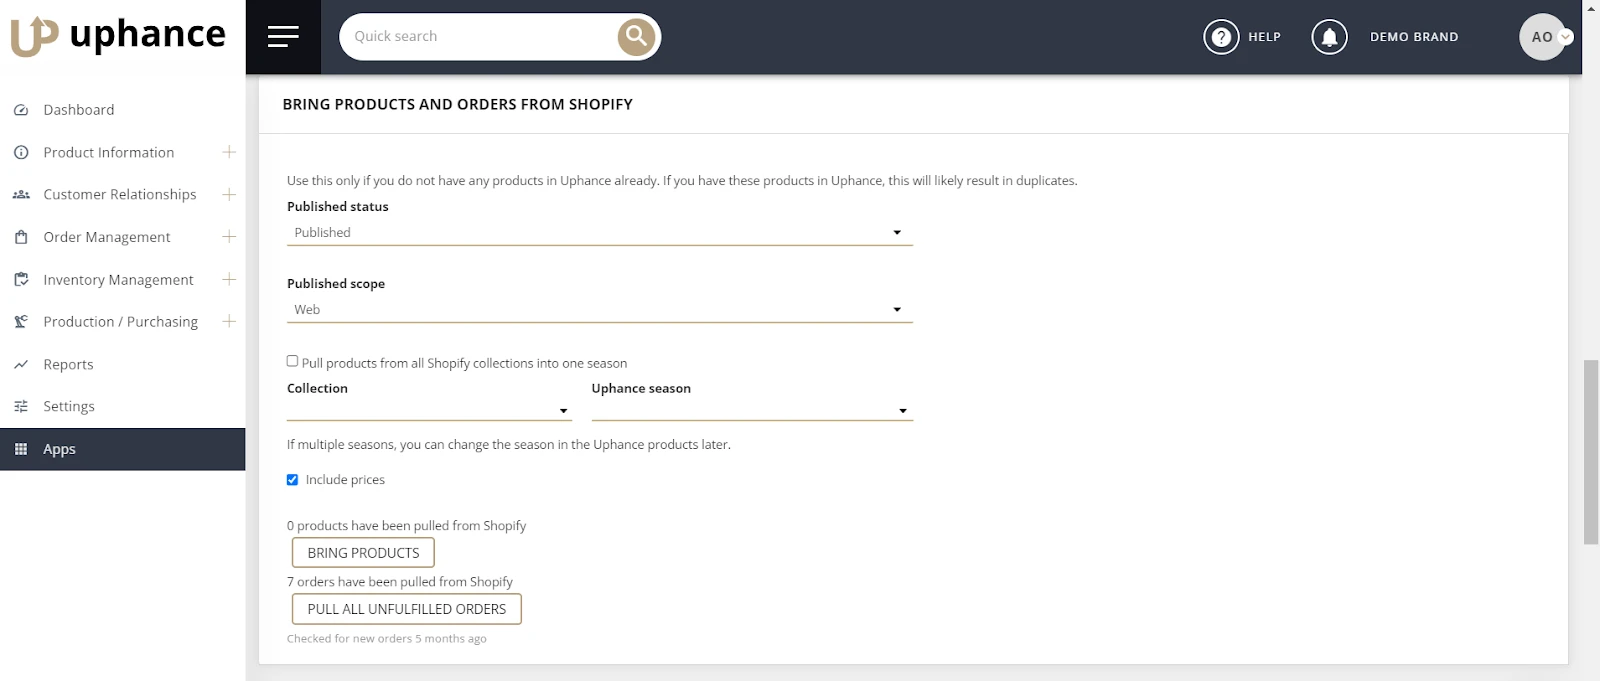
In the "Published Status" and "collections/Uphance season” tabs, select" fields, select which season you want to "import" (sync) from Shopify.
Tick the relevant box to import the prices on the products and orders that you pull.
Click "Bring Products"

Once this is complete, you should not use the Pull All Products feature again. You can seamlessly Create New Products in Uphance and "Push All Products" to Shopify. You will also need to link these newly seeded products on each product you imported on the Product's eCommerce tab.
Push All Products (or Updates) to Shopify
To Push All Products to Shopify or Update All Products in Shopify with New Seasons;
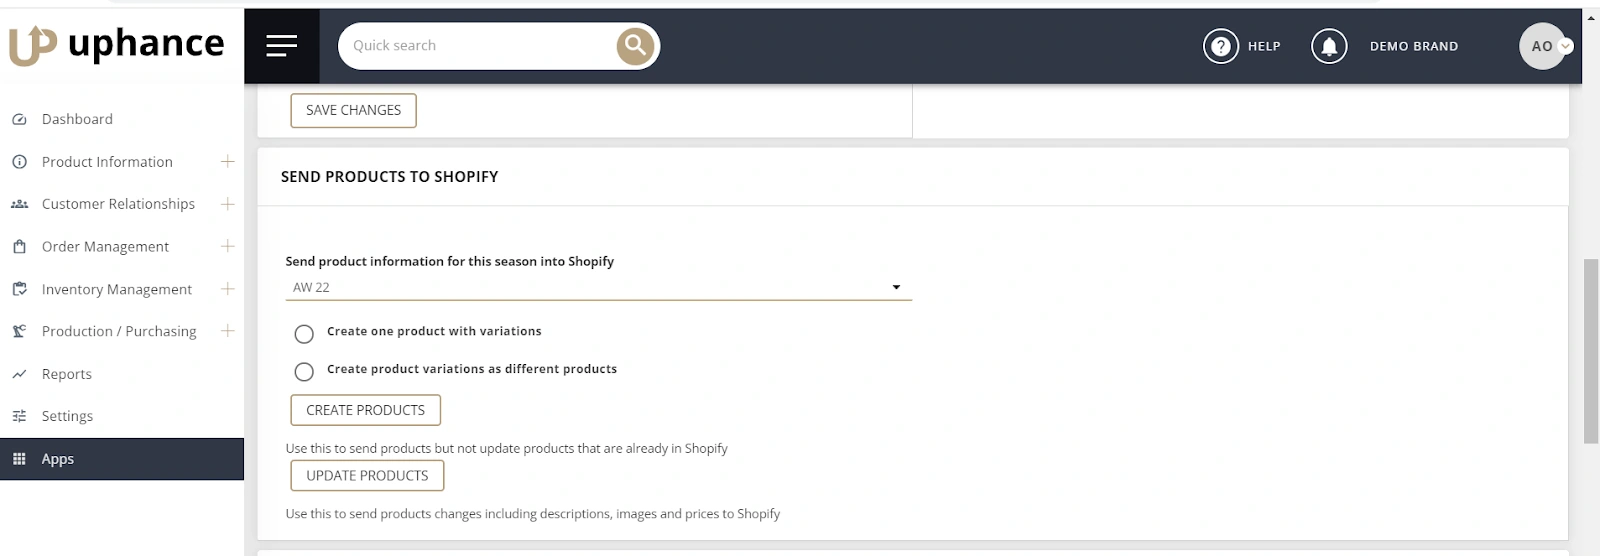
From the Shopify App configuration panel, navigate to the SEND PRODUCTS TO SHOPIFY section.
Select the new season name in the "Send product information for this season into Shopify" field.

Click the "Create Products" or "Update Products" button to complete the process. You should click "Update Product" if those products are already available and have established links. You may want to update them if they made changes to their descriptions, images, or pricing. You should "Create Products" if it is a new season and you do not have the products in Shopify.
Orders and Customers
If you have orders or Customers in Shopify that you want to pull into Uphance, use the “Bring Products and Orders From Shopify” section. This bulk upload should only be performed once for the initial population of the data in Uphance. All future orders and customers should be created within Uphance. For customer orders, this only goes back to the last 90 days and Uphance will not pull in canceled orders.
Click the "Pull all unfulfilled orders" from Shopify to create the order in a draft with a "Shopify invoicing" method. The Totals for the Orders are always pulled from Shopify. Once orders are automatically confirmed, Invoices and Payments are created for them automatically as well. Uphance will not manage the tracking of that information for those legacy orders. For any new orders created via Uphance (first), Uphance will track the confirmations, invoices, and payments through the normal life cycle.
Activity
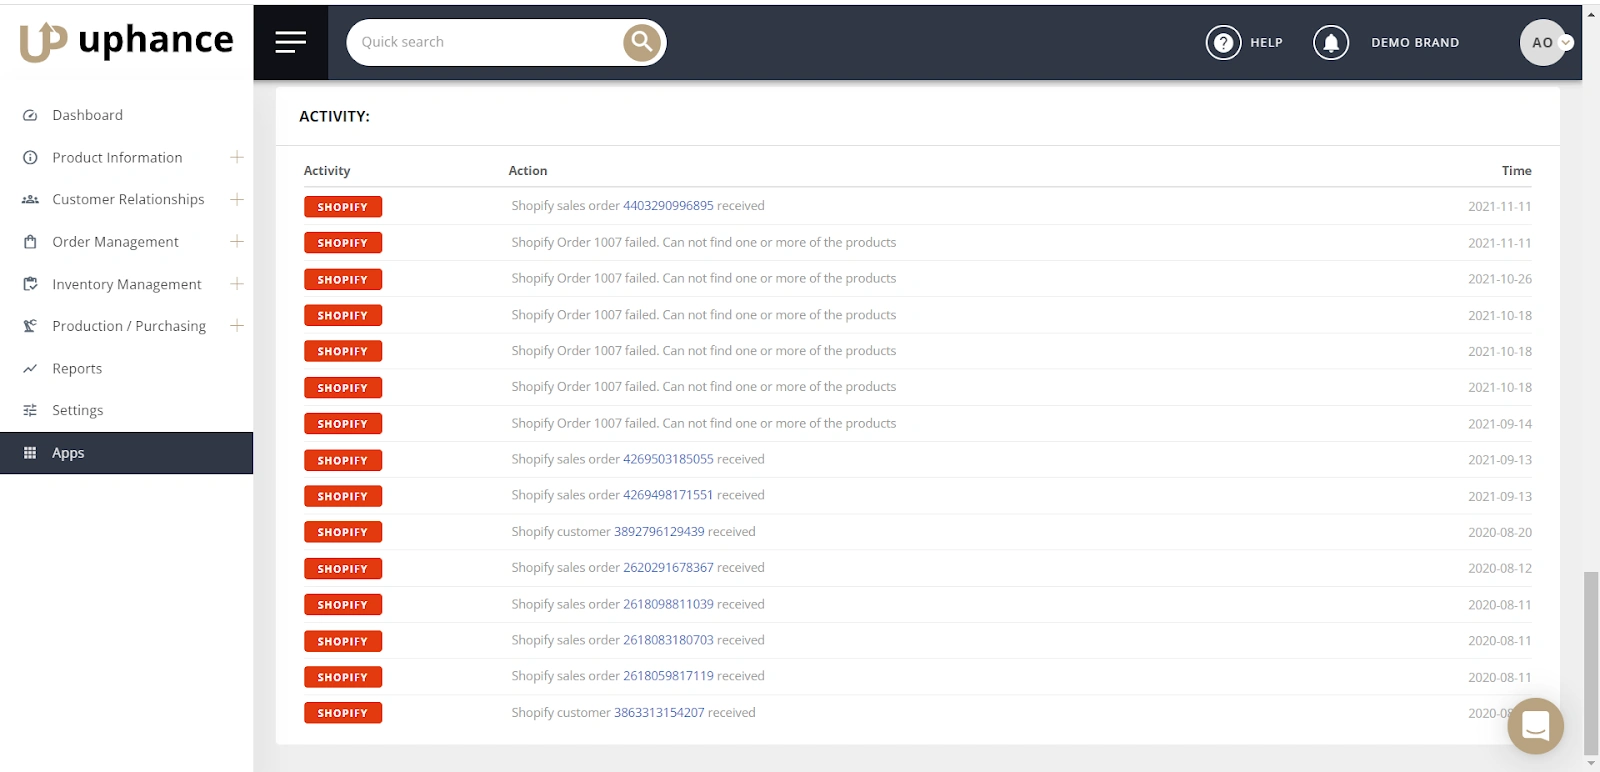
See the Activity section to learn more about what Shopify activity has transpired on your account.
Shopify Product or Price Updates
If you have your Shopify Integration settings set to order fulfillment in Uphance, you may have product changes or price updates that need to be made in Uphance and Shopify.
Depending on the number of changes you need to make, you can make these changes on individual products. Or, you can make the updates in a batch and apply the changes for that batch.
Individual Shopify Product Updates
To update individual products;
Navigate to the Product Information menu from your Uphance dashboard.
Click the Products Menu
Locate the product that requires an update.
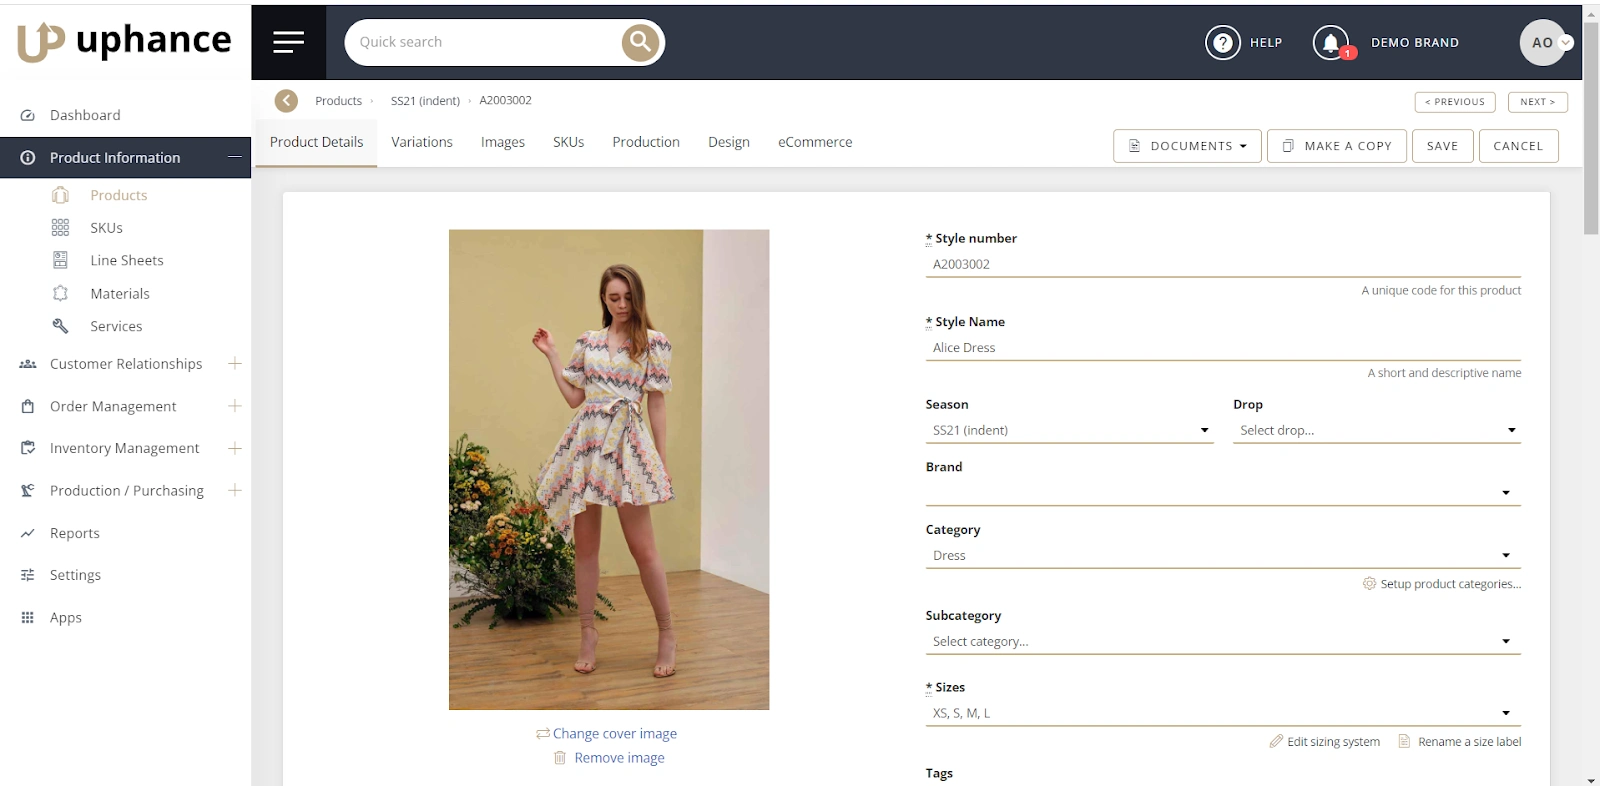
Make the required changes to the product (e.g. description or price). To change the price, you would change MSRP on the Variation tab of your product.
Navigate to the eCommerce tab for your product.
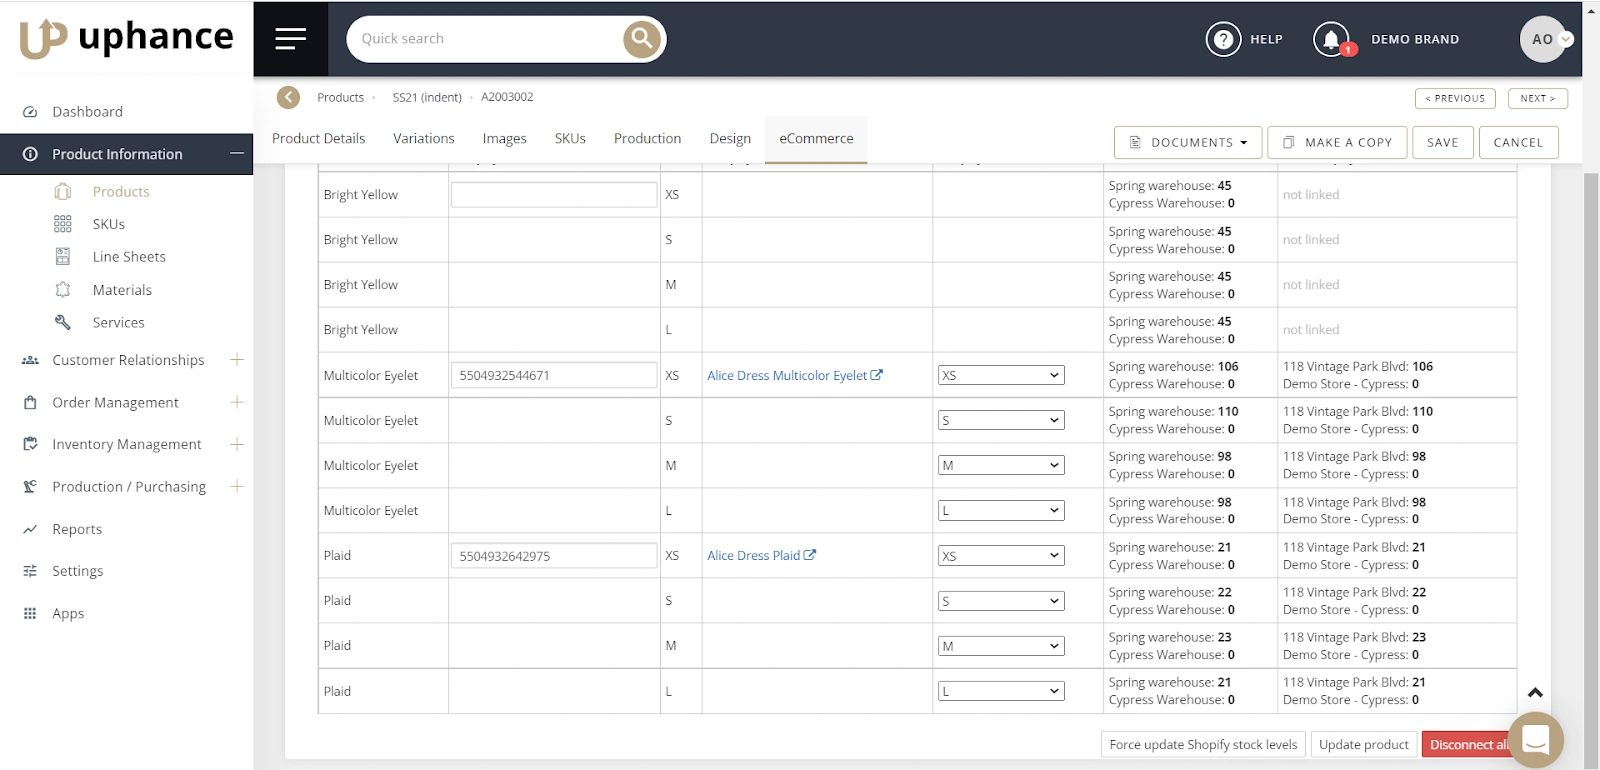
Click the Update Product button to sync updates with Shopify.
Batch Product Updates
If you have a large number of changes,
Navigate to the Product Information menu from your Uphance dashboard.
Click the Products Menu
Filter on the Season (or other criteria) if you would like to narrow down your focus list.

Scroll to the top-right section of the Products screen and click the Actions button.

From the Drop menu, click Download CSV to export the filtered products.
Open the CSV file.
Make your changes in the spreadsheet including description changes or price changes
From your Products page on Uphance, click the Actions button again and select Upload Products from the drop menu.

Click the Upload button to upload your revised file and update your products.
Select the Season you want to push updates to.
Select the Sales Channel in Shopify
Click the "Update Products in Shopify" button.
Shopify Orders, Shipments, Payment Terms & Returns
When you create an order in Shopify, the order may come in as Draft or Confirmed depending on whether you had a good match-up with your Customer.
Pricing
When orders are coming from Shopify, Uphance pulls product prices from Shopify to make the order fully identical to the order in Shopify. In addition, the settlement discount footer will not show up in the order.
Identifying Shopify Orders within Uphance
You will be able to see which orders are coming in by using the icon in the Status column as shown below.
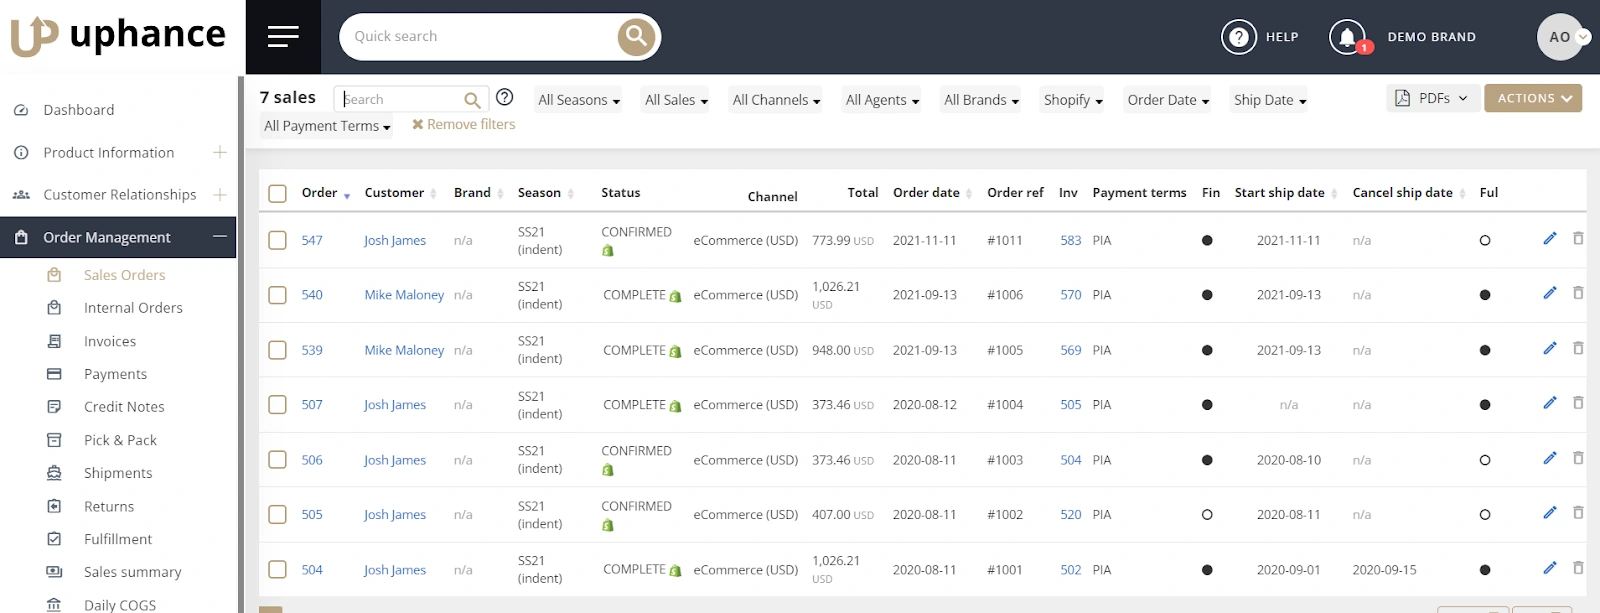
Shopify (Retail/Direct Consumer Sales) - Indicated by the green icon with a currency symbol.
Mobile App (Entered by your Sales Agents) - indicated by grey mobile device.
Showroom / eCommerce Store (Wholesale Customers)- indicated by a grey globe.
Regular Orders - entered manually/directly into the system; indicated by no icon.
Pick Tickets
Uphance provides an option to create pick tickets automatically when an order is placed from Shopify. To have your Pick Tickets created automatically, you’ll need to ensure that your Channel settings are appropriately configured.
Navigate to Settings > Channels & Currencies
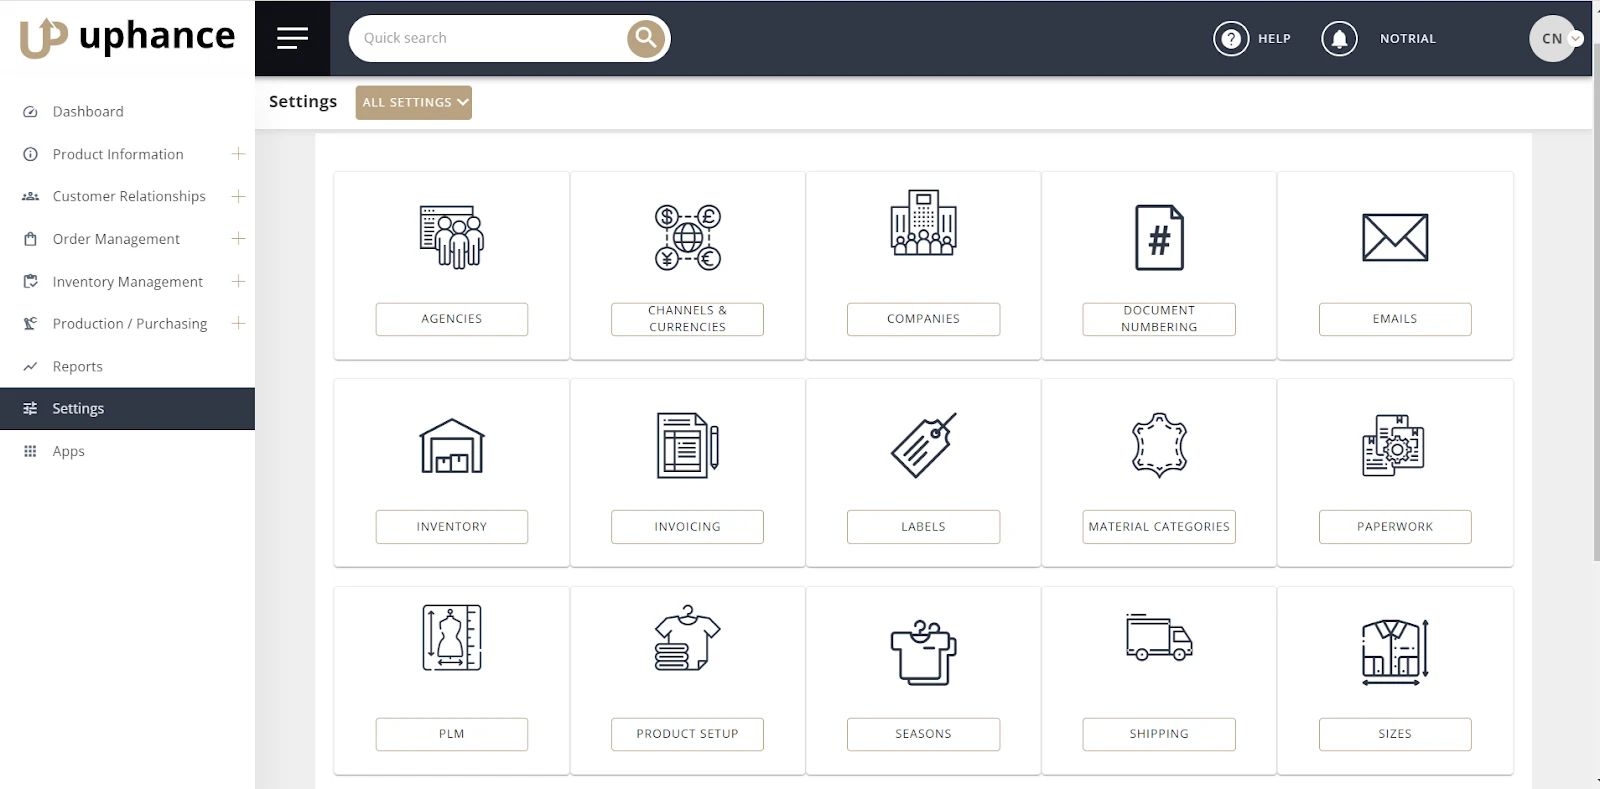
Click on the Edit icon (pencil) next to the Channel you would like to have the automated pick tickets for. For instance, if your Shopify store uses the Retail channel, edit this channel.

Scroll down and click the checkbox next to "Create pick tickets automatically".
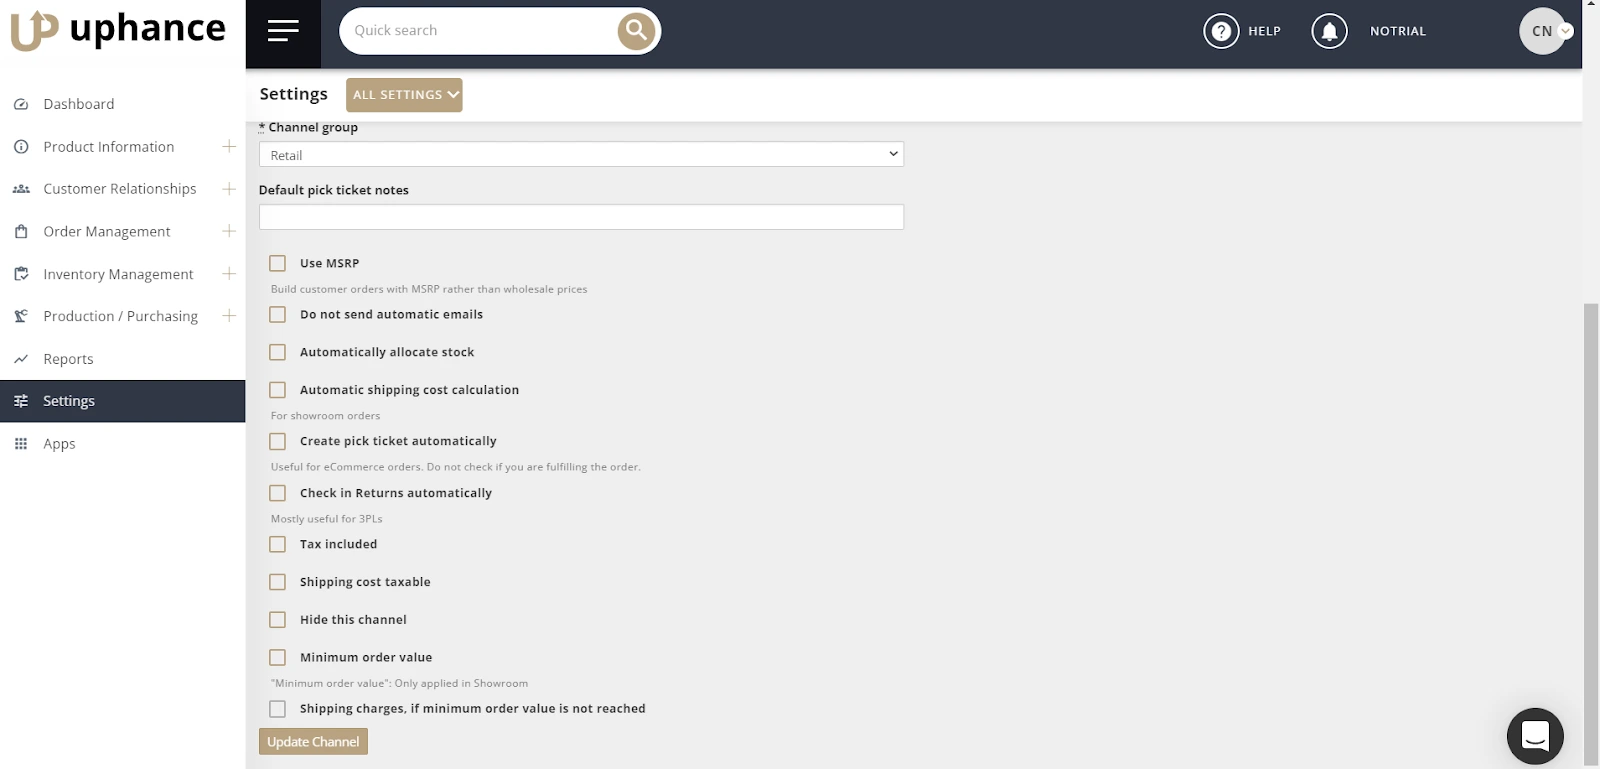
Click Update Channel to save changes to your channel's configurations.
If this field remains unchecked, you will need to create the Pick Tickets manually. Creating Pick Tickets does not "ship" the products. You will need to create Shipments when you are ready to ship. Once a pick ticket is shipped, the status is automatically updated in Shopify and marked as Shipped.
Shipments
If you have your Carriers defined in Shopify and Uphance finds a match, when you Ship your Sales Order in Uphance, the tracking number and Carrier will be reflected in Shopify. If the Carrier is not defined in Shopify, only the Tracking number entered on your Shipment will be reflected in Shopify.
To specify the Tracking number and Carrier;
Navigate to the Order Management section from your Uphance Dashboard and select Sales Orders.
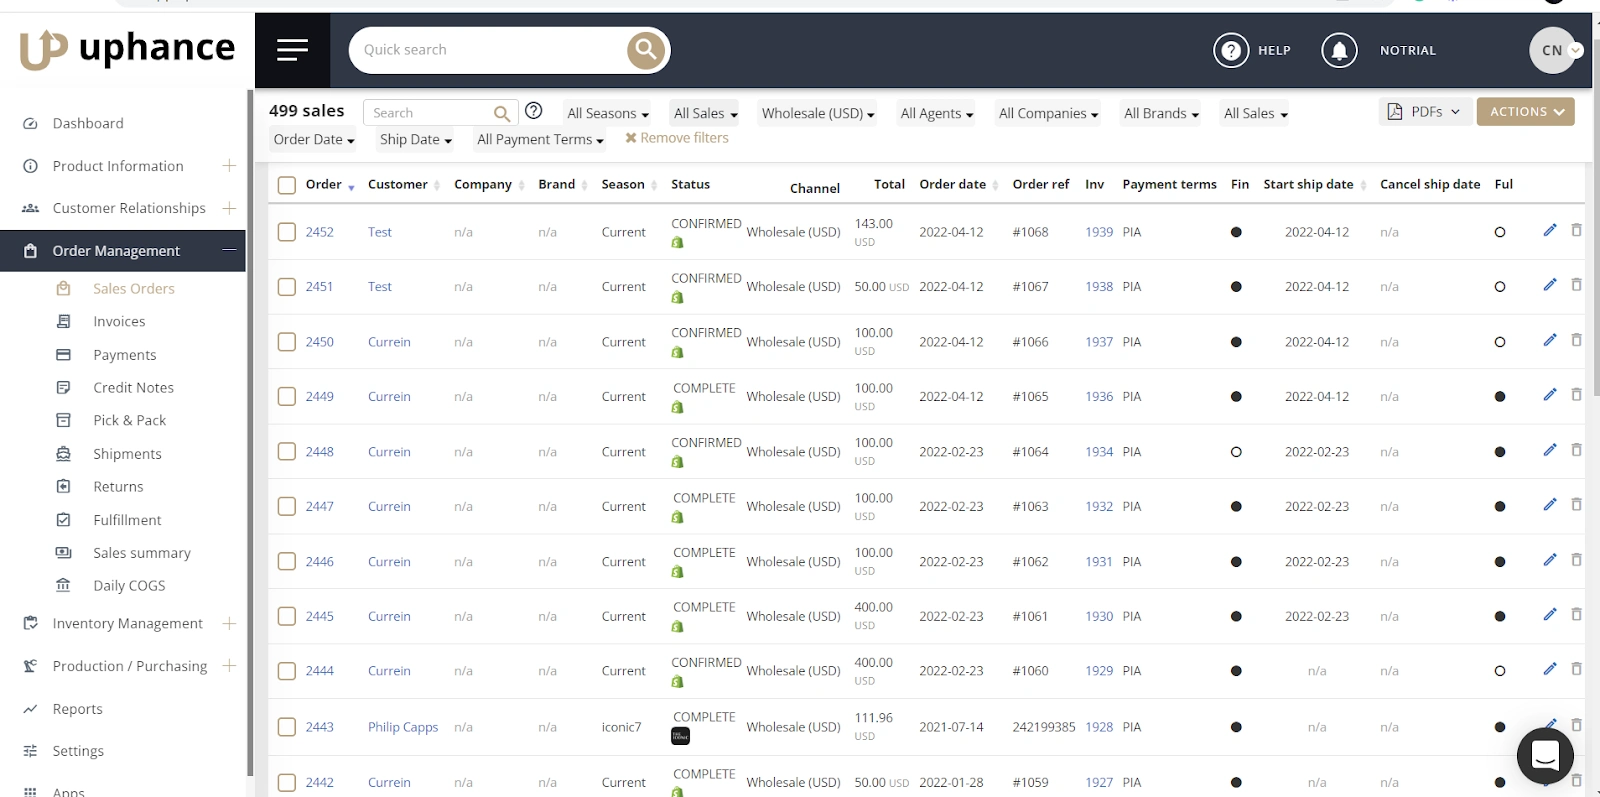
From the Sales Orders page, navigate to the top section with filters. Change the All Sales filter to Confirmed Sales.

Locate an order and click the Order Number on the left side of the page.
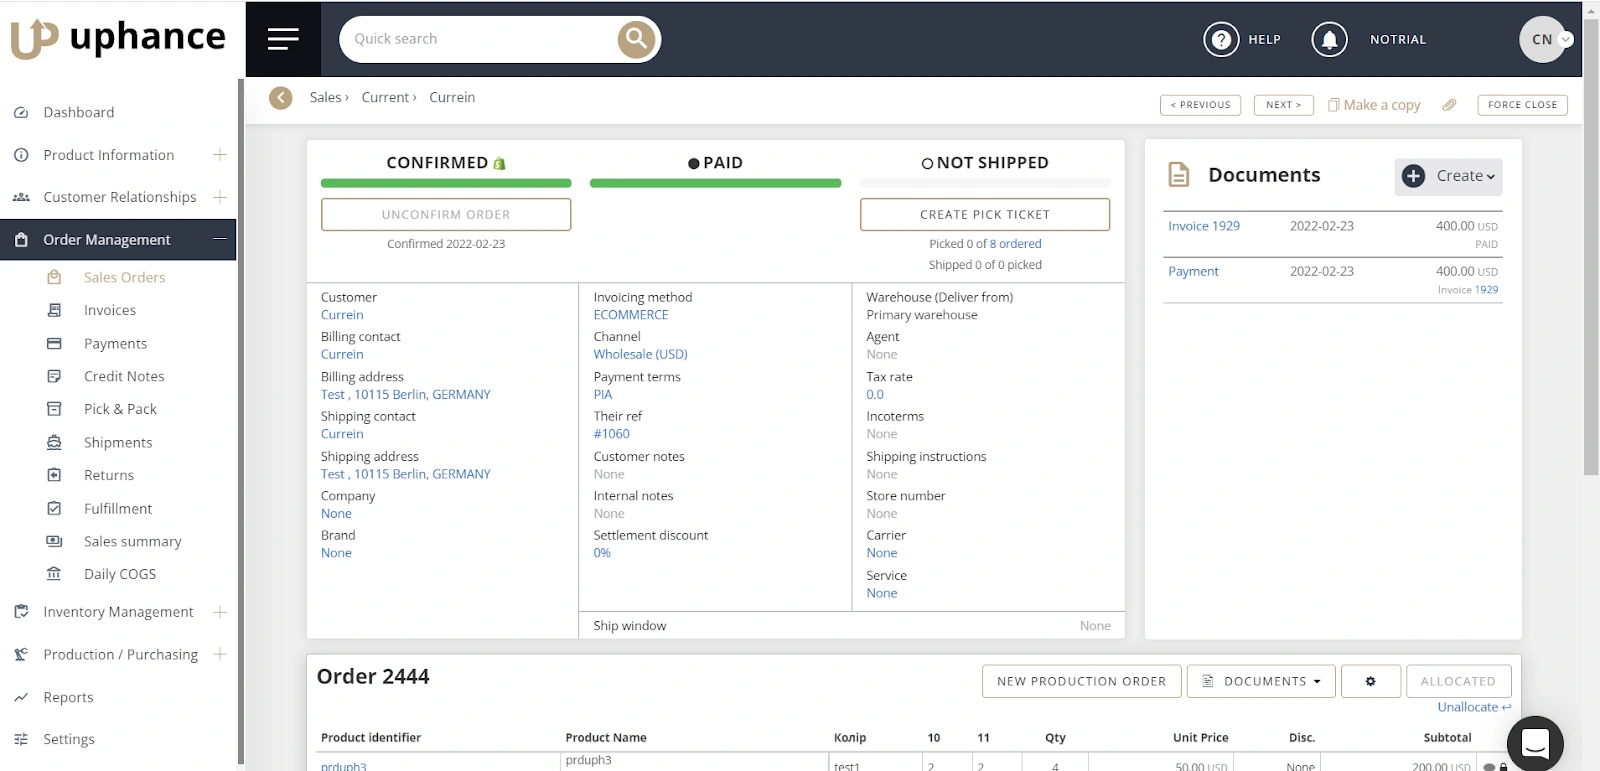
Click the Create Pick Ticket from the Not Shipped Tab (midsection) of the page. Alternatively, you can use the Create menu in the Documents tab to create a pick ticket.
Select the relevant warehouse and order, and indicate the quantities of the products you want to ship.
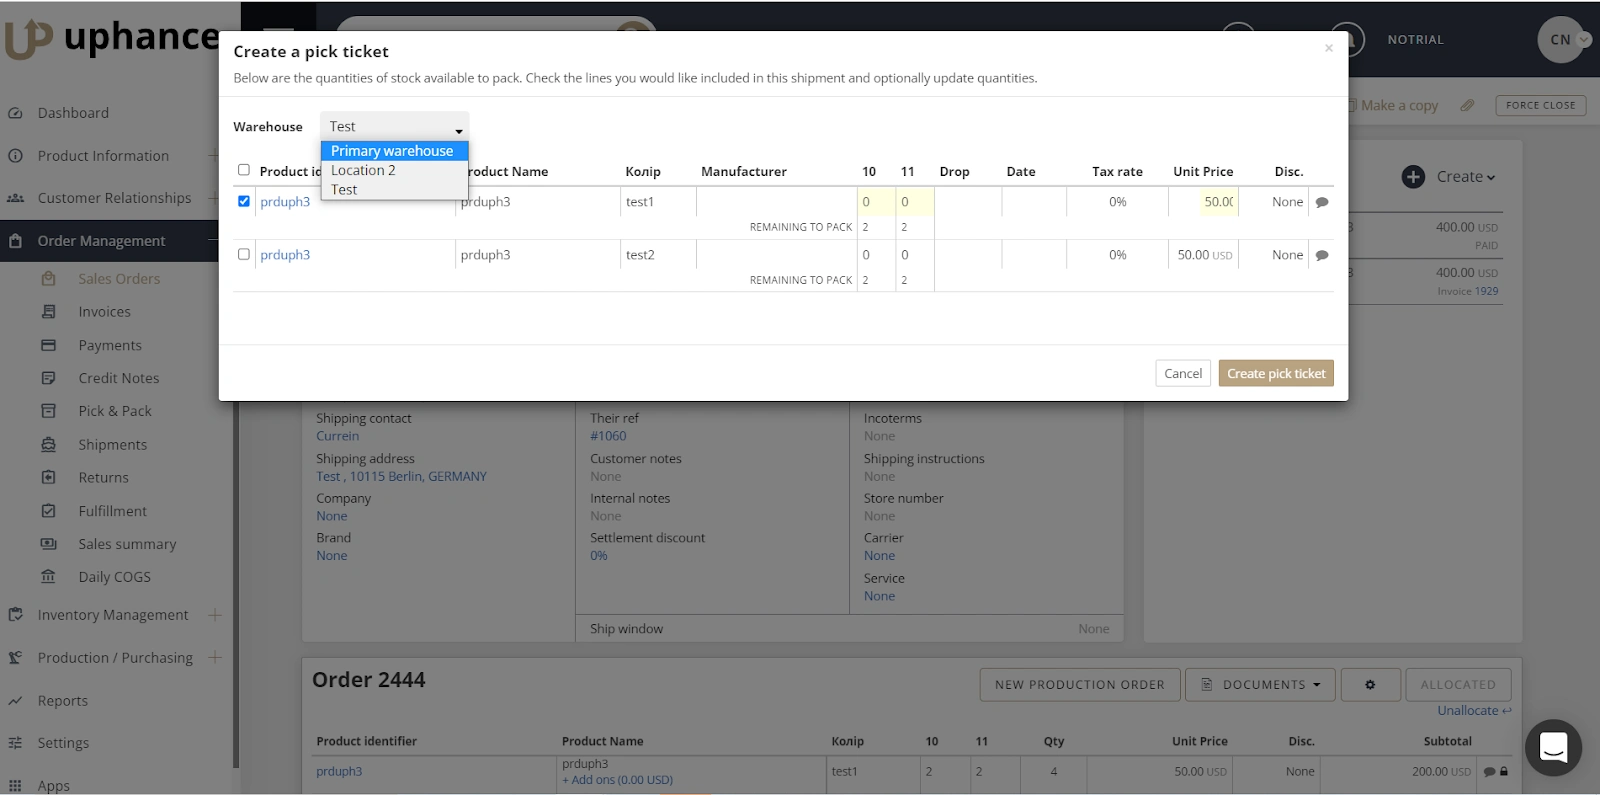
Scroll to the Pick Ticket section of the page. Ship your Pick Ticket using the Ship button on the top, right of your Pick Ticket.
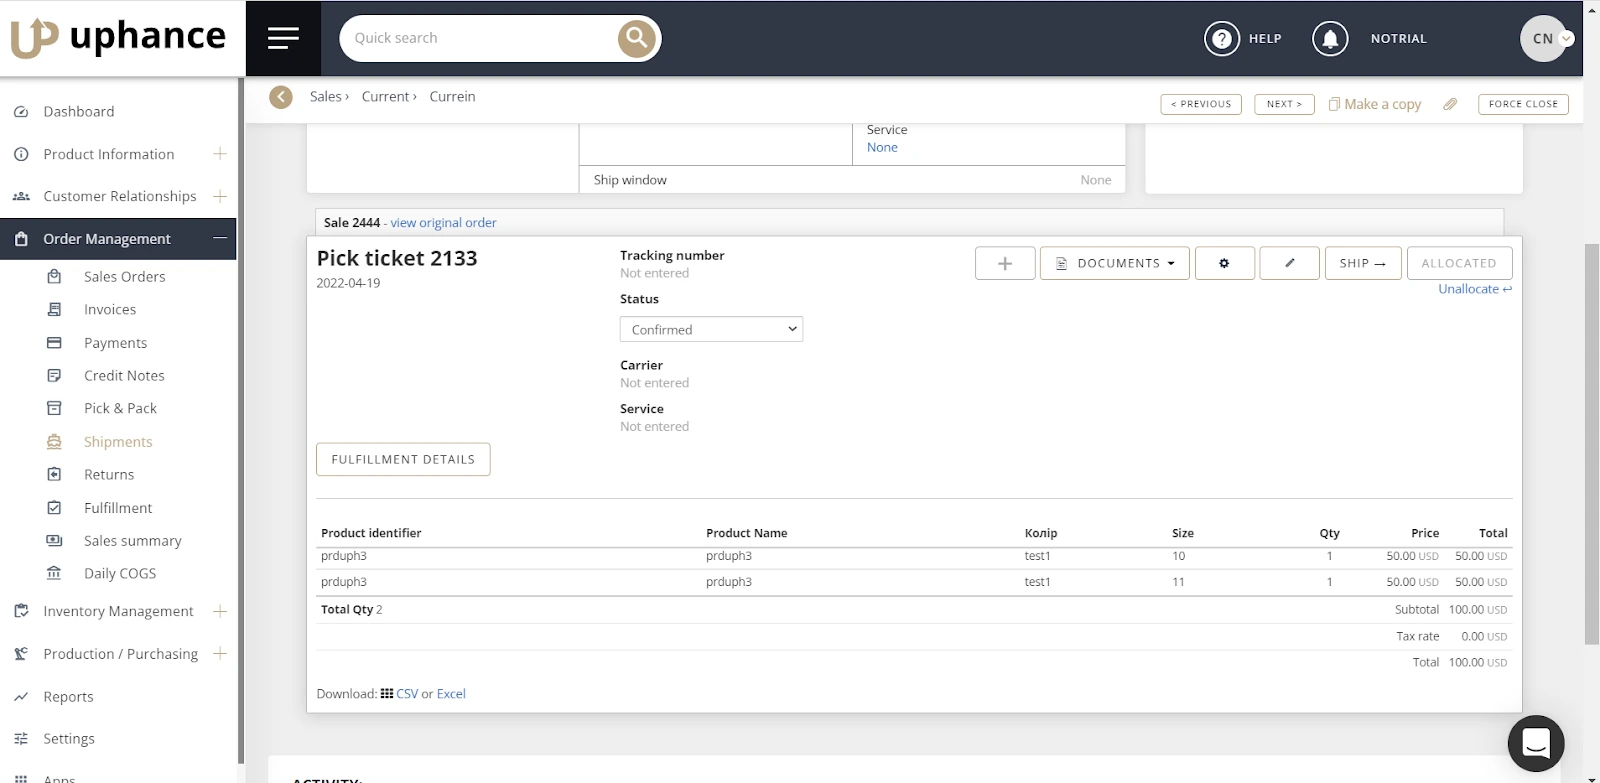
From the Pick Ticket tab, Use the edit icon (pencil) in the top, right of your Shipment to pull up the edit form.
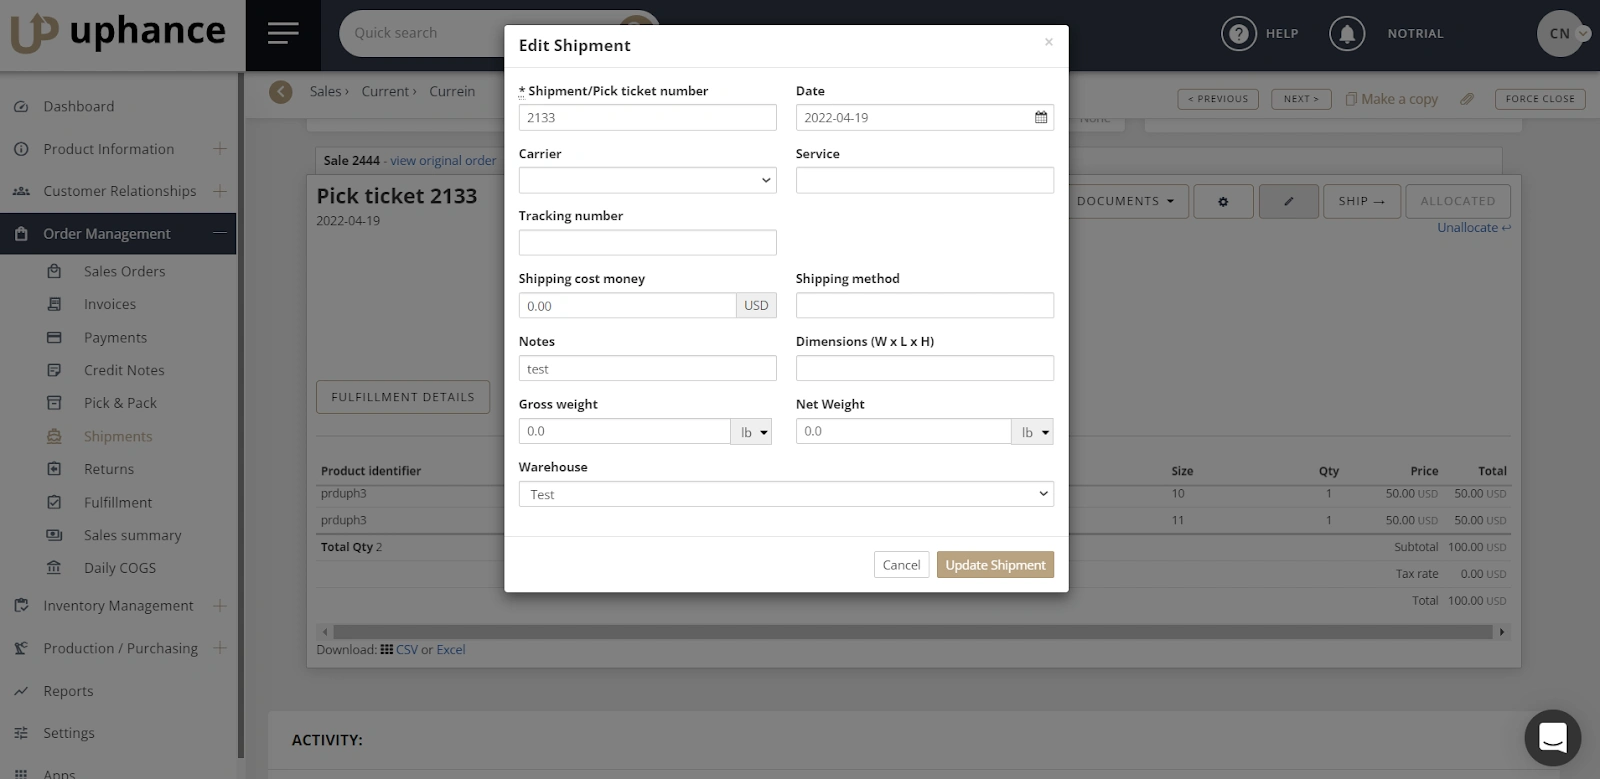
Enter your Carrier and Tracking number and click the Update Shipment button to save your changes.
Fulfillment
When the Sales Order is in Shipped status in Uphance, the Sales Order will be marked as "Fulfilled" in Shopify.
Returns
If you ship your customer products and they return them, you can create a Return transaction in Uphance. The Return will add the products back into your inventory and adjust your revenues. Also, your order in Shopify will show "Returned".
If you create a "Refund" within Shopify against Sales Order that has been paid, a "Cancellation" document will automatically be created within Uphance.
Like this project
Posted Aug 1, 2023
This help documentation explores how users can integrate their Shopify store and fulfill orders with the Uphance ERP platform.
Likes
0
Views
28
Clients

Uphance


