Mpowerr FaceNote
Gunarakulan Gunaretnam
Attendance System With Face Recognition
Introduction
Attendance Management keeps track of your employee or students present/absent details. It is the system to document the time your employees/students work and the time they take off.
In this digital era, face recognition system plays a vital role in almost every sector. Face recognition is one of the mostly used biometrics. It can used for security, authentication, identification.
This is an artificial intelligence based attendance management system with face recognition technology. The main objective of this AI based software solution is to update attendance with employees' face using computer vision.
This project can be divided into two main sub-systems. Attendance receiver module also called as face scanner (Written in Python) for reading and updating attendance to the database, and management module (Written in C#) for creating datasets of employees, training AI models with GUI, entering employees details and other management relented operations .
Features
Entering Attendances with time & Leaving Attendances with time.
First time it will update the entering attendance.
Second time, it will update leaving attendance.
Do not need to touch the device, the attendance can be done with face.
Training can be done with a single click.
It has a dataset creation module, where system can collect images of new employee.
An easy approach management panel.
Unauthorized access detection and prevention.
Voice outputs
Eye should be blinked to confirm the identify, this prevents digital image faking attack.
Technologies & Frameworks
Attendance Receiver - Face Scanner (Python)
Python 3.6 - Main programming language.
OpenCV - for computer vision.
Face_Recognition module
Pyzbar module - for scanning QR code.
PYTTSX3 - a module for voice outputs.
Playsound - a module for playing external sounds.
mysql module - for database management
pickle module - store trained data as pickle file.
Management Panel (CSharp)
C# - Main programming language
MySQL - Database.
Setup Management Panel (CSharp)
Step 01:
Create an empty database in MySQL panel with name of "management_auto_attendance_system".
Step 02:
Import into that empty database with a SQL database that is found on following folder of this repository (attendance-system-with-face-recognition/1-database).
Setup Attendance Receiver - Face Scanner (Python)
The attendance receiver is the main script that takes attendances from employees and store in the database. This module handles OR code detection, face recognition processes.
Setting up this attendance receiver is a bit tricky one since it contains many dependencies and framework installation.
Note: We need to install all dependencies in a Python virtual environment in order to connect the management panel (C#) and attendances receiver (Python) properly. The virtual environment name must be ai_attendance_system_env. Because, the management panel (C#) listens for environment that has the name of ai_attendance_system_env.
Create a Python virtual environment with the name of (ai_attendance_system_env)
In this step, a python virtual environment needs to be created in order to setup the attendance receiver (Face Scanner) module. There are many environment management tools available such as Venv, Anaconda, Virtualenv and etc. Here, we are going to use the Anaconda Python distribution tool to manage environments and packages installation. Because, Anaconda usually use for advanced data science purpose.
Step 01:
Install Anaconda Python distribution.
Anaconda is a distribution of the Python and R programming languages for scientific computing (data science, machine learning applications, large-scale data processing, predictive analytics, etc.), that aims to simplify package management and deployment.
In order to install the Anaconda distribution, please checkout the official website for the instructions (https://www.anaconda.com/).
Download Anaconda: https://www.anaconda.com/products/individual
Anaconda installation tutorial: https://www.youtube.com/watch?v=RYSNnp5V7ps&t
Anaconda Documentation: https://docs.anaconda.com/
Step 02:
Easy setup
NOTE : If you want to setup the environment easily without installing dependencies one by one manually, run the environment.yml file using the bellow command. If setup the environment using bellow command, you don't need to follow the step 04 instructions.
Manual setup
Create a virtual environment using Anaconda.
At its core, the main purpose of Python virtual environments is to create an isolated environment for Python projects. This means that each project can have its own dependencies, regardless of what dependencies every other project has.
Enter the bellow command in Terminal/CMD after the successful installation of Anaconda.
At this point, we are creating a virtual environment with the name of "ai_attendance_system_env" and this environment is using python 3.6.
Note 1: The environment name must be "ai_attendance_system_env".
Step 03:
Activate the "ai_attendance_system_env" environment.
Note: After the activation, If we install a dependency, it will be installed under this environment.
Step 04:
Install the following dependencies on the "ai_attendance_system_env" environment (Python 3.6).
Note: These are the important dependencies of the attendance receiver (Python) module. These dependencies must be installed under the "ai_attendance_system_env" environment.
IMPORTANT NOTE 1: When you install a dependency by using "pip install", it will install the latest version of the dependency. Sometimes, we need the exact version that is used in the project. To find the dependencies' version, please check out 'required-dependencies.txt' that is found on the project folder.
IMPORTANT NOTE 2: If you are setting up this project in a virtual environment, the environment can be easily setup using the environment.yml file using the bellow command.
Explained main python scripts of this project.
There are 3 main python scripts that are the backbone of this project.
dataset-creator.py
training.py
run.py
The scripts are found on the following directory
01. dataset-creator.py script explained
A Python script for creating employees' face dataset for training. This script is written in Python and, it is used to take snapshots of employees' face and generate dataset from it.
Note: This script is executed (trigger) from the C# management panel whenever the admin register employees into the database.
02. training.py script explained
A Python script for training face recognition models for employees. After the dataset has generated. Now, it's time to train the face recognition model for that registered employee. For this task, training.py script will be used.
Note: This script is executed (trigger) from the C# management panel. There is a sub-module in management panel (C#) called "Training", we can simply train a machine learning model with a single click. When training happens, this Python script is execute by C# management panel.
03. run.py script explained
The main Python script that does the attendance receiving process. This script is huge, because, this script acts as the attendance receiver module. This single file contains many functions such as QR-code scanning, eye-blinking detection & face verification, updating attendance in the database and etc.
Note: This script could be run manually. There is a run.bat file in the project folder where we can click that file and execute to the attendance receiver module.
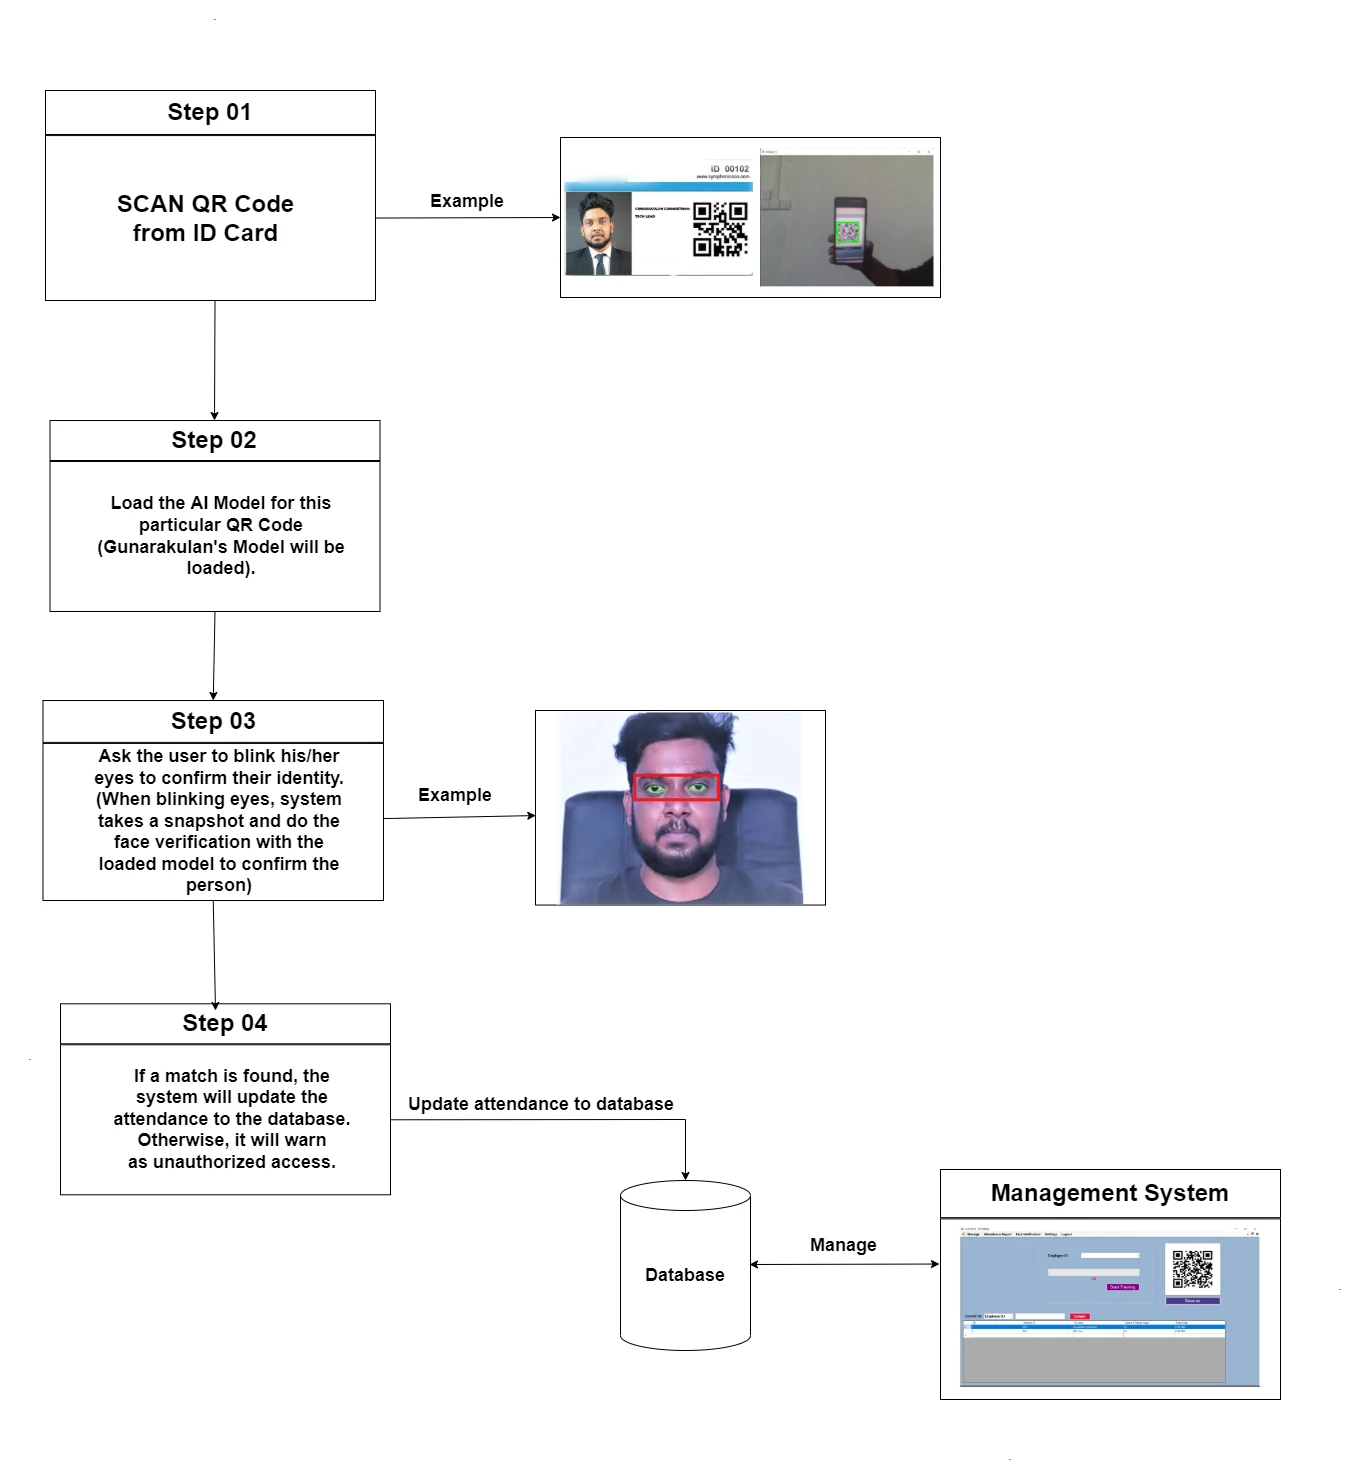
Explained Attendance Receiver
Attendance receiver is the main module that takes attendance (Python) and update to the database. Then, the database is maintained and managed by the management panel(C#).
Features
Scan QR-Code and Validation.
Load ML model of the scanned QR-Code.
Eye-blinking detection & face verification.
Update attendance to database.
To run (execute) the attendance receiver, please open the following batch script that is found the following directory.
This module updates attendance to the database after completing these procedures. Scan QR code, blink eyes.
Note 1: If the user presses the (Space bar) key during the face verification part, the system will be restarted, and begin from QR-Code scan section. This is implemented to avoid some confliction in the project.
Note 2: If the user presses the (Enter) key during the face verification part, the system will ignore the face verification part and update attendance as present in the database. The reason why it is implemented, errors happens always in computer vision and machine learning applications. Sometimes, It is not able to recognize the employee face due to some issue like lighting, with facial hair, insufficient face images and etc. To avoid these types of issue, the user can pass out after QR-Code scan by pressing the enter key during the face verification part. This feature will be removed in future versions once, the system has the capable to recognize face more accurately. If a user pass out via pressing the "Enter" key, the attendance will be updated in NOT FACE VERIFIED mode, then the system admin will show that face manually in the Management System (C#) and verify the face.
Explained Management Panel (C#)
The management panel (C#) is the key component, that handles the database and management part of the system.
The database setup has been already finished in the above section (Setup Management Panel C#).
Features
Insert Employees
Edit Employees data
Create dataset of employees face
Train AI model with single click
Analyze & manage attendance data
Credentials
Username: admin
Username: kuna123
Splash Screen
The splash screen is the loading screen of the management system.
Login Screen
The login screen is the authentication section of the management system. Currently, this module has only admin account.
Credentials
Username: admin
Username: kuna123
Dashboard
The management panel dashboard is the central are of all features' accesses and usages.
Dashboard Structure
Manage
Manage Employees
Insert Employees
Modify Employees
Create Dataset
Training
Attendance Report
Face Verification
Settings
Logout
Manage Employees (Insert Employees Module)
The main function of this module is to register employees to the database. The system admin needs to enter some basic information of an employee including a headshot photo.
Features
Insert employees details
Add headshot photo
Manage Employees (Modify Employees Module)
This main function of this module is to update/edit employees' details in the database. It also has function to delete employees.
Features
Edit employees details
Delete employees
Search employees by Employee ID, NIC Card No, First Name, Phone Number.
Create Dataset
This module is responsible for creating & managing datasets of employees' face. It lists out all the employees' ids in the first dropdown select box who DOES NOT have dataset.
From the second select box, the admin needs to set the number of image samples that is needed for the model training.
After selecting the employee ID and number of images, the admin will click the "Start Capturing" green button, then a Python script will be trigger by the C# with the help of a Batch script to take employees' face sample images to train a machine learning model for face recognition task.
The bellow table shows up all the datasets that are already been taken. The admin can delete a dataset using this module, and able search datasets using Employee ID, Full Name.
Features
Create datasets
Delete datasets
Search datasets by Employee ID, Full Name
Image Capturing Process.
This Python script will be trigger when clicking the green "Start Capturing" button by the C# with the help of a batch script.
Training
The primary function of this module is to train a machine learning model for the face recognition task, of a particular employee with the captured face image samples.
It lists out all the employees' ids in the first dropdown select box who DOES NOT have a face recognition machine learning model.
The admin will select an employee that needs face recognition model, and then the admin can simply click the "Start Training" button to begin the training process.
The bellow table lists out all the trained models, from there, the admin can delete or search ML model of a particular employee.
Generate QR Code
Note: After the training finishes, the system will automatically generate a QR-Code for that particular employee, this QR-Code will be printed in the employee's ID card.
The employee will show this QR-Code to load his model to verify his face by blinking his/her eyes to update the attendance record to the database.
Features
Single click model training.
Generate QR code for the particular employee.
Delete ML models.
Search ML models using Employee ID, Full Name.
Training Algorithm
We are using 128d (FaceNet) face embeddings agriculture for model training process. During the training process, the it collects and organize 128d face embeddings in a vector, then those data are stored in a pickle format as a model to use later in the attendance receiver module when verifying faces.
FaceNet takes an image of the person’s face as input and outputs a vector of 128 numbers which represent the most important features of a face. In machine learning, this vector is called embedding. Why embedding? Because all the important information from an image is embedded into this vector. Basically, FaceNet takes a person’s face and compresses it into a vector of 128 numbers. Ideally, embeddings of similar faces are also similar.
Mapping high-dimensional data (like images) into low-dimensional representations (embeddings) has become a fairly common practice in machine learning these days
Attendance Report
This module is the place where the attendance details are managed & maintained. It will show who are present on particular date.
Features
List all attendances data
List all attendance based on a particular date.
List all attendance based on status (Absent, Present)
Export table data in Excel file.
Good Filter and search options.
Face Verification
This module is used to avoid run time errors during face verification part. For an example, if an employee’s face has not trained well, lighting issue or facial hair issue, the system will find difficult to verify employee's face. Therefore, the employee would be unable to pass out the attendance, to sort out this issue, the employee can skip the face verification step via pressing the “Enter key”. However, the attendance will be marked as unverified face in the database. Then, it will be reviewed by the system admin manually.
This module will list all the attendances that are not face verified. From this table, the system admin will manually verify the face.
The system admin will see these images and manually verify them via clicking the "Verify Face" button.
Features
Verify Face
Show images
Settings
This module is the setting part of the system. From this module, the system admin can change the preferences.
Features
Change username
Change Password
Turn on/off face verification
Others & References
To change camera index in python script.
There are 2 main Python scripts that are using OpenCV, those are dataset-creator.py and run.py.
The index "0" means, it is using the first attached camera of the computer/device, If the computer/device has more than 1 cameras, they can be switched by changing the index that means, 0 is first camera, 1 is second camera, 2 means third camera and etc.
If we're trying to run this application with a second camera, we should change these in dataset-creator.py and run.py Python scripts.
Contact
Website:
Social Media:
Like this project
Posted Feb 28, 2025
Mpowerr FaceNote is an AI-powered, open-source facial recognition system for seamless, real-time attendance tracking, boosting efficiency in workplaces.
Likes
0
Views
3